Do you want to add a border to a picture on your WordPress site but don’t know how? This guide was written for you, as it features multiple methods to achieve that.
Option 1: Add a Border to a Picture via WordPress Block Editor
One way to add a border to a picture on your WordPress site is through the default WordPress block editor. However, not all versions of WordPress offer an option to add a border to an image through the block editor.
Basically, the option is only available in WordPress version 5.0 or higher. Thus, any WordPress version before version 5.0 won’t have the option to include a border to an image via the block editor.
That being said, follow the procedures below to add a border to a picture on your WordPress website via the WordPress block editor.
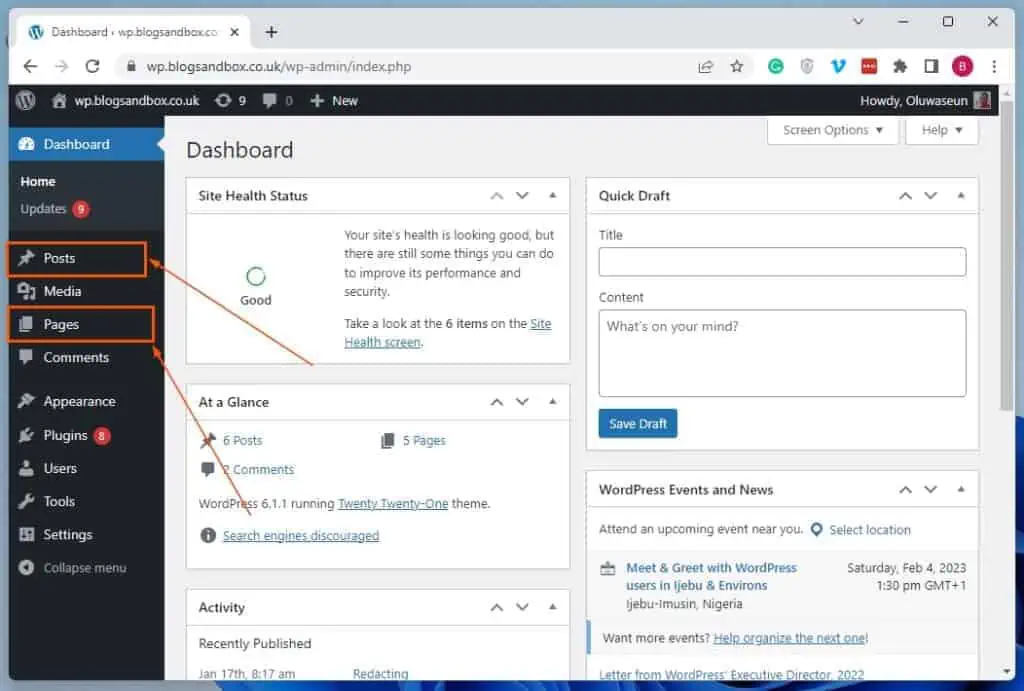
- Sign in to the backend dashboard of your WordPress website as an administrator. Then, click Posts or Pages among the options on the left pane, depending on where you want to add a border to an image.
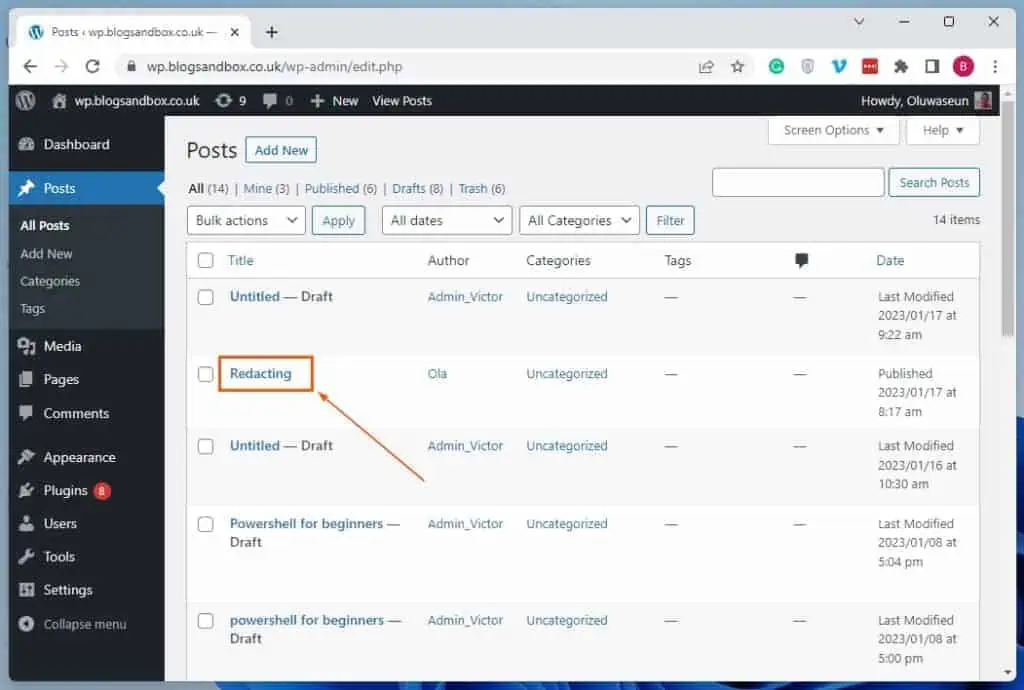
- Following that, click the title of the page/post where you want to add a border to a picture to open it. For this demonstration, I will open a post titled “Redacting” on our WordPress site.
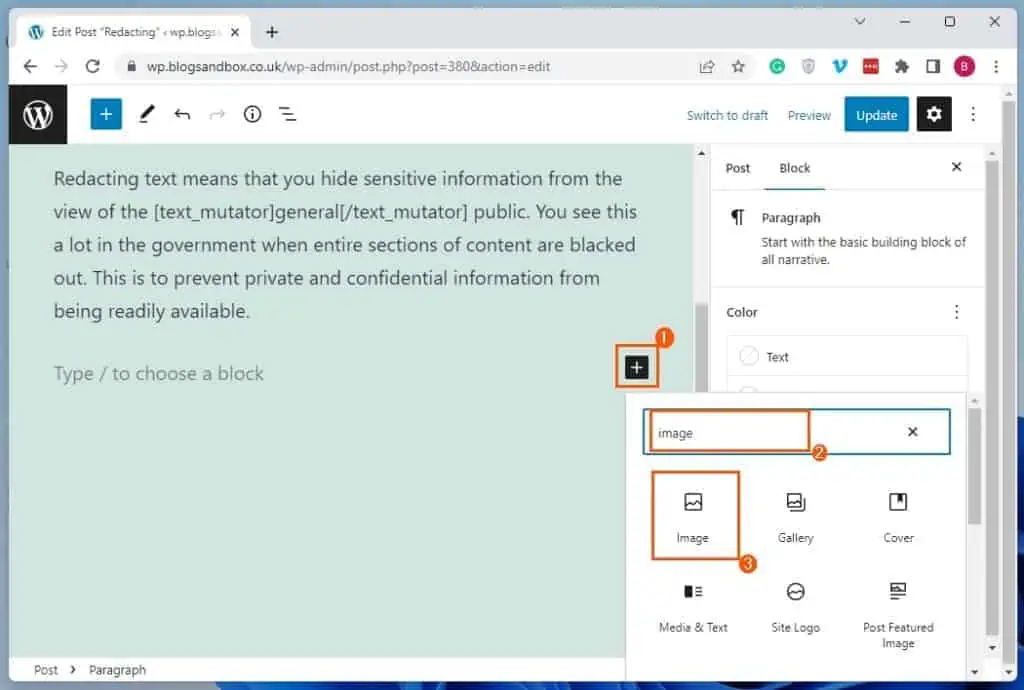
- When the post/page opens, left-click the Add block icon in the area you wish to upload the picture to which you want to add a border. Next, type “image” in the search field, then select the Image block from the search result.
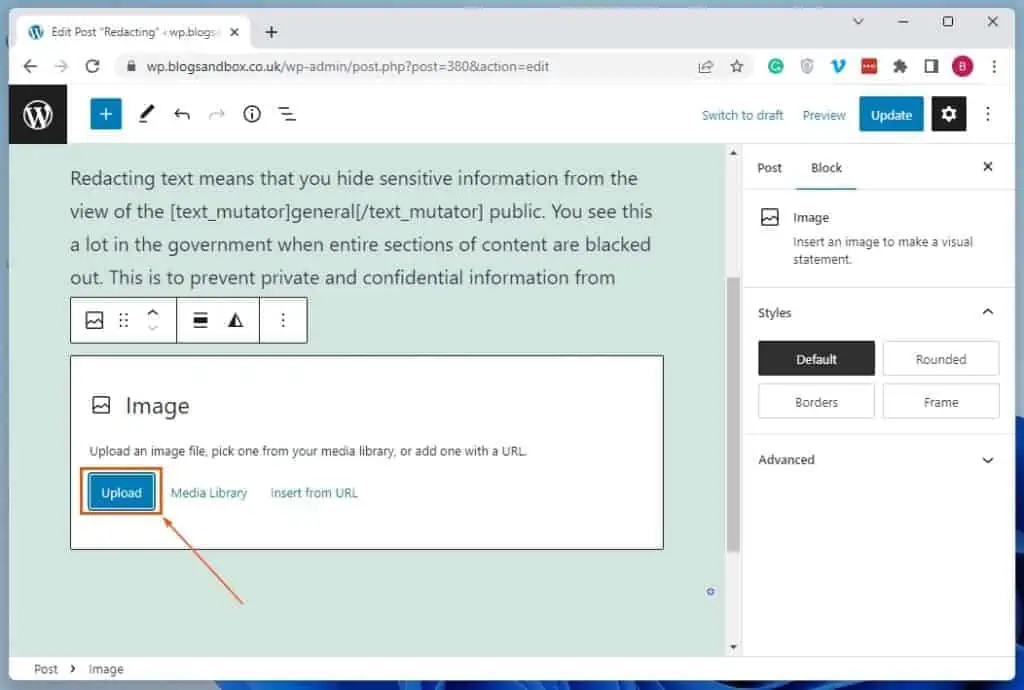
- In the Image block, click the blue Upload button.
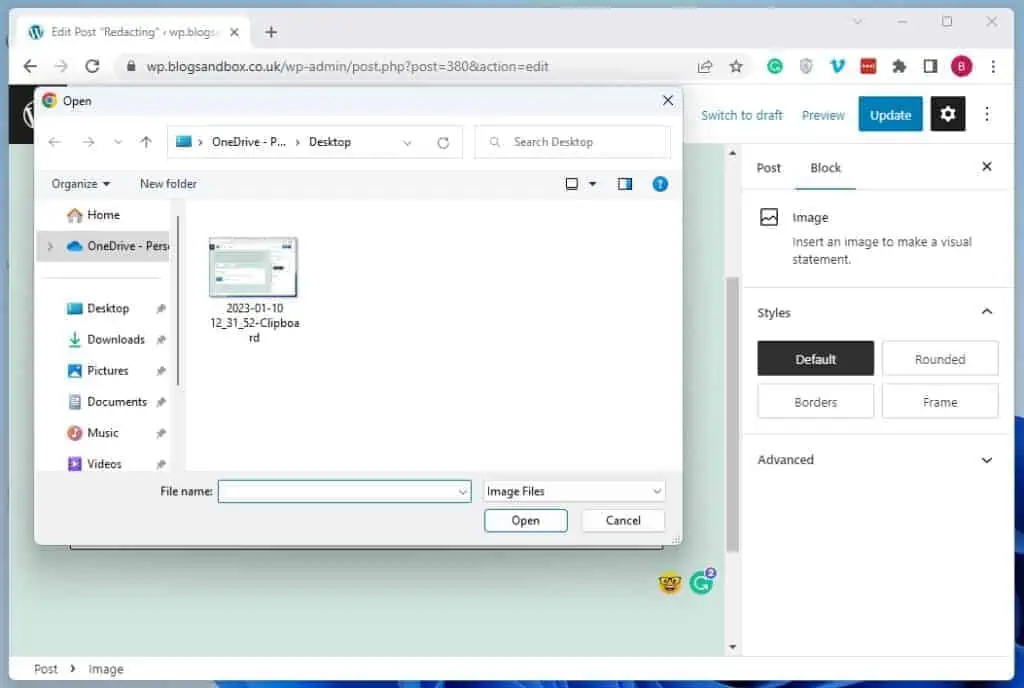
- Consequently, the Open window should automatically launch. Hence, navigate to the location where you stored the image you wish to upload, then double-click the image to upload it.
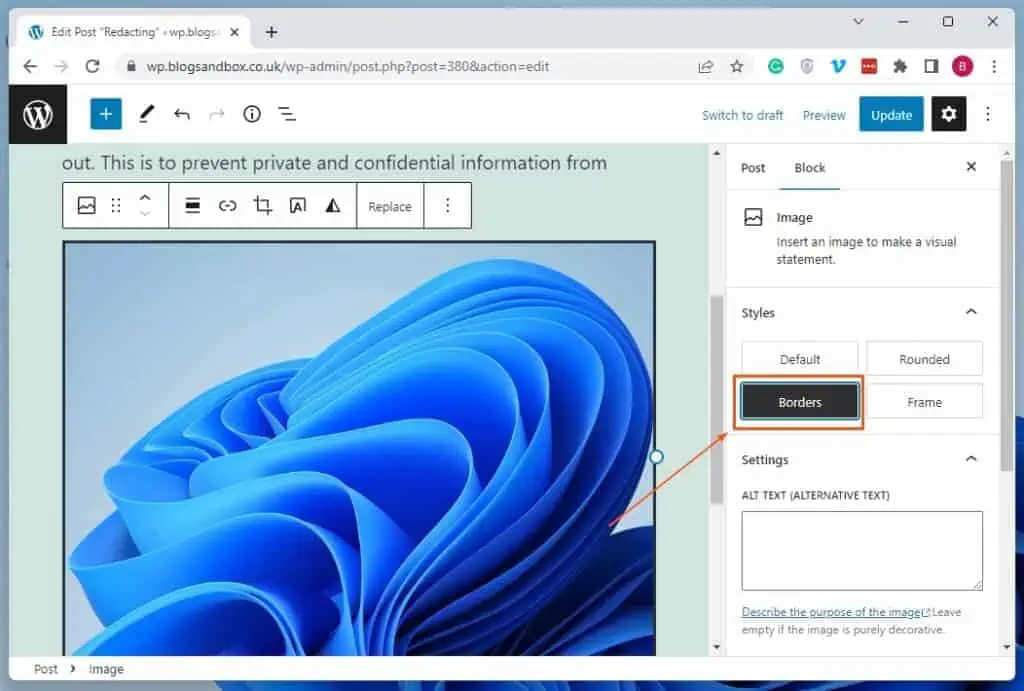
- After uploading the image, click it and ensure the Settings panel is selected and opened.
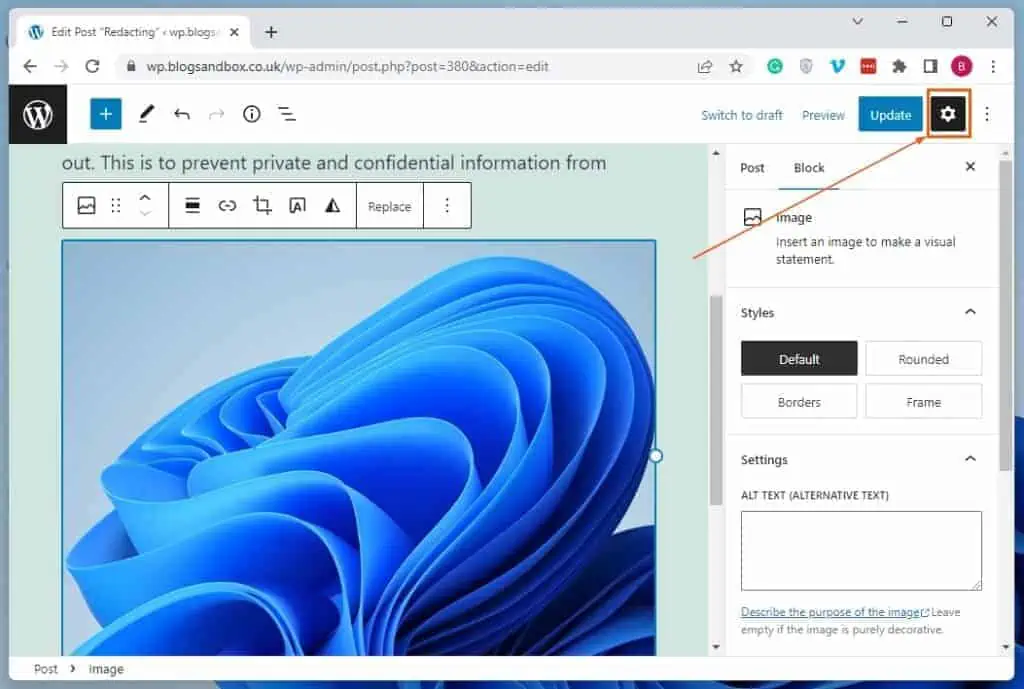
- Now, click Borders under the Styles category in the Block tab on the Settings panel. Hence, you will notice a black border surrounding the selected image.
Option 2: Add a Border to a Picture Using a Plugin
Another way to add a border to a picture in WordPress is with the help of an image editor plugin. Although there are quite a number of image editor plugins out there, I recommend the WP Paint plugin.
Hence, read How to Install and Activate WP Paint Plugin in WordPress to learn how to install and enable this plugin on your WordPress site. Then, follow the procedures below to learn how to use the plugin to add a border to a picture in WordPress.
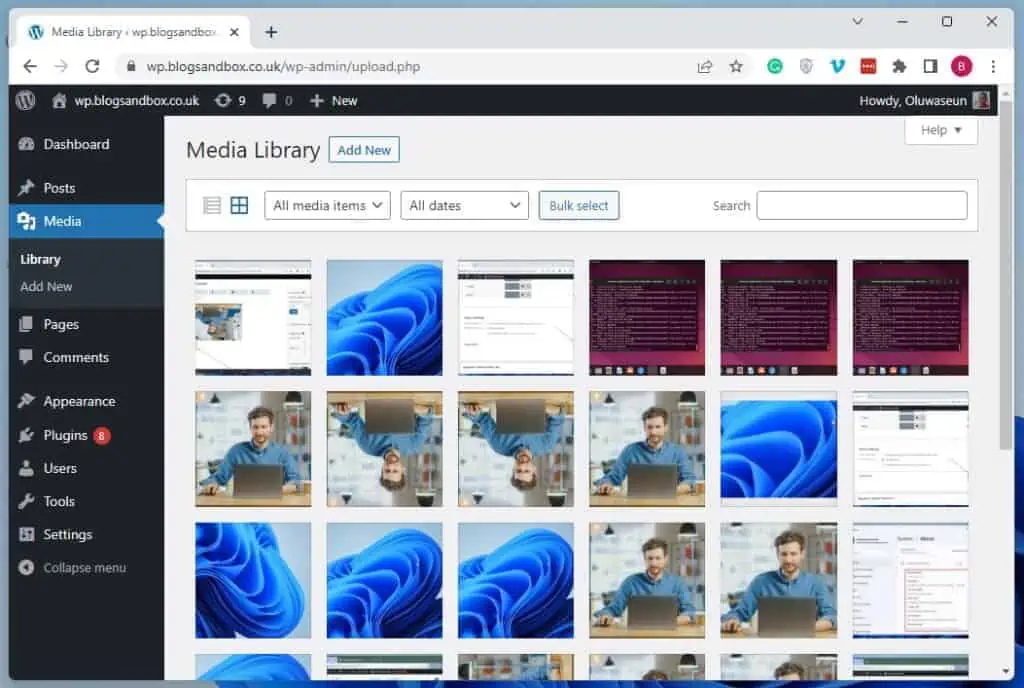
- After you’ve installed and activated the plugin, ensure you are logged in as an administrator on your WordPress site’s backend. Then, click Media among the options on the left pane of the backend.
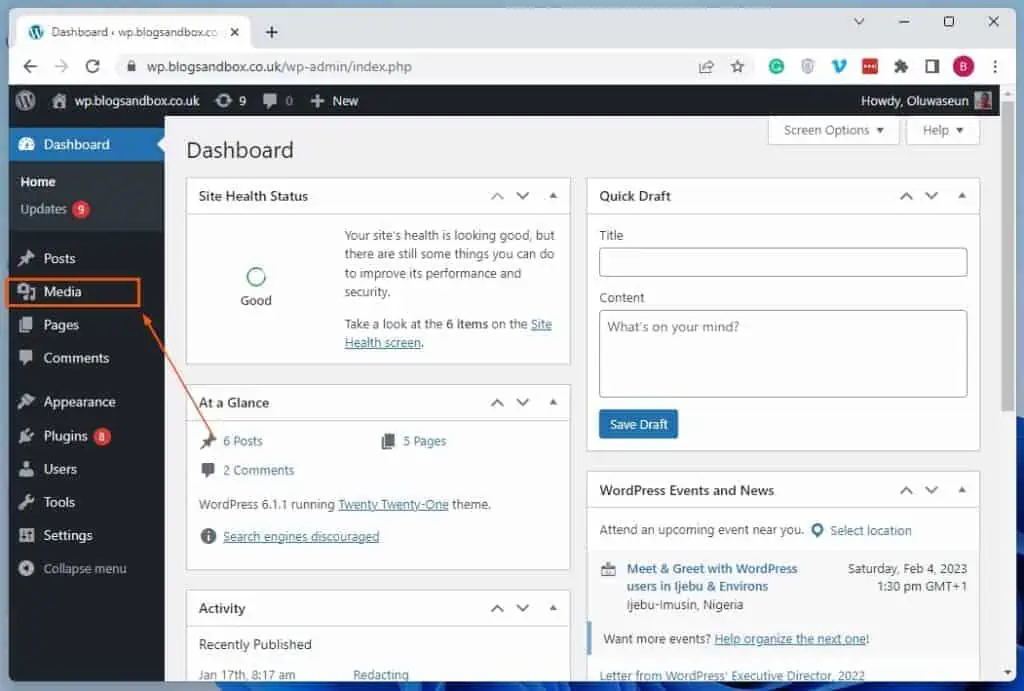
- In your WordPress Media Library, select the image to which you want to add a border. Thus, the image’s Attachment details page should open.
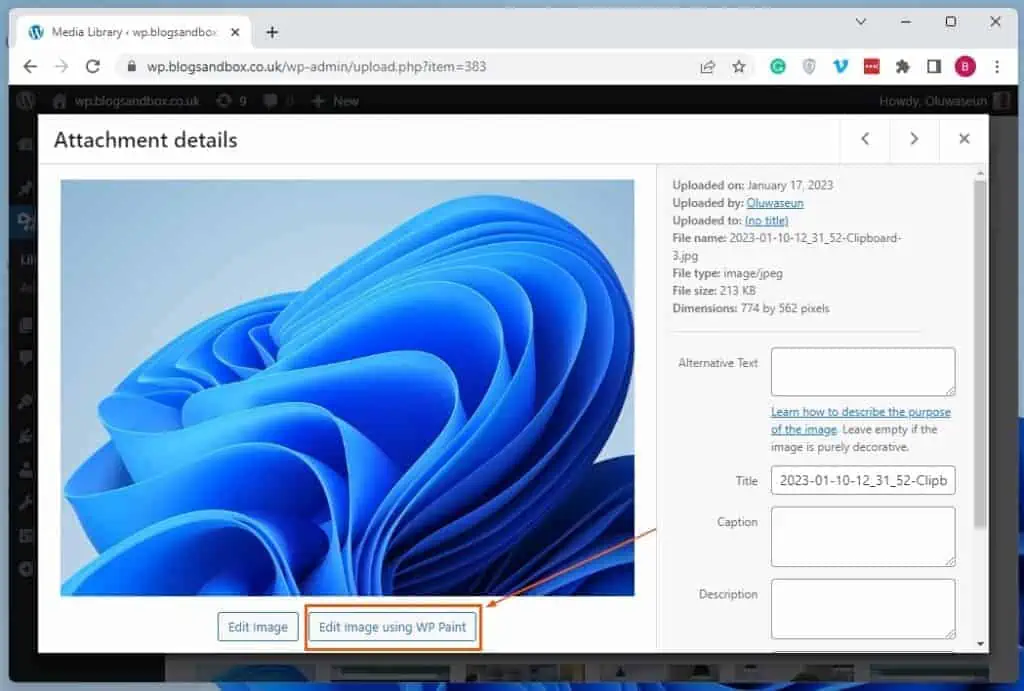
- In the Attachment details page, click the Edit Image using WP Paint button under the picture. Hence, the WP Paint image editor plugin should open.
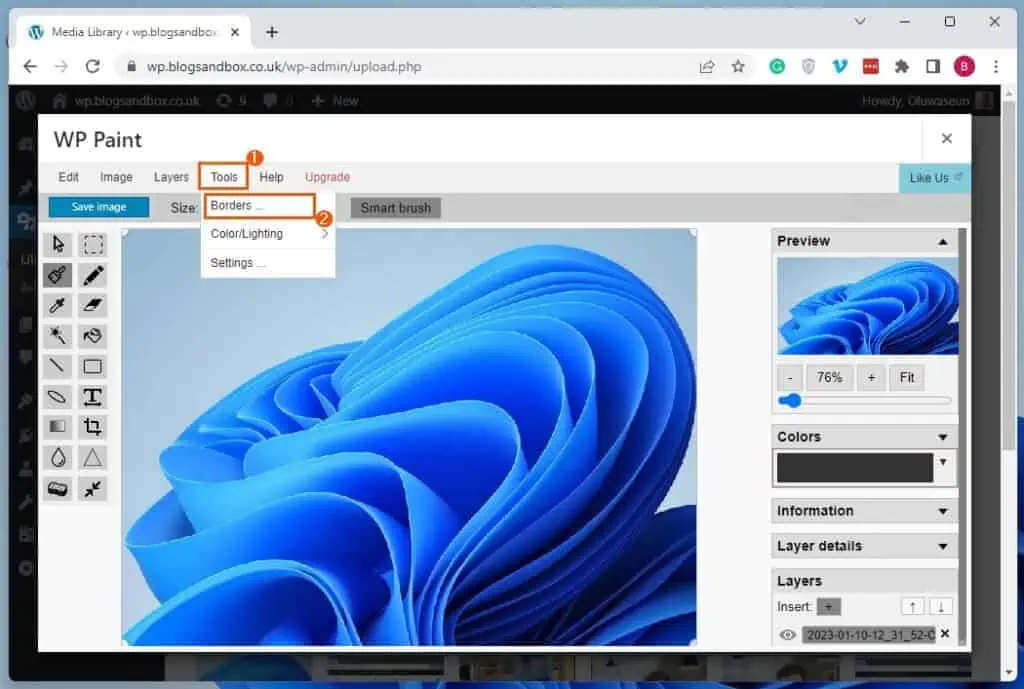
- Now, click the Tools menu at the top of the WP Paint image editor plugin page. Then, select Borders … from the options that appear.
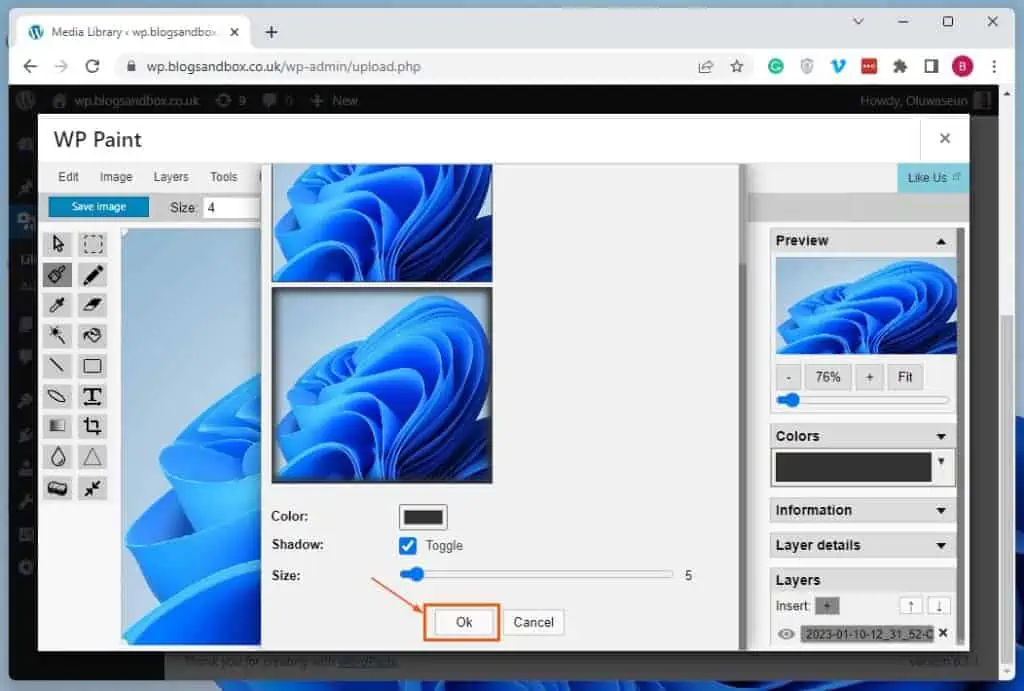
- After that, click the color palette button on the Borders page to select a preferred color for the border.


- Then, use the Size slider to increase or decrease the thickness/width of the border.
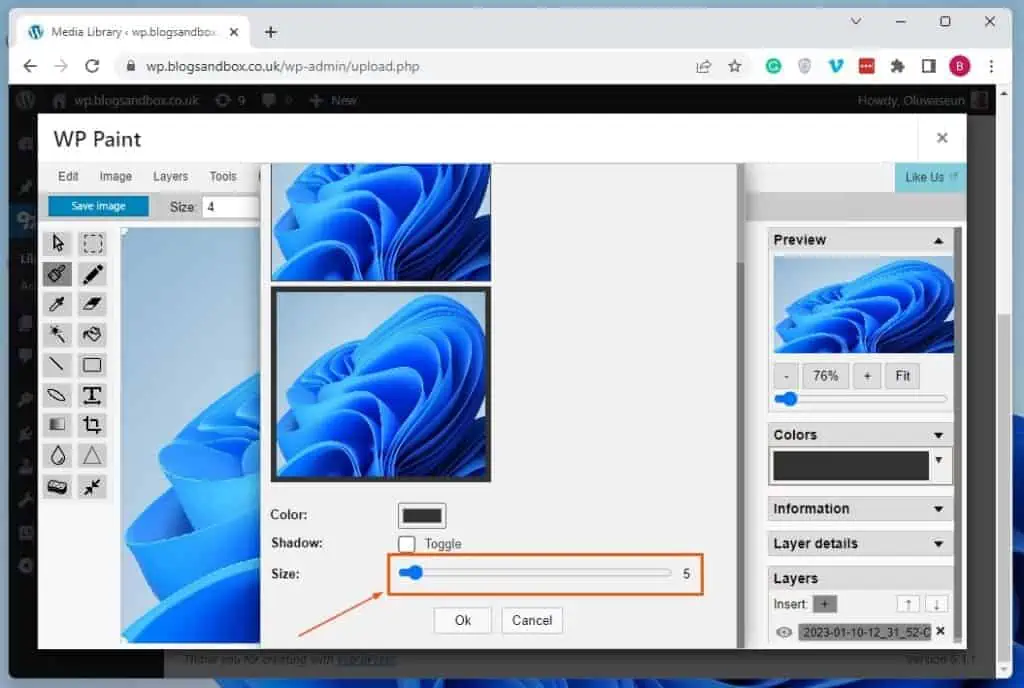
- After customizing the border to your satisfaction, click the Ok button at the bottom of the Borders page.
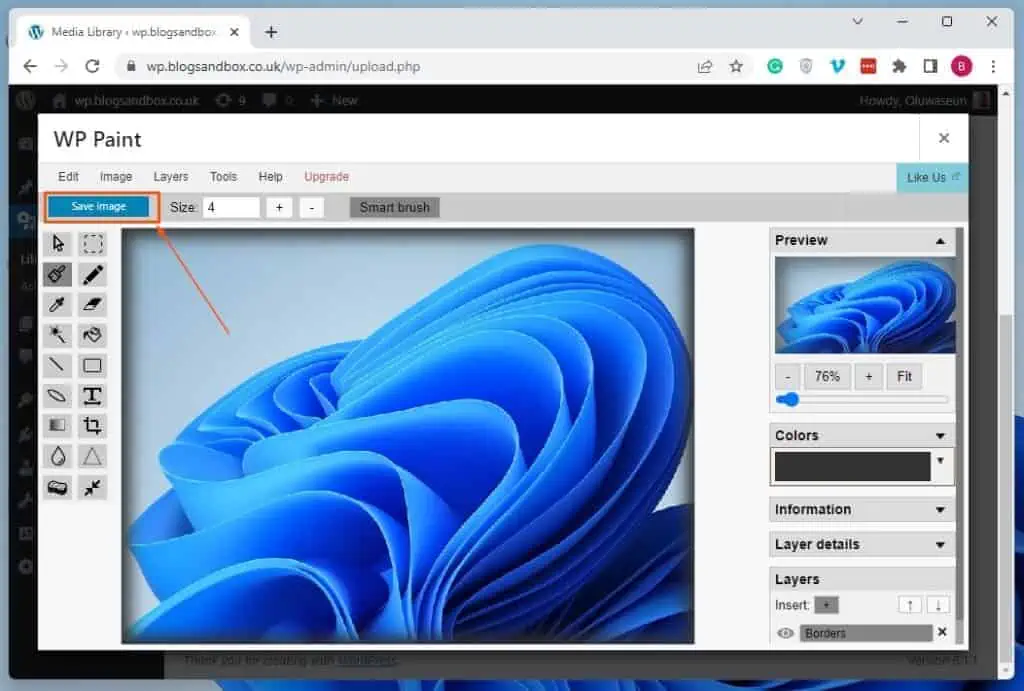
- Now, click the blue Save image button at the top left of the WP Paint image editor plugin page to save the change.
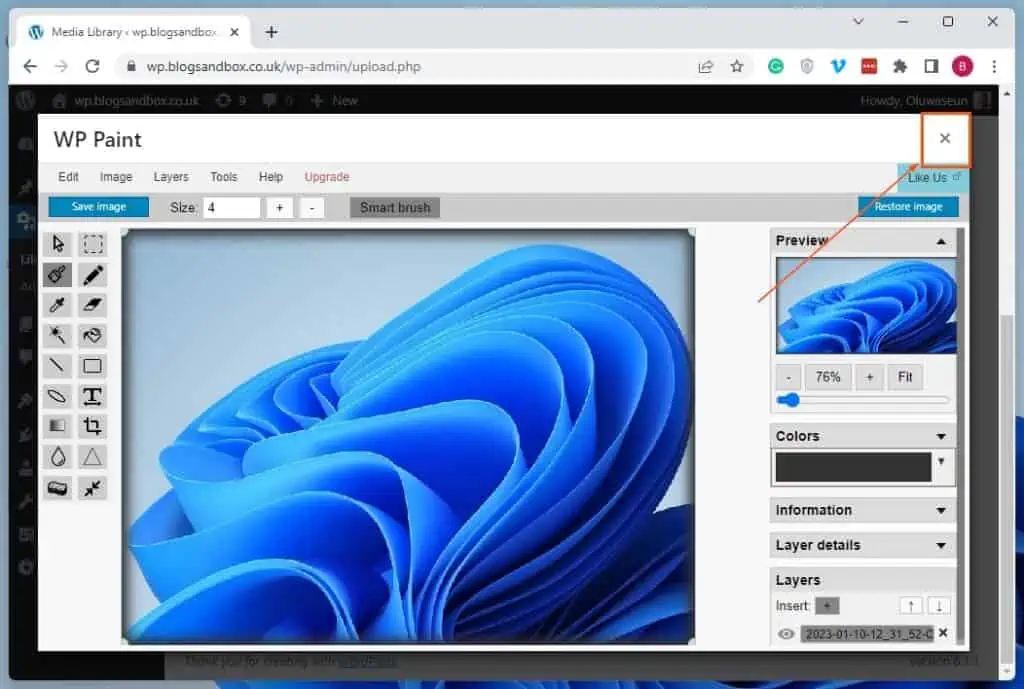
- Lastly, click the “x” sign at the top right corner of the page to close the image editor plugin.
Option 3: Add a Border to a Picture Using HTML
Interestingly, you can also add a border to a picture on your WordPress site using HTML. However, HTML can be daunting for those without HTML knowledge.
Nonetheless, I will make the procedures as simple as possible. Hence, follow the steps below to add a border to an image in WordPress using HTML.
- First, log in to the backend dashboard of your WordPress site as an admin. Then, depending on where you want to add a border to a picture, click Posts or Pages on the left pane.

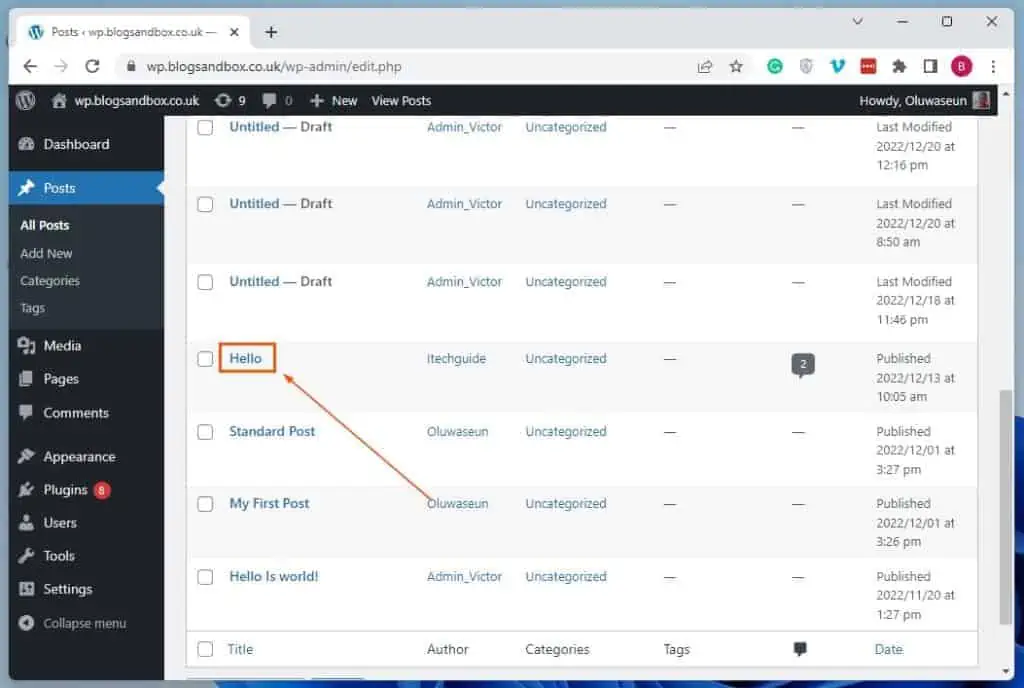
- After that, left-click the title of the page/post where you want to add a border to a picture to open it. In this case, I will open a post titled “Hello” on our WordPress site.
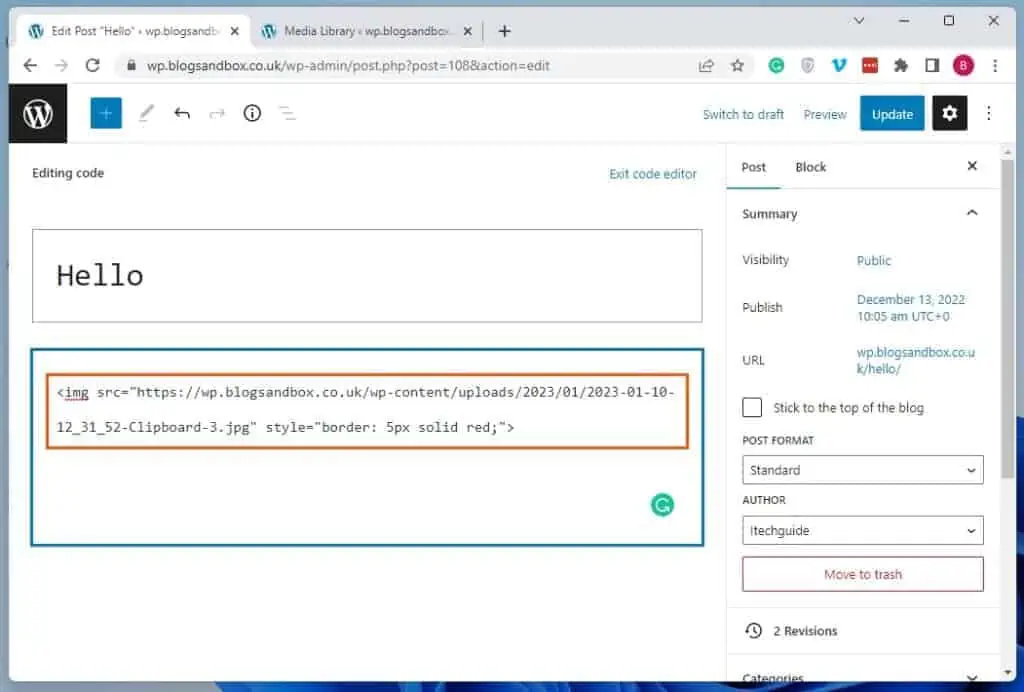
- When the post or page opens, click the Options icon at the top right corner and select Code editor.

- Now, input the HTML code below in the area you want to include a border to an image. However, replace “image URL” with the URL of the picture to which you want to add a border.
Also, replace “size” with a pixel value, depending on how wide you want the border to be. Additionally, replace “color” with the name of your preferred color for the border.
<img src="image URL" style="border: size solid color;">
Thus, the code should appear as follows if I wish to give my preferred image a red border that is 5 pixels wide.
<img src="https://wp.blogsandbox.co.uk/wp-content/uploads/2023/01/2023-01-10-12_31_52-Clipboard-3.jpg" style="border: 5px solid red;">
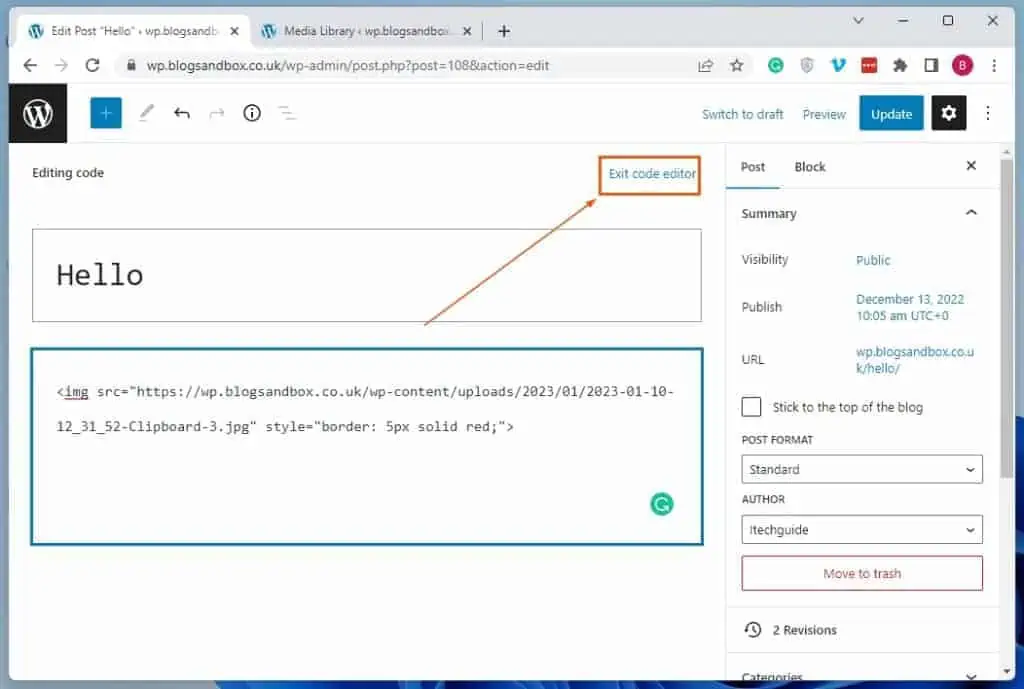
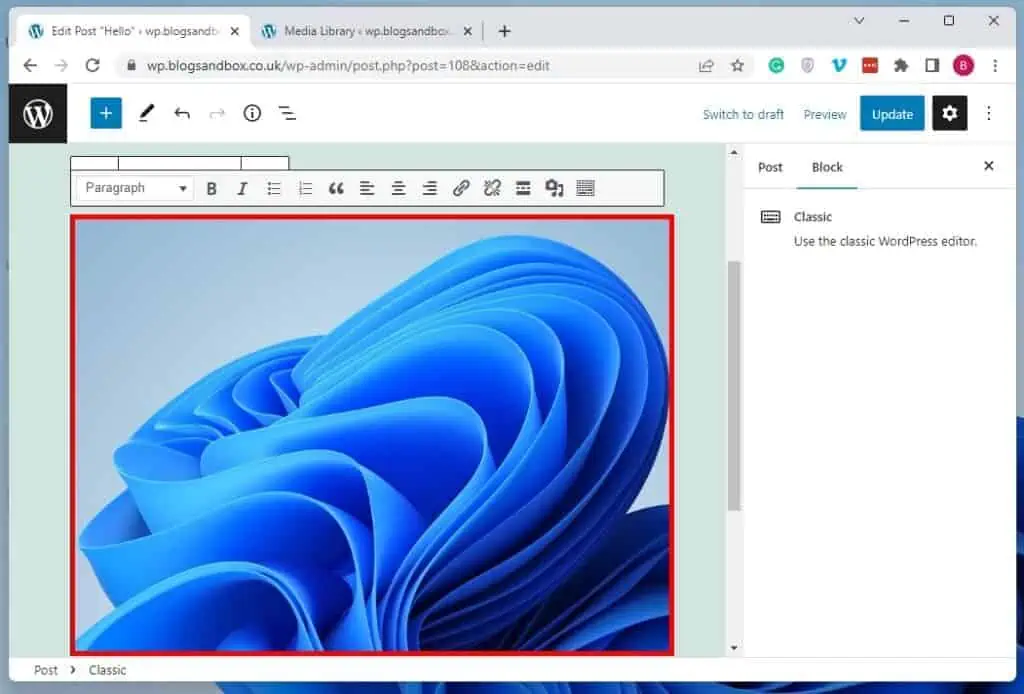
- Finally, click the Exit code editor button. Hence, the image should appear with the border and a classic WordPress editor toolbar at the top – see the second screenshot.
Frequently Asked Questions
Yes, you can add a border to any format of image in WordPress, including PNG images.
Sure, you can remove a border from a picture on your WordPress website.
WordPress was primarily developed using the PHP programming language. As a matter of fact, the plugins and themes available in WordPress were all developed using PHP.
An image border is an outline that surrounds or frames a picture.
Yes, you can add a border to an image that is already in your WordPress post or page.
Conclusion
Adding a border to a picture is a simple yet effective way to improve the visual appeal of your WordPress website. This will make specific images on your website stand out from others and help draw attention to them.
Gladly, this guide demonstrated numerous ways to add a border to an image in WordPress. To be specific, we discussed how to execute this task through the default WordPress block editor.
I also provided steps to add a border to a picture in WordPress using a plugin. That’s not all; this guide also included procedures to perform this task using HTML.
I hope this guide was able to help you add a border to an image on your WordPress website. If it was, click on “Yes” beside the “Was this page helpful” question below.
You may also express your thoughts and opinions by using the “Leave a Reply” form at the bottom of this page.
Lastly, visit our WordPress & Websites How-To page to access other helpful WordPress guides.
![WordPress Lost Password Redirects to Page Not Found [Fixed]](https://www.itechguides.com/wp-content/uploads/2024/03/WordPress-Lost-Password-Redirects-to-Page-Not-Found-Fixed.webp)