Received “audio services not responding” Windows 10 error message? In this Itechguide, I share 4 solutions that have proven to fix this problem.
Option 1: Restart the Audio Service
If you receive “audio services not responding windows 10” error message, the first and simplest thing to do is to restart the audio service.
Follow the steps below to restart the audio sevice:
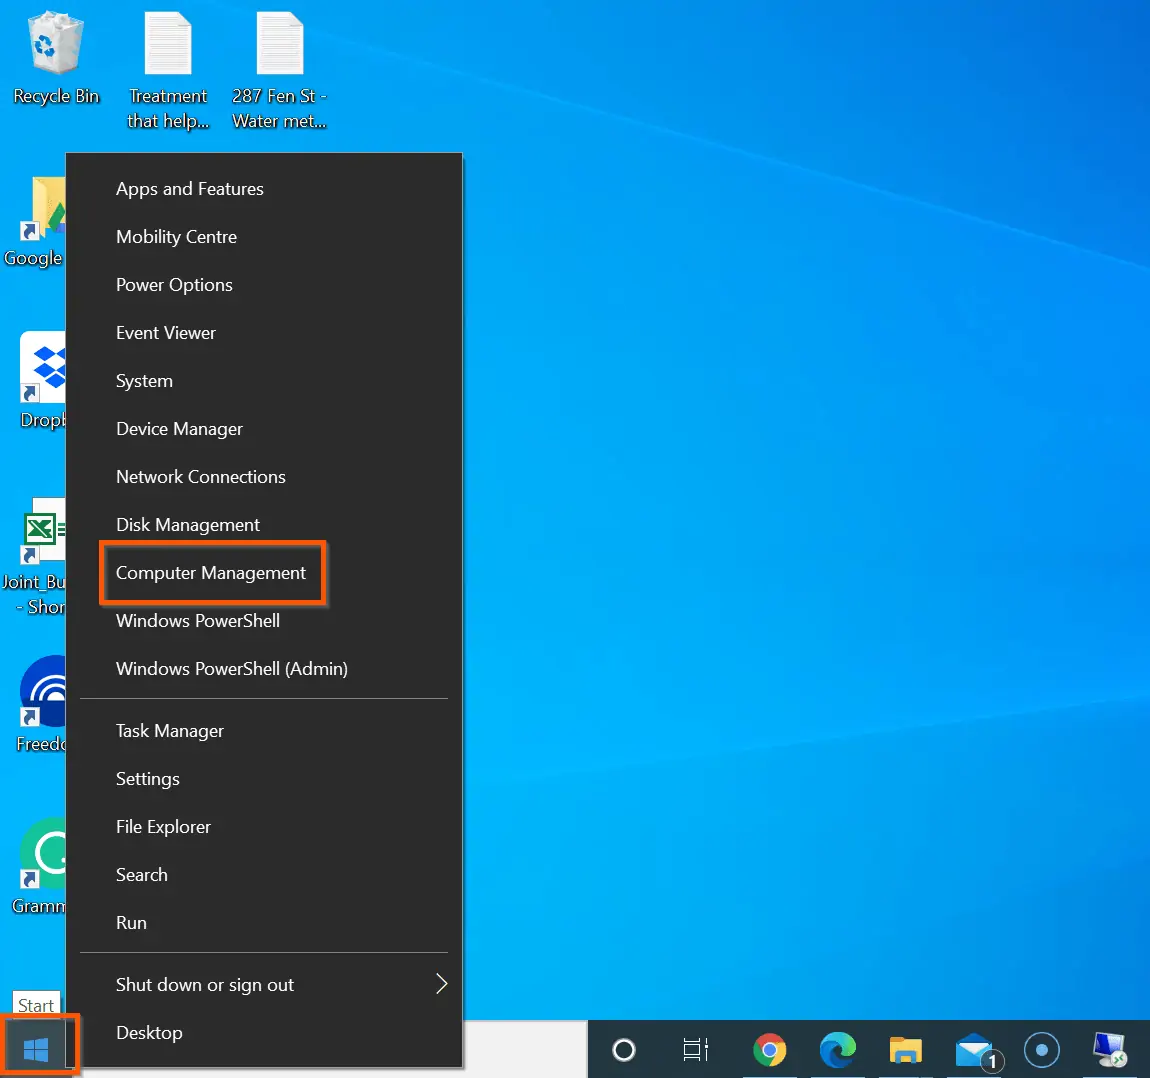
- On the bottom left of your desktop, right-click the Start Menu. Then, from the displayed options, click Computer Management.
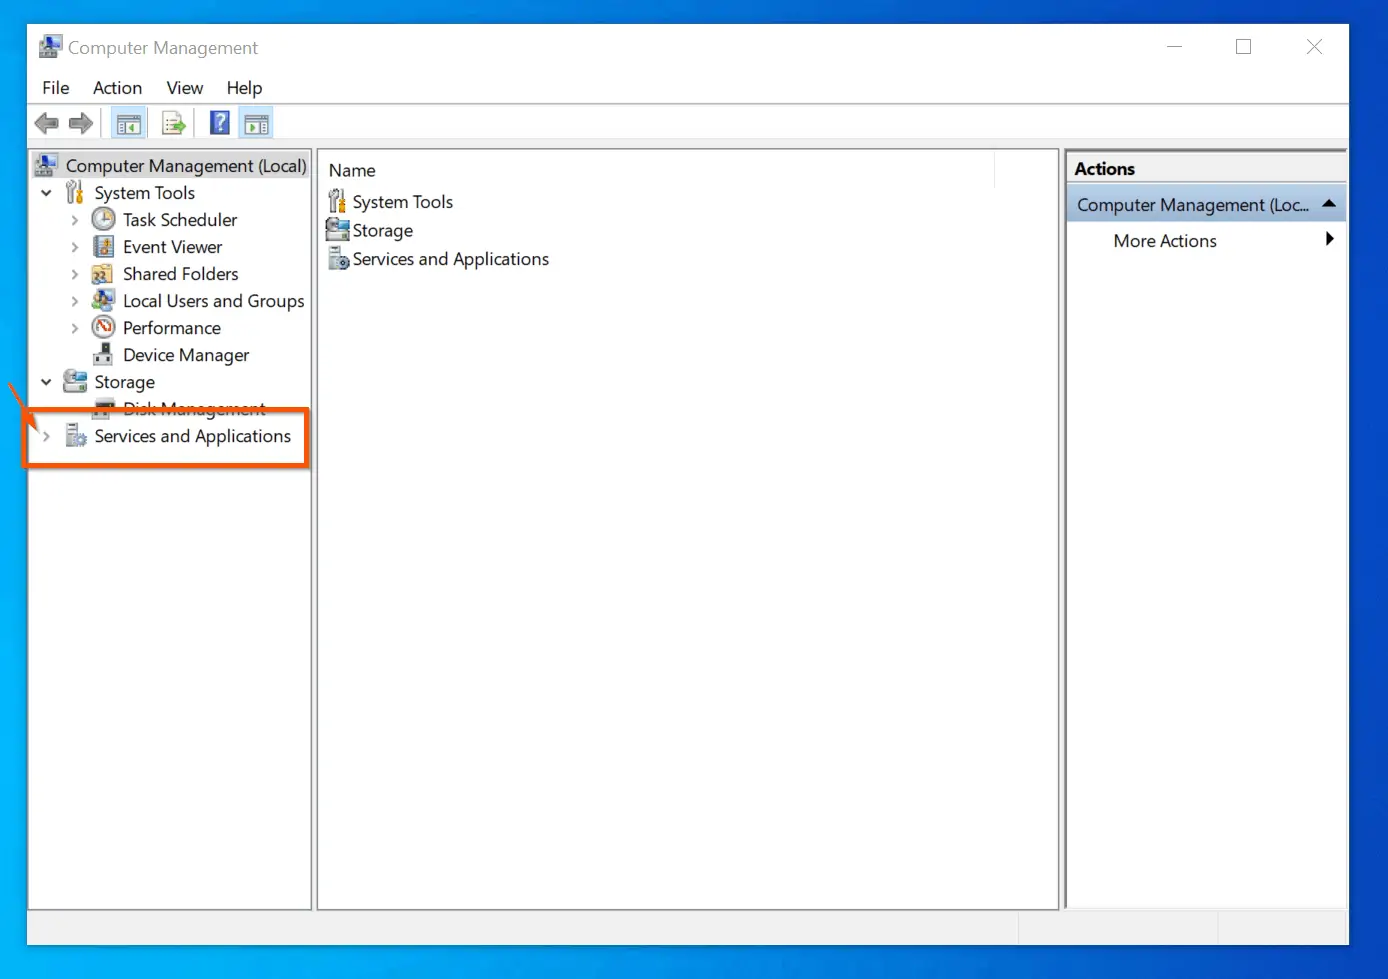
- When Computer Management MMC opens, on the left pane, expand Services and Applications.
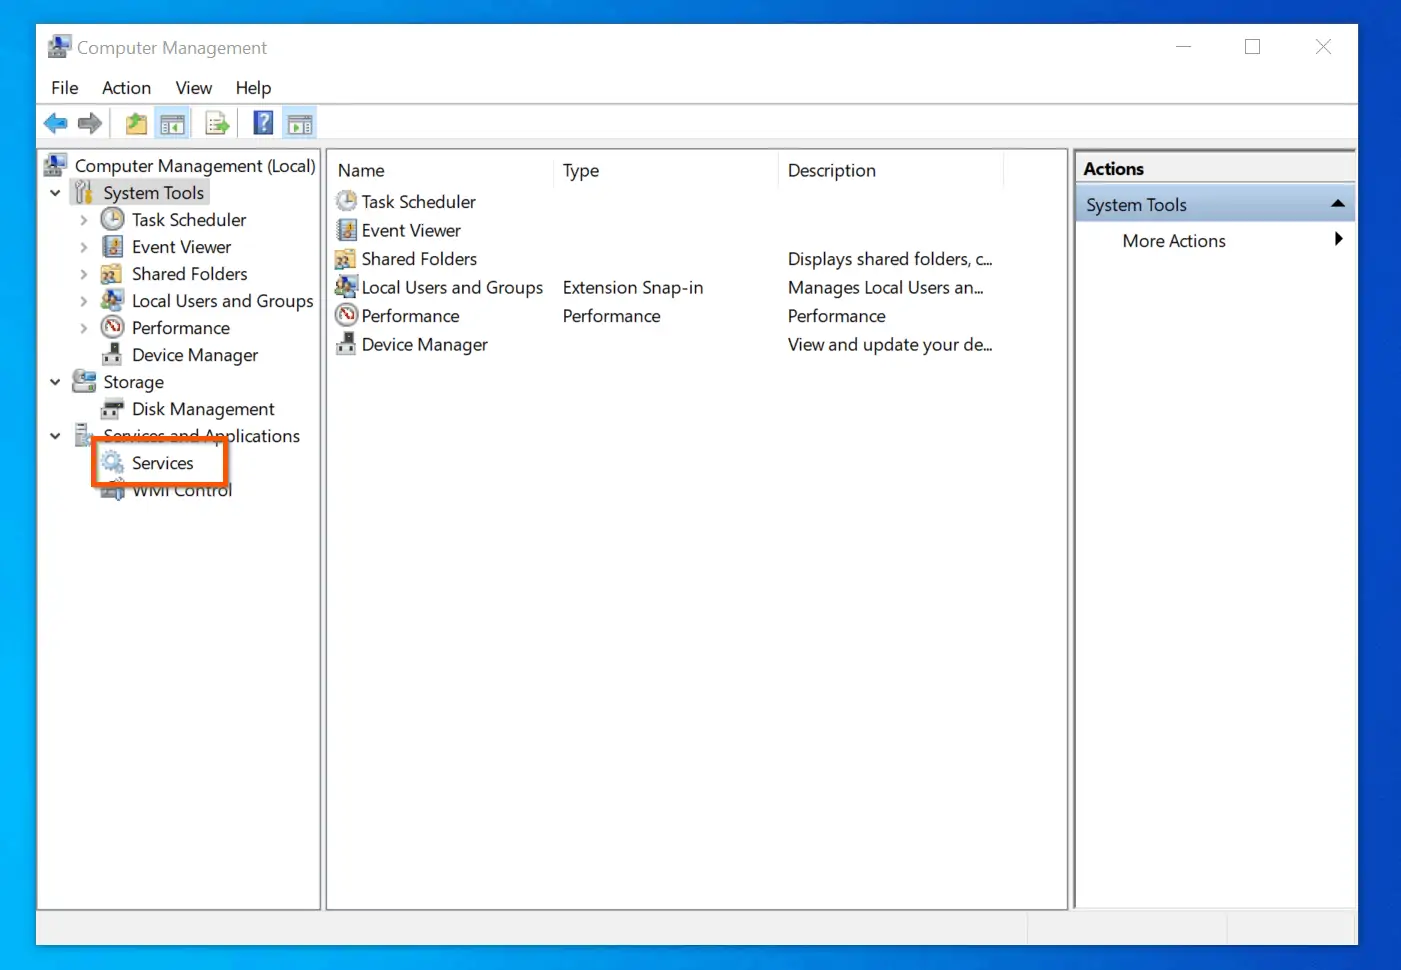
- Then, on the Services and Applications group, click Services. All services on the PC will be displayed on the right pane.
- Finally, on the right-pane, locate Windows Audio and select Restart.

Before you try the next recommended solution, restart your PC and check if the “audio services not responding” Windows 10 error is resolved. If not, try the next fix.
However, if this method fixed the problem for you, kindly let us know by leaving a commend at the end of this page.
Option 2: Add System Services to the Administrators Group
So many users have fixed “audio services not responding” windows 10 error message with this method. I will teach you 2 methods to perform this task.
The first method is a GUI method – via “Local Users and Groups”. In the second method, I will teach you how to complete the task via Windows Command Prompt.
Both methods will achieve the same result – please complete the steps in one of the methods.
Method 1: Via the “Local Users and Groups”
To add “Network service” and “Local service” to local Administrators group via “Local Users and Groups”, follow the steps below:
- Right-click the Start Menu and click Computer Management.
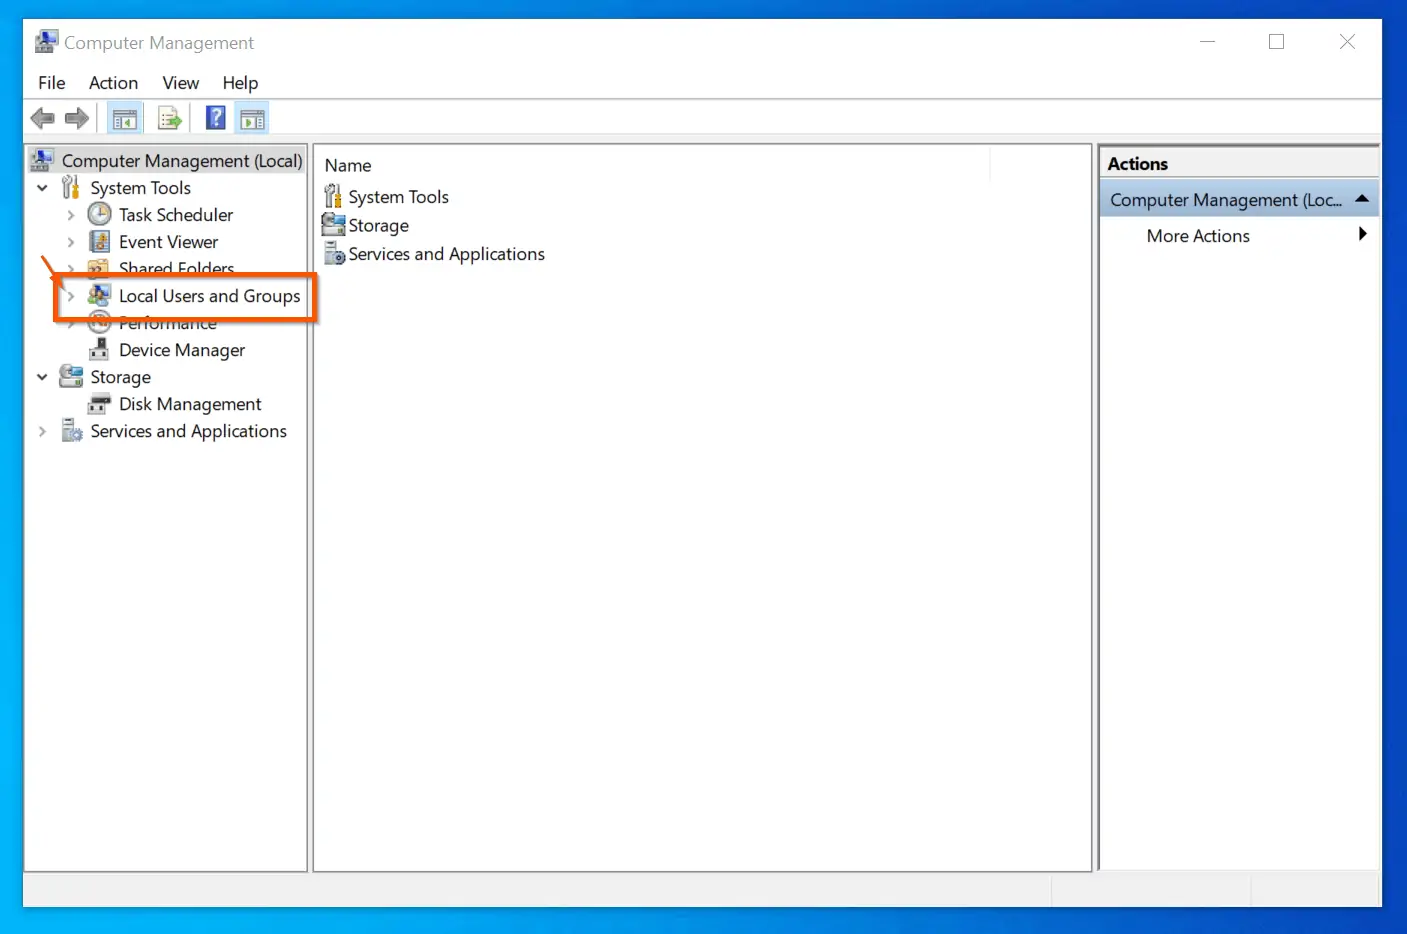
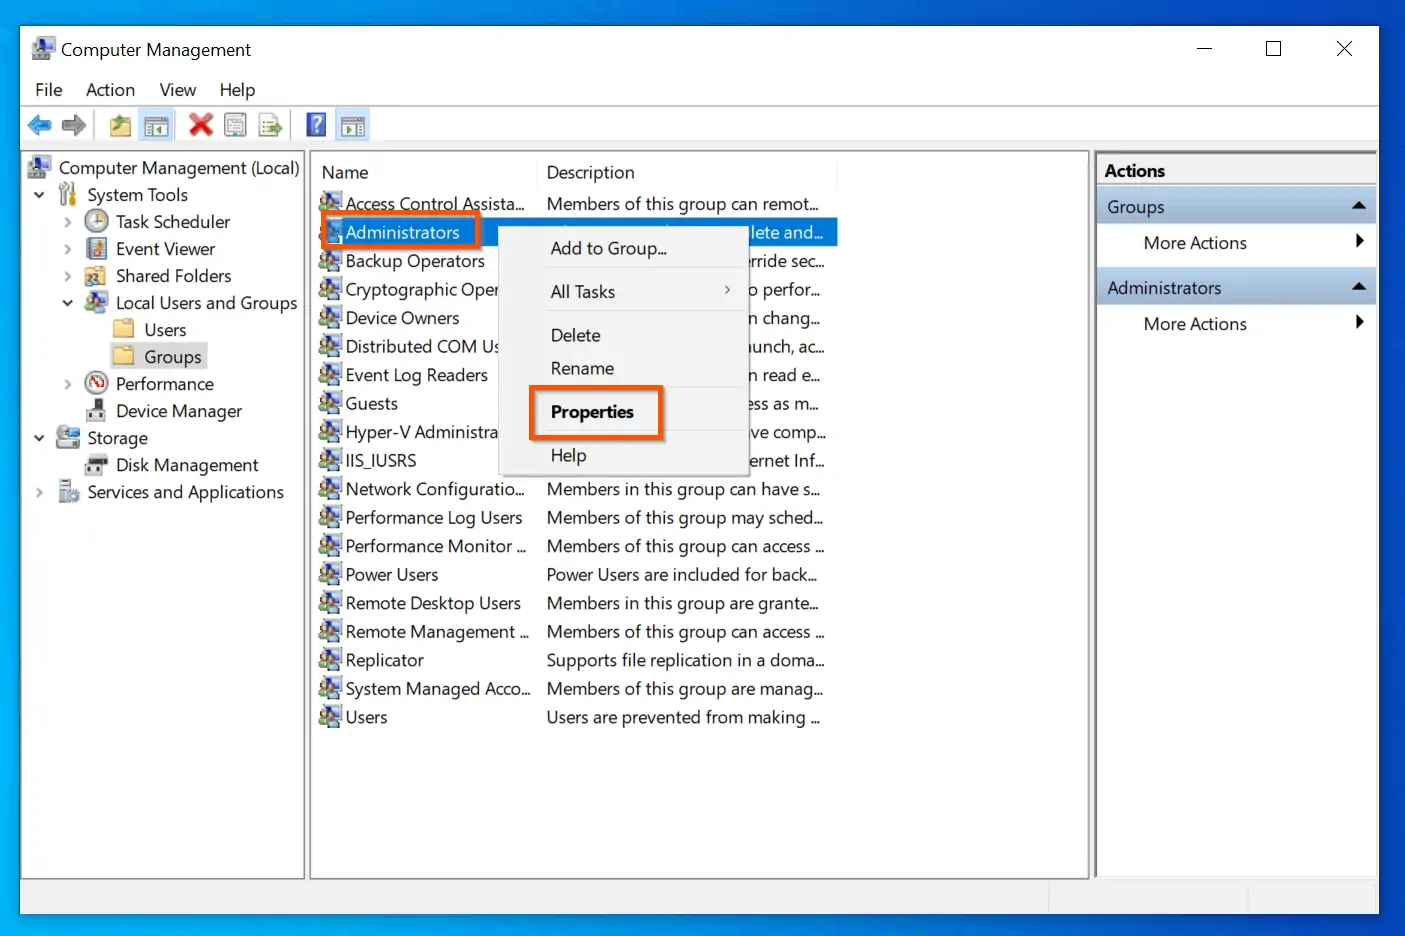
- On the left pane of Computer Management, expand Local Users and Groups. Then, click the Groups node.
- Then, on the right pane of the Groups node, right-click Administrators and select Properties.
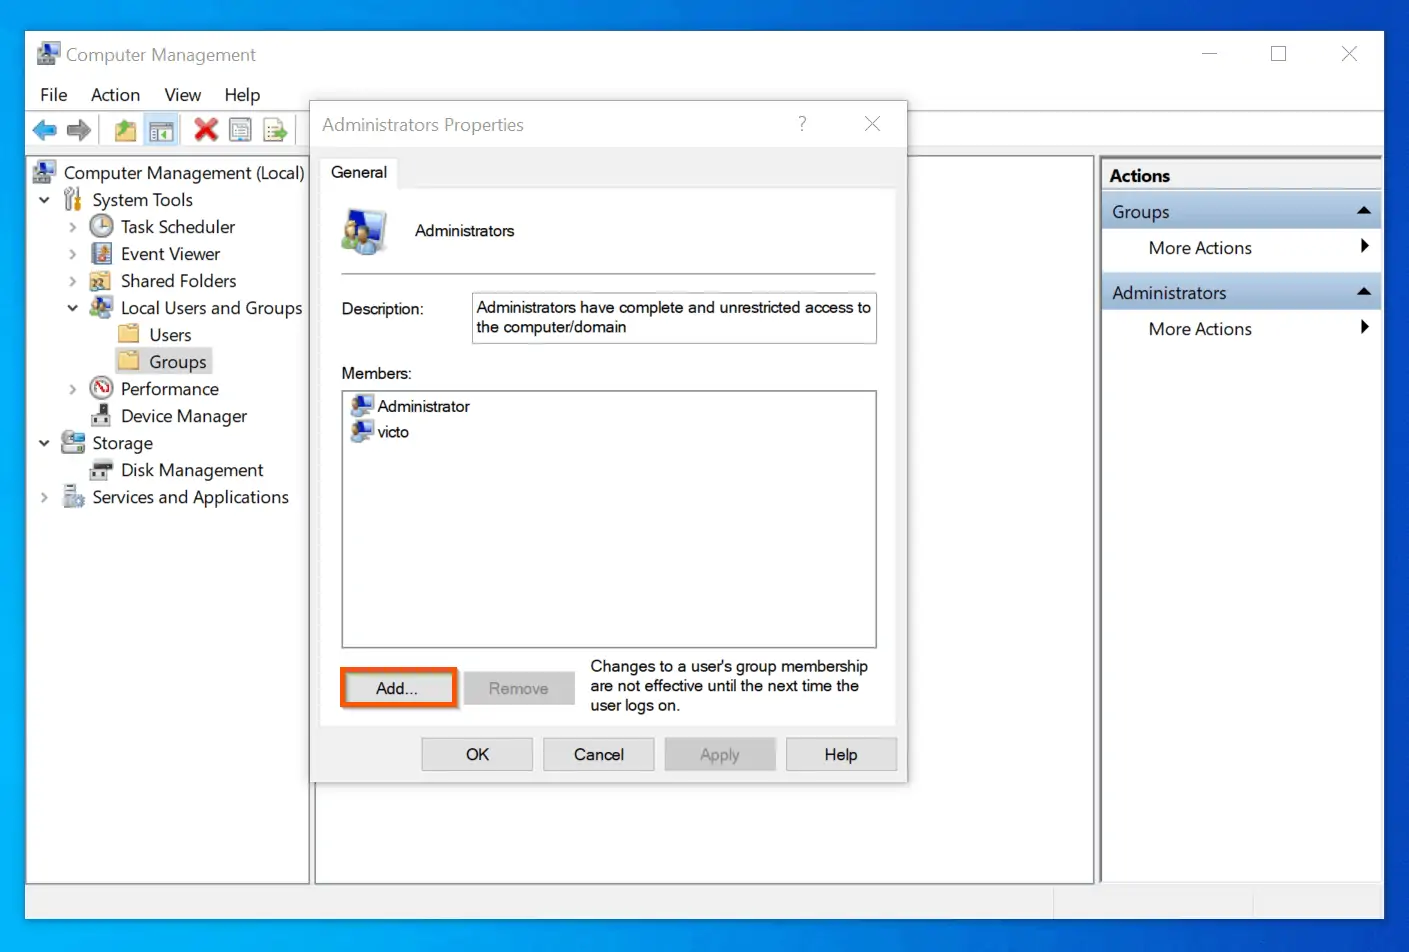
- On the bottom left of the Administrators Properties window, click Add.
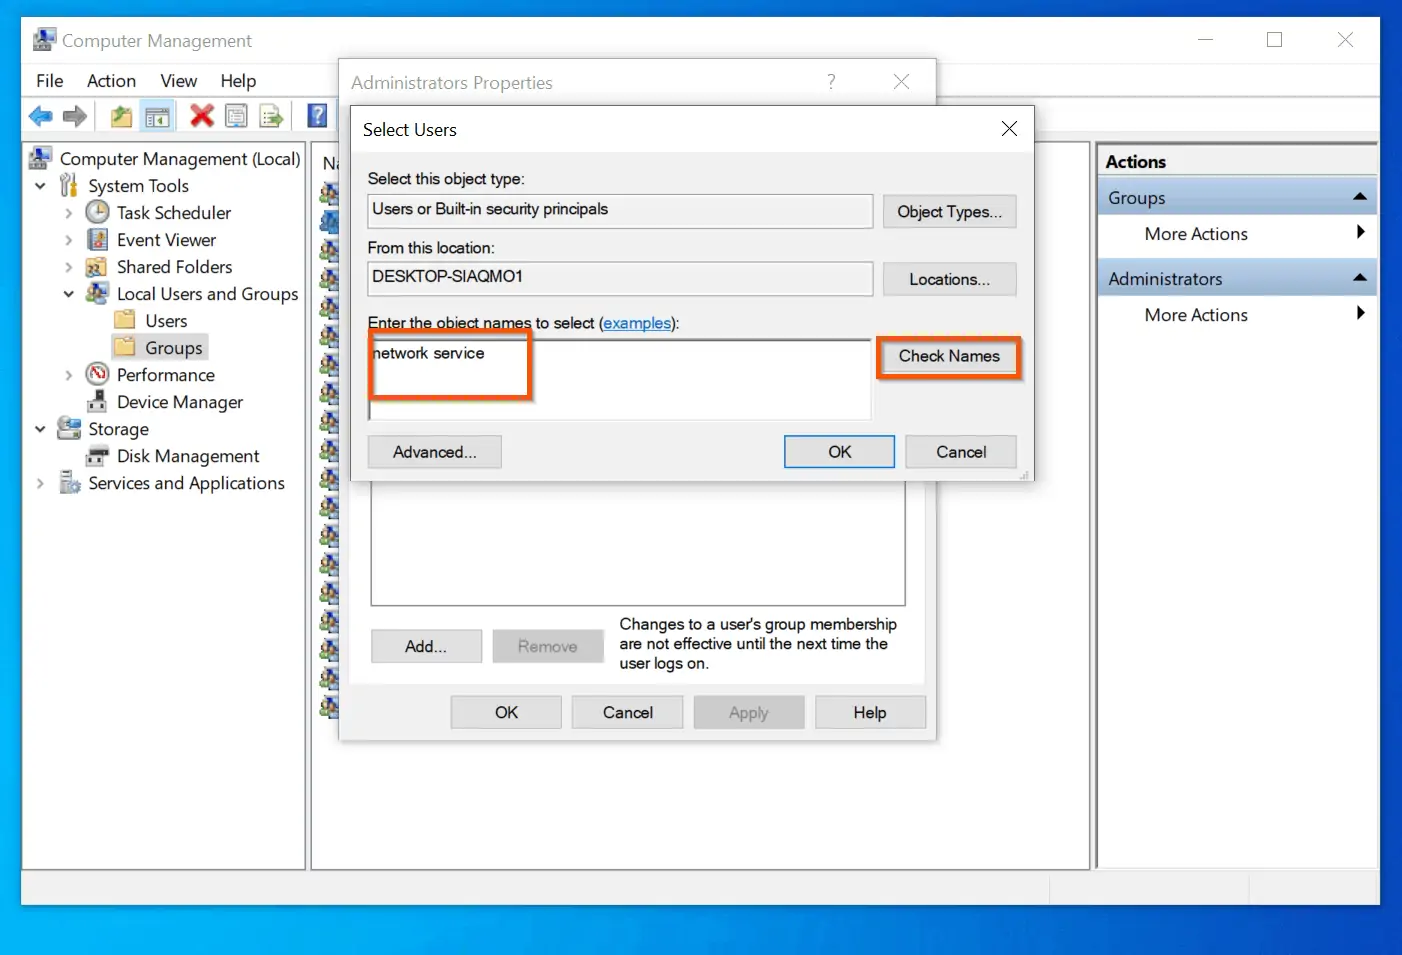
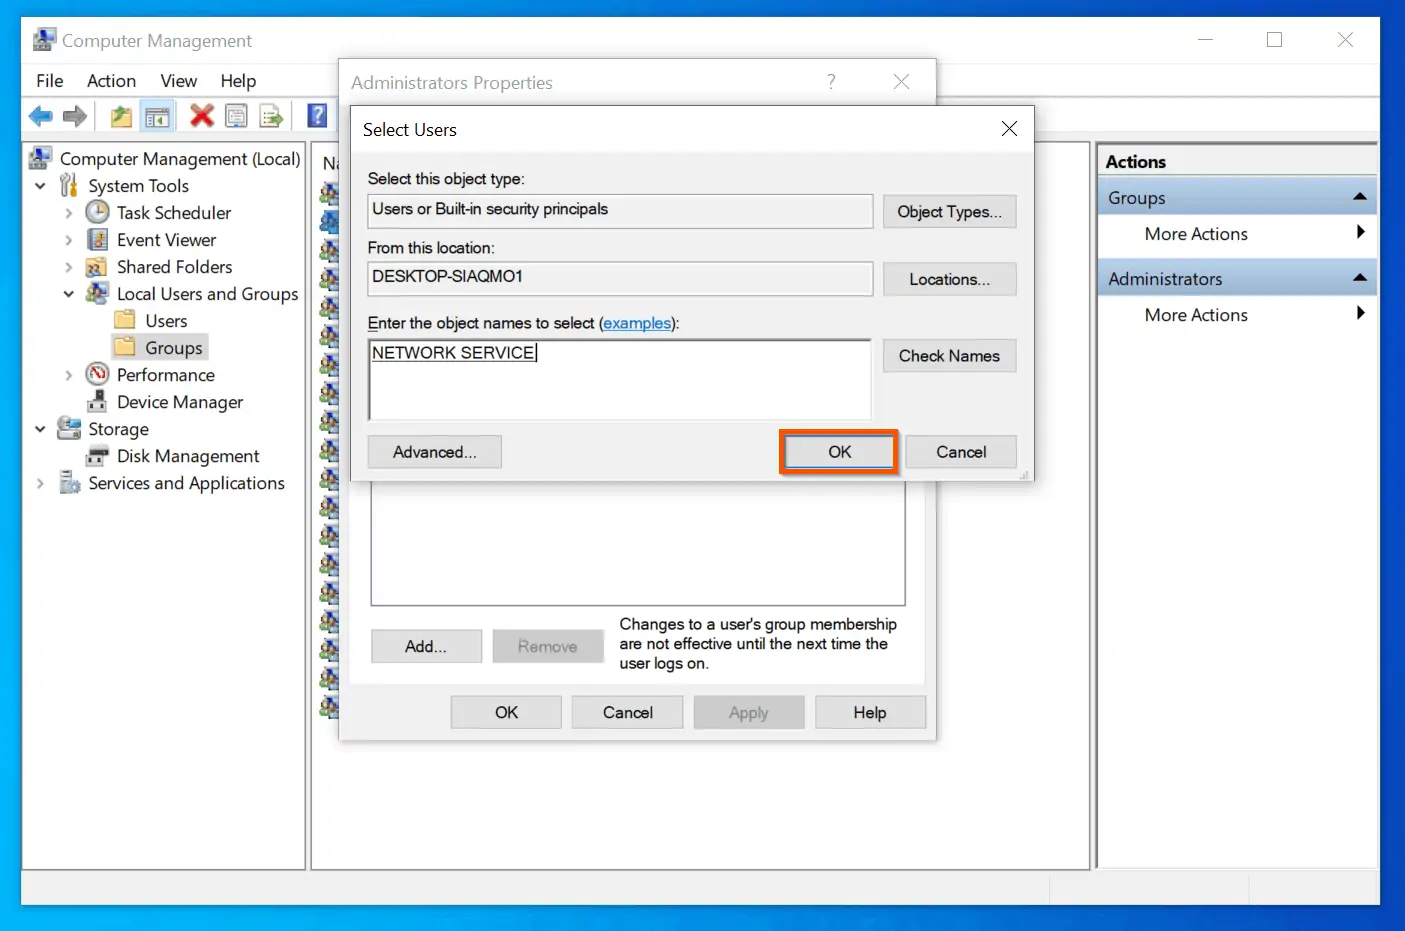
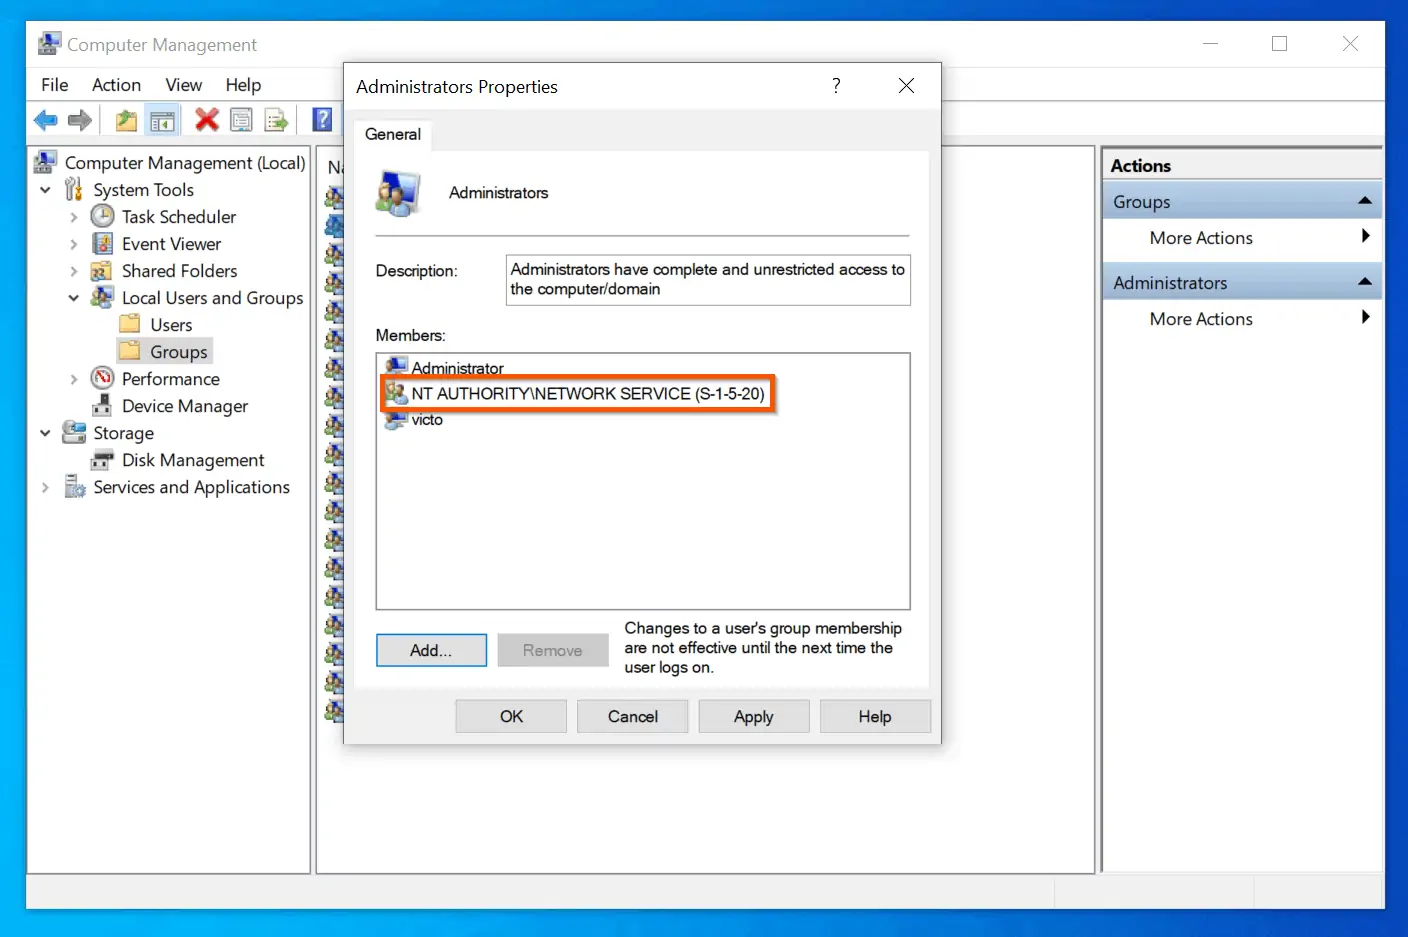
- When the Select Users window opens, on the “Enter the object names to select” box, enter network service. Then, click Check Names – The name will change from network service to NETWORK SERVICE.
- To add NETWORK SERVICE to the local Administrators group, click OK.
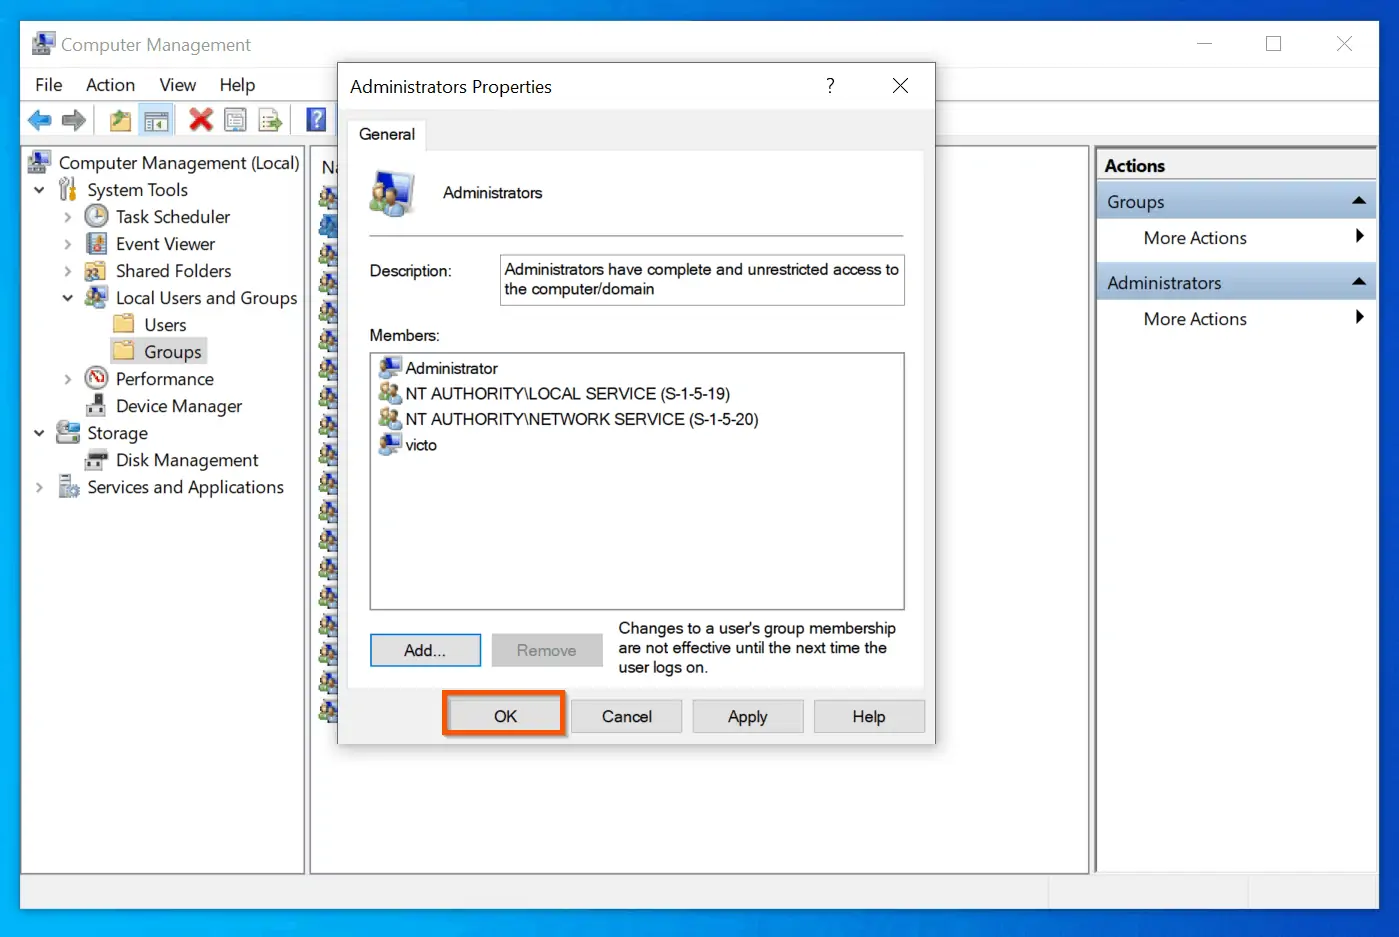
You will be returned to Administrators Properties. If you look closely, NT AUTHORITY\NETWORK SERVICE is now included in the list. To add “Local service” to the list, repeat steps 4-6 above.
- When you finish, the Administrators Properties list will look like this: To save your changes, click OK.
After performing this step, check whether “audio services not responding” windows 10 error message is fixed. If it is not fixed, try the next solution.
Method 2: Via the Windows Command Prompt
Another method to add “Networkservice” and “Localservice” to the local Administrators group via command prompt. Here are the steps:
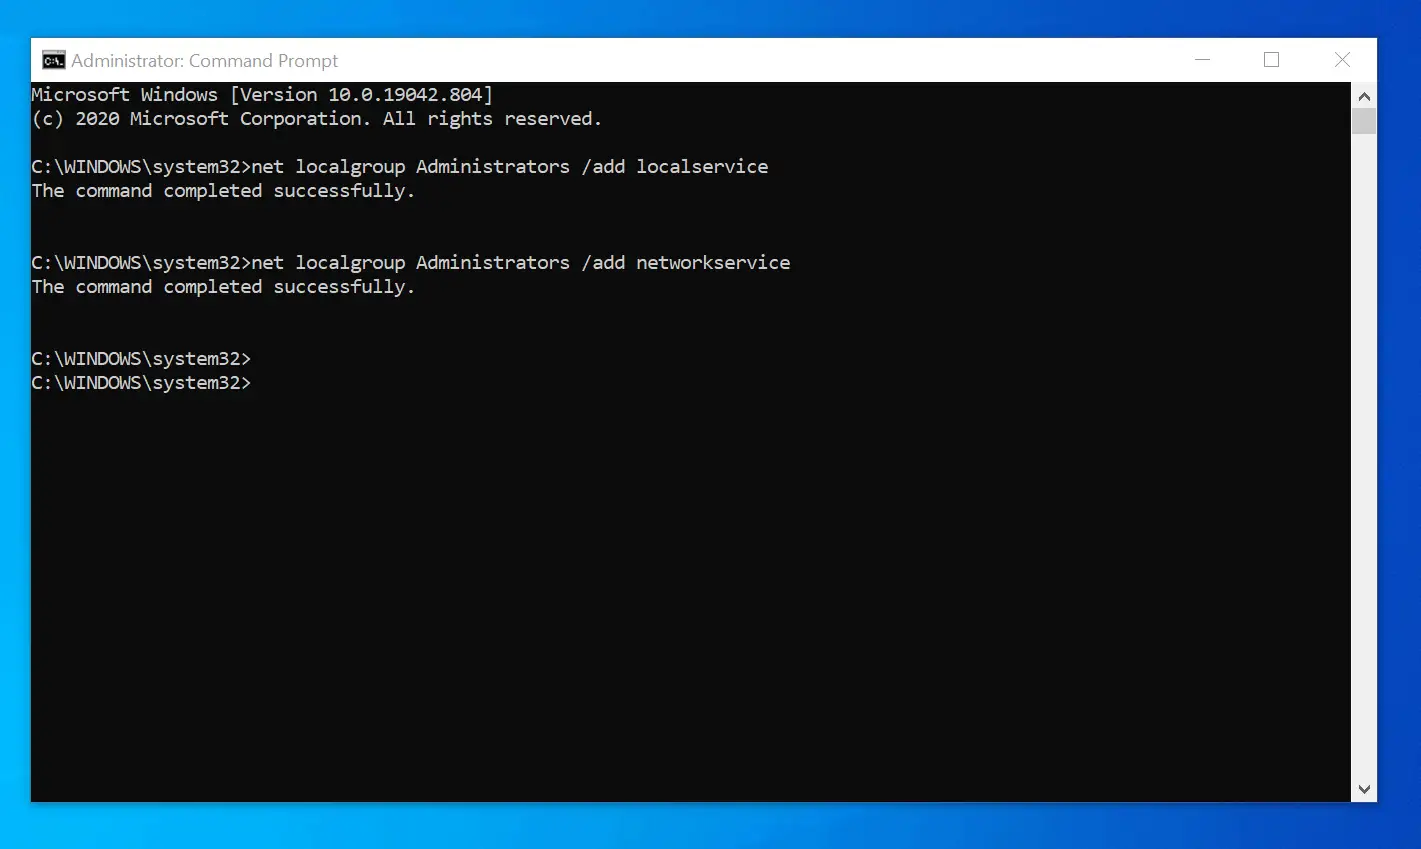
- Open command prompt as administrator (link opens in a new tab). When command prompt opens as administrator, enter the following commands and press enter – one command at a time
net localgroup Administrators /add localservice
net localgroup Administrators /add networkservice
Each of the commands will return “The command completed successfully”.
As I have mentioned multiple times in this section, adding add “Networkservice” and “Localservice” to local Administrators may fix “audio services not responding” windows 10 error message.
Before checking whether the method fixed the problem, restart your PC. If the method fixed the problem for you, kindly let us know by leaving a comment at the end of this page – use the “Leave a Reply” form.
However, if this method does not fix the error message for you, try the next solution.
Option 3: Restart the Services Outlined Below
Like other solutions in this guide, some users have fixed the “audio services not responding” Windows 10 error by restarting some audio-related services.
Follow the steps below to try this fix
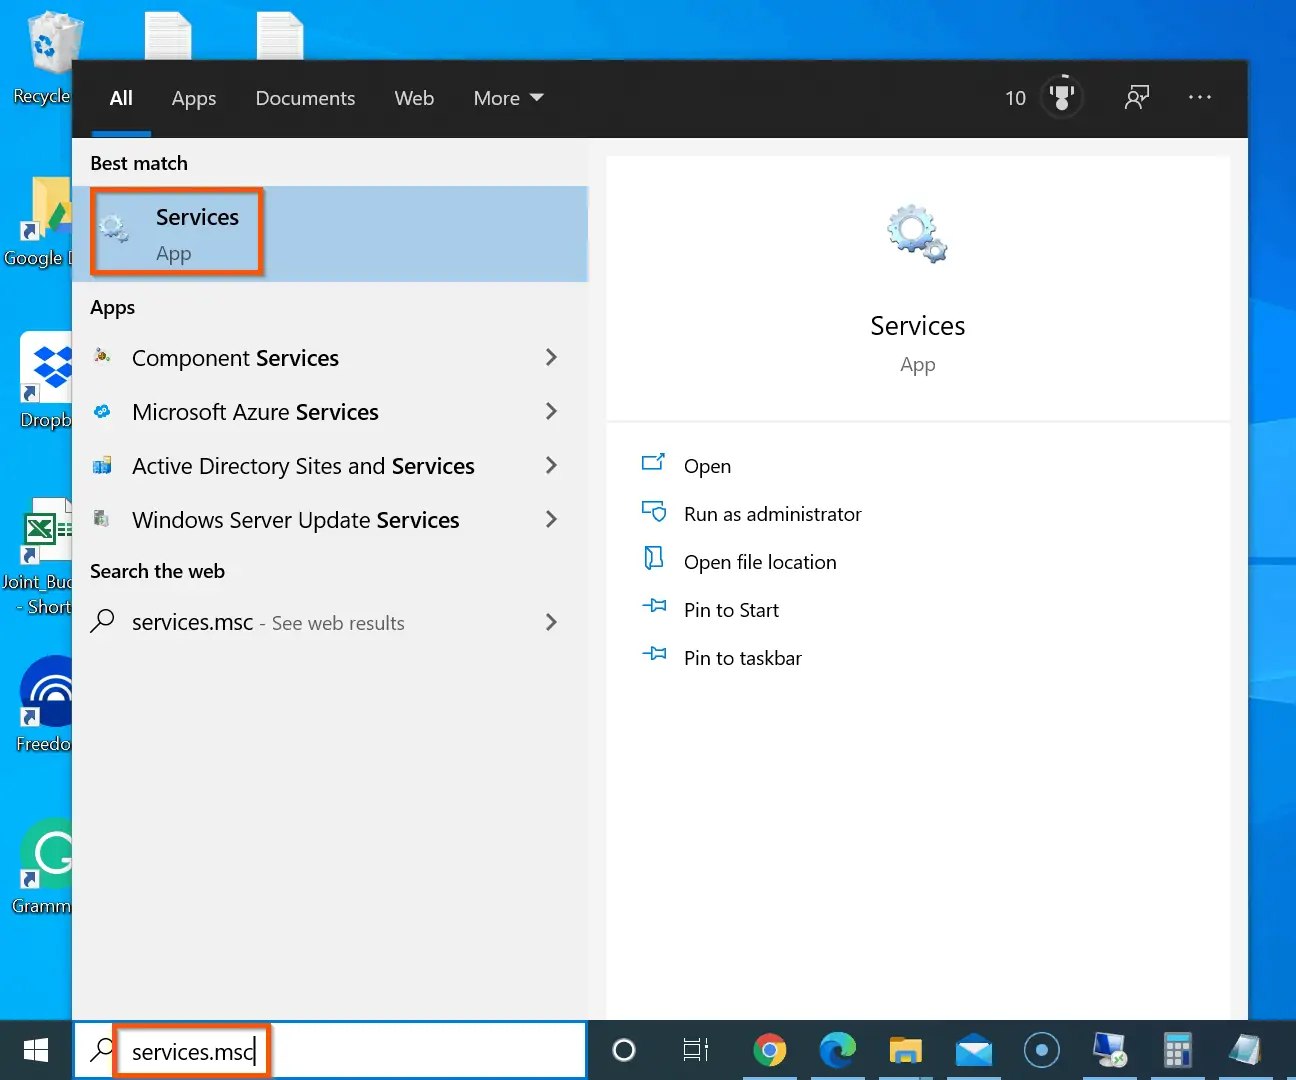
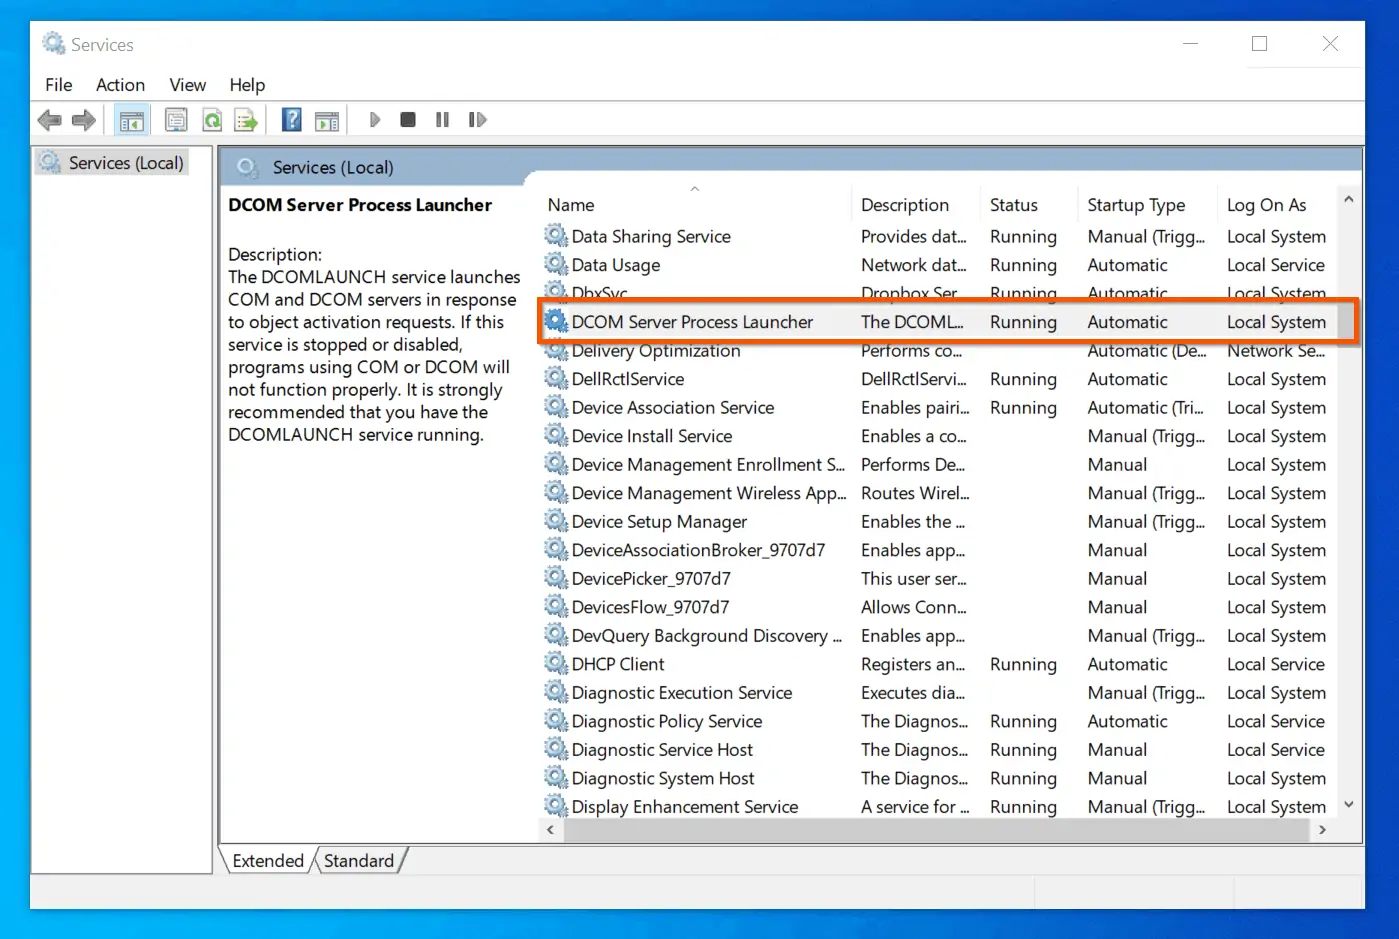
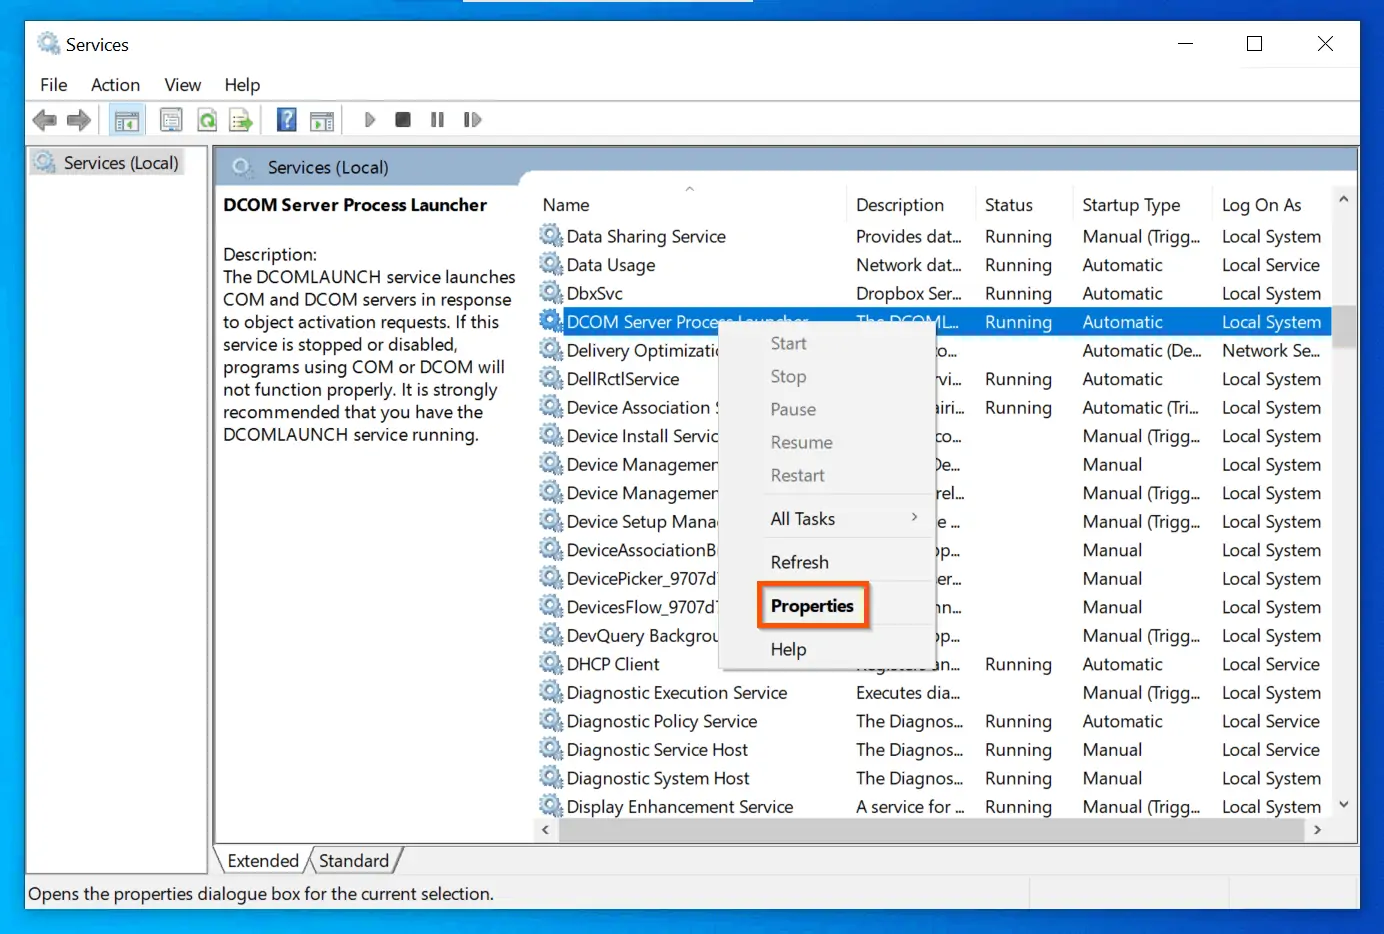
- Search services.msc and open Services App from the search result.
- When Services MMC opens, locate the following services and perform the tasks detailed in the next step.
DCOM Server Process Launcher
RPC Endpoint Mapper
Remote Procedure Call (RPC)
- For each of the services listed above, confirm that the Status is Running, and the Start-up Type is set to Automatic.
If you made a change to any of the services listed above, restart your PC. Then, check if the solution fixed the “audio services not responding” windows 10 error message.
However, if the fix did not work for you, I have the last solution below.
Option 4: Reinstall the Default Audio Driver
Reinstalling audio driver to default may fix “audio services not responding” windows 10 error.
Follow the steps below to apply this fix:
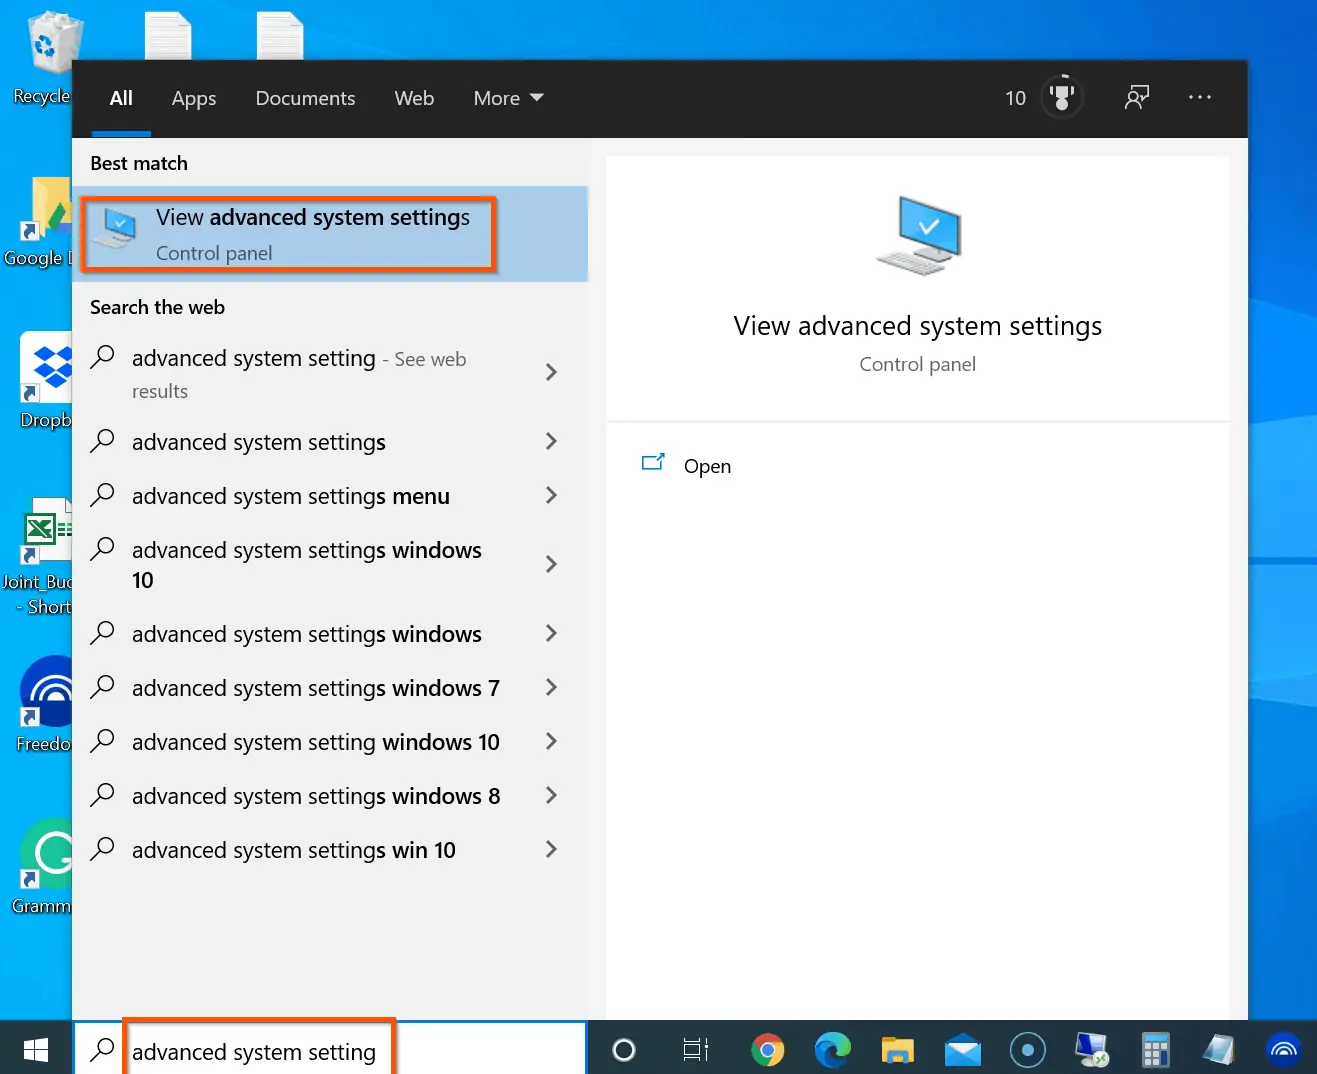
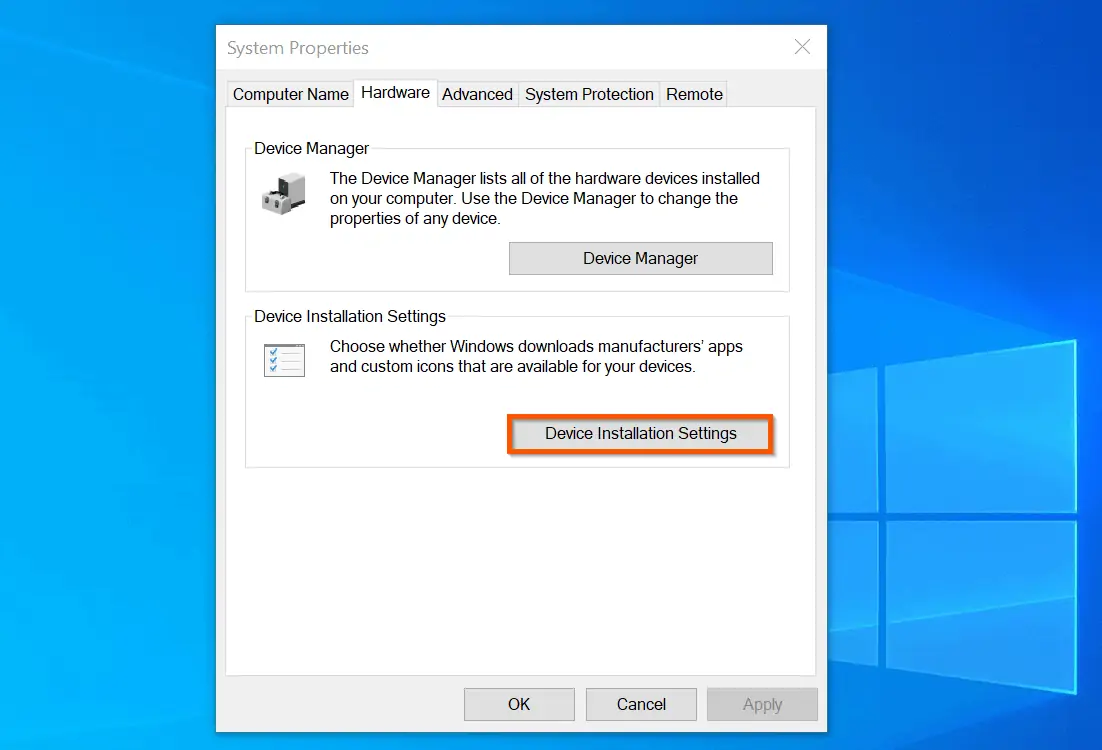
- Search advanced system setting. Then, from the search results, click View Advanced System Setting – System Properties will open.
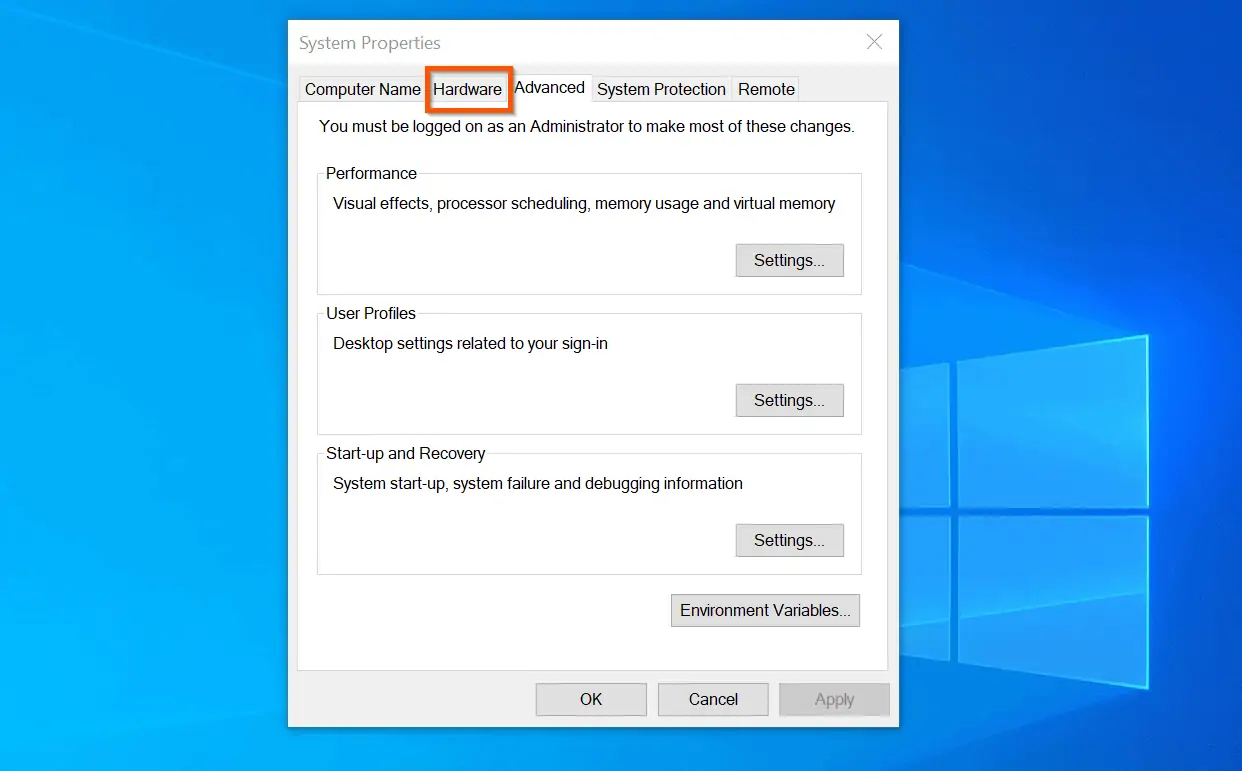
- On System Properties, click the Hardware tab. Then, on the Hardware tab, click Device Installation Settings.
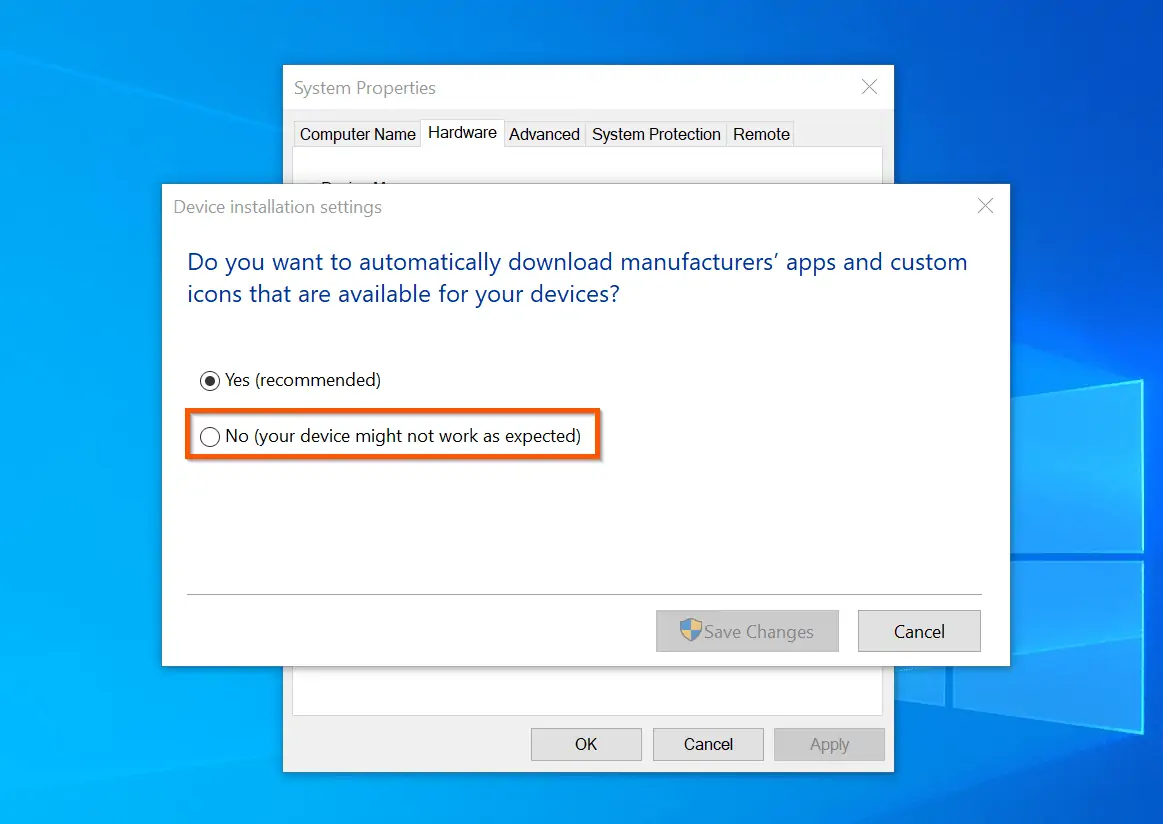
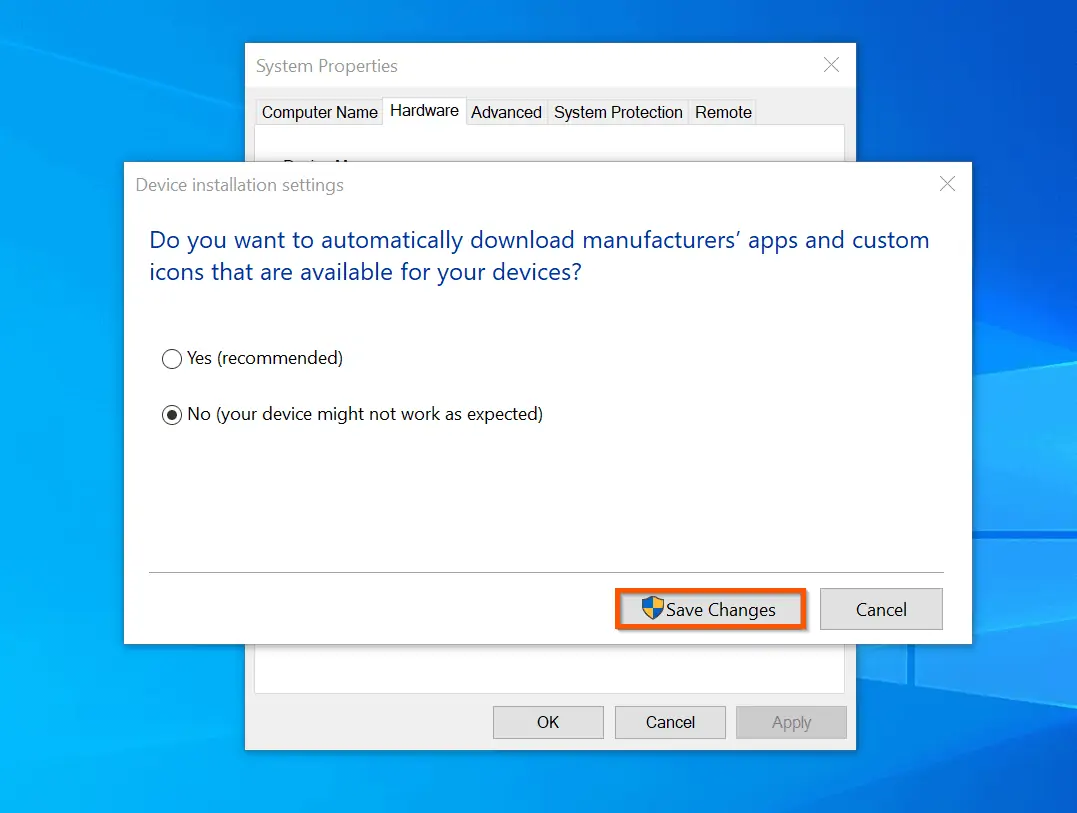
- On Device Installation Settings select No (your device might not work as expected). Then, click Save Changes.
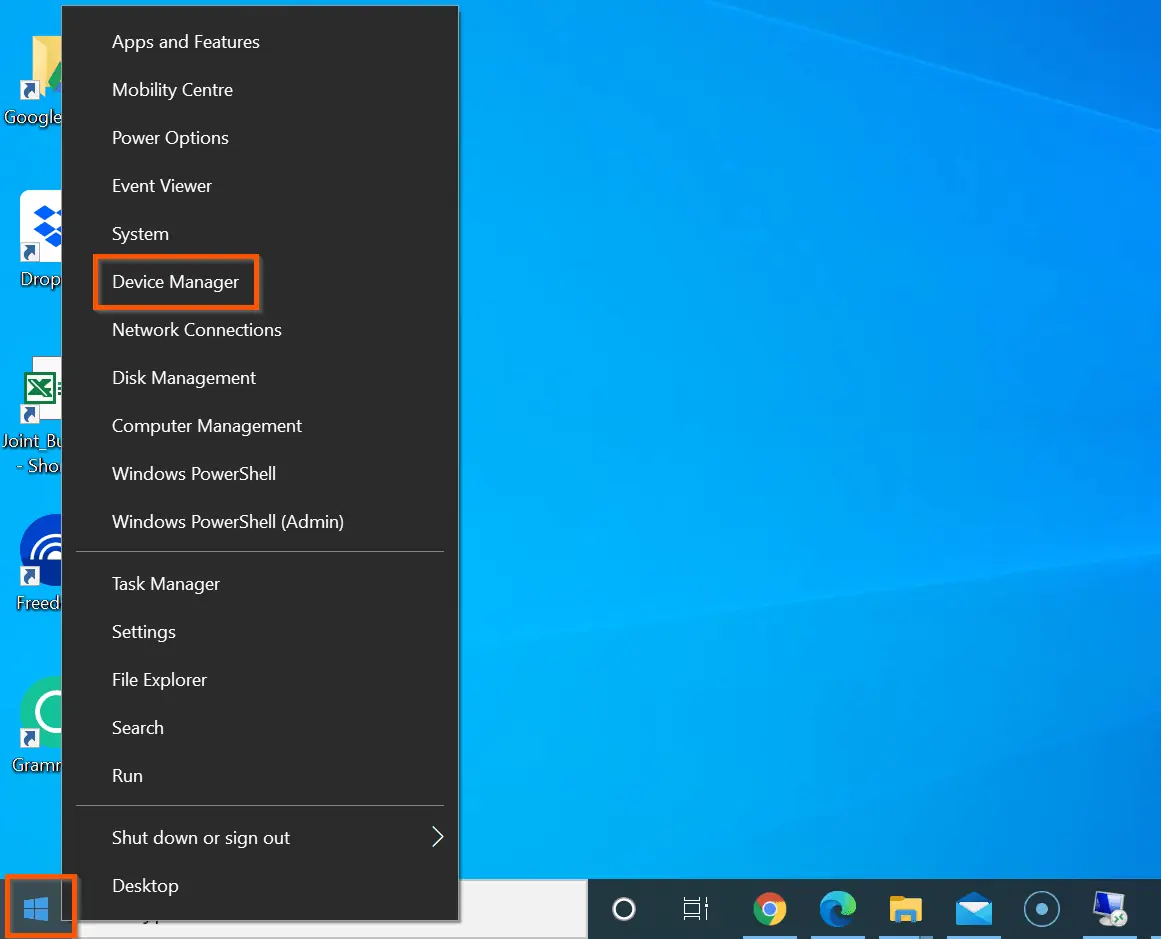
- Once you have changed the Device Installation Settings, return to your desktop. Then, right-click the Start Menu and select Device Manager.
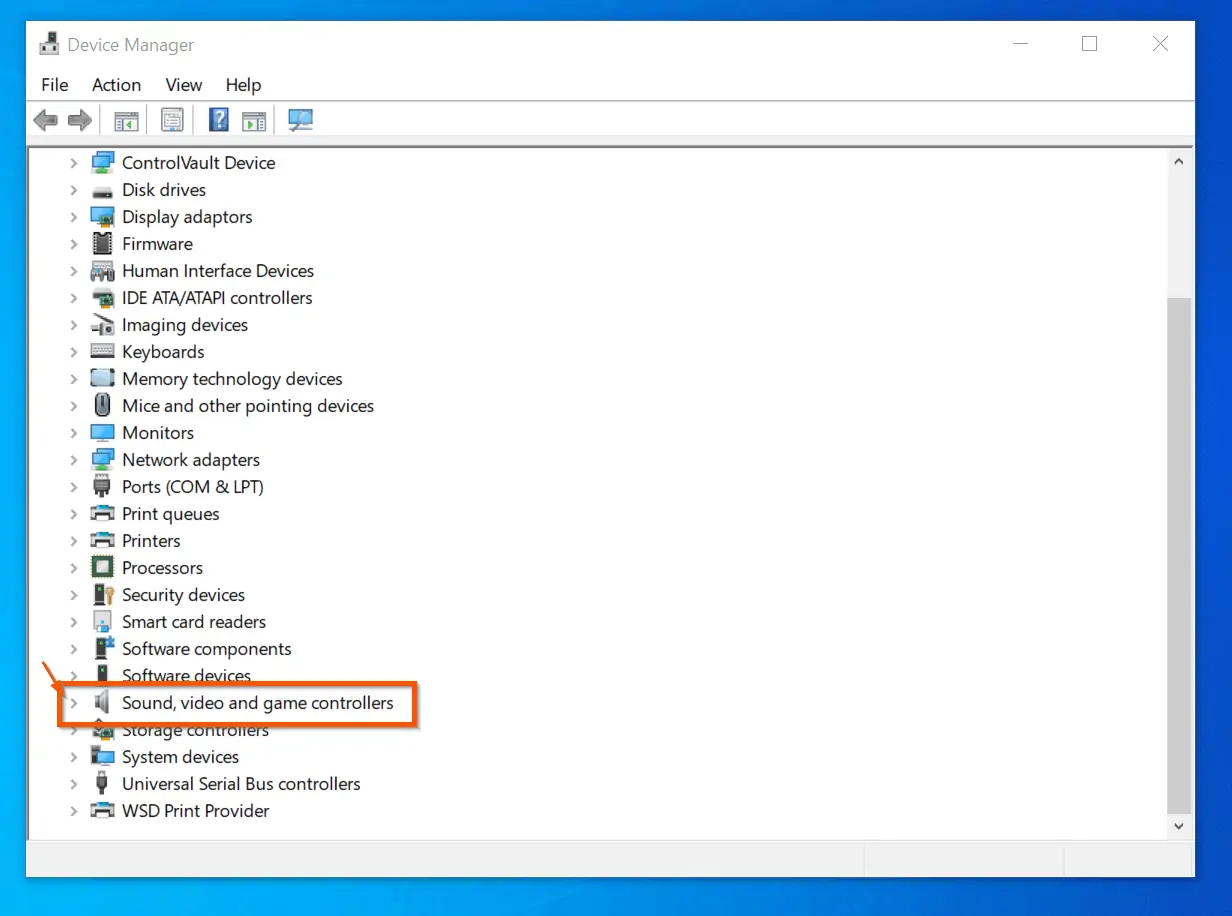
- When Device Manager opens, locate Sound, video and game controllers category and expand it.
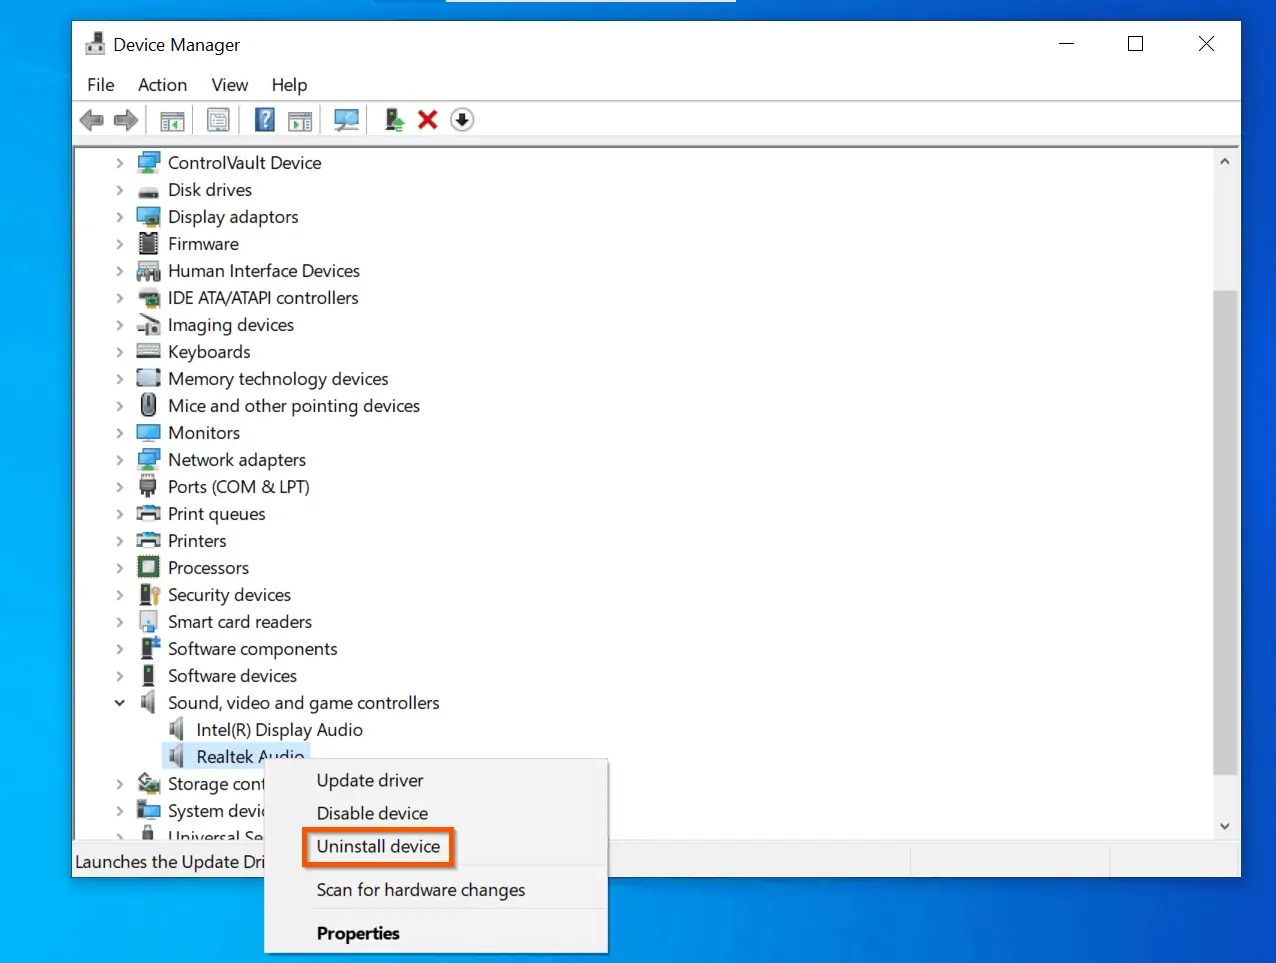
- With the Sound, video and game controllers category expanded, right-click the audio device driver and select Uninstall device.
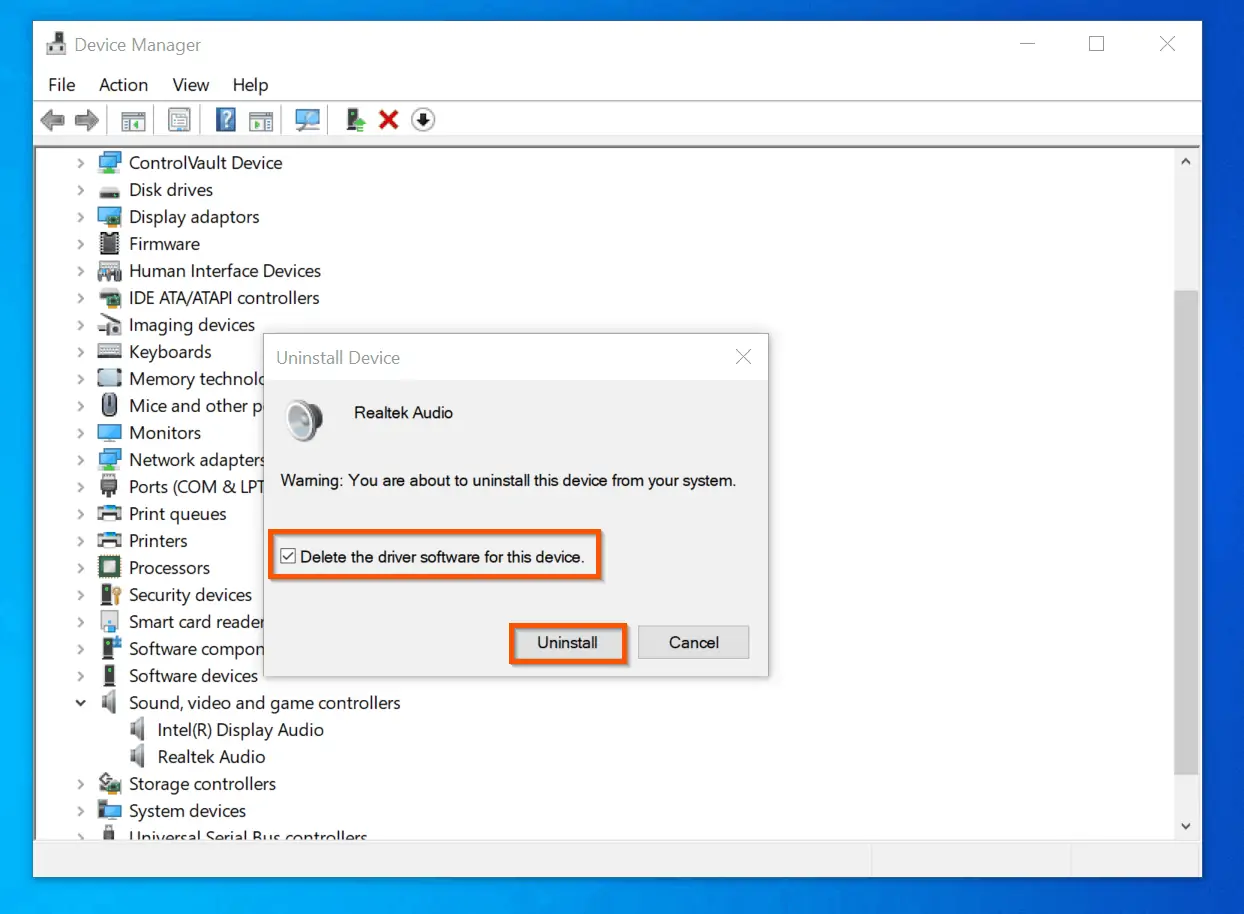
- Finally, check Delete the driver software for this device checkbox and click Uninstall. Wait for the driver to uninstall completely. Then, proceed to the next step.
- Scroll back to the top of Device Manager, right-click the name of your computer. Then, click Scan for hardware changes.
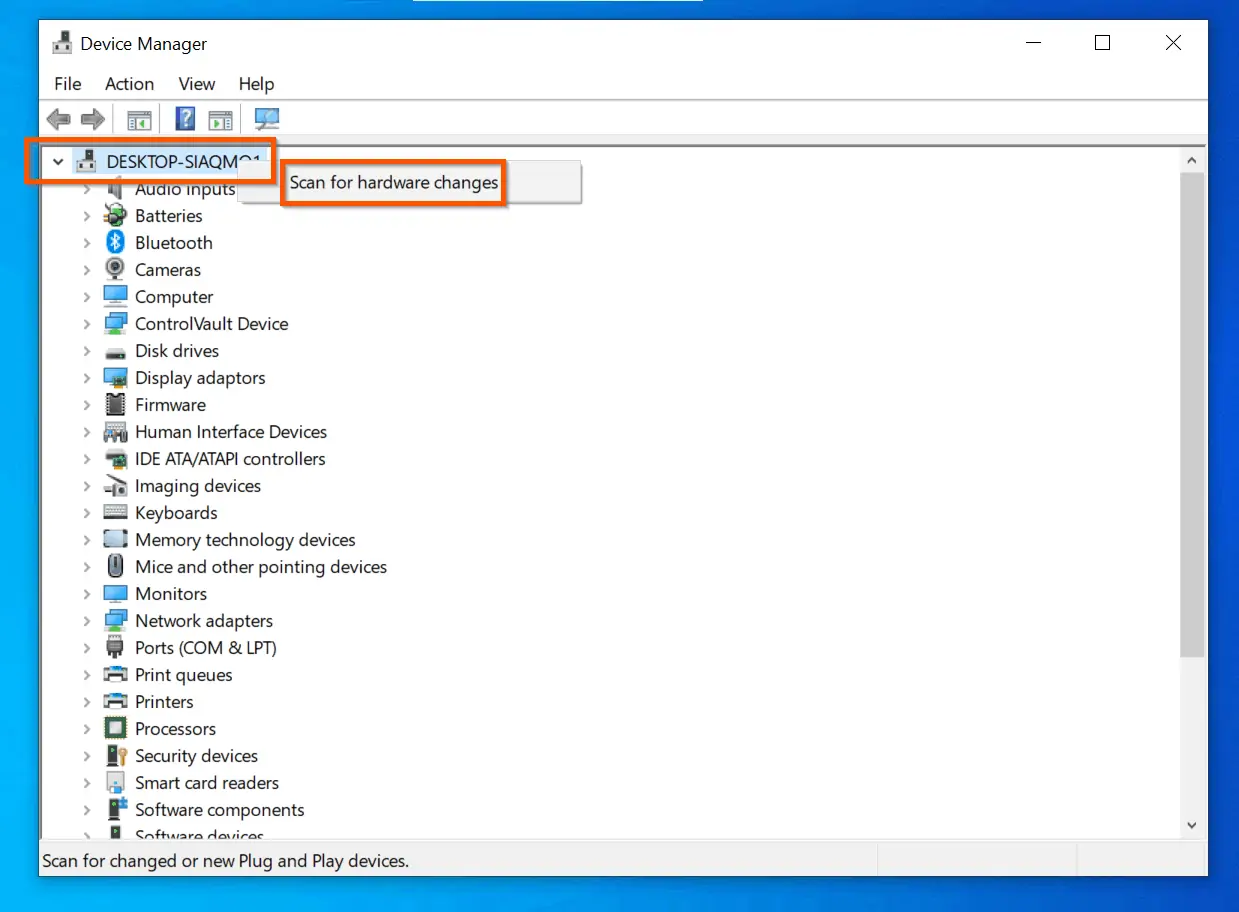
Scanning for hardware changes will detect that the sound driver is not installed – and because we configured Device Installation Settings to No (your device might not work as expected) (steps 3 and 4 above) – Windows will install the default Windows sound driver.
When the installation is completed, restart your PC. Then, check if the error is fixed.
Conclusion
I hope you found this Itechguide helpful. If you did, kindly spare 2 minutes to share your experience by responding to the “Was this page helpful?” question below.
Finally, for more Windows 10 Itechguides, visit our Windows Fix It page.