A PowerShell Try Catch block is used to handle errors in PowerShell scripting. When using PowerShell Try Catch block for scripting you can achieve the following:
- Get your script to continuing running despite a error
- Display and handle error messages better
In this guide, you will learn how to use Powershell Try Catch blocks to handle terminating error messages in PowerShell. Additionally, you will learn how to including the Finally block in a Try Catch block.
The guide starts with the syntax of the Try Catch block.
PowerShell Try Catch Syntax
The syntax of PowerShell Try Catch is…
try {<statement list>}catch [[<error type>][',' <error type>]*] {<statement list>}finally {<statement list>
The Try is the part of the block you want PowerShell to monitor for errors. This is the block with the original scripts that may return a terminating error.
When an error occurs in the Try block, PowerShell saves the error in the $Error automatic variable (more on this later).
On the other hand, the catch statement of the PowerShell Try Catch block handles the errors generated in the try block. You can also specify the types of errors that are handled within the Catch statement block.
The Finally block may be used to free up any resources that are no longer needed by the script.
Common Types Of Exception Errors
You can handle different types of errors in a PowerShell Try Catch block. For example, you can handle specific errors.
Additionally, you can handle generic error messages. However, to handle specific types of errors, you need to know the type of error.
later in this guide, you’ll learn that error messages are saved in the $error automatic variable. Additionally, errors may also be saved in the $_ pipeline variable.
Moreover, errors saved in $error automatic variable are saved in an array. To help explain this, let’s run a command that returns a terminating error message:
Try {
 Get-EventLog -LogName Systerr
 }
 Catch {
 }
Surprisingly, the command did not display any error message. So, what happened to the error message?
It is saved in the $error automatic variable! To display the error from the last command, saved in the $error variable, run the command…
$error
The result of the command displays the error details saved in the $error automatic variable. The error information has a section called FullyQualifiedErrorId.
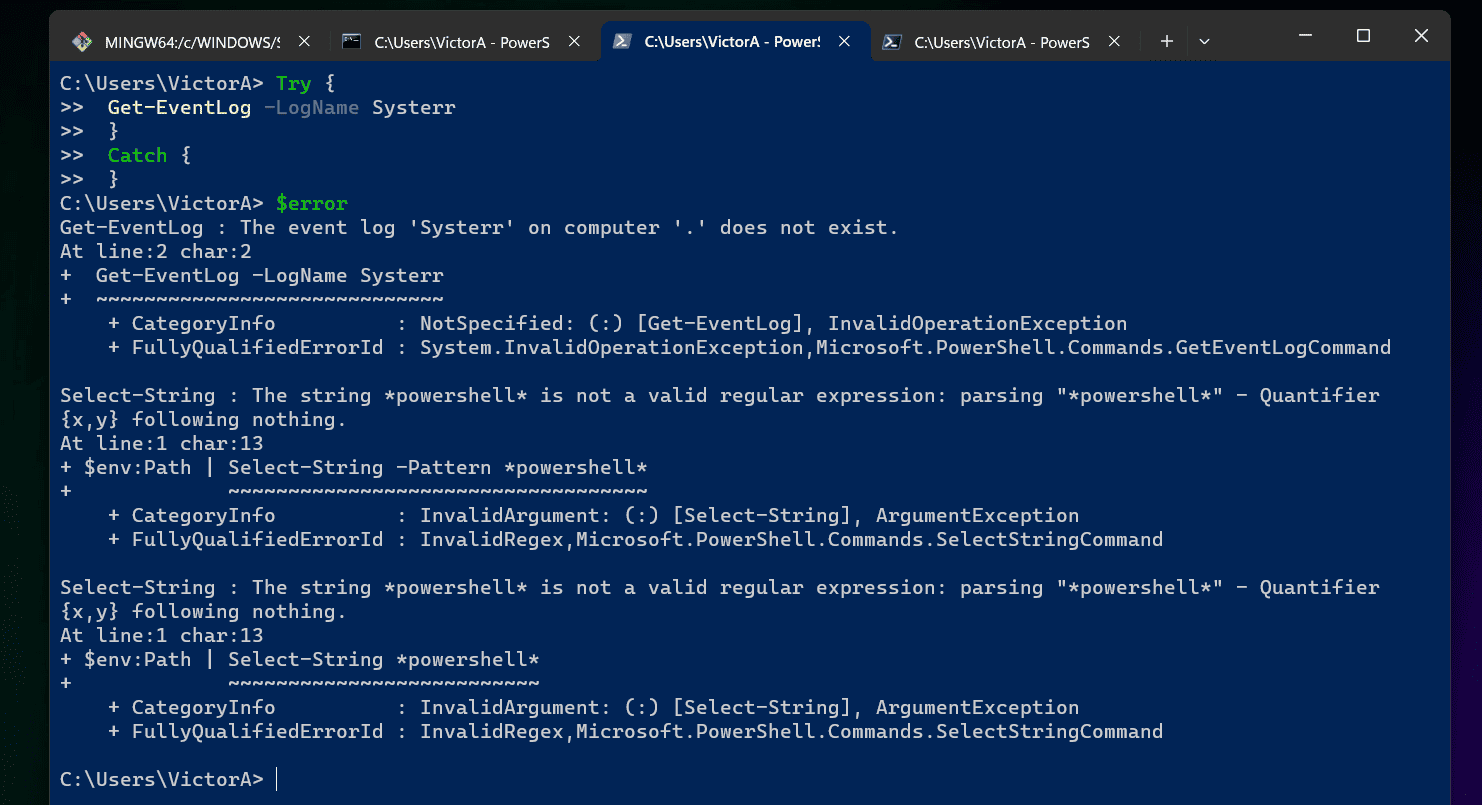
For this specific error, the FullyQualifiedErrorId has two sets of information – System.InvalidOperationException and Microsoft.PowerShell.Commands.GetEventLogCommand.
The information we are interested in is System.InvalidOperationException. This is a type of error you can catch in the PowerShell Try Catch block.
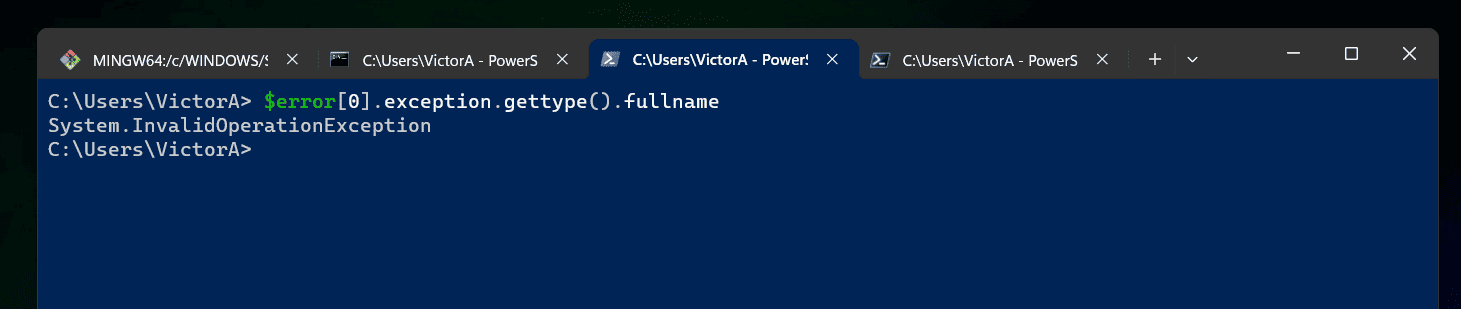
To get the name of this PowerShell exception, run the command below:
$error[0].exception.gettype().fullname
There it is, System.InvalidOperationException!
In the next few sub-sections, I will discuss common PowerShell Try Catch Exception Errors.
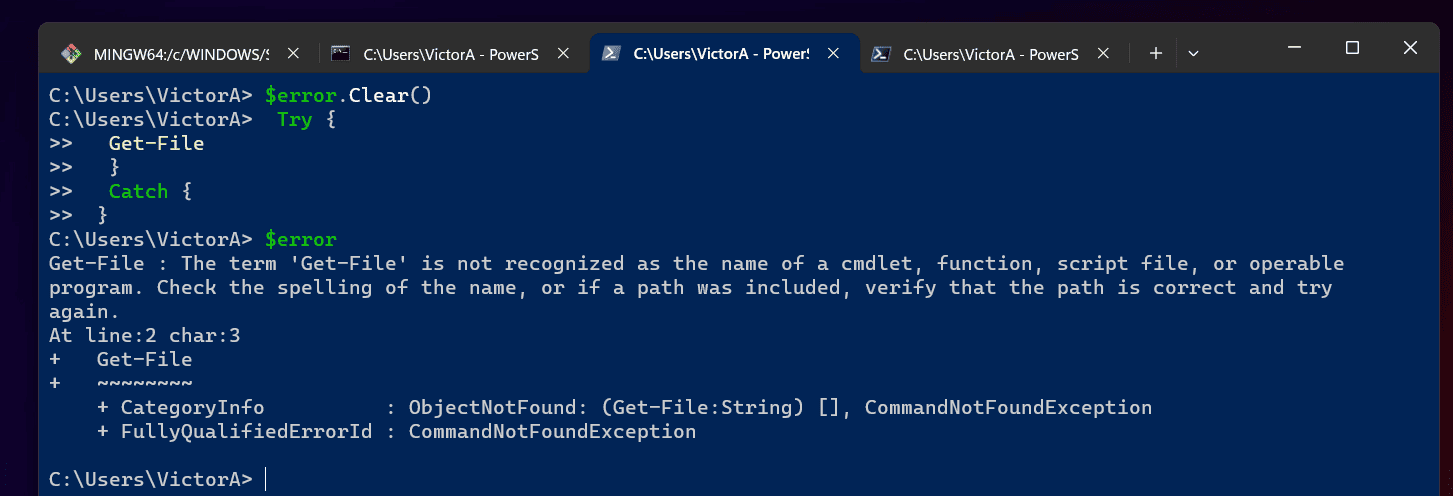
CommandNotFoundException Error
If you run a command that does not exist in PowerShell or Microsoft Command Prompt, you will receive an error message. For example, if you run the Get-File command, you will receive an error message because this command is not a valid PowerShell Cmdlet.
Here is a screenshot of the result of the command in PowerShell…

As you can see from the screenshot, the type of exception (FullyQualifiedErrorId ) is CommandNotFoundException.
Since this is a terminating error, it will stop your script from continuing. To stop this error from terminating your script, wrap the command in a Try Catch block.
If we wrap this error in a PowerShell Try Catch block, PowerShell will suppress the error. Moreover, it will stop it from terminating your script.
However, even though the error is suppressed it is saved in the $error variable. As usual, before you run the command below, first clear the errors saved in the $error variable.
$error.Clear()
 Try {
  Get-File
  }
  Catch {
 }
Then, to display the error, run…
$error
As I mentioned in the main introduction to this section, to display the exception ID for this error, run the command below:
$error[0].exception.gettype().fullname
The full name of the exception is System.Management.Automation.CommandNotFoundException.

ManagementObjectNotFoundException Error
When you run a command in a remote PS session with the wrong information, PowerShell returns a ManagementObjectNotFoundException error.
A typical scenario is when you run the Get-LocalUser command but supply the wrong User.
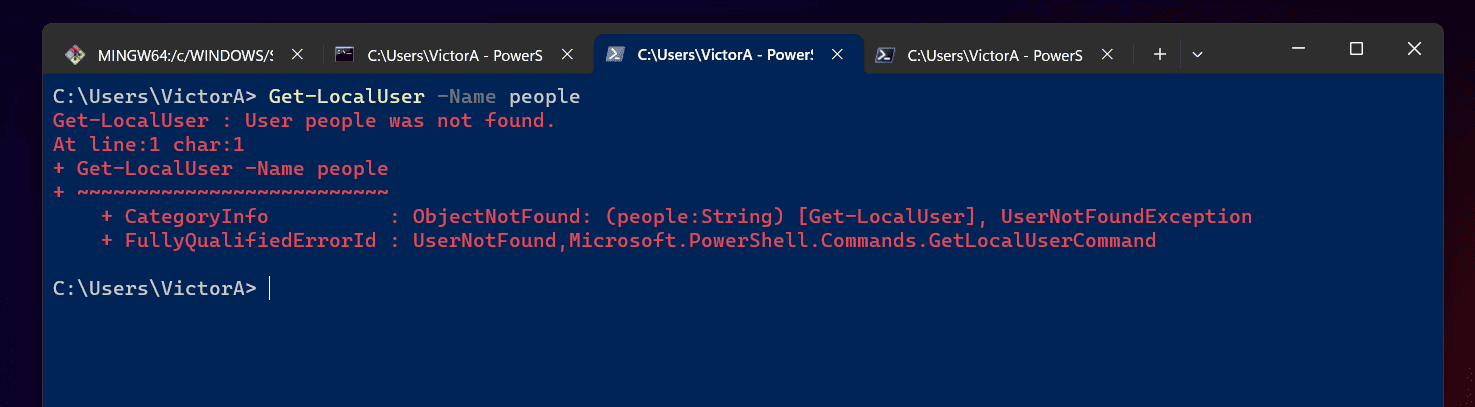
To catch this error with PowerShell Try Catch, use a command similar to the one below:
$error.Clear(); Try {Get-User -Identity paul -ErrorAction Stop} Catch {}
Finally, to get the name of the exception, use the command below:
$error[0].exception.gettype().fullname
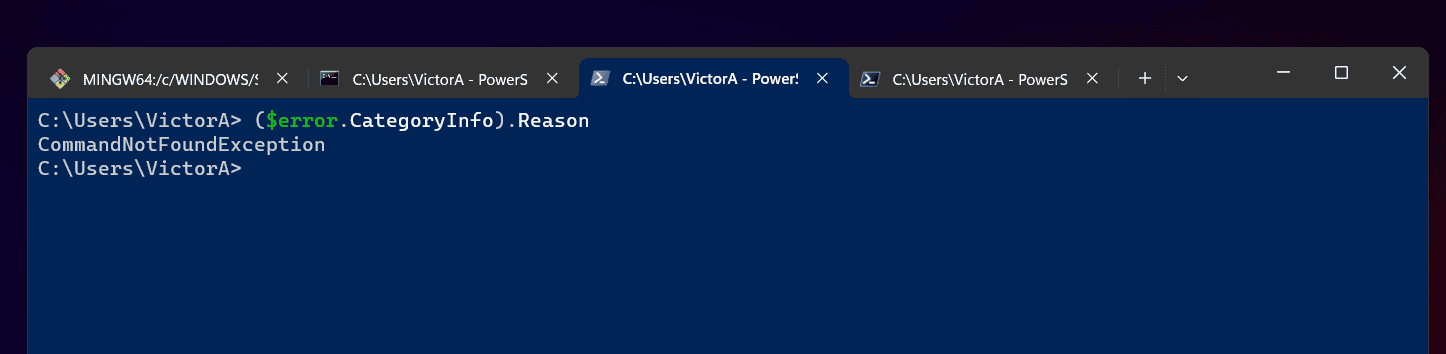
The command returns the type of exception as System.Management.Automation.RemoteException. So, what is ManagementObjectNotFoundException?
ManagementObjectNotFoundException is the reason for the exception as confirmed by the command below:
($error.CategoryInfo).Reason
UnauthorizedAccessException Error
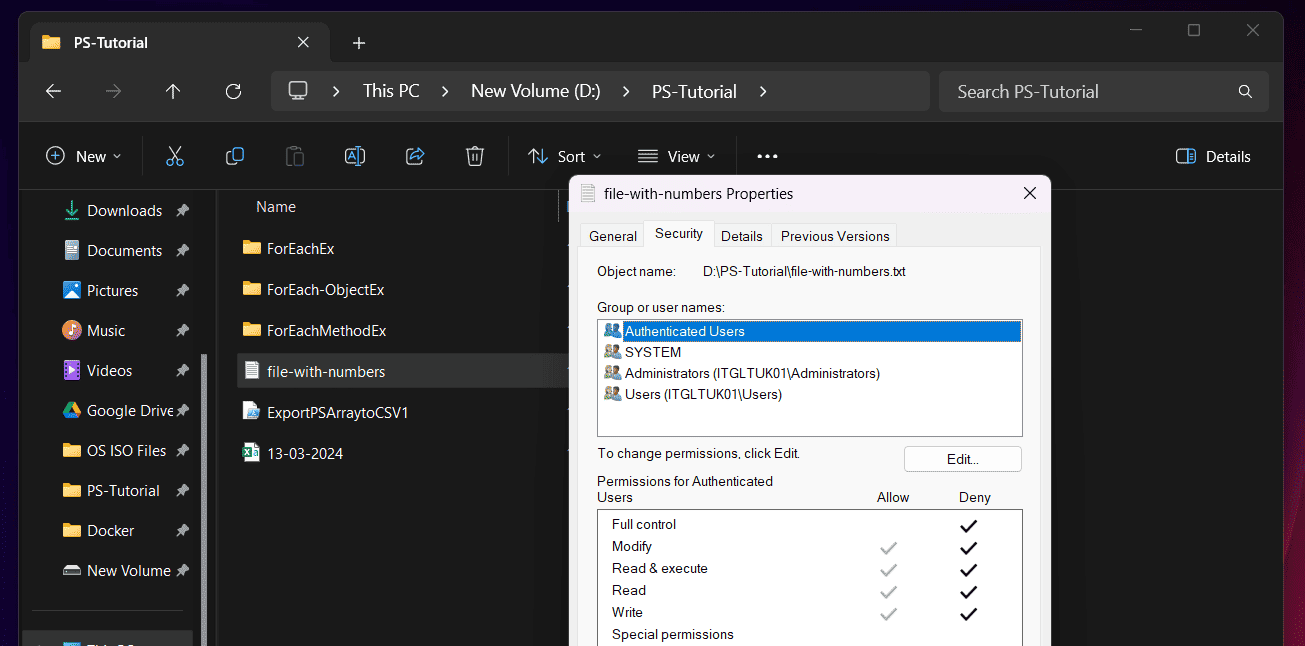
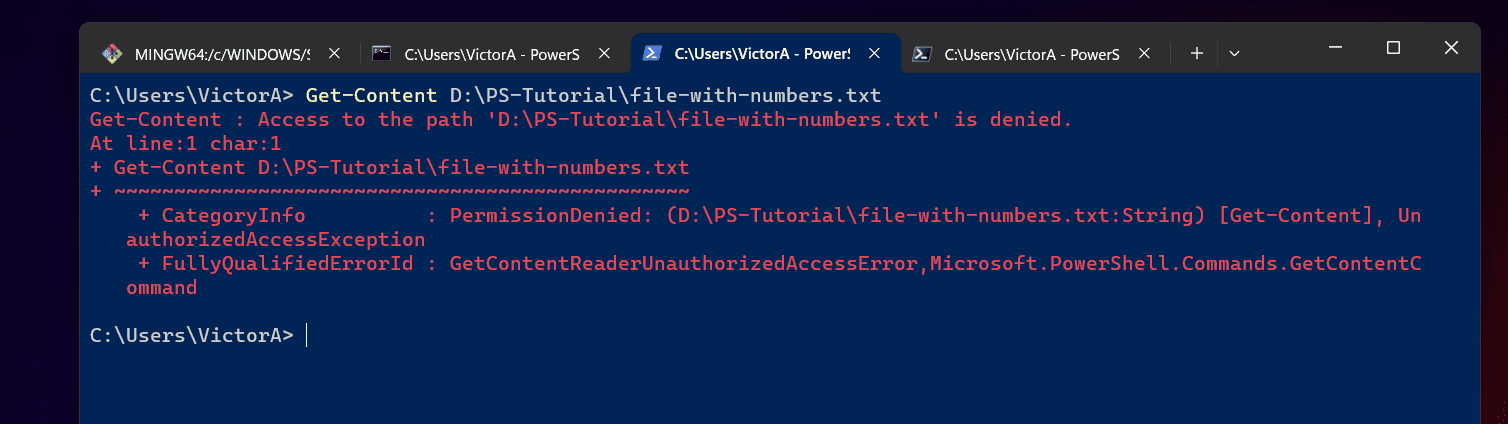
Another common PowerShell exception error is UnauthorizedAccessException. This type of error is thrown when you try to access an item you do not have at least read permission.
To illustrate this example, I denied authenticated users access to the “file-with-numbers” file.
Now, if I try to access the file with the Get-Content command, I receive an “access denied” message.
Get-Content D:\PS-Tutorial\folder-names.txt
To stop this error displaying, run the command within the PowerShell Try Catch block as shown below…
$error.Clear(); Try {Get-Content D:\PS-Tutorial\folder-names.txt} Catch {}
Unfortunately, the command above does not stop the error from displaying. The reason is that it is not a terminating error.
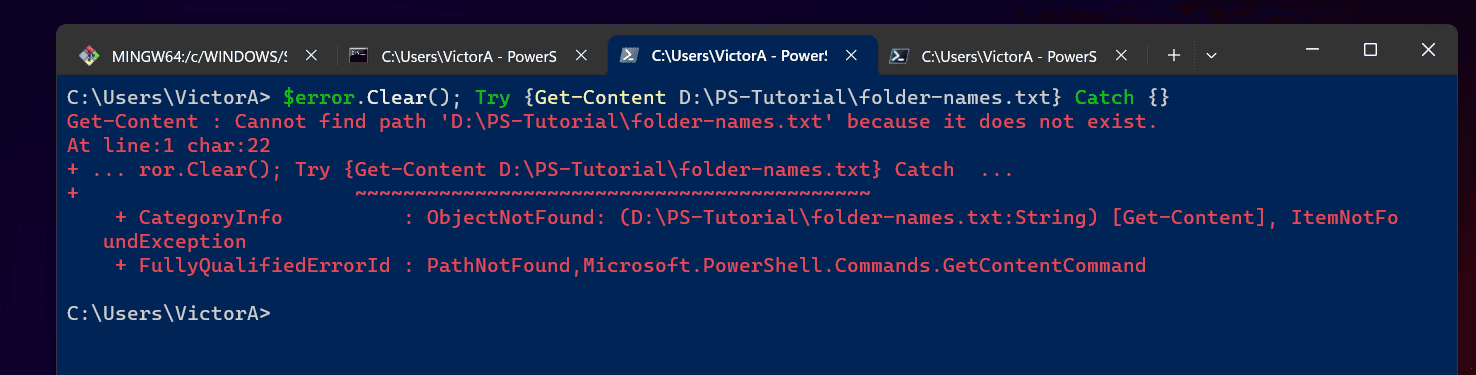
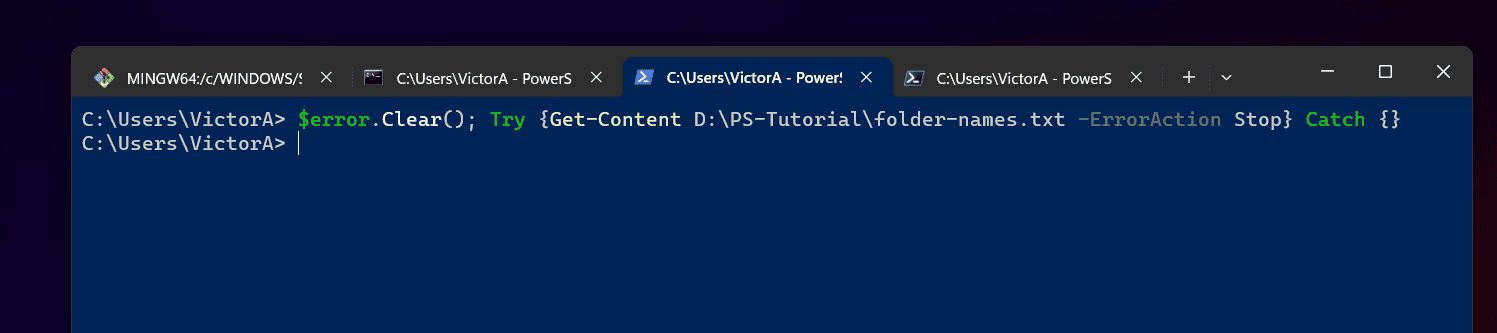
To stop the error displaying, include the ErrorAction parameter and specify Stop.
$error.Clear(); Try {Get-Content D:\PS-Tutorial\folder-names.txt -ErrorAction Stop} Catch {}
Now, the command suppresses the error.
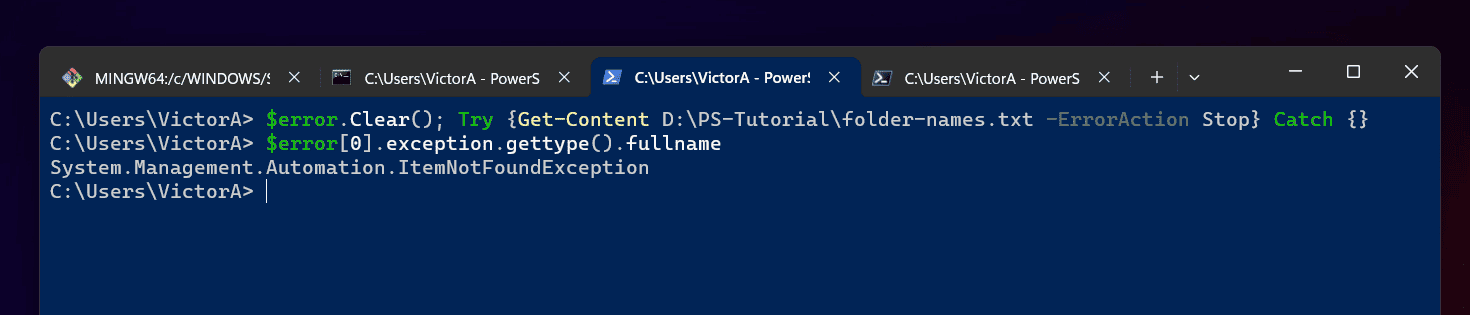
To display the type of exception, run the command below…
$error[0].exception.gettype().fullname
The type of exception is System.UnauthorizedAccessException.
How to Capture Specific Exceptions with Try Catch
The last section discussed common PowerShell exceptions and how to find the type of exception. This section will cover how to use that information to capture specific types of error messages.
In the syntax section of this guide, I said that the general syntax of a PowerShell Try Catch Finally is…
try {<statement list>}catch [[<error type>][',' <error type>]*] {<statement list>}finally {<statement list>
In the catch block of the syntax, you can see the [error type]. This is where you specify the type of error you want to catch in this block.
For example, to catch UnauthorizedAccessException errors, use the statements below…
Try {
Get-Content D:\PS-Tutorial\folder-names.txt -ErrorAction Stop
}
Catch [System.UnauthorizedAccessException]  {
}
To run the command in PowerShell, specify the statements in a single line. The first part of the statement – $error.Clear() – clears any errors saved in the $error variable.
$error.Clear(); Try {Get-Content D:\PS-Tutorial\folder-names.txt -ErrorAction Stop} Catch [System.UnauthorizedAccessException] {}
How to Add Multiple Catch Blocks in Try Catch Statement
In the introduction of this section, I showed you how to catch a specific type of exception in the Catch block. You can specify multiple.
Here is an example…
try {
Get-Content D:\PS-Tutorial\folder-names.txt -ErrorAction Stop
Get-EventLog -LogName Systerr
}
 Catch [System.UnauthorizedAccessException], [System.InvalidOperationException] {

  }
 Catch  {

 }
In this example, the first catch block handles the specified types of exceptions. Moreover, the second catch block handles generic errors.
How to Extract Error Exception with Try Catch
The last subsection covered how to specify multiple catch blocks to handle different types of exceptions. In this subsection, you will learn how to extract the error details in an exception.
To illustrate this, I will use an example I used earlier. Run this PowerShell statement in PowerShell.
$error.Clear(); Try {Get-Content D:\PS-Tutorial\file-with-numbers.txt -ErrorAction Stop } Catch {}
Now run the $error alone…
$error
Although multiple pieces of information are saved in the $error variable, the actual error message is highlighted in the screenshot below.

If you want to log this error in a text file, you only need to log the actual error details. To extract this error, use the command below:
$error.Exception
The command extracts the actual error message “Access to the path ‘D:\PS-Tutorial\folder-names.txt’ is denied.”

You can write this error message into a log file by including a Out-File command in the Catch block.
$error.Clear(); Try {Get-Content D:\PS-Tutorial\folder-names.txt -ErrorAction Stop } Catch {$error.Exception | Out-File D:\PS-Tutorial\errorlogs.txt -Append}
To make it easy to understand the last command, I will re-write it in the script format below…
$error.Clear()
Try {
Get-Content D:\PS-Tutorial\folder-names.txt -ErrorAction Stop
}
Catch {
$error.Exception | Out-File D:\PS-Tutorial\errorlogs.txt -Append
}
How to Include a Finally Block to a Try Catch Statement
You can include a Finally block to PowerShell Try Catch Statement. The syntax is
try {<statement list>}catch [[<error type>][',' <error type>]*] {<statement list>}finally {<statement list>
The finally block may be used to free up any resources that are no longer needed by the script.
In the last example, I had the statement that writes the error log to a text file in the Catch block. However, the best place to have that statement is in a Finally block.
See the modified script below…
$error.Clear()
Try {
Get-Content D:\PS-Tutorial\folder-names.txt -ErrorAction Stop
}
Catch {
}
Finally {
$error.Exception | Out-File D:\PS-Tutorial\errorlogs.txt -Append
}
Additional Useful Information About Try Catch
In this section, I will share some simple but useful information about PowerShell Try Catch.
How to Clear PowerShell Try Catch $Error Automatic Variable
The $error automatic variable has a Clear Method. You can use this method to clear all errors saved in the $error automatic variable.
To clear all errors saved in the $error automatic variable for the current PowerShell session, run the command below.
$error.Clear()
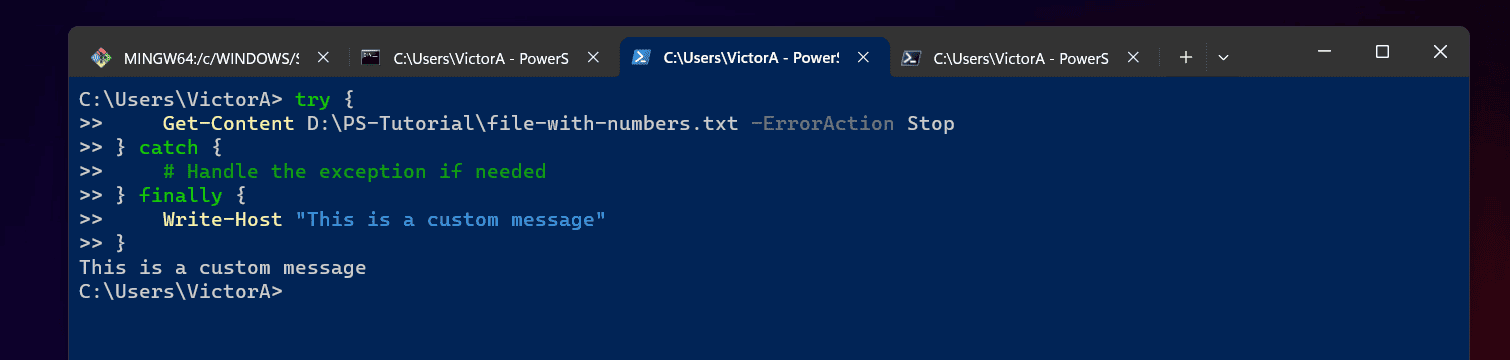
How to Display a Custom Error Message in a Try Catch Block
To display a custom error message in a PowerShell Try Catch Block, use the Write-Host command. Here is an example…
try {
    Get-Content D:\PS-Tutorial\file-with-numbers.txt -ErrorAction Stop
} catch {
    # Handle the exception if needed
} finally {
    Write-Host "This is a custom message"
}
Here is the result of this script in PowerShell.
How to Get Error CategoryInfo Information in Try Catch
The $error automatic variable has a property called CategoryInfo. To see this property and other properties and Methods, run the command below…
$error | Get-Member
One of the properties returned by the last command is called CategoryInfo.
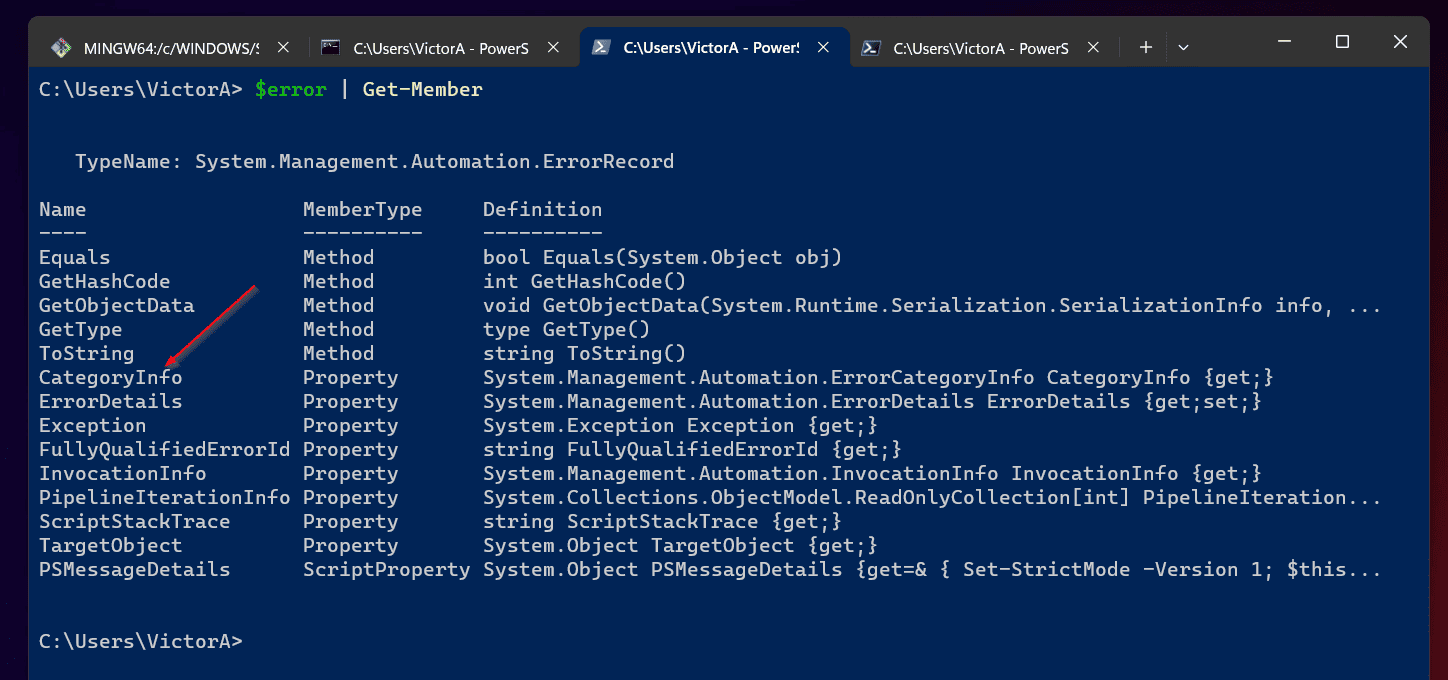
To access this information, run the command below.
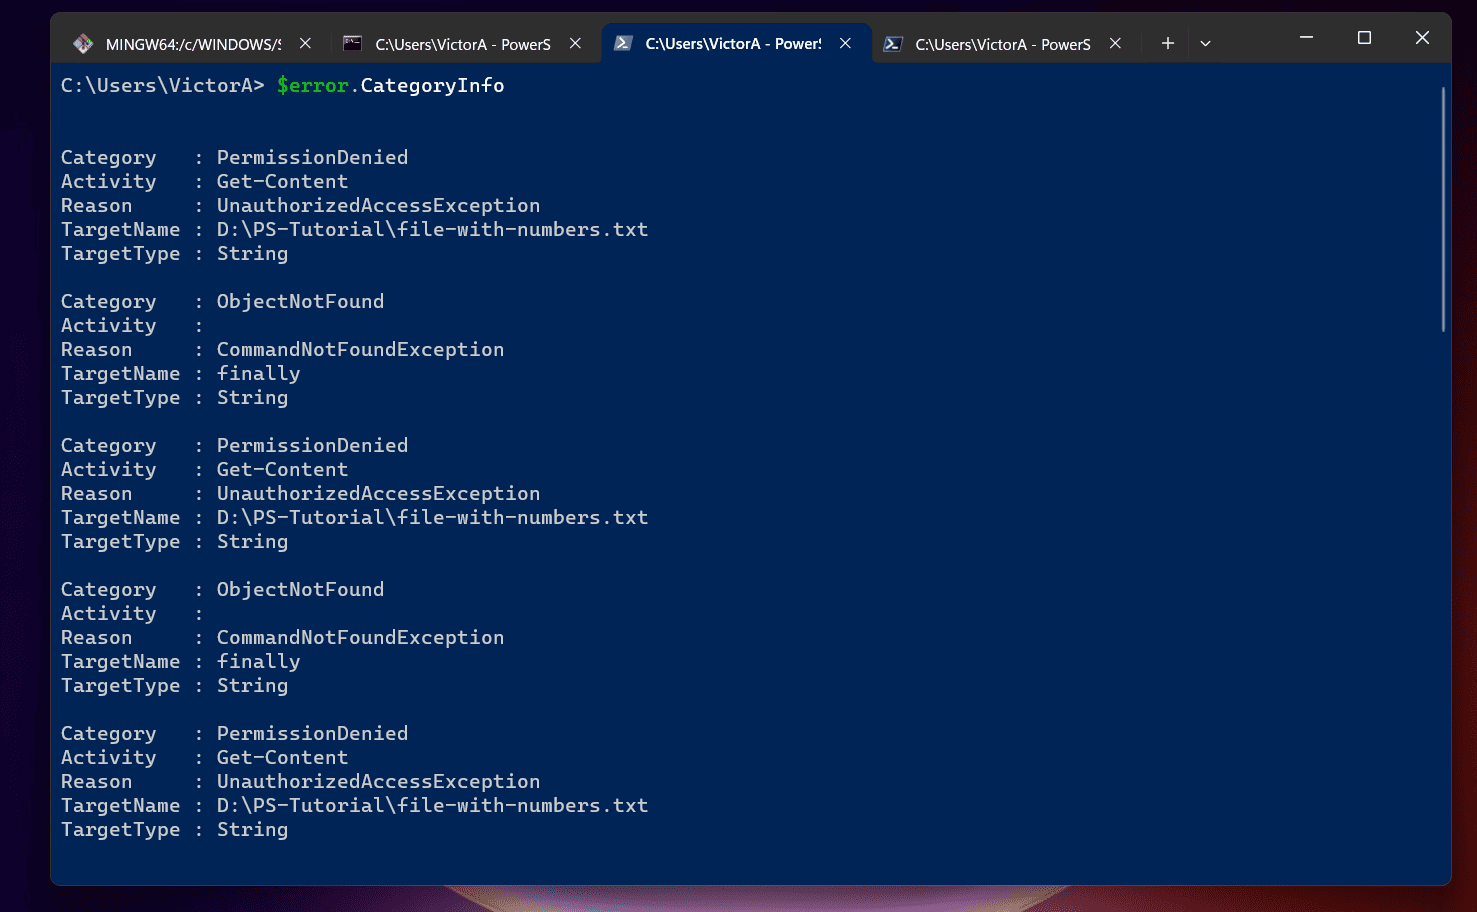
$error.CategoryInfo
This command returns multiple sub-properties.
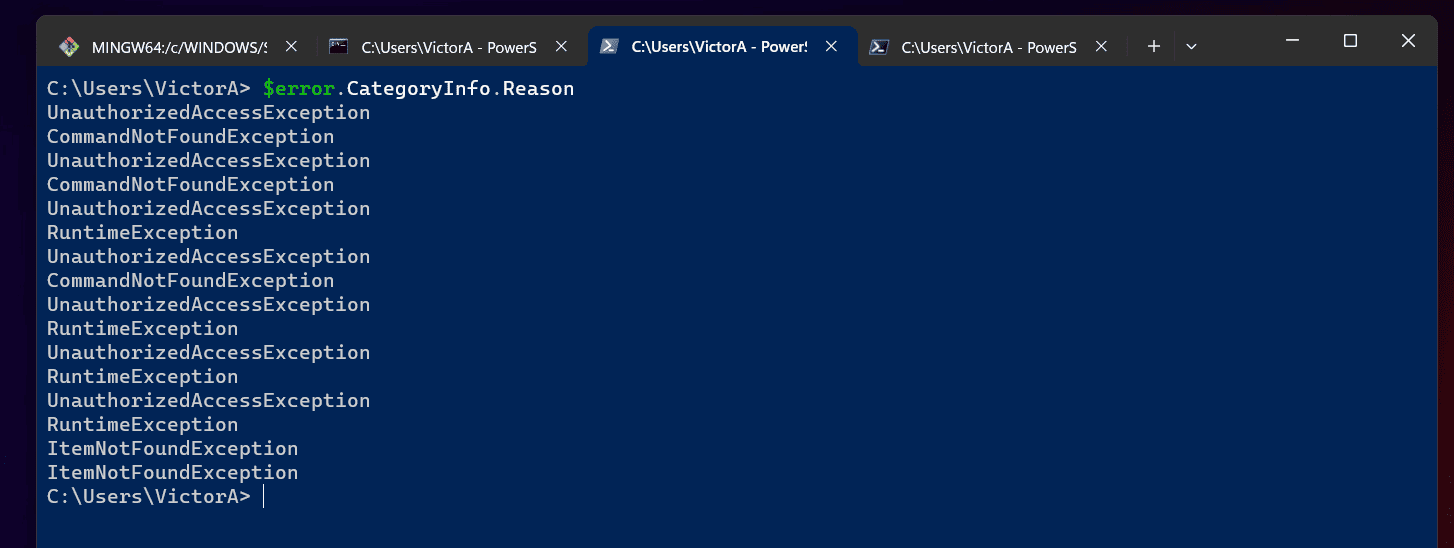
Each of these sub-properties can be accessed by adding the sub-properties name after a period. For example, to display the Reason sub-properties, run the command below.
$error.CategoryInfo.Reason
How to Use Write-Host to Display Error Messages in Try Catch
Like the CategoryInfo property in the last sub-section, the $error automatic variable also has a property called Exception. To display the exception in an error, run the command below:
$error.Exception
Unfortunately, if you try to display this information with the Write-Host command, it doesn’t work as expected.
Write-Host $error.Exception
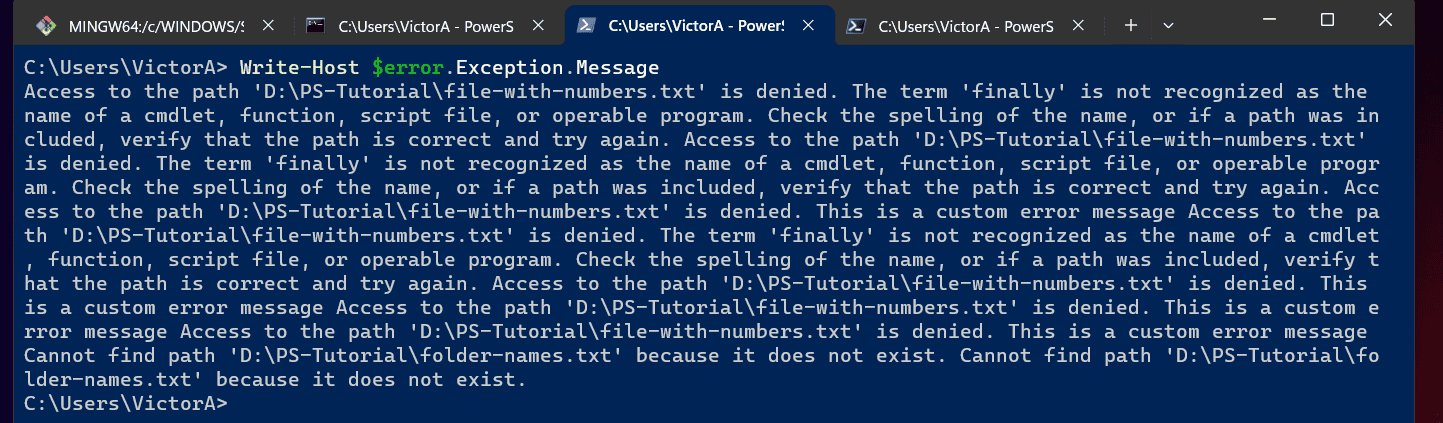
Here is the result of this command in PowerShell…
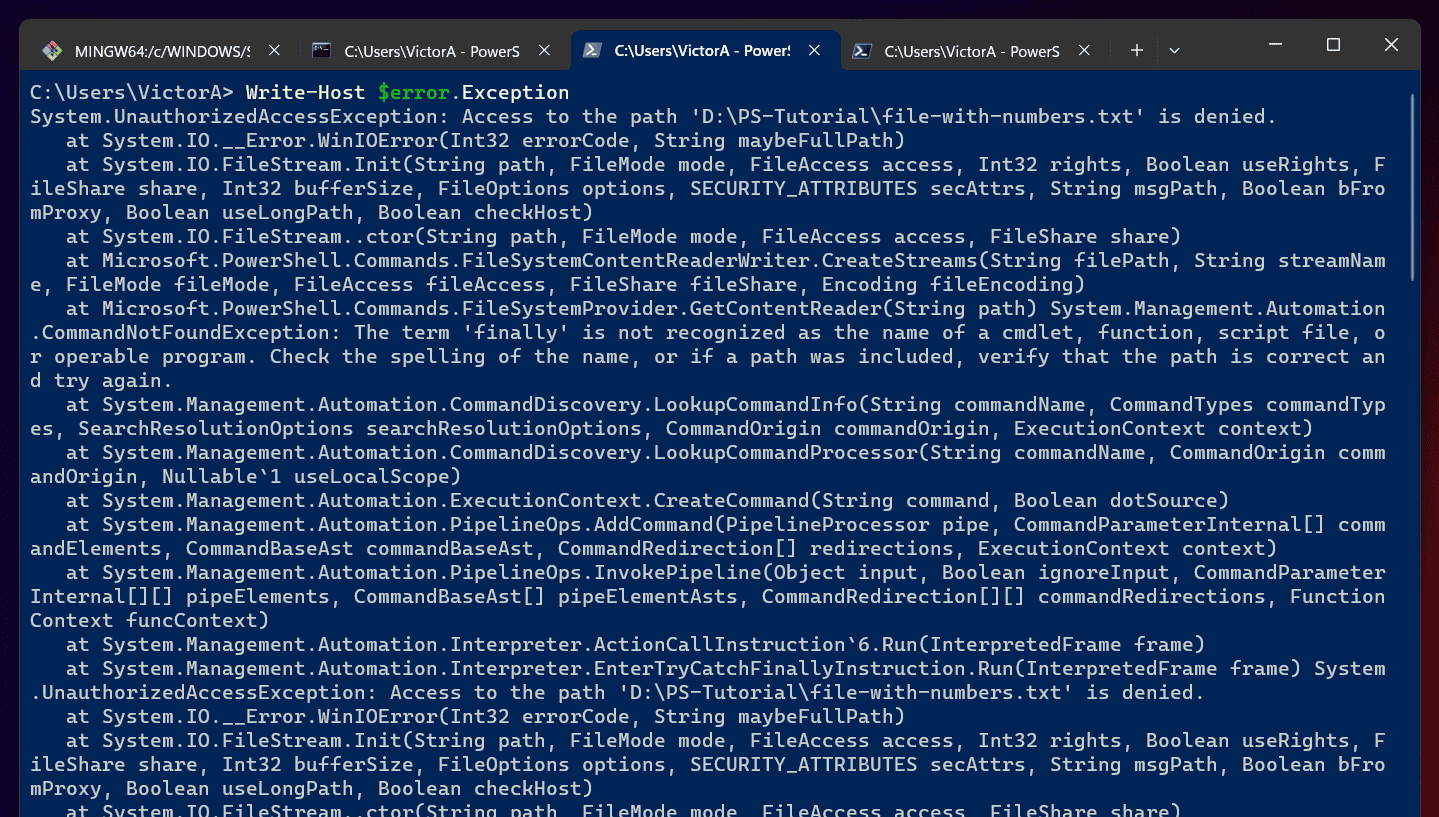
As you can see, the command displays a bunch of other information. The good news is that $error.Exception has another property called Message.
You can call this sub-property by appending it to $error.Exception, like this…
$error.Exception.Message
Additionally, you can use Write-Host command to display this error information…
Write-Host $error.Exception.Message
The last command now displays the actual error message…
How to Create a Hashtable in a Try Catch Block
There are two common ways you can create a PowerShell hashtable in a Try Catch block.
- You can create a hashtable with multiple key/value pairs within the Try block
- Alternatively, you can create a single key/value hashtable with the Key outside the Try Catch block and the Value within the Try Catch block.
Here is an example of the first method…
Try {
    $hashtable = @{
      Name = "Document"
      PSProvider = "FileSystem"
      Root = "C:\Users\victo\Documents"
 }#end of hastable
}
Catch {

}#end of Try Catch block
As you can see the hasttable is within the Try Catch block…
On the other hand, you can create a single hashtable Key with the Value defined within a Try Catch block. Here is an example…
$hashtable = @{
"File Name" = Try {
  (Get-ChildItem -Path D:\PS-Tutorial\file-with-numbers.txt).Name
  } Catch {

}#end of Try Catch block
}#end of hastable
To confirm that the last script produces a PowerShell hashtable, after running the script, I called the values saved in the $hashtable variable.
As you can see from the result of the last command, it has a Name/Value pair!

PowerShell Try Catch Examples
In this final section, I will cover multiple examples of the application of PowerShell Try Catch.
How to Use PowerShell Try Catch with Get-Childitem
The Get-Childitem command can return multiple errors. To illustrate the two common errors, I will use the two commands below:
Get-Childitem D:\PS-Tutorial \file-with-numbers.txt
Get-Childitem D:\PS-Tutorial\file-with-numbers.txt
The correct path to the text file used in the last command is “D:\PS-Tutorial\filelist.txt”.
However, in the first command, I included a space after “D:\PS-Tutorial”. This resulted in an error (We’ll determine the error details shortly).
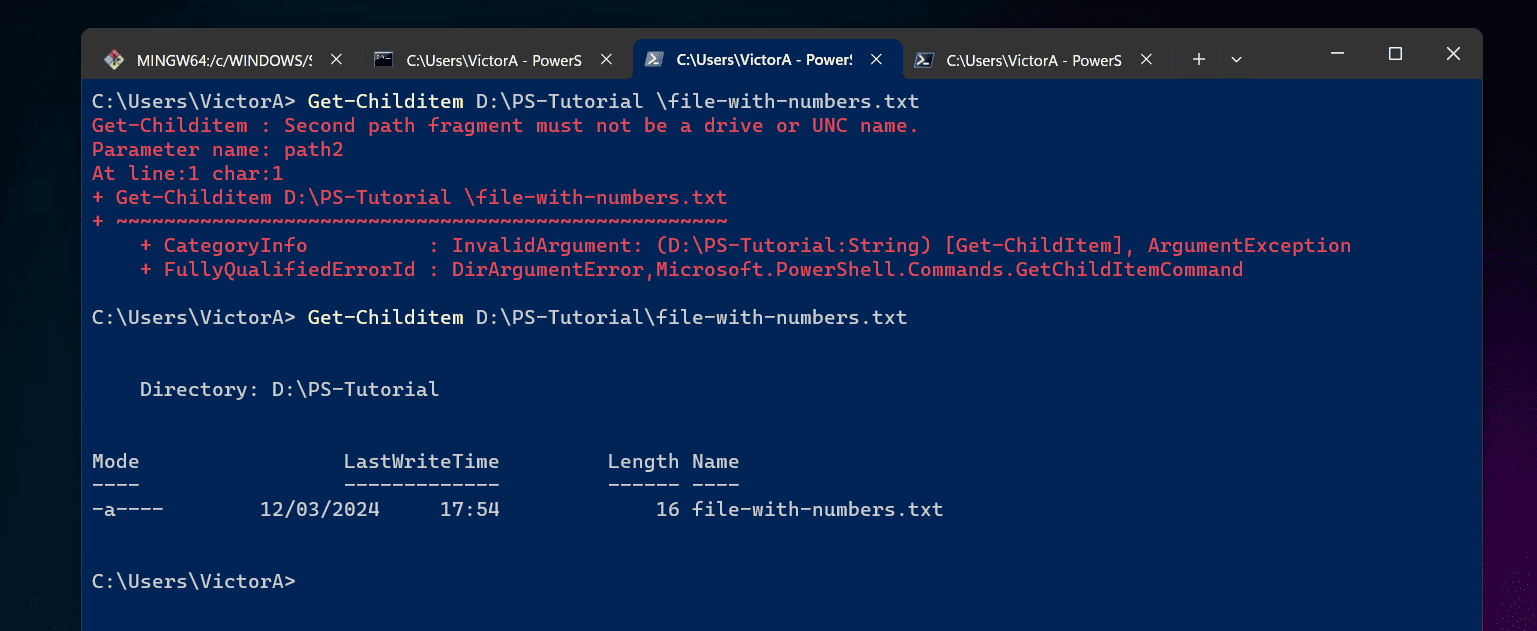
Also, in the second command, I specified the correct path but used the wrong file name. This resulted in an error.
Get-Childitem D:\PS-Tutorial\filelis.txt
Moving on, to get more information about these errors, I will run the commands in a PowerShell Try Catch block.
Try {
 Get-Childitem D:\PS-Tutorial \filelist.txt -ErrorAction SilentlyContinue
 Get-Childitem D:\PS-Tutorial\filelis.txt -ErrorAction SilentlyContinue
 }
 Catch {
 }
Our first task is to determine the types of error returned by the commands. To get this information, run the commands below…
$error[0].exception.gettype().fullname
$error[1].exception.gettype().fullname
Back to getting more information about the errors thrown by the Get-Childitem command, based on the error types, we can modify our Try Catch block to capture these 2 types of errors…
Try {
 Get-Childitem D:\PS-Tutorial \filelist.txt -ErrorAction SilentlyContinue
 Get-Childitem D:\PS-Tutorial\filelis.txt -ErrorAction SilentlyContinue
 }
 Catch [System.ArgumentException], [System.Management.Automation.ItemNotFoundException] {

 }
Our second task is to display the actual error messages. This command will do the job:
$error.Exception
How to Use PowerShell Try Catch to Export Get-WMIObject Errors with Export-csv
In this sub-section, I will export errors generated when I run Get-WMIObject on a remote computer into a CSV file with the Export-csv command.
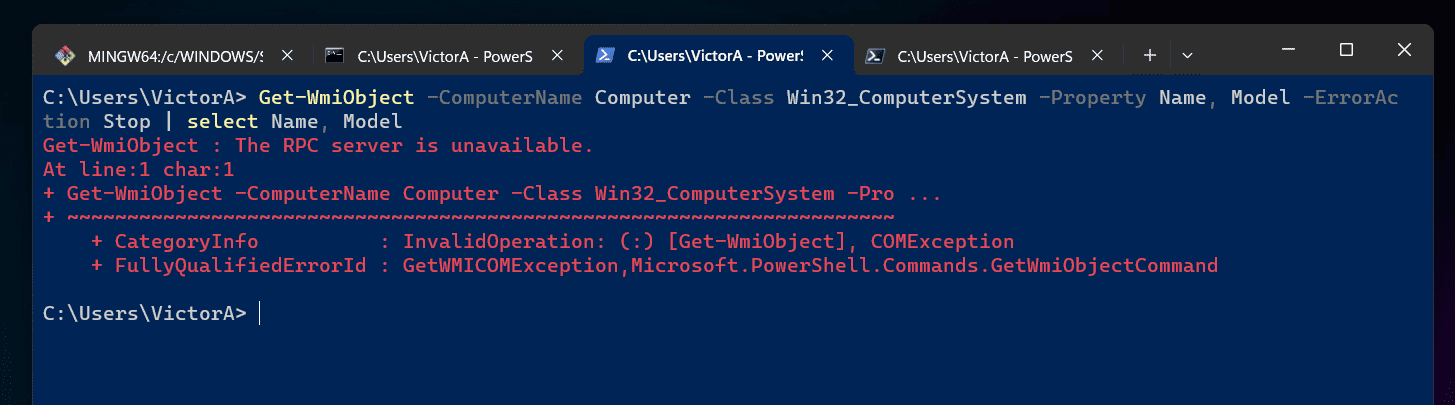
First, let’s see the error details generated when you try connecting to an offline remote computer with Get-WMIObject. To illustrate this run the command below…
Get-WmiObject -ComputerName Computer -Class Win32_ComputerSystem -Property Name, Model -ErrorAction Stop | select Name, Model
The command generated an error message because Computer is not a valid PC name.
Moving on, to manage the error, I will run the command within the Try block of a Try Catch statement.
Try {
  $ComputerName = "RemoteComputer"
  Get-WmiObject -ComputerName $ComputerName -Class Win32_ComputerSystem -Property Name, Model -ErrorAction Stop | select Name, Model
  } Catch {
 $path = "D:\PS-Tutorial\"
 $csvfilename = "$((Get-Date).ToString("yyyyMMdd_HHmmss"))" + ".csv"
 $data = "" | Select-Object -Property 'Computer Name', 'Error Message' #creates an empty
 $data.'Computer Name' = $ComputerName
 $data.'Error Message' = $error.Exception.Message
 $csvfilepath = $path + $csvfilename
 $data | Export-csv $csvfilepath -NoTypeInformation
  }
In the first line of the Try block, I defined the $ComputerName variable. Then, in the second line, I ran the Get-WmiObject command.
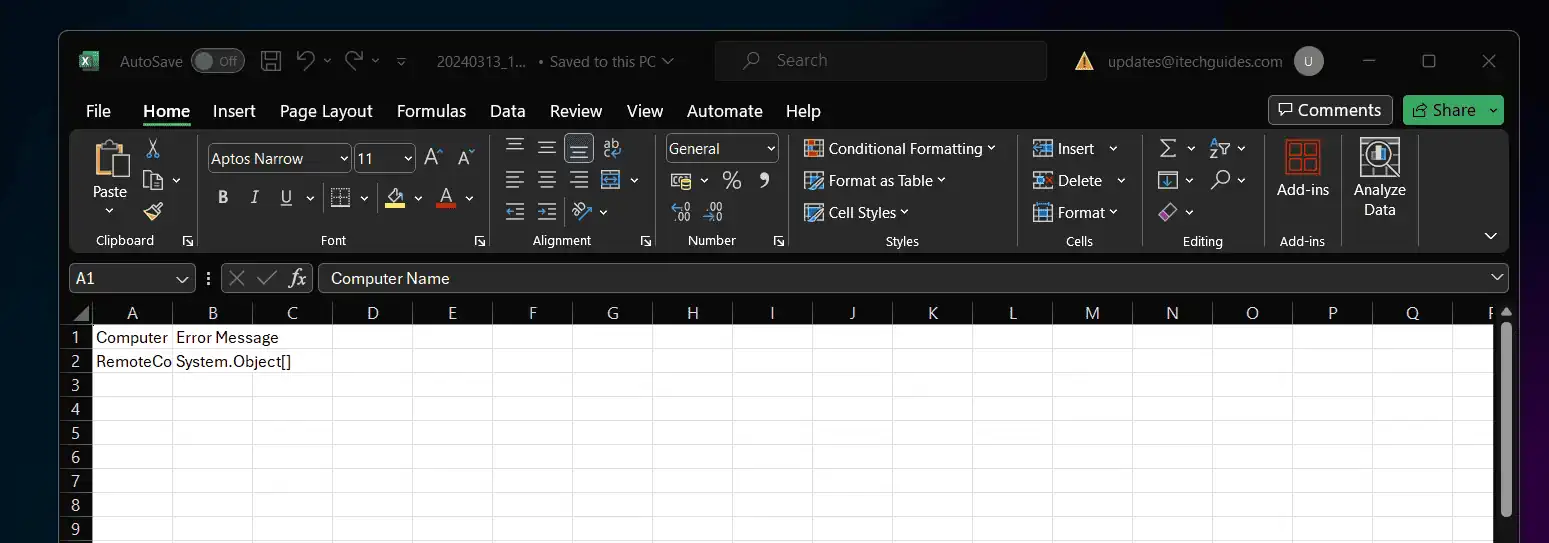
Furthermore, in the Catch block, I created the error details exported it to a CSV file with Export-csv.
Here is a detailed explanation of the script in the Try block:
- In line 1, I created a $path variable that specifies where I want to save the CSV file
- Then, in line 2 I used the Get-Date command to create a file name for the CSV file. The file name is in the format, yyyyMMdd_HHmmss.csv
- In line 3, I created an empty object saved in a variable called $data
- Then, in line 4 I added the ‘Computer Name’ column into the object I created in line 3. The column takes the $ComputerName variable
- In line 5, I added the ‘Error Message’ volume that will save the error messages, $error.Exception.Message
- Then, in line 6, I created a $csvfilepath variable that combines the $path and $csvfilename variables to create a full path to the CSV file
- Finally, in line 7, I piped the information saved in the $data variable ($ComputerName and $error.Exception.Message) into Export-csv and saved the file in $csvfilepath
The screenshot below shows the CSV created by the script…
How to Catch Get-Process Errors with Try Catch Statement
If you run the Get-Process command with a process ID that does not exist, it will return a Microsoft.PowerShell.Commands.ProcessCommandException error.
To capture this specific type of exception, run a command similar to the one below:
Try {
      $ProcessID = 104056
      Get-Process -Id $ProcessID -ErrorAction SilentlyContinue
  } Catch [Microsoft.PowerShell.Commands.ProcessCommandException] {

 } Finally {
 Write-Host $error.Exception.Message
 }
Alternatively, you can define a custom error message by modifying the script as shown below…
Try {
      $ProcessID = 104056
      Get-Process -Id $ProcessID -ErrorAction SilentlyContinue
  } Catch [Microsoft.PowerShell.Commands.ProcessCommandException] {
 } Finally {
 IF ($error.Exception.getType().FullName -eq "Microsoft.PowerShell.Commands.ProcessCommandException") {
  Write-Host "The process with ID $ProcessID could not be found"
 }

 }
How to Catch Get-Mailbox Errors with Try Catch Statement
If you connect to Office 365 PowerShell and run the Get-Mailbox against a user that does not exist, you will get an error message. Some users have reported having problems capturing the error message in Get-Mailbox command.
To test this scenario, after connecting to our Office 365 account via PowerShell, I ran the script below:
Try {
 Get-Mailbox -Identity Pius -ErrorAction stop
 }
 Catch {
 }
 Finally {
  $error.Exception.Message
 }
The script returned the error message The operation couldn’t be performed because object ‘Pius’ couldn’t be found on ‘AM6PR05A05DC002.EURPR05A005.PROD.OUTLOOK.COM‘.
However, if Try Catch does catch the error, try adding the exception type as shown in the modified command below:
Try {
 Get-Mailbox -Identity Pius -ErrorAction stop
 }
 Catch [System.Management.Automation.RemoteException] {
 }
 Finally {
 $error.Exception.Message
 }
Conclusion
As I demonstrated in this guide, the Try Catch Finally statement is extremely useful for managing errors in PowerShell scripts.
We like to hear your thoughts about this article. You could provide us your feedback or share any concerns by responding to the “Was this page helpful?” question below.
Finally, for more PowerShell tech Itechguides, visit our Windows PowerShell How-To guide page. You may also find our Work from Home page very helpful.