A PowerShell hashtable is a collection of items and their values. The items are referred to as keys. Moreover, each key in a hashtable has an equivalent value.
In essence, a PowerShell hashtable is a key/value store ‘table’.
In this Itechguide, I will teach you all you need to know about PowerShell hashtables. The first section explores the difference between a Hashtable and an Array.
Then, in the second section, using the Get-Member Cmdlet, I will take you behind the hood of hashtables.
Finally, I will explore different ways to use hashtables in scripting.
PowerShell Hashtable vs PowerShell Array
Before I dive into Hashtables, I want to explain the difference between Hashtables and Arrays. This differentiation is important as the two concepts can easily get confused.
In the introduction to this guide, I explained that a hashtable is a key/value store. Additionally, a hashtable is like a table with keys and values.
On the contrary, a PowerShell Array is a collection of values or objects.
The primary difference between a PowerShell hashtable and a PowerShell array is that a hashtable is a collection of items (keys) and their values – while an array is just a list of items.
For a quick example, the codes below are examples of a hashtables and an array – the first code creates a hashtables while the second code creates an array:
$hashtable = @{
     Name = "Document"
     PSProvider = "FileSystem"
     Root = "C:\Users\victo\Documents"
 }
$array = @("Document", "FileSystem", "C:\Users\victo\Documents")
The screenshot below displays the results of the two codes.
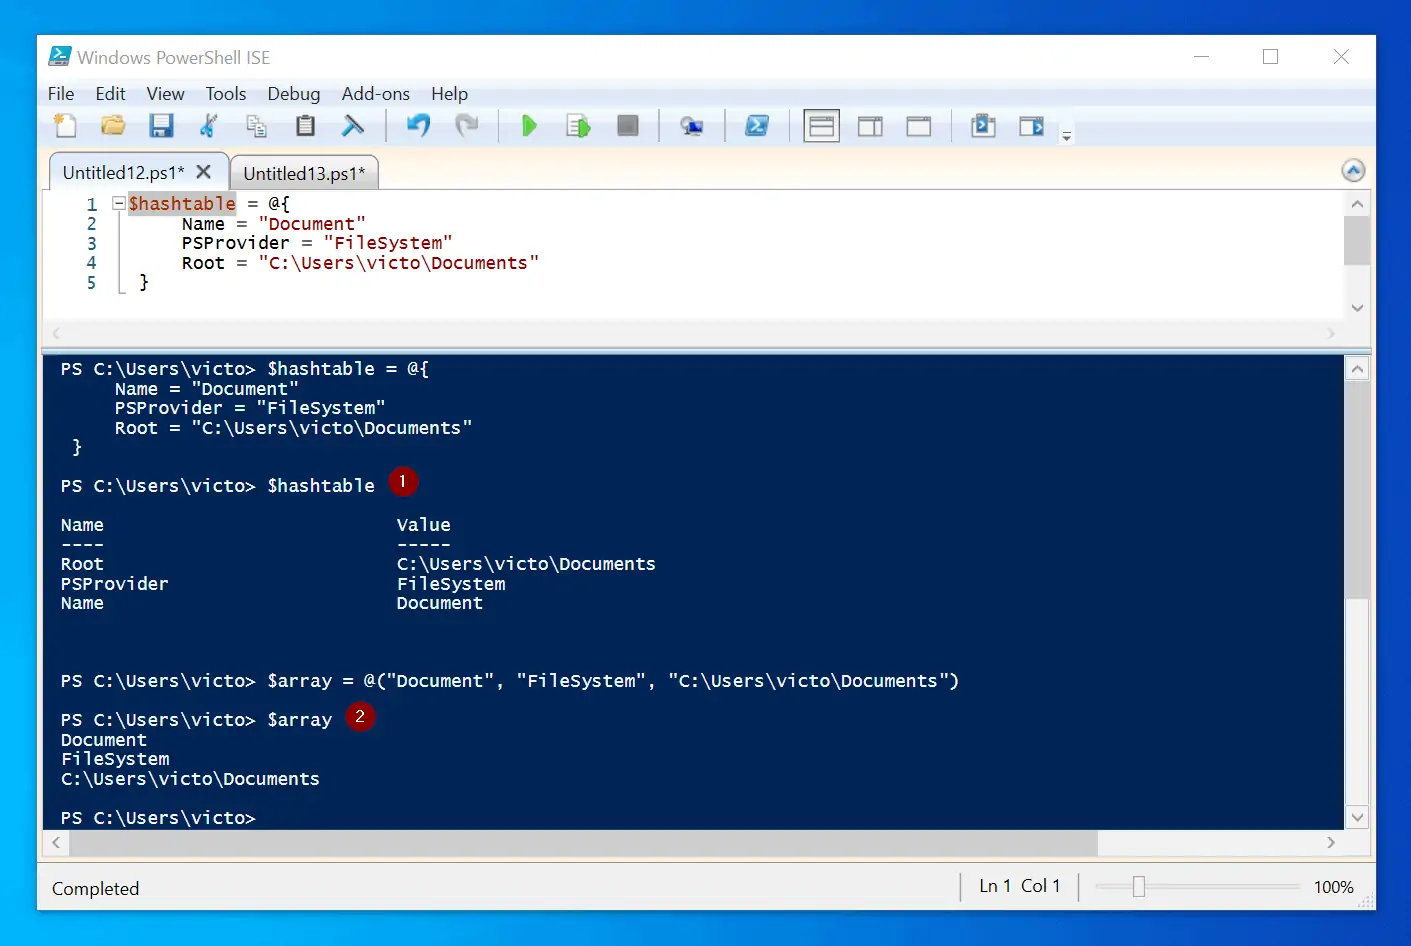
The part of the screenshot labeled (1) is the result of the hashtable. Have you seen the key/value pair?
In the above example, the key, “Root” has a value of “C:\Users\victo\Documents”. Also, the “PSProvider” key has a value called “FileSystem”.
Finally, “Name” has a value of “Document”.
Furthermore, the part of the screenshot labeled (2) has the result of the array code. As explained earlier, it is just a list.
PowerShell Hashtable Methods and Properties
In the introduction I promised to take you behind the hood of PowerShell Hashtables. This is it!
In this section, I will teach you how to use the Get-Member Cmdlet to “look behind” hashtables.
When you pipe the result of a PowerShell Hashtable to Get-Member, you will be able to review the available Methods and Properties of the Hashtable.
Let’s get back to our first hastable example above:
$hashtable = @{
     Name = "Document"
     PSProvider = "FileSystem"
     Root = "C:\Users\victo\Documents"
 }
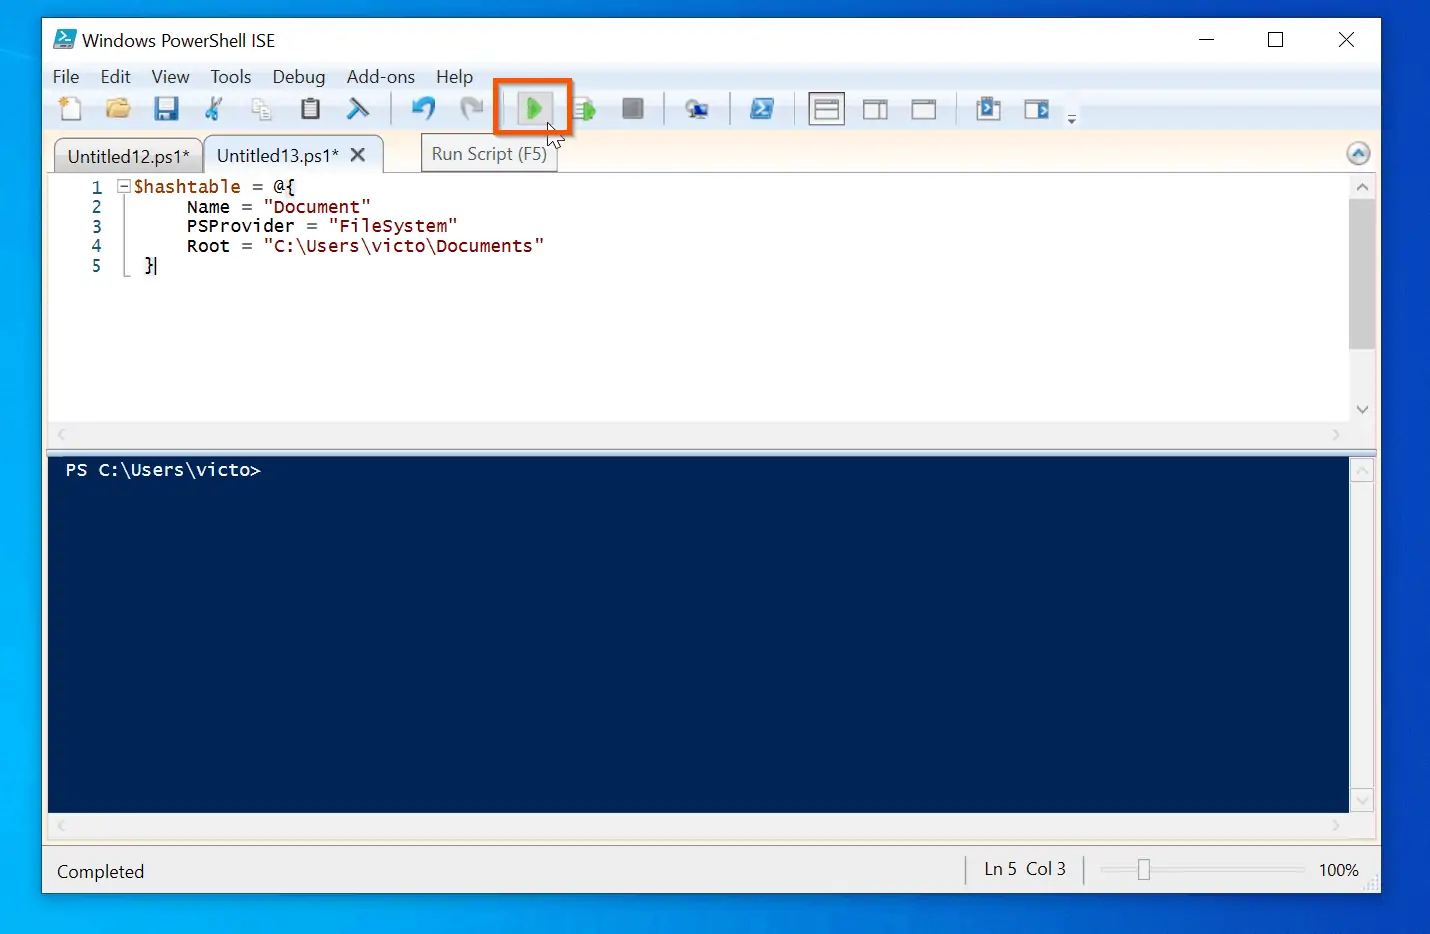
Copy the code into a new PowerShell ISE document. Then, run the code.
Then, to see available Methods and Properties in this hashtable, run this command on the same PowerShell ISE.
$hashtable | Get-Member
To run the above command, paste it below the last code. Then, highlight it and either press F8 or click the highlighted icon.
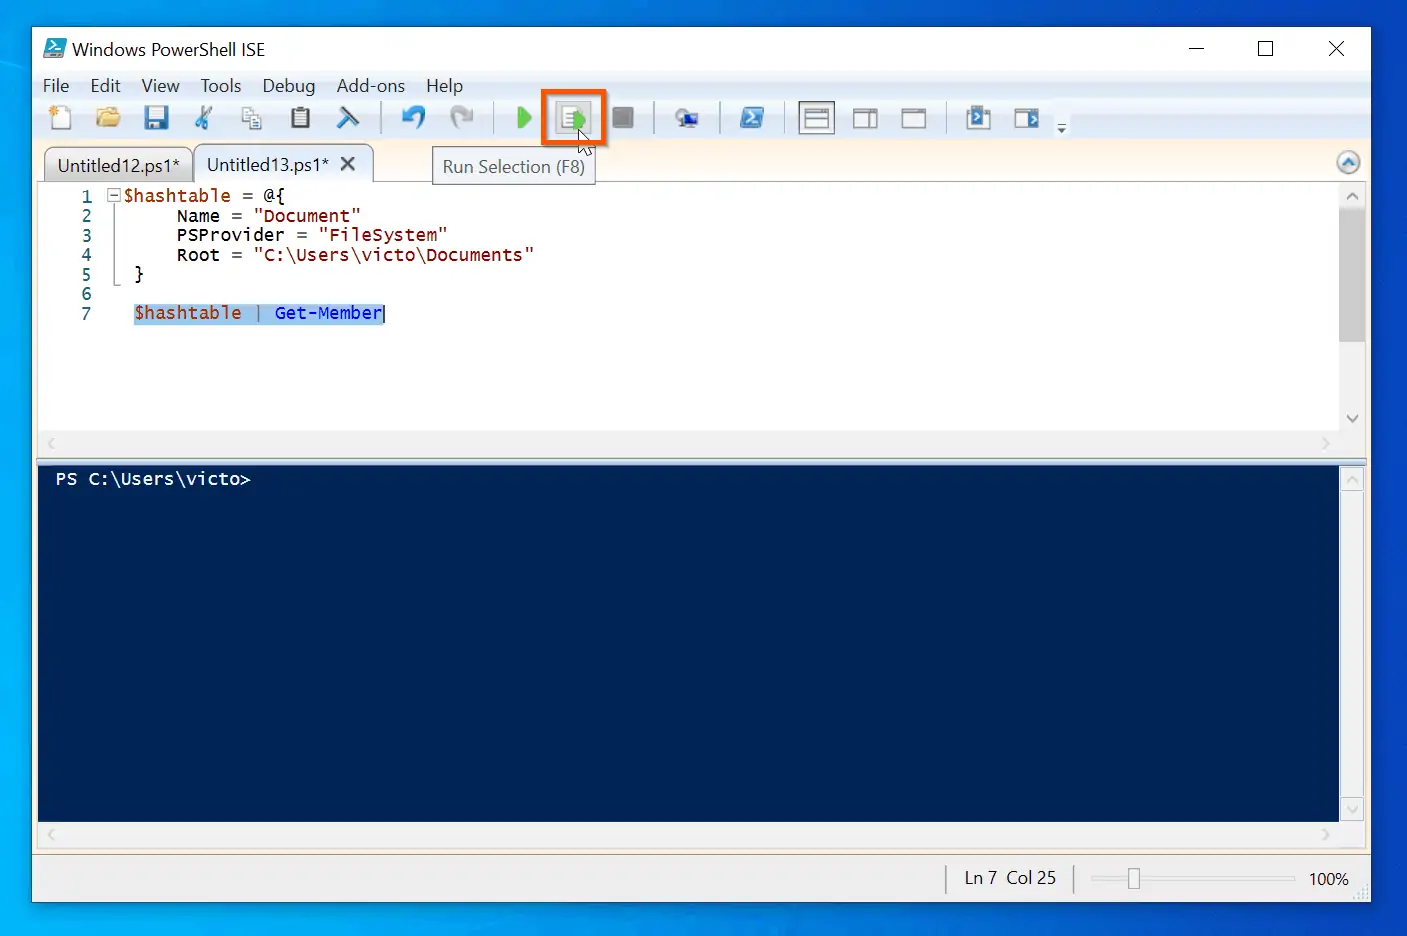
The command will display results on the PowerShell console pane.
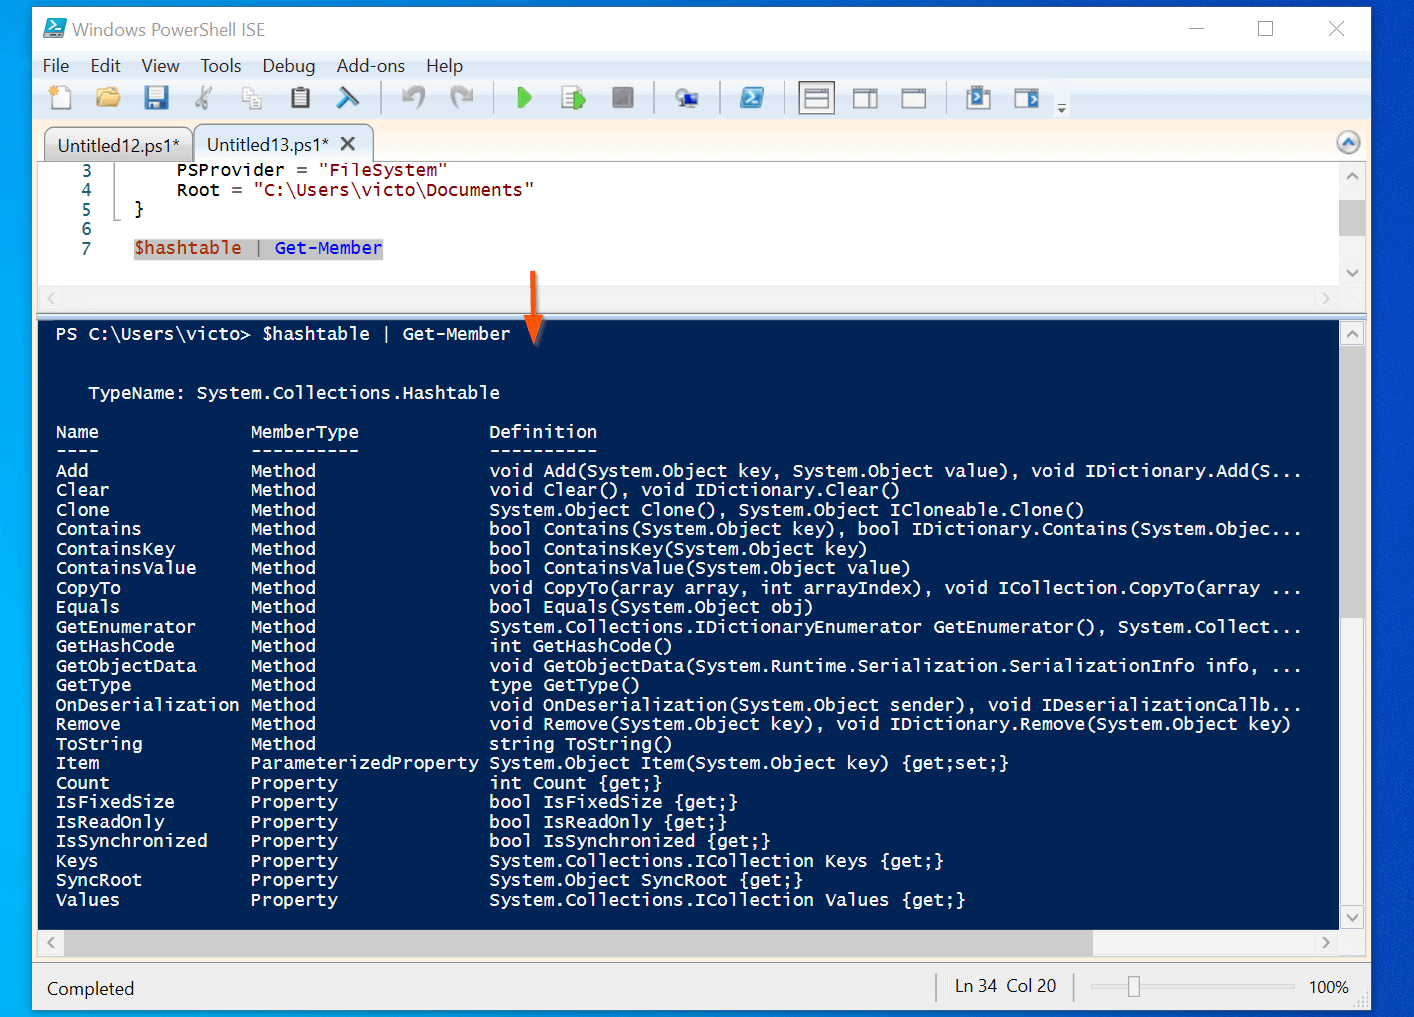
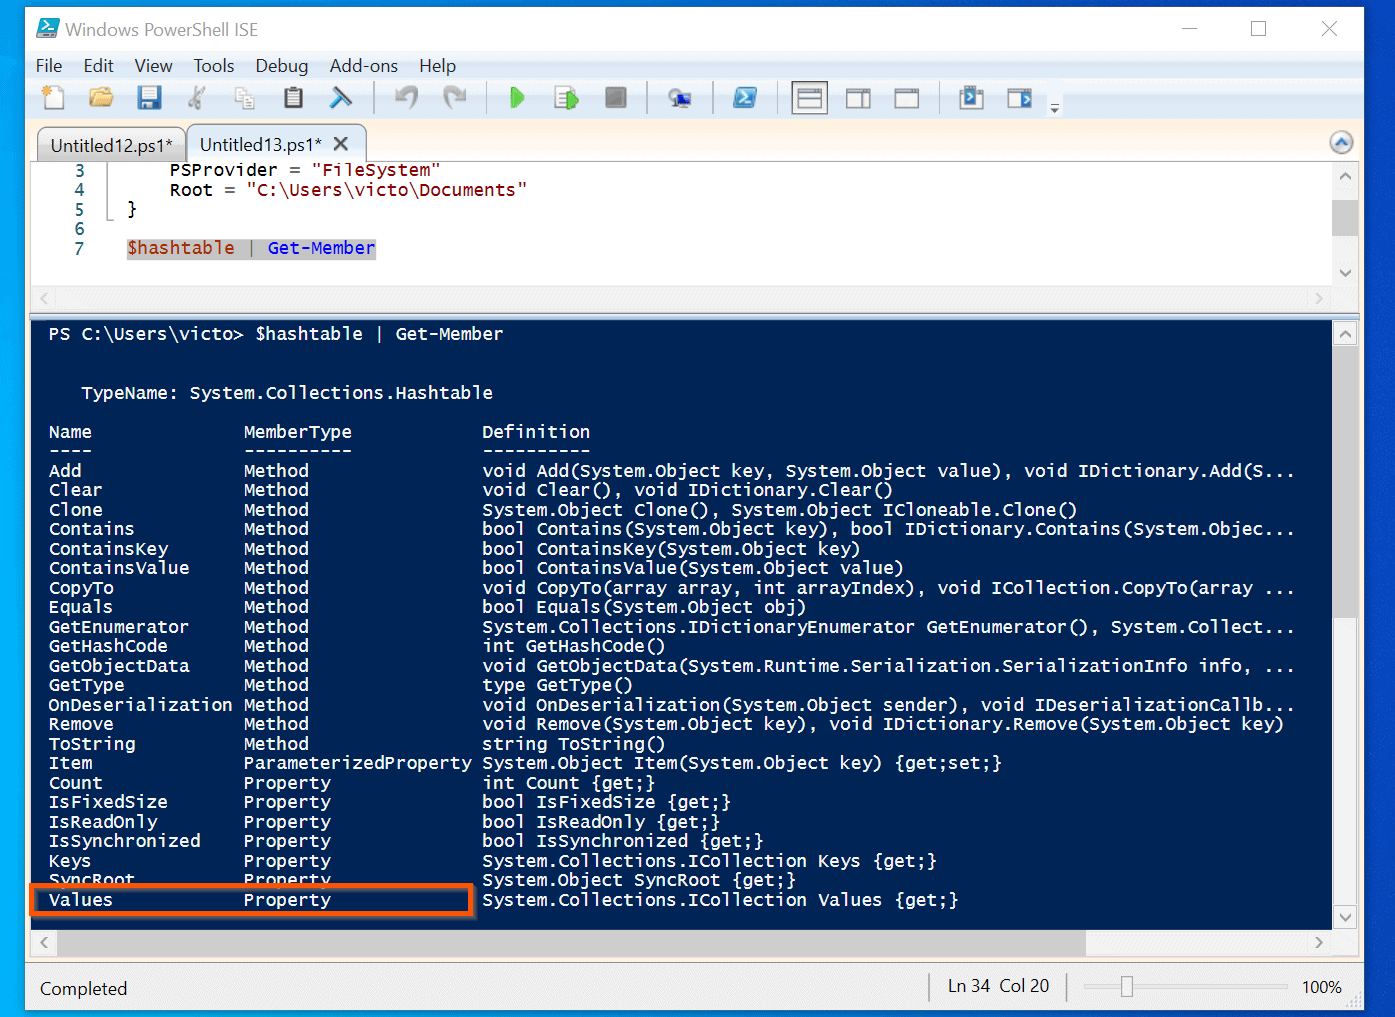
For now, look on top of the result. It has “TypeName: System.Collections.Hashtable”.
This confirms that the objects piped into the Get-Member Cmdlet is a Hashtable!
In the following sub-sections of this section, I will show you how to use the common methods and properties of a PowerShell hashtable.
How to Add or Remove Items to Existing Hashtable
In this section, you will learn to add new items to an existing PowerShell hashtable. Moreover, you will also learn how to remove an item from an existing PowerShell hashtable.
Before I dive into it, I want to mention that you can also create an empty hashtable. Then, add keys/values to the hashtable – more on this next later.
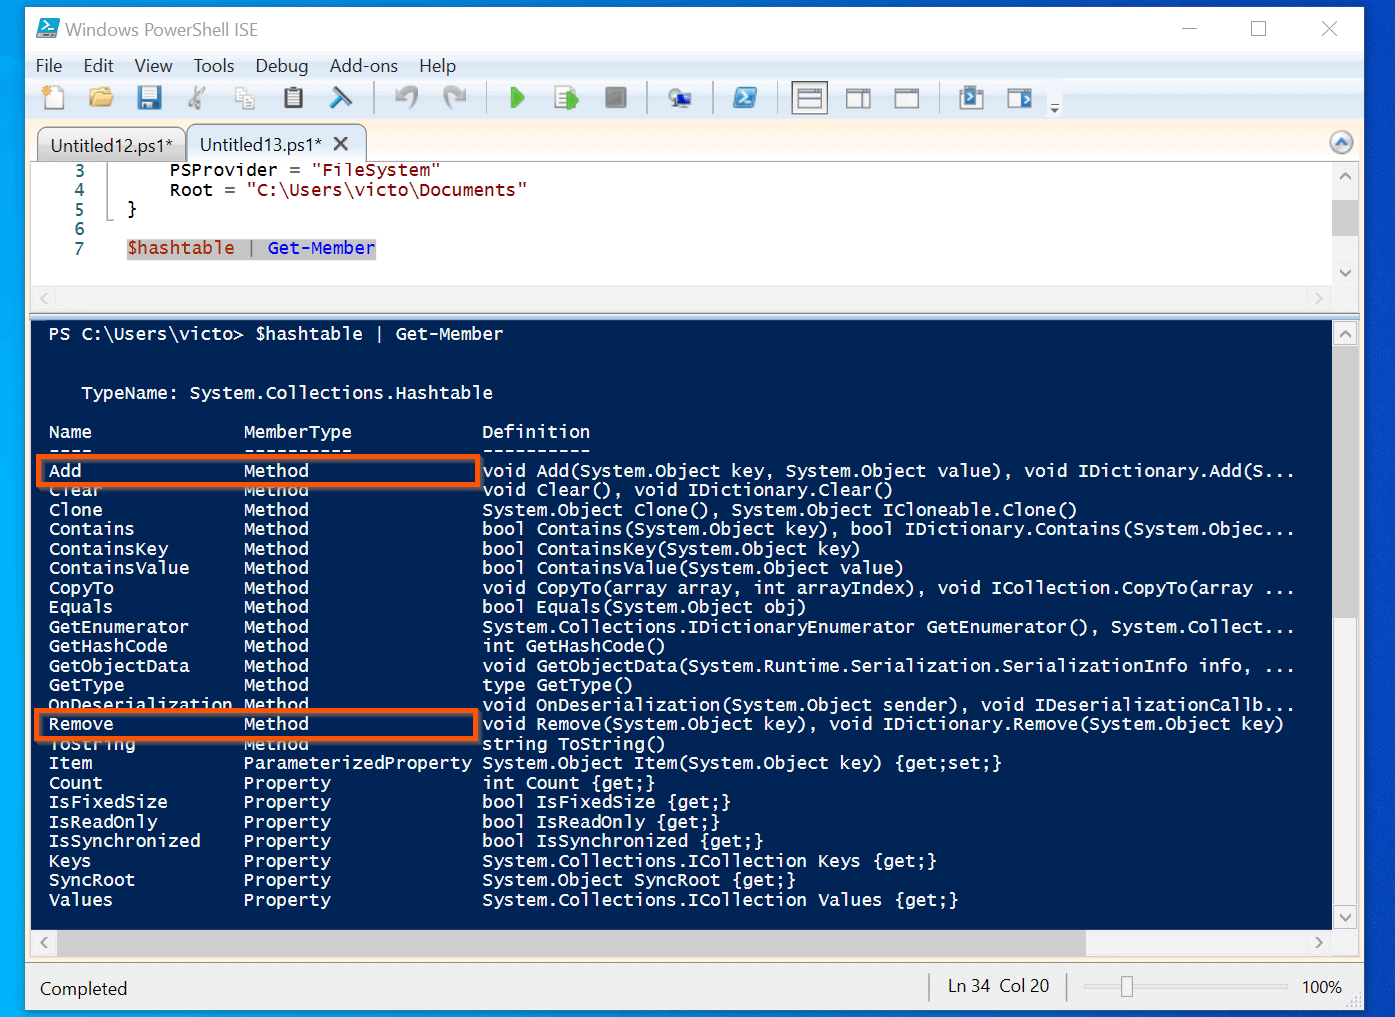
Back to adding or removing items to existing PowerShell hastables – when we ran the “$hashtable | Get-Member” command, one of the methods displayed in the result is “Add“. There is also a method, “Remove“.
See the highlighted portions of the screenshot below:
Before I show you how to use these two Methods, lets look at the original PowerShell hashtable code:
$hashtable = @{
     Name = "Document"
     PSProvider = "FileSystem"
     Root = "C:\Users\victo\Documents"
 }
The hashtable has 3 entries. In this example, I will add another key called “Description” with the value “Maps to my ‘My Documents’ folder.”
To complete this task, I will run the command below (on the same PowerShell ISE console that I ran the previous commands)
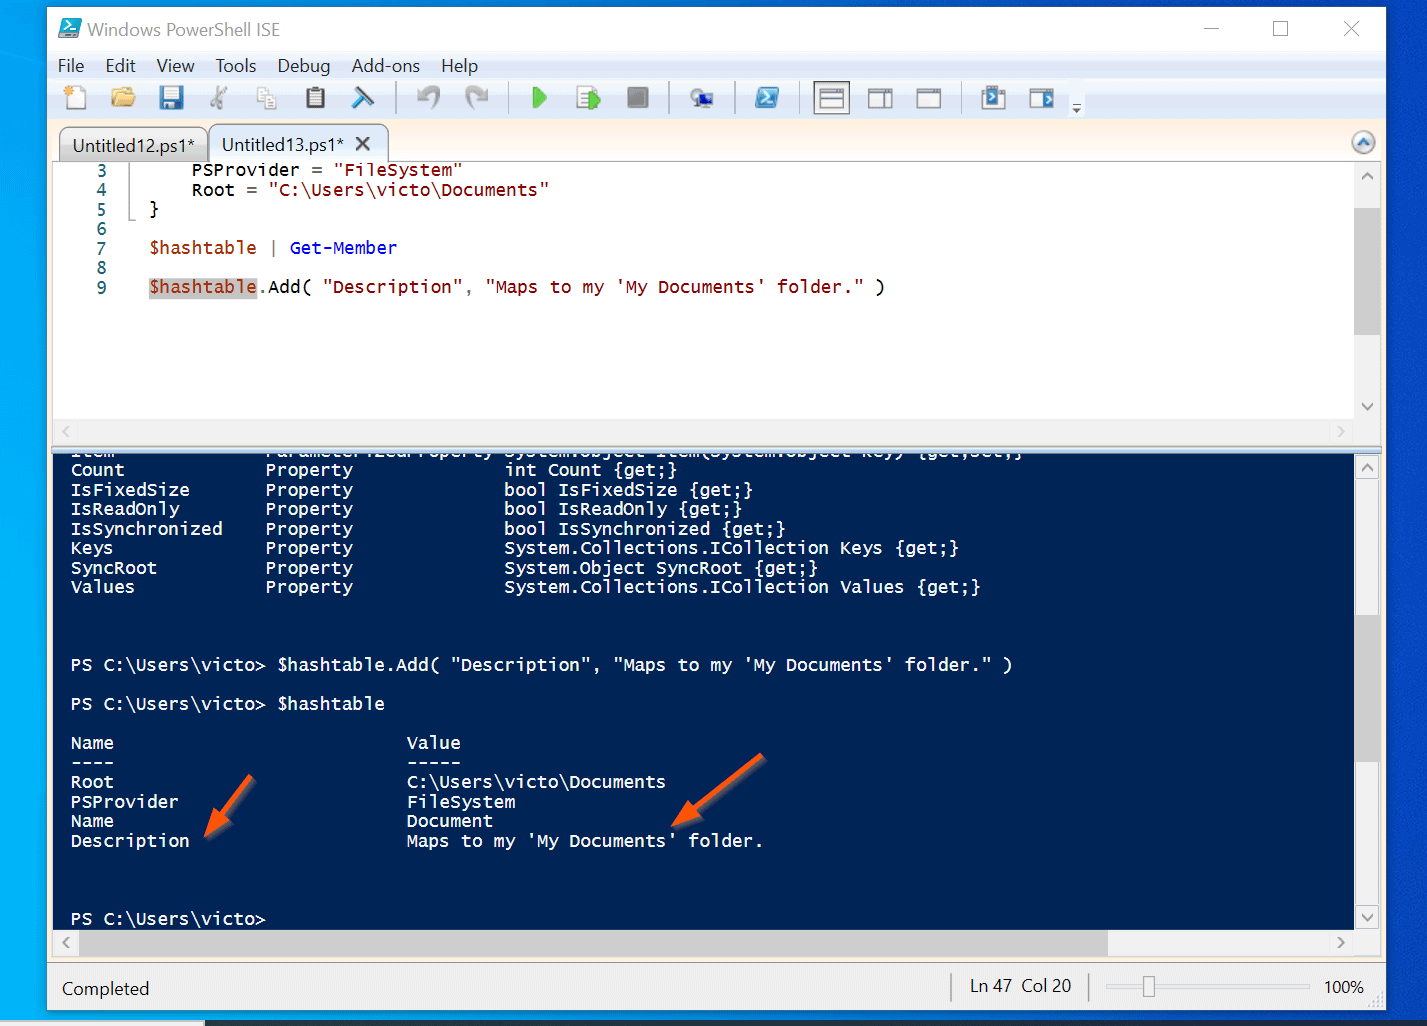
$hashtable.Add( "Description", "Maps to my 'My Documents' folder." )
Once you run the command, to confirm that the additional key has been added, highlight $hashtable and press F8.
$hashtable
Here is a screenshot of the result – confirming that the new key/value has been added.
Moving on, you can use the same approach to remove a value from a PowerShell hashtable.
To remove the last key we added to the hashtable, run a command similar to the last command. This time though replace the Add Method with the Remove Method.
Here is the command:
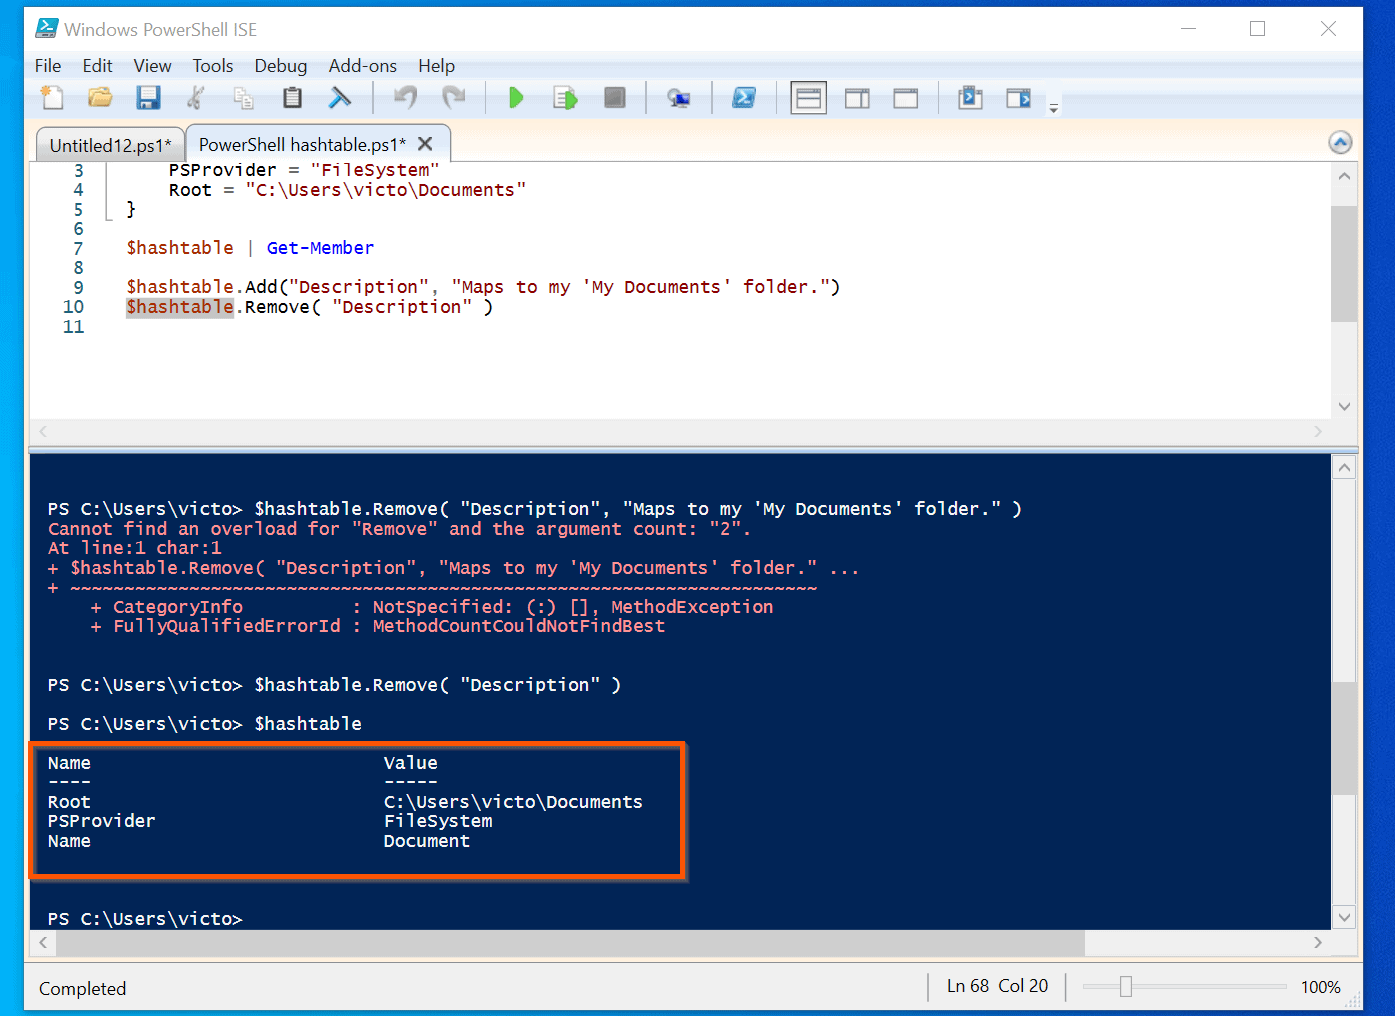
$hashtable.Remove( "Description" )
First, run the above command. Then, to confirm that the key was removed, highlight $hashtable and press F8.
$hashtable
The result of the command confirms that the key has been removed!
How to Check If a PowerShell Hashtable Contains a Key
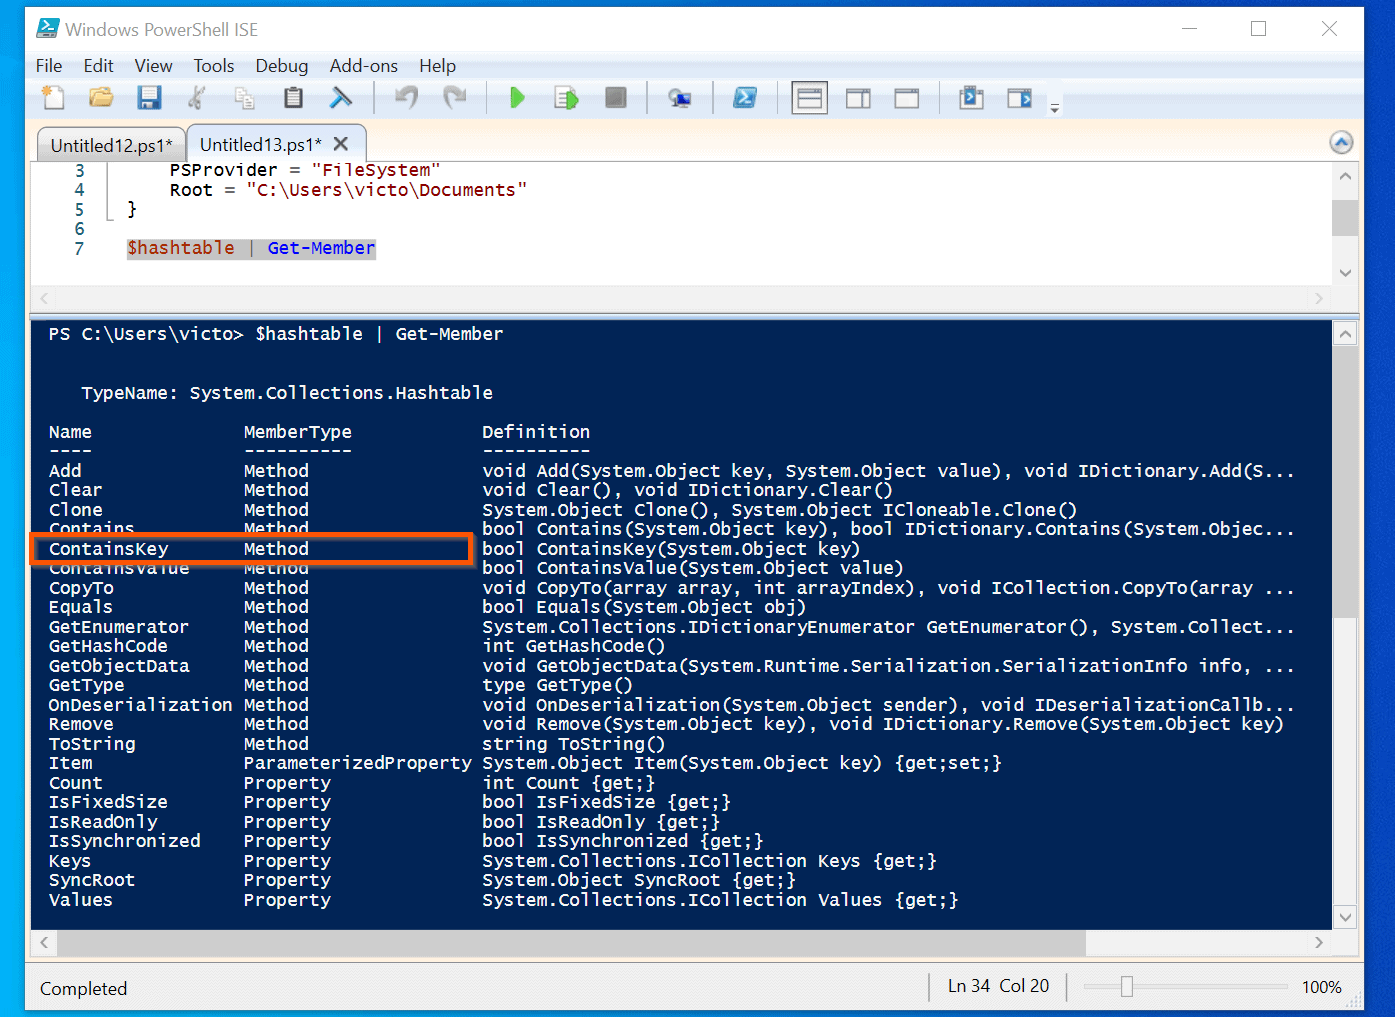
When we piped the hastable below to the Get-Member Cmdlet, one of the methods displayed is the ContainsKey Method – see the screenshot below.
$hashtable = @{
     Name = "Document"
     PSProvider = "FileSystem"
     Root = "C:\Users\victo\Documents"
 }
The ContainsKey Method can be used in so many ways. However, one of the common applications of this method is to use it to check if a key exists in a hashtable and if it does not, add the key.
Another application of the ContainsKey Method of a PowerShell hashtable is to simply use it to check if a key name exists in the hashtable.
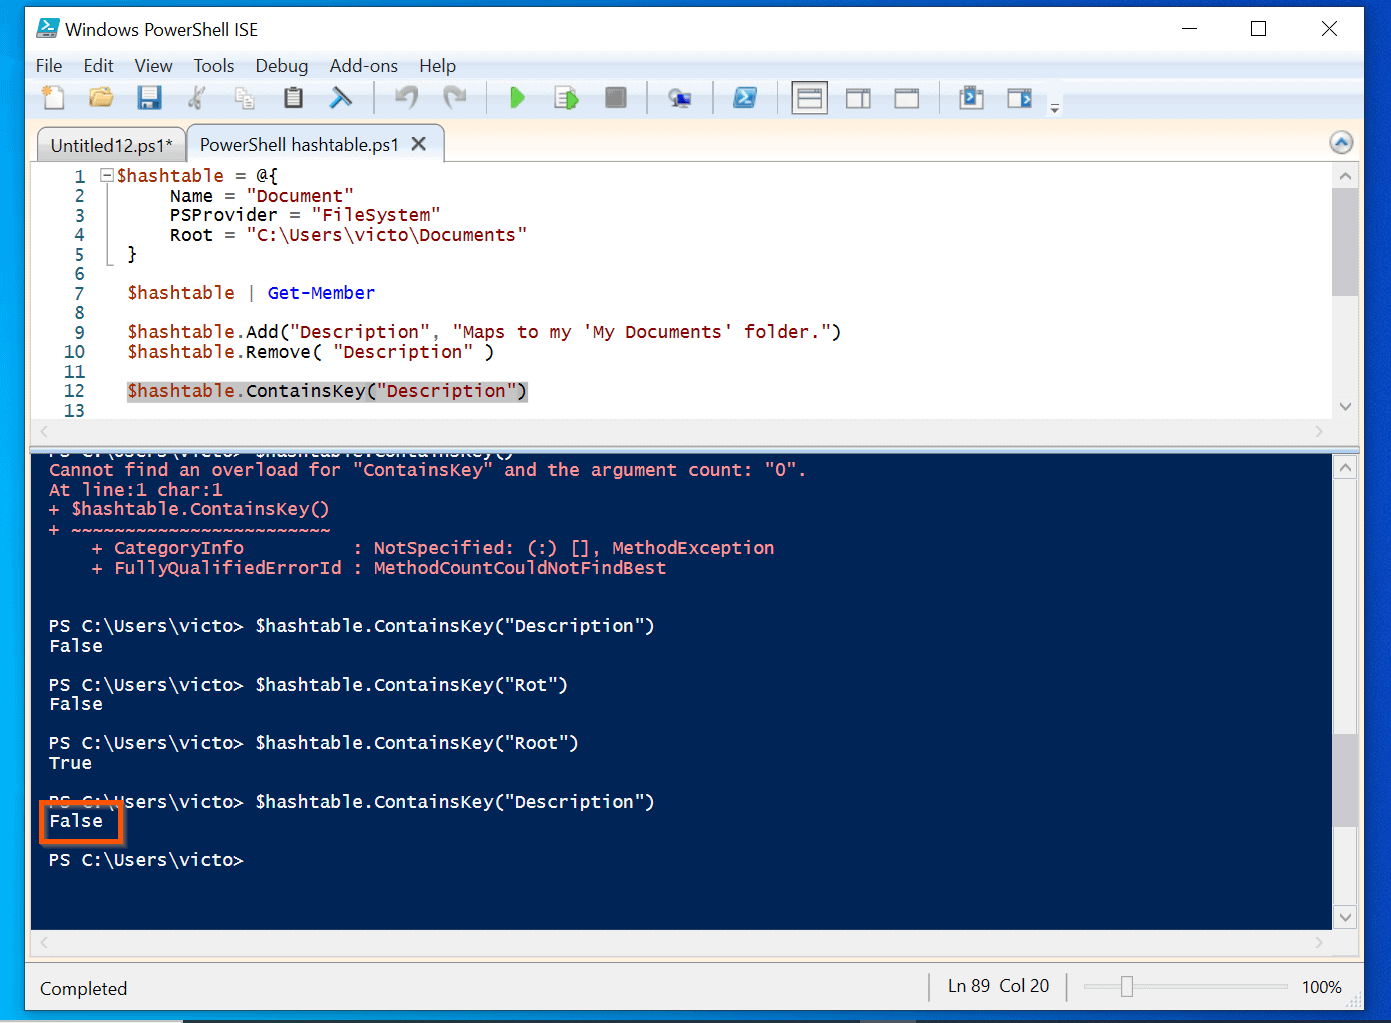
To check if a key exist in a PowerShell hashtable using the ContainsKey Method, run the command below:
$hashtable.ContainsKey("Description")
This command checks if a key with the name, “Description” exists in the hashtable saved in the $hashtable variable. The result of the command displays “False”.
To check if the “Description” key exists before adding it to the PowerShell hashtable, we will need an additional line of codes to the previous command.
Here is the improved code.
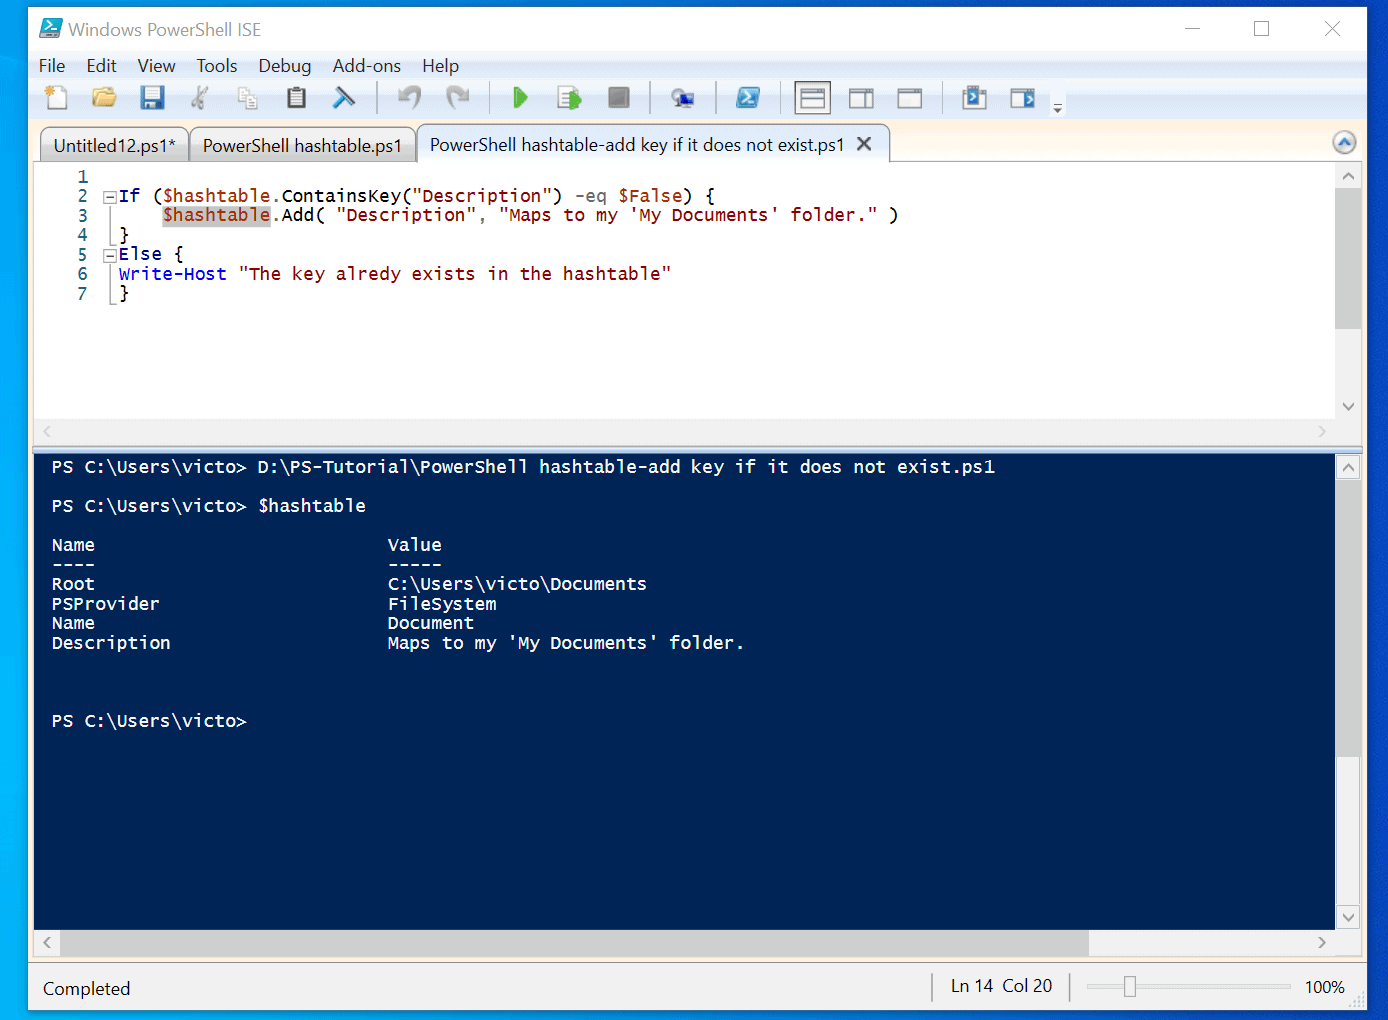
If ($hashtable.ContainsKey("Description") -eq $False) {
    $hashtable.Add( "Description", "Maps to my 'My Documents' folder." )
}
    Else {
    Write-Host "The key alredy exists in the hashtable"
}
The code uses the IF conditional statement to check if a key with the name, “Description” exists in the hashtable.
Then, if the result is “False”, in the command execution part of the IF statement, we use the Add Method of the PowerShell hashtable to add the key to the hashtable.
However, if the key exists in the hashtable, in the “Else” part of the IF statement, we display a message informing the person that ran the command that the key already exists.
After running the last command, highlight the $hashtable variable and run it alone. The result confirms that the key, “Description” was added to the variable because it did not exist.
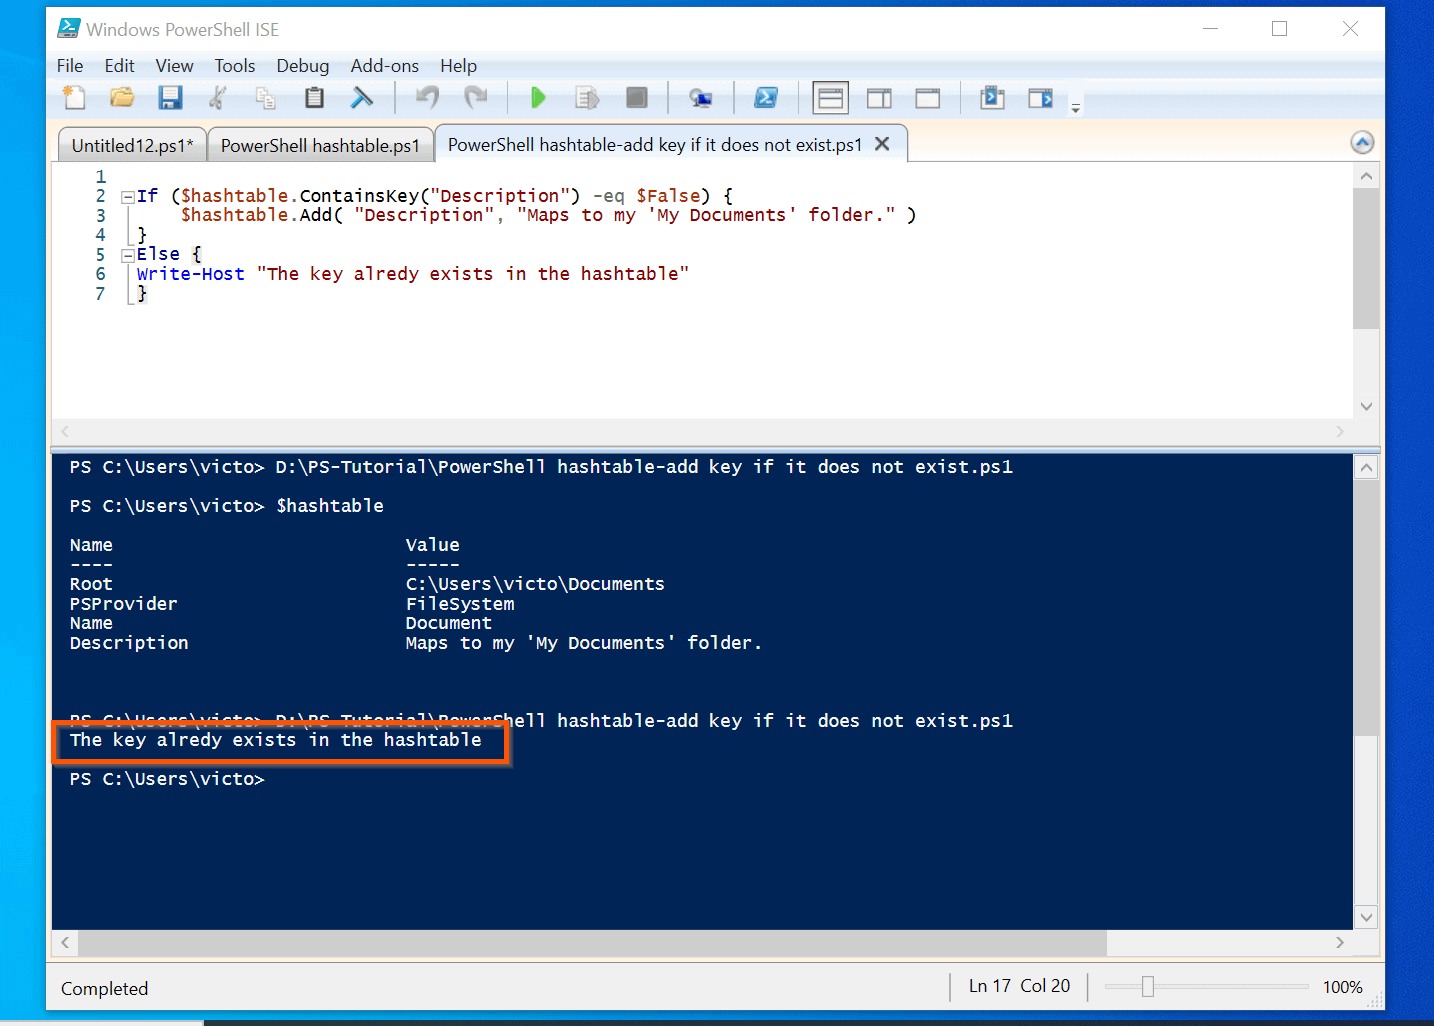
To test if this script works – run it again…
If ($hashtable.ContainsKey("Description") -eq $False) {
    $hashtable.Add( "Description", "Maps to my 'My Documents' folder." )
}
Else {
Write-Host "The key already exists in the hashtable"
}
This time around, the script did not add the key. Rather, it returned the information in the “Else” part of the IF statement – The key already exists in the hashtable.
How to Convert a PowerShell Hashtable to String
The first step to convert a PowerShell Hashtable to a string is to return the values of the keys in the hashtable. In other words, you convert the PowerShell hashtable into a PowerShell Array.
To return the values in a hashtable, call the Values property of the hashtable.
Here is the command that returns the Values in a hashtable:
$hashtable.Values
Once you have returned the values in a PowerShell hashtable, the next step is to pipe “$hashtable.Values” to the Out-String Command…
$hashtable.Values | Out-string -stream
How to Use PowerShell Hashtable GetEnumerator Method
Another important Method of a PowerShell hashtable is the GetEnumerator Method.
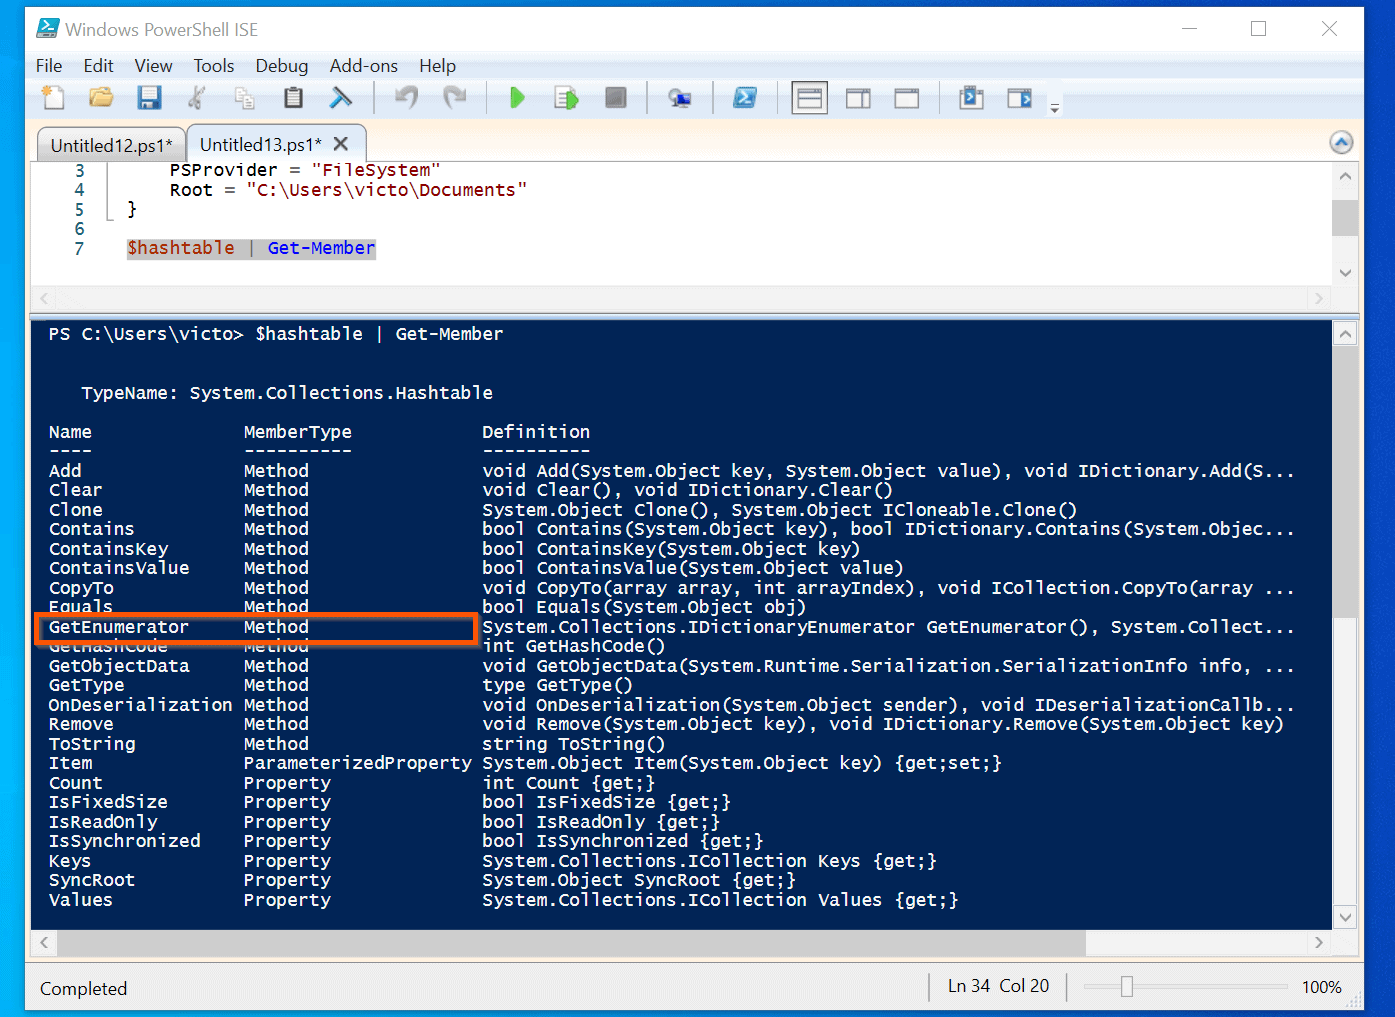
You can use this Method to separate the keys in a hashtable into individual strings. Here is a sample command of the GetEnumerator Method of a hashtable:
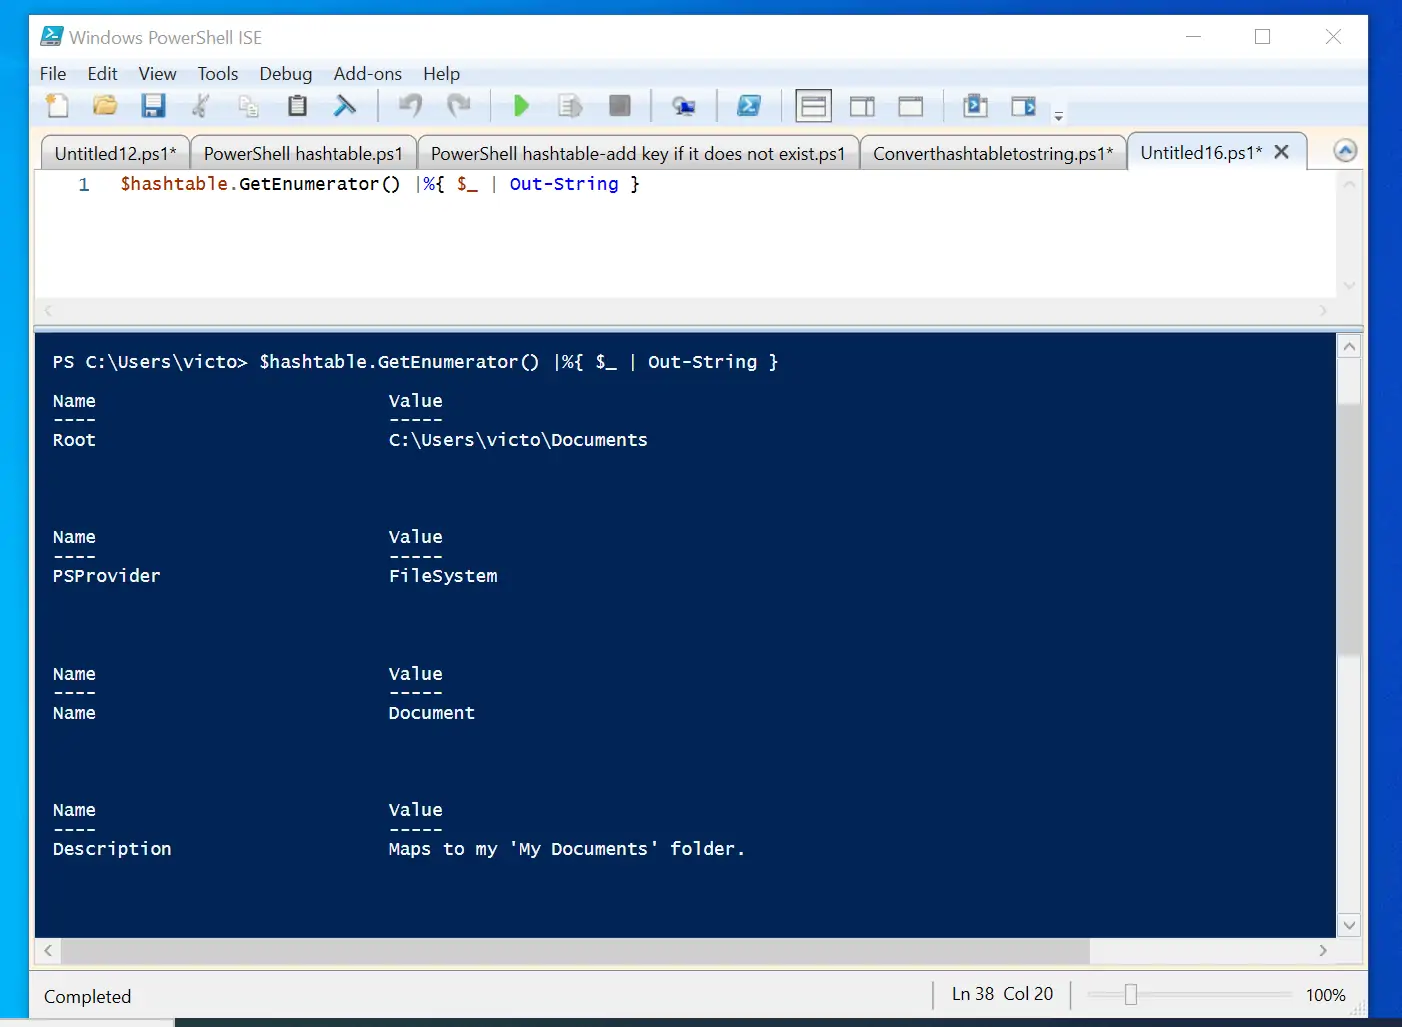
$hashtable.GetEnumerator() |%{ $_ | Out-String }
As you can see from the result of the above command, the keys and values are returned in individual headers. I cannot think of an application now, however, if you ever need to break up the keys in a PowerShell hashtable, you know how to do it!
How to Count PowerShell Hashtable Items
There is yet another useful hashtable Property, Count. As the name implies, this Property returns the number of keys in a hashtable.
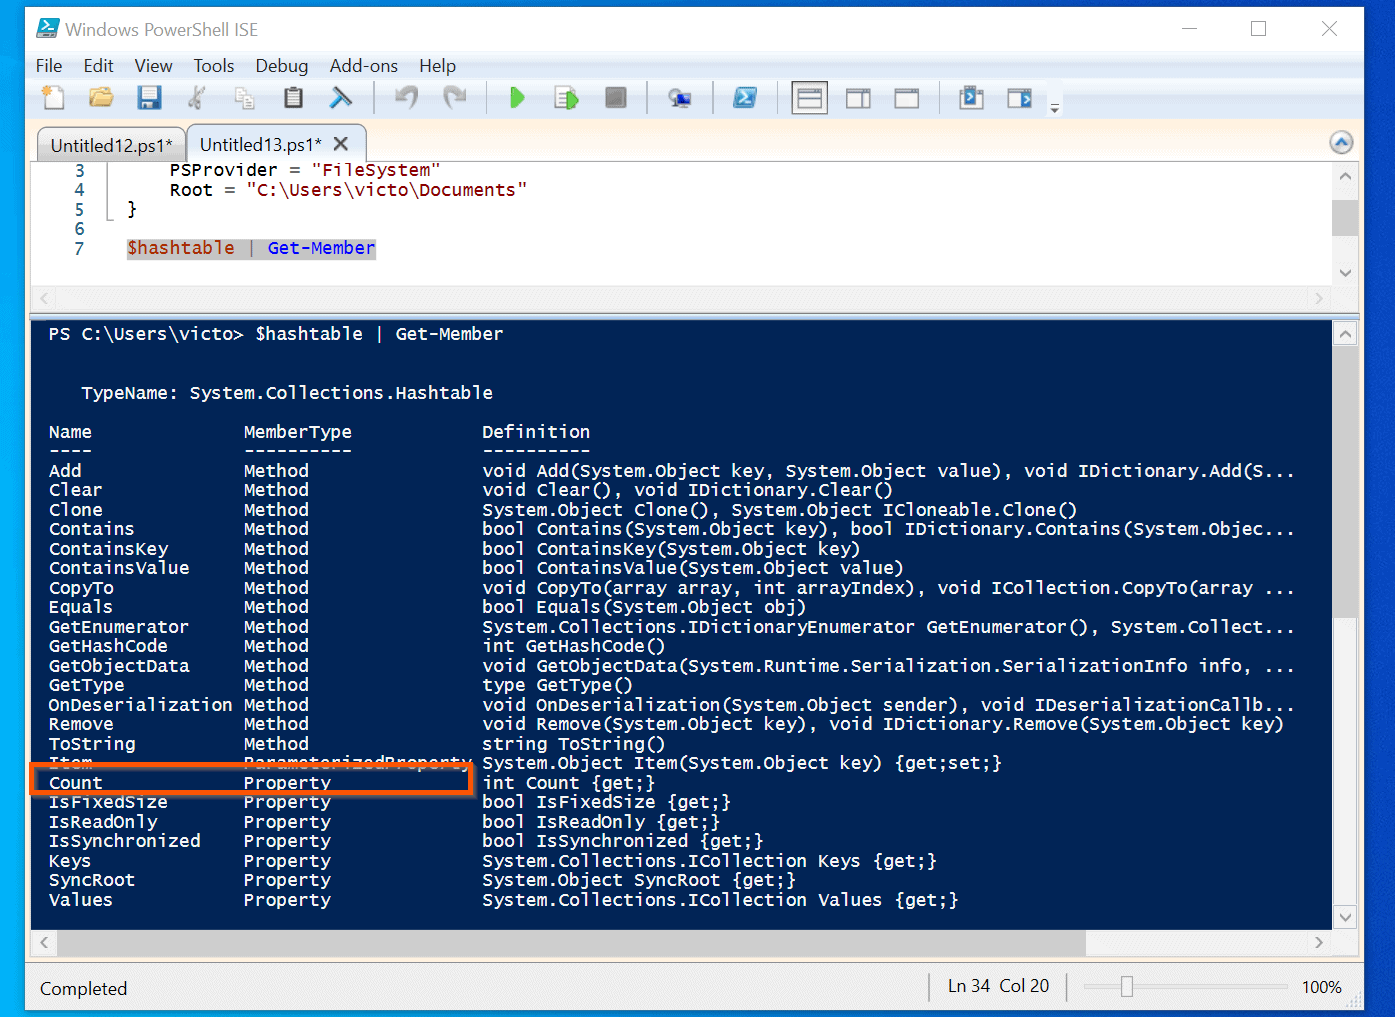
Like the Values Property, to call the Count Property, use a command similar to the one below:
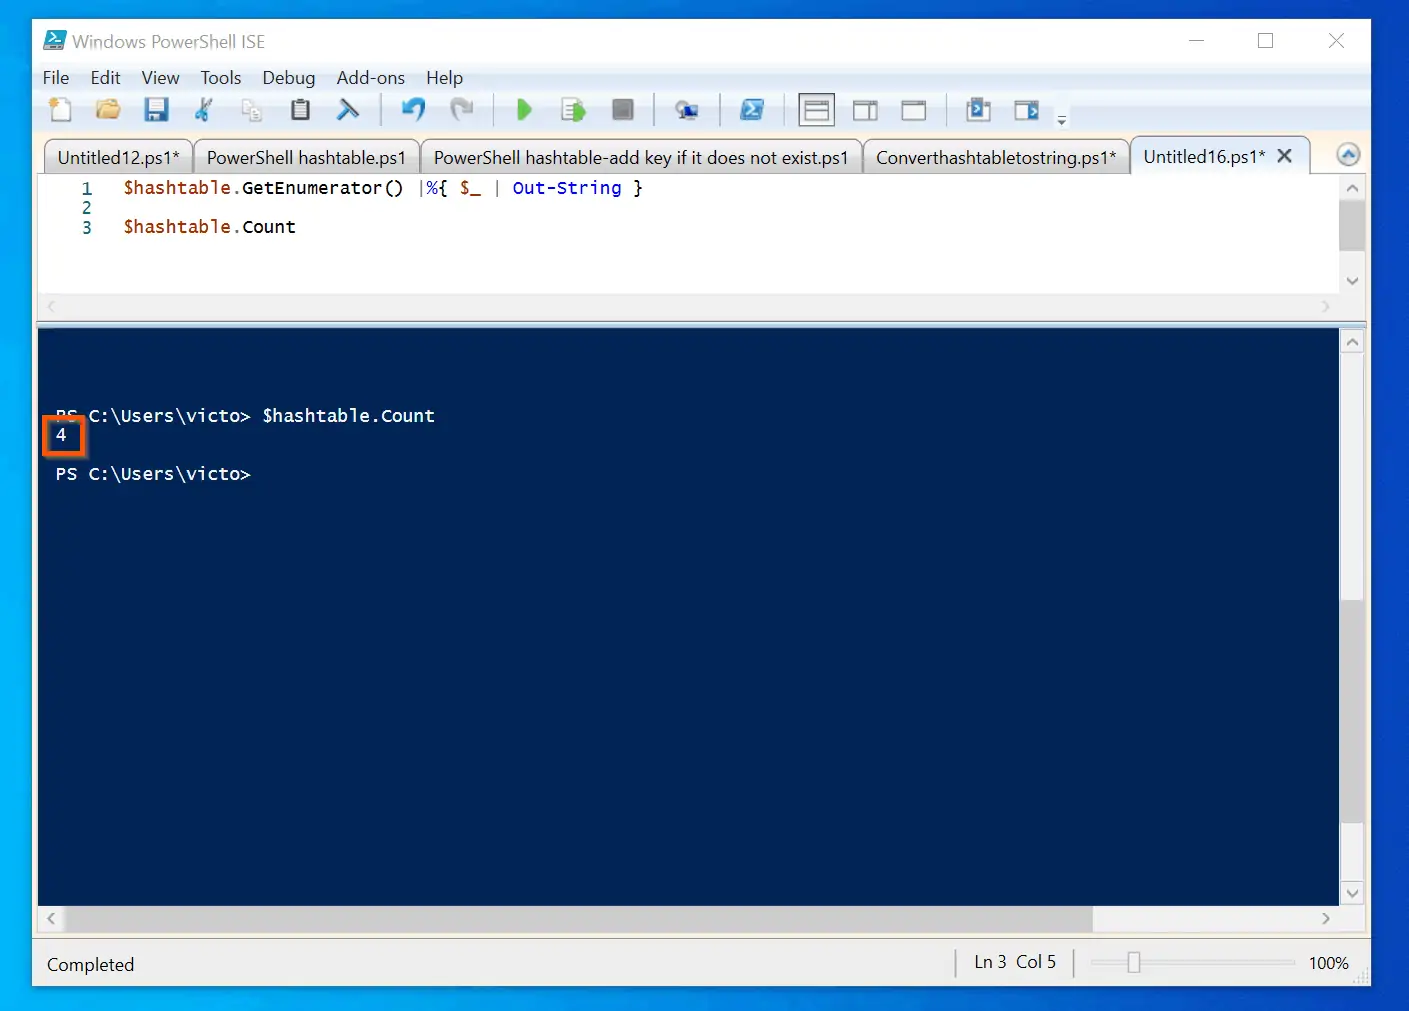
$hashtable.Count
The command confirms that the hashtable, $hashtable has 4 keys.
Create an Empty PowerShell Hashtable and Add Keys
So far, all the examples in this Itechguide have focused on manipulating PowerShell hashtable with existing keys. In this section, you will learn how to create an empty hashtable.
Then, add keys to the hashtable.
To create an empty PowerShell hashtable, simply enter the @ sign, followed by {} brackets. Here is an example of an empty hashtable saved in a variable, Emptyhashtable:
$Emptyhashtable = @{

}
To confirm that the hashtable is created with no values, run the previous command. Then, run the variable on its own.
$Emptyhashtable
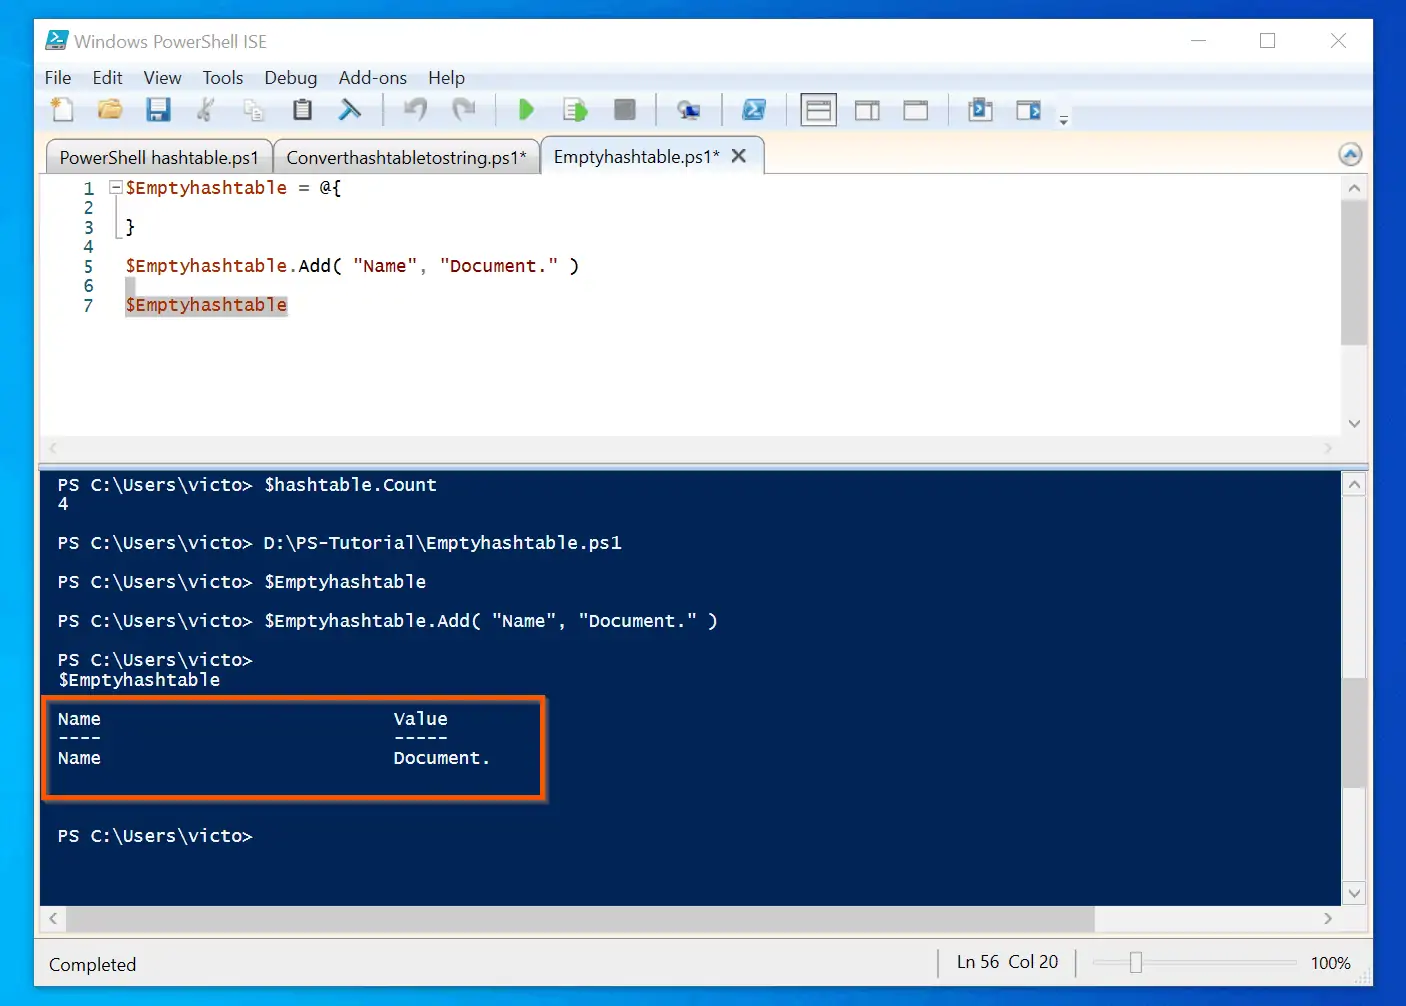
The next step is to use the Add method, covered earlier in this guide, to add keys/values to the hashtable. In this example, I will add a key, called Name, with a value of Document.
Here is the command to perform this task.
$Emptyhashtable.Add( "Name", "Document." )
Finally, to confirm that the values were added successfully, run the variable, $Emptyhashtable:
$Emptyhashtable
The last command confirms that the values were added sucessfully:
Create PowerShell Hashtable with Multiple Values and One Key
In all the examples we have covered so far, the PowerShell hashtable has one key/value pair. However, there are circumstances when you may need to have a single key in a hashtable with multiple values.
In this instance, you effectively want to create a hashtable with arrays as the values.
To begin, I think it is better to show you the codes I used to differentiate a hashtable from an array.
$hashtable = @{
     Name = "Document"
     PSProvider = "FileSystem"
     Root = "C:\Users\victo\Documents"
 }
$array = @("Document", "FileSystem", "C:\Users\victo\Documents")
So, to create a PowerShell hashtable with single keys and multiple values, run a script similar to this:
$hashtableWithArrays = @{
     LogName = @("System", "Application", "Security")
 }
In the script above, LogName is the hashtable key while the values “System”, “Application”, and “Security” are assigned to the key. Effectively, we have created a single hastable key with multiple values.
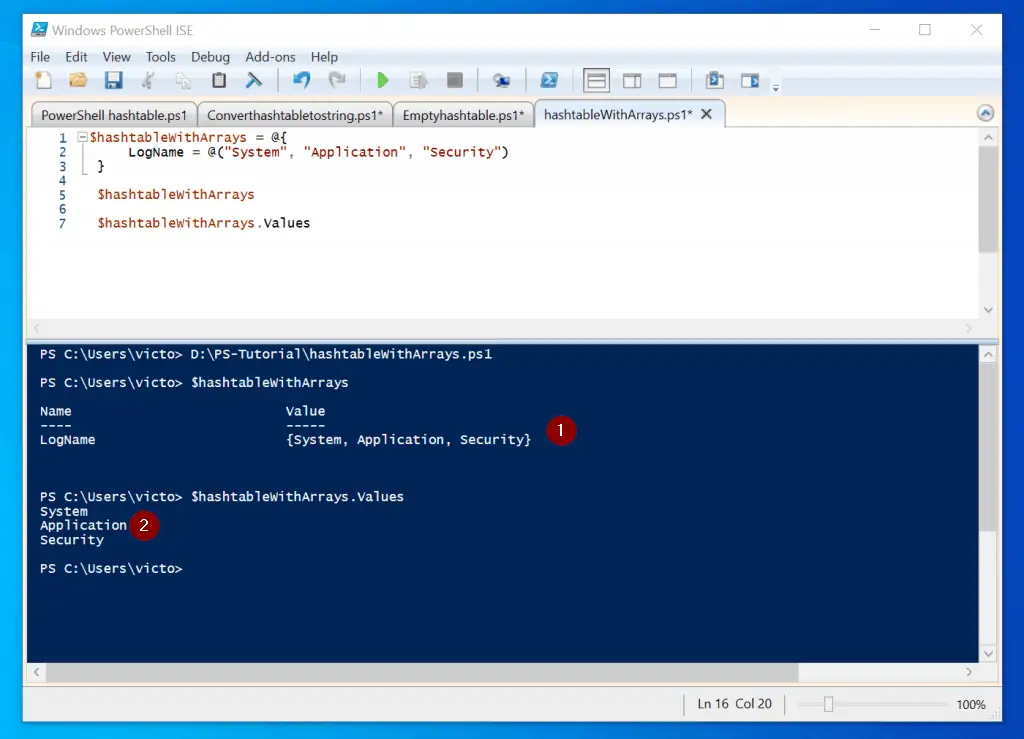
To list the individual values in the LogName key, run the command below:
$hashtableWithArrays.Values
The part part of the screenshot below labeled (1) is result of the hashtable, $hashtableWithArrays. Moreover, the portion labeled (2) shows the result of the $hashtableWithArrays.Values command.
If you are familiar with Windows Event Logs – “System”, “Application”, and “Security” – are names of Windows event logs.
In the next section, I will show you how to use PowerShell ForEach loop to iterate through the above hashtable – and run the Get-EventLog command on these 3 event logs – using a single PowerShell script.
Iterate PowerShell Hashtable with ForEach Loop
In the last section, I created a single-key PowerShell hashtable with multiple values.
For the example in this section, I have changed the variable that stored the hashtable to LogNameKeys. Here is the updated script.
$LogNameKeys = @{
       LogName = @("System", "Application", "Security")
   }
In this section, I will teach you how to use ForEach to loop through the values stored in the LogName key and run the Get-EventLog command.
For a quick refresher course on PowerShell ForEach, below is the general syntax of a PowerShell ForEach command:
ForEach ($Object in $Objects) {
<run a set of commands>
}
If you apply the above syntax to our LogNames hashtable, the updated command will look like this:
#Create a single-key hashtable (LogName) with values - "System", "Application", "Security"
 $LogNameKeys = @{
       LogName = @("System", "Application", "Security")
   }

#Convert the hashtable to a string
 $LogNameKeysAsStrings = $LogNameKeys.Values | Out-String -Stream #we used a similar command earlier

#Use ForEach to loop through $LogNameKeysAsStrings and run the Get-EventLog command
 ForEach ($LogNameKey in $LogNameKeysAsStrings) {
 Get-EventLog -LogName $LogNameKey -Newest 5
 }
The first part of the script is the same script that creates the single-key PowerShell hashtable with multiple values. Here is the script:
$LogNameKeys = @{
       LogName = @("System", "Application", "Security")
   }
In the second part of the script, I converted the values stored in the ($LogNameKeys.Values) to strings and saved the result in another variable, LogNameKeysAsStrings.
$LogNameKeysAsStrings = $LogNameKeys.Values | Out-String -Stream
Finally, in the third part of the script – the ForEach loop is introduced:
 ForEach ($LogNameKey in $LogNameKeysAsStrings) {
 Get-EventLog -LogName $LogNameKey -Newest 5
 }
In this part of the script, we tell PowerShell to take each value stored in the LogName key ($LogNameKeysAsStrings) – save that individual value temporarily in the variable LogNameKey – then, use the temporal variable to run the Get-EventLog command.
Now, copy the script below into a new PowerShell ISE document and run it.
#Create a single-key hashtable (LogName) with values - "System", "Application", "Security"
 $LogNameKeys = @{
       LogName = @("System", "Application", "Security")
   }

#Convert the hashtable to a string
 $LogNameKeysAsStrings = $LogNameKeys.Values | Out-String -Stream

#Uses ForEach to loop through $LogNameKeysAsStrings and run the Get-EventLog command
 ForEach ($LogNameKey in $LogNameKeysAsStrings) {
 Get-EventLog -LogName $LogNameKey -Newest 5
 }
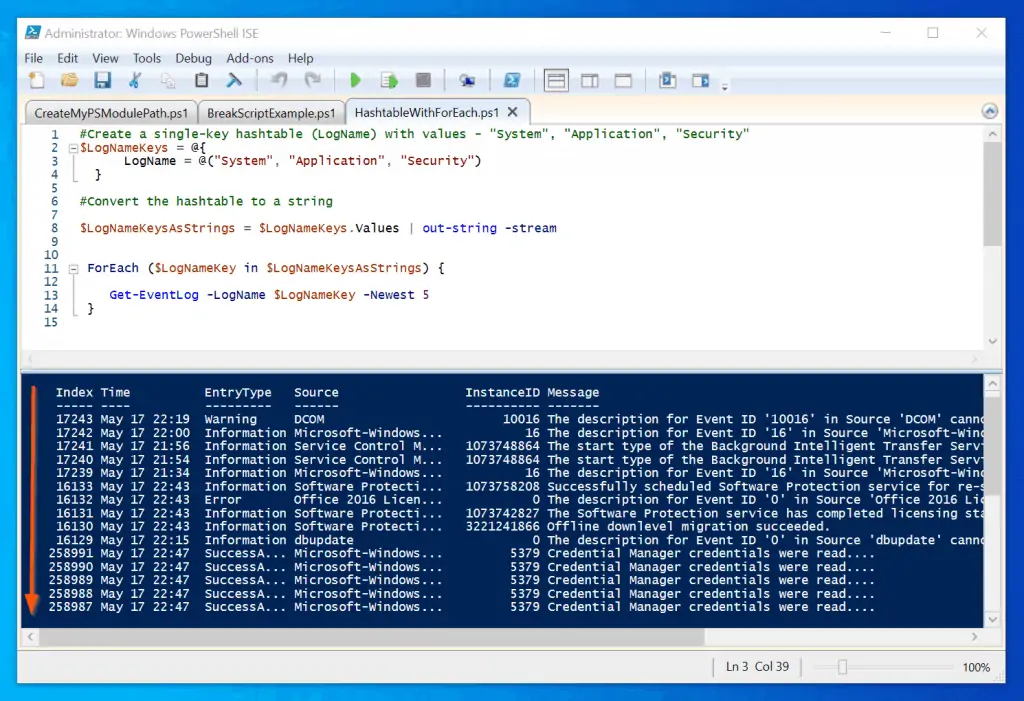
The screenshot below displayed the result of the script. There are 15 rows in the result pane – representing 5 of “System”, “Application”, “Security” event logs.

Customize a Report with PowerShell Hashtable and Select-Object
In the last section, we created a PowerShell script that pulls the Windows event log report. Here is a screenshot of the report
The default output of the script has 5 columns – Index, Time, EntryType, Source, InstanceID, and Message. If you are sending this as a report, you may want to change these column names to names that will be easily understandable.
Here is the script from the last section.
#Create a single-key hashtable (LogName) with values - "System", "Application", "Security"
 $LogNameKeys = @{
       LogName = @("System", "Application", "Security")
   }
#Convert the hashtable to a string
 $LogNameKeysAsStrings = $LogNameKeys.Values | out-string -stream
#Uses ForEach to loop through $LogNameKeysAsStrings and run the Get-EventLog command.
#Then, save the output of the command in the EventLogReport variable,
$EventLogReport = ForEach ($LogNameKey in $LogNameKeysAsStrings) {
   Get-EventLog -LogName $LogNameKey -Newest 5
 }
To modify the column header names from this script, we will pipe the Get-EventLog command to a Select-Object command.
Then, create a PowerShell hashtable within the Select-Object command that modifies the column names. Here is the modified script that performs the magic.
#Create a single-key hashtable (LogName) with values - "System", "Application", "Security"
 $LogNameKeys = @{
        LogName = @("System", "Application", "Security")
    }
 #Convert the hashtable to a string
 $LogNameKeysAsStrings = $LogNameKeys.Values | out-string -stream
#Uses ForEach to loop through $LogNameKeysAsStrings and run the Get-EventLog command.
#Then, save the output of the command in the EventLogReport variable,
$EventLogReport = ForEach ($LogNameKey in $LogNameKeysAsStrings) {Get-EventLog -LogName $LogNameKey -Newest 5 | Select-Object `
    @{Name='Log ID';Expression={$_.Index}},
    @{Name='Event Log Time';Expression={$_.TimeWritten}},
    @{Name='Event Source';Expression={$_.Source}},
    @{Name='Event ID';Expression={$_.InstanceID}},
    @{Name='Event Details';Expression={$_.Message}}
 }
#Finally, pipe the EventLogReport variable to Format-Table to create the report in table format
 $EventLogReport | Format-Table
The script appears much more complex than it really is. However, if you focus on the part of the script after Select-Object, it will be easy to spot the difference between this script and the earlier copy.
Specifically, I included hashtables in the Select-Object block of the code. Each hashtable customizes the output of the Get-EventLog command.
Here is a sample hashtable from the Select-Object block:
@{Name='Event ID';Expression={$_.InstanceID}}
As usual, the PowerShell hashtable has two elements. The key is the Name, the value is the Expression.
Another important thing to note is that at the end of each hashtable in the Select-Object block, there is a comma (,).
Finally, here is the result of the final script in PowerShell:
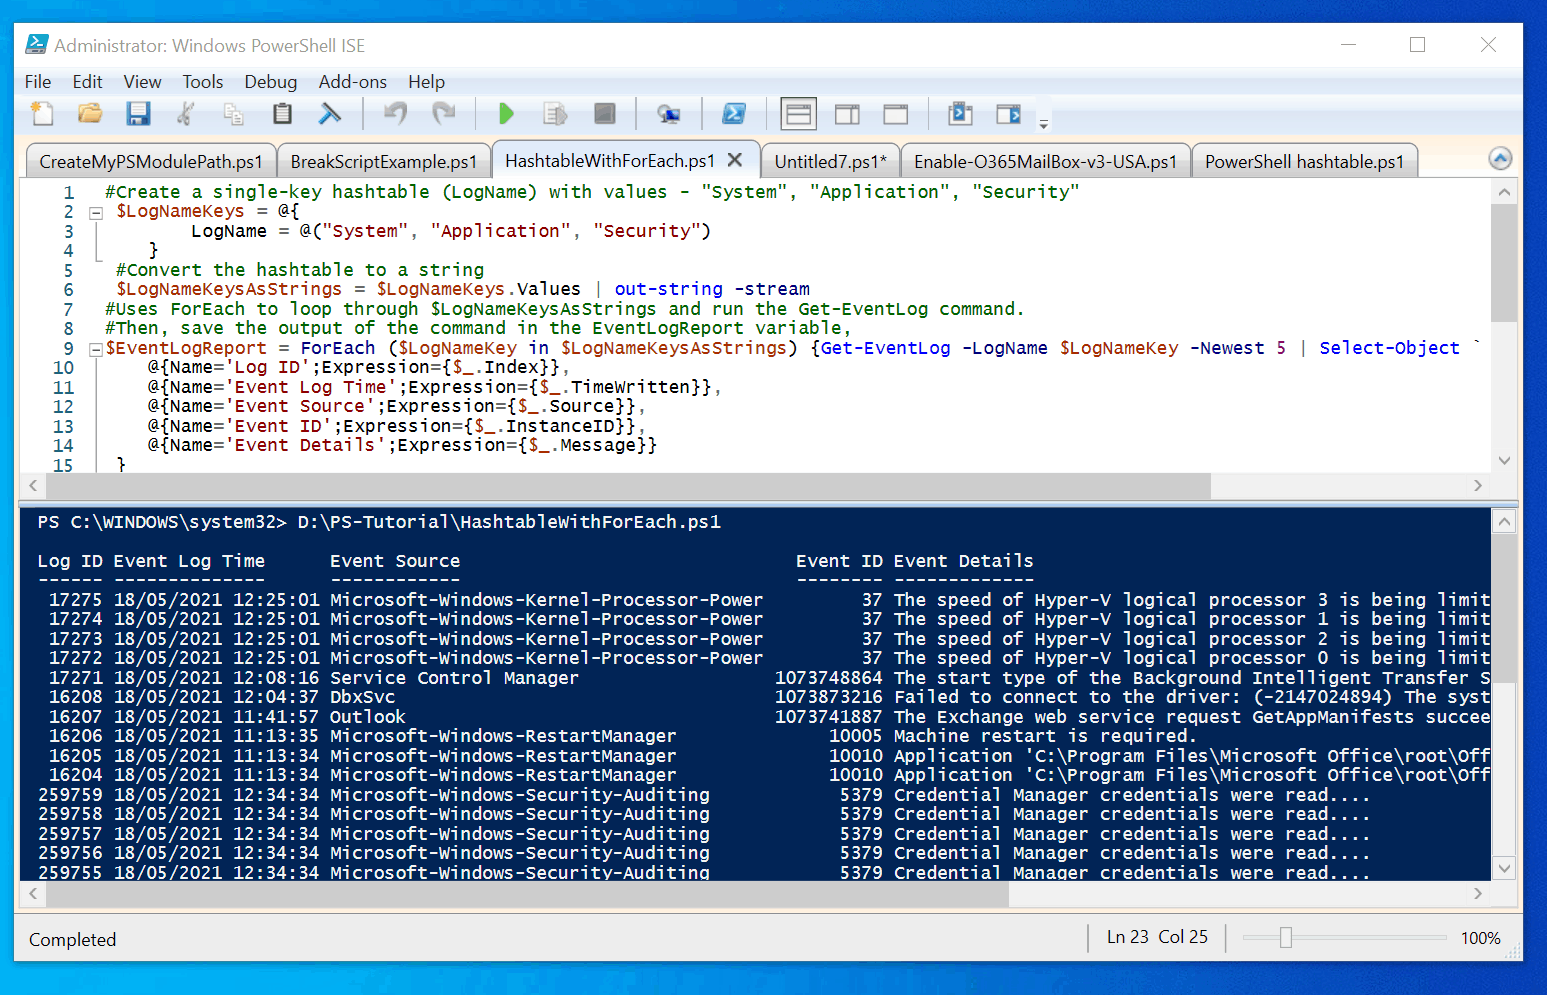
$EventLogReport | Format-Table
Export PowerShell Hashtable to CSV
In this final section, you will learn how to export a PowerShell hashtable to CSV.
In my first example for this section, I will show you how to export this hashtabe to CSV.
$hashtable = @{
     Name = "Document"
     PSProvider = "FileSystem"
     Root = "C:\Users\victo\Documents"
 }
To successfully export this PowerShell hashtable to a CSV file, you have to use the GetEnumerator Method (discussed earlier) to list the values. Otherwise, the actual key/value pairs will not be exported.
Here is the modified script that exports the hashtable saved in the hashtable variable to a CSV file.
$hashtable = @{
     Name = "Document"
     PSProvider = "FileSystem"
     Root = "C:\Users\victo\Documents"
 }
$hashtable.GetEnumerator() | Select-Object Name, Value | Export-Csv -Path D:\PS-Tutorial\hashtable.csv -NoTypeInformation
In introduced the script below:
$hashtable.GetEnumerator() | Select-Object Name, Value | Export-Csv -Path D:\PS-Tutorial\hashtable.csv -NoTypeInformation
The script includes the GetEnumerator Method in the hashtable. Then pipes the output to the Select-Object command.
Finally, I pipe the output of the Select-Object command to the Export-Csv command. To read more about how to use Export-Csv Cmdlet, read our guide – Powershell NoTypeInformation: Applications and Examples.
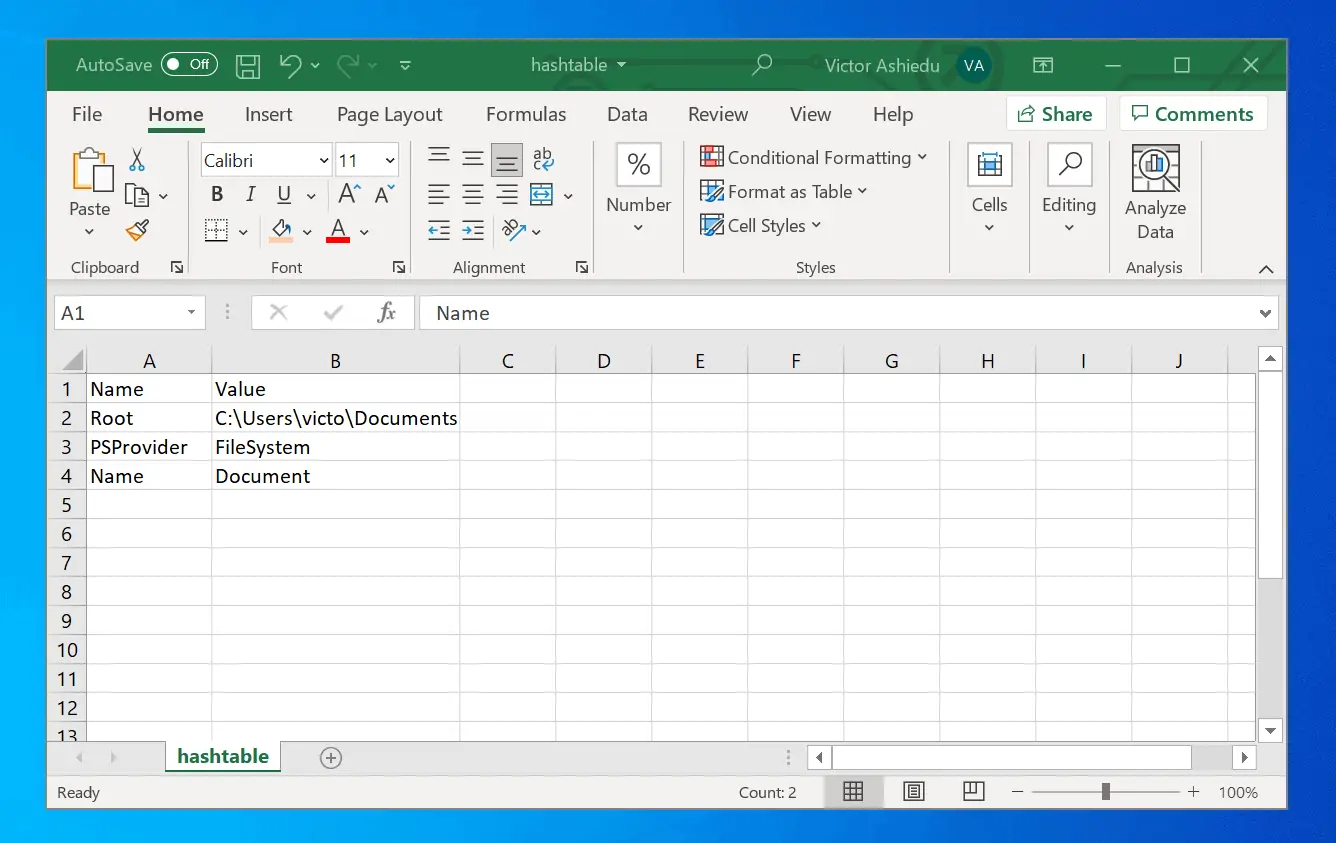
When you run this script, it creates a CSV file called hashtable.csv, in the path you specified. See the screenshot below for the output of the CSV file.
$hashtable = @{
     Name = "Document"
     PSProvider = "FileSystem"
     Root = "C:\Users\victo\Documents"
 }
$hashtable.GetEnumerator() | Select-Object Name, Value | Export-Csv -Path D:\PS-Tutorial\hashtable.csv -NoTypeInformation
In my second example, I will export the output of the script we created in the last section – the event log script – to a CSV file.
Here is the script. To export the report to CSV, I added the code below this one at the end of this script.
#Create a single-key hashtable (LogName) with values - "System", "Application", "Security"
$LogNameKeys = @{
LogName = @("System", "Application", "Security")
}
#Convert the hashtable to a string
$LogNameKeysAsStrings = $LogNameKeys.Values | out-string -stream
#Uses ForEach to loop through $LogNameKeysAsStrings and run the Get-EventLog command.
#Then, save the output of the command in the EventLogReport variable,
$EventLogReport = ForEach ($LogNameKey in $LogNameKeysAsStrings) {Get-EventLog -LogName $LogNameKey -Newest 5 | Select-Object `
@{Name='Log ID';Expression={$_.Index}},
@{Name='Event Log Time';Expression={$_.TimeWritten}},
@{Name='Event Source';Expression={$_.Source}},
@{Name='Event ID';Expression={$_.InstanceID}},
@{Name='Event Details';Expression={$_.Message}}
}
#Finally, pipe the EventLogReport variable to Format-Table to create the report in table format
$EventLogReport | Format-Table
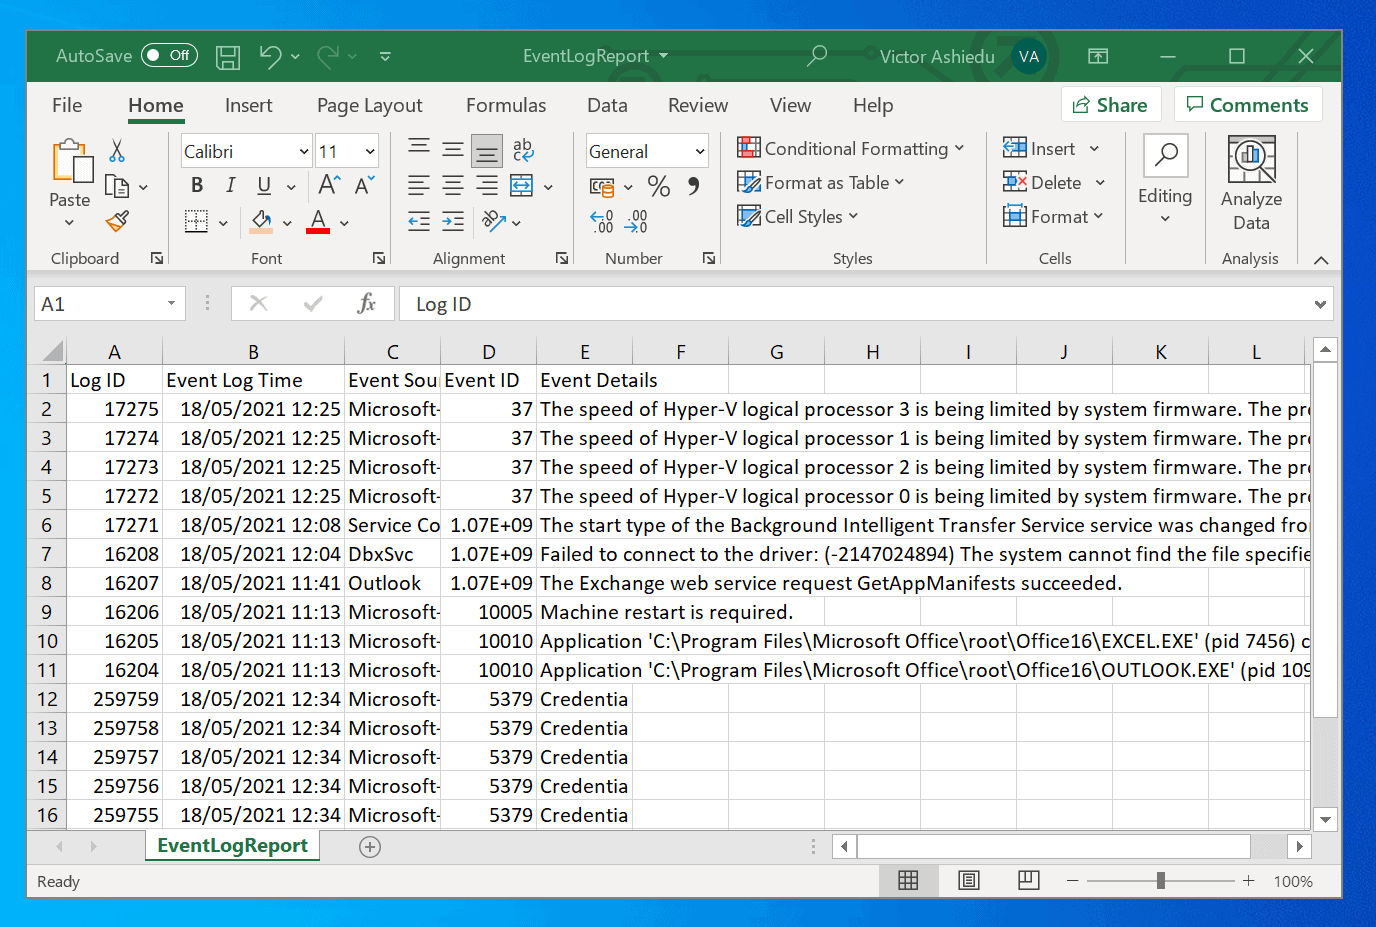
$EventLogReport | Export-Csv -Path D:\PS-Tutorial\EventLogReport.csv -NoTypeInformation
$EventLogReport | Export-Csv -Path D:\PS-Tutorial\EventLogReport.csv -NoTypeInformation
The code pipes the output of the ForEach loop – saved in the EventLogReport variable – to the Export-Csv command. The CSV file generated is shown in the screenshot below.
That is it – a comprehensive guide about PowerShell hashtable! I hope you found it helpful?
If you found it helpful, we would appreciate you sharing your experience with our community using the comments form below.
You could also respond to the “Was this page helpful” question below and provide us with your feedback.
Finally, for more PowerShell tech Itechguides, visit our Windows PowerShell How-To guide page. You may also find our Work from Home page very helpful.