Are you new to PowerShell scripting or simply want to learn how to use the ForEach statement? In this article, I explain this all-important PowerShell scripting statement and share my experience using it.
How PowerShell ForEach Iteration Work?
The ForEach loop iterates through a collection of items and performs a specified task.
To start the iteration, PowerShell takes the first item and assigns it to a variable. Then, PowerShell performs a specified task on the first item.
When ForEach loop completes the first task, it returns to the collection and assigns the next item to the same variable. Next, it performs the same task on this second item.
The process will continue until ForEach performs the task on the last item on the collection. Then, PowerShell ForEach terminates.
As an example, say you have a crate of eggs with 12 eggs. Your task is to break all the eggs.
However, you need to break the eggs one at a time. You begin by picking out the first egg from the crate and breaking it.
Then, you return to the crate, pick the second egg and break it. You’ll continue this iteration until you break the last egg.
PowerShell ForEach Syntax
The syntax of PowerShell ForEach is:
ForEach ($<item> in $<collection>) {<statement lists>}The $<item> and $<collection> are usually variables. However, you may represent the $<item> with a variable but replace $<collection> with a command.
The ForEach statement iterates through a collection of items in the $<collection> and assigns each item the $<item> variable. Then, PowerShell uses the value stored in the $<item> variable to run the commands in the {} block.
For example, assuming I have the following collection:
$collection = 1, 2, 3, 4
I can use PowerShell ForEach statement to iterate the values saved in the $collection variable. Say I want to add 6 to each of the numbers in the $collection variable, I will run the commands below:
$collection = 1, 2, 3, 4
ForEach ($item in $collection) {$item + 6}
When I run the above commands, the following happens:
- PowerShell saves the array of numbers 1, 2, 3, 4 in the $collection variable.
- Next, in the PowerShell ForEach statement, it starts of by assigning the first item in the collection. In this instance, it assigns “1” to the $item variable.
- Then, PowerShell runs the command in the {} block. In this example, $item + 6 equal 1 + 6. The result is 7
- Next, PowerShell circles back to the ($item in $collection) and assigns the next item in the $collection. This time, it assigns number “2” to the $item variable.
- Then, it proceeds to proces the command in the $item + 6 block. However, this time, $item equals 2, so PowerShell computes 2 + 6, equals 8.
- PowerShell repeats the loop until it processes the last item in the $collection.
Based on this explanation, if I run the commands…
$collection = 1, 2, 3, 4
ForEach ($item in $collection) {$item + 6}
PowerShell will display the following values:
7
8
9
10
Let’s give it a go…
Here you go…the result is exactly as predicted…

Earlier, I mentioned that you do not have to save the items in the $collection in a variable. I did say that you can run a command directly.
Based on this, I can achieve the same result as the last commands by running a single command as shown in the PowerShell ForEach loop below:
ForEach ($item in (1, 2, 3, 4)) {$item + 6}As predicted, this command produces the same result as shown in the screenshot below:

ForEach vs ForEach-Object vs For
Wondering whether there is a difference between PowerShell ForEach vs ForEach-object vs For? You’re not alone – this is a common question.
In the next 2 subsections, I will compare PowerShell ForEach vs ForEach-object, then PowerShell ForEach vs For.
ForEach vs ForEach-Object
If you’ve been reading this article from the beginning, you should know that PowerShell ForEach is used to iterate a collection of items. Similarly, PowerShell ForEach-Object iterates a collection of items.
However, PowerShell ForEach and ForEach-Object approach the iteration in slightly different ways. While you need to assign each item in a collection to a variable in ForEach, ForEach-Object assigns the automatic pipeline variable, $_ to each item in the collection.
In addition to this difference, the syntax of ForEach is different from that of ForEach-Object.
As I already discussed in the Syntax section of this guide, the syntax of ForEach is:
ForEach ($<item> in $<collection>) {<statement lists>}On the other hand, the syntax of ForEach-Object is:
ForEach-Object -MemberName -InputObject
So, if I continue with the example I used to explain PowerShell ForEach, I can pipe the output of the numbers “1, 2, 3, 4” to ForEach-Object…
1, 2, 3, 4 | ForEach-Object {$_ + 6}Alternatively, I can save the array of values in a collection variable…
$collection = 1, 2, 3, 4
Then, pipe the $collection to ForEach-Object as shown below:
$collection | ForEach-Object {$_ + 6}To summarize this section, the major differences between PowerShell ForEach vs ForEach-Object are:
- To use ForEach, you need to manually assign each value in a collection a variable. However, ForEach-Object automatically assigns the pipeline variable, $_
- While PowerShell ForEach cannot accept input via a pipeline, ForEach-Object can.
- Finally, based on facts 1, and 2, the syntaxes of ForEach and ForEach-Object are different
ForEach vs For Statements
In the last subsection, I discussed the differences and similarities between ForEach vs ForEach-Object. In this subsection, I will compare ForEach vs For.
Based on what I have discussed so far in this article, we know a lot about ForEach. So, to compare PowerShell ForEach vs For, I will focus more on PowerShell For loop.
So, what is a “For Loop” in PowerShell?
A PowerShell For loop construct runs commands in a block while a specified condition evaluates to $true. Even by definition, there is a clear difference between PowerShell ForEach and PowerShell For.
While a PowerShell ForEach statement iterates a list of collections, a PowerShell For loop runs the command in a block as far as a specified condition continues to evaluate to $true.
To expand on this, here is the syntax of the PowerShell For statement…
for (<Init>; <Condition>; <Repeat>)
{

   <statement lists>

}
In the syntax of For Loop:
- For loop uses <Init> to create and initialize a variable with a starting value.
- <Condition> defines the condition evaluated by PowerShell each time it runs the For Loop. This value resolves to $true or $False and determines whether the loop should continue
- The <Repeat> defines a command that runs each time the For Loop executes. Typically, PowerShell For loop uses this to adjust the value defined in <Init>. s
- Finally, there is the <Statement> in the {} block. This is the actual command that executes each time the For Loop runs
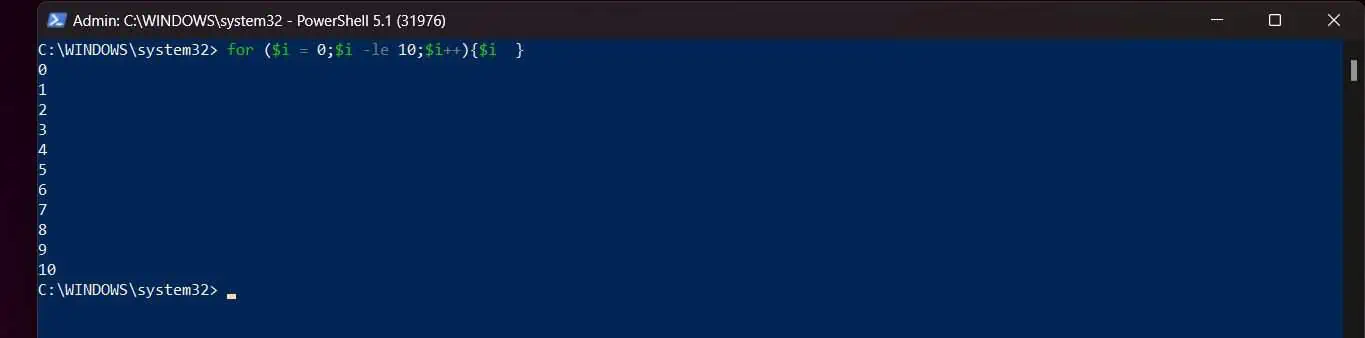
To give an example, if I want to list numbers from 0 to 10 in increments of 1, I can use the following commands
for ($i = 0;$i -le 10;$i++){$i }In the command, $i = 0 is the <Init>. $i -le 10 is the <Condition>. Every time the For Loop runs, it will check whether the <Init> value is less than or equal to 10.
Next, is $i++. This is the <Repeat> value. Everytime this For Loop runs, PowerShell increments $i (the <Init> value) by 1 (represented by $i++).
Finally, we have the value in the {} block – which is the variable $i. Note that this variable is the result of incrementing the <Init> by 1 in each For Loop.
To see what the command does, let’s pop it into PowerShell…
I can produce the same result with ForEach with the command below…
ForEach ($i in 1..10) {$i}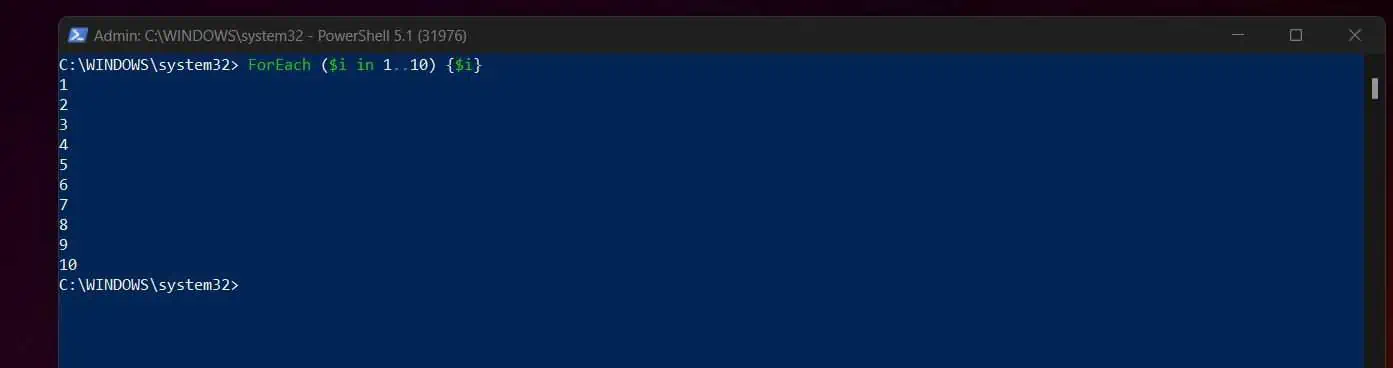
The only difference is that if you wish to increment by a number other than 1, the limitation of ForEach becomes apparent. For example, I can increment by 2 in the <Repeat> part of For Loop, but I cannot do the same with ForEach.
for ($i = 0;$i -le 10;$i += 2){$i }PowerShell ForEach Method Explained
So far in this guide, I have discussed the standard syntax for the PowerShell ForEach loop. In addition to that, I have also compared the ForEach loop to ForEach-Object and PowerShell For Loop.
In PowerShell version 4, Microsoft introduced another way to iterate a collection of items – the ForEach Method. To illustrate this, let’s go back to our collection of items used in previous examples.
$collection = 1, 2, 3, 4
To access the ForEach Method in this array, start by running the into PowerShell. Then, copy and paste the $collection variable in PowerShell, followed by a period “.” and the letter “F”.
Then press the Tab key.
$collection.F
When you press the Tab key, PowerShell will autocomplete the command as shown below…
$collection.ForEach(
However, before you use the method, you need to add the closing braces, “)” as shown below…
$collection.ForEach( )
You’re not done yet, though. Within the braces, “( )”, you need to enclose “{ }”.
$collection.ForEach( { } )Finally, within “{ }”, you can now add your command.
To continue with the example from our previous section of this guide, say I want to add 6 to each of the numbers in $collection, I’ll run the command below…
$collection.ForEach( { $_ + 6 } )Here is the result of the last command in PowerShell.
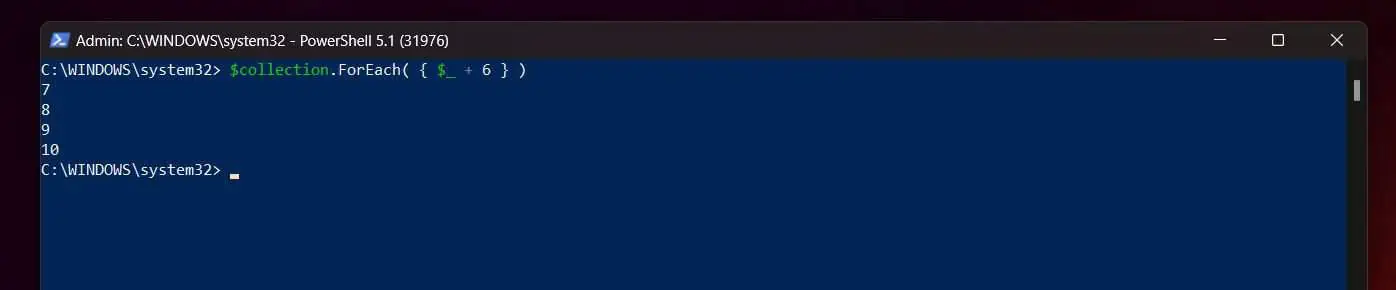
You would have noticed that, unlike the traditional PowerShell ForEach statement, the ForEach Method assigns the automatic pipeline variable, $_ to each item in the collection.
Then, it uses the automatic pipeline variable, $_ in the command part “{ }”, of the ForEach Method Loop. It is also important to note that this is the same way ForEach-Object accesses the items in a collection.
Finally, for this section, here is the syntax of PowerShell ForEach Method…
$<collection>.({<statement list>})ForEach Examples
Yeah, we finally got to the examples!
I have already covered a lot of grounds in this guide. I have discussed PowerShell ForEach syntax.
In addition to that, I have compared ForEach with ForEach-Object and For Look. The guide has also explained PowerShell ForEach Method and its similarities and differences to the traditional ForEach and ForEach-Object.
In this section, I share 10 common examples of the application of PowerShell ForEach. In the examples, I will use ForEach, ForEach-Object, and ForEach Method.
1. Use the ForEach to Iterate the Keys in a Hashtable
In this example, I will discuss how to use ForEach to iterate the keys in a hashtable. To learn more about Hashtables, read our guide – PowerShell Hashtable Ultimate Guide With Examples.
In this example, I want to use ForEach to loop through the hashtable below – then, use Get-EventLog to return values for each EventLogName:
$EventLogKeys = @{ EventLogName = @("System", "Application", "Security") }The first step is to execute the above code in the PowerShell console.

Because hashtables are stored in key/value pair, you need to extract the values in the above hashtable, and then convert them to strings.
$EventLogKeysAsStrings = $EventLogKeys.Values | Out-String -Stream
If I add the last command to the script, I’ll have the script below:
$EventLogKeys = @{EventLogName = @("System", "Application", "Security")}
$EventLogKeysAsStrings = $EventLogKeys.Values | Out-String -Stream
Finally, to use ForEach to iterate the values in the hashtable, include the code below:
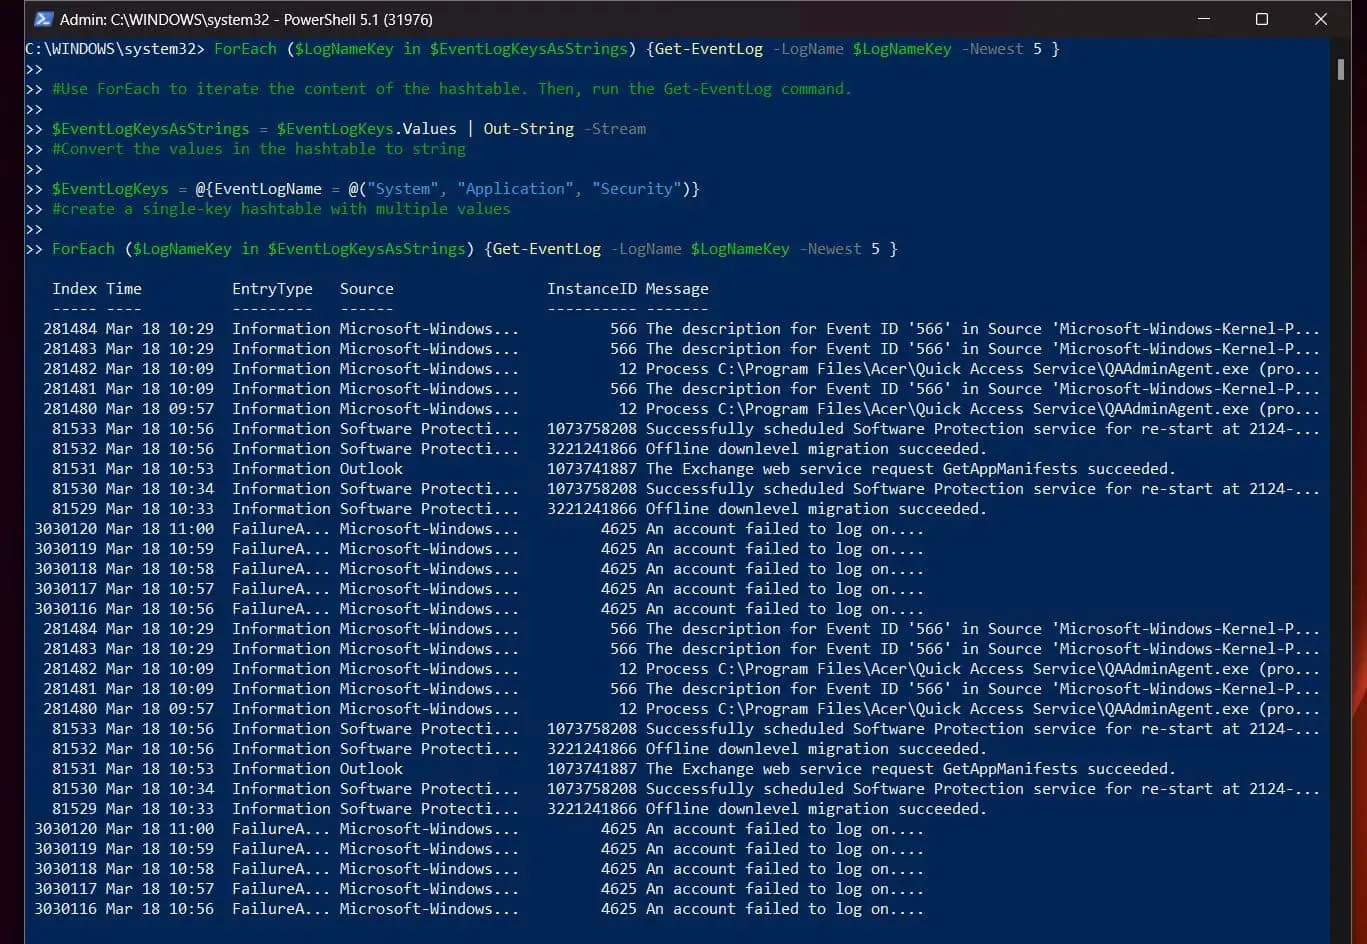
ForEach ($LogNameKey in $EventLogKeysAsStrings) {Get-EventLog -LogName $LogNameKey -Newest 5 }

#create a single-key hashtable with multiple values
$EventLogKeys = @{EventLogName = @("System", "Application", "Security")}

#Convert the values in the hashtable to string
$EventLogKeysAsStrings = $EventLogKeys.Values | Out-String -Stream

#Use ForEach to iterate the content of the hashtable. Then, run the Get-EventLog command.

ForEach ($LogNameKey in $EventLogKeysAsStrings) {Get-EventLog -LogName $LogNameKey -Newest 5 }
And here is the result of the script in PowerShell…
2. Use the ForEach Loop to Iterate an Array
In this second example, I will use the ForEach Method to iterate the content of an array. You can learn the difference between a hashtable and an array in our guide – PowerShell Hashtable vs PowerShell Array.
Moving on, in this example, I will use the ForEach Method to loop through the array below:
$EventLogNames = @("System", "Application", "Security")The good news is that, unlike with the hashtable that required us to extract the values and convert them to string, we do not need to do that for an array.
So, I can proceed straight to add the ForEach Method to the script as shown below…
$EventLogNames = @("System", "Application", "Security")

$EventLogNames.ForEach( {Get-EventLog -LogName $_ -Newest 5 } )Going back to our script, run it to PowerShell…
$EventLogNames = @("System", "Application", "Security")
$EventLogNames.ForEach( {Get-EventLog -LogName $_ -Newest 5 } )
Now, we have the result of the command as a list of all the log entries in the “System”, “Application”, and “Security” logs on my computer…

3. ForEach-Object “Begin,” “Process,” and “End” Explained
Earlier in this article, I said that the syntax of ForEach-Object is:
ForEach-Object -MemberName -InputObject
In addition to this syntax, PowerShell ForEach-Object can also include “Begin”, “Process”, and “End” blocks as used in PowerShell functions.
The syntax of ForEach-Object with “Begin”, “Process”, and “End” blocks is…
ForEach-Object -Begin scriptblock -Process scriptblock -End scriptblock
With this syntax, you can add script blocks into the “Begin”, “Process”, and “End” blocks of ForEach-Object
To demonstrate how to use ForEach-Object with “Begin”, “Process”, and “End” blocks, I will use the commands below:
$SystemEvents = Get-EventLog -LogName System -Newest 100
$SystemEvents | ForEach-Object -Begin {Get-Date} -Process {Out-File -FilePath F:\Report\Events1.txt -Append -InputObject $_.Message} -End {Get-Date}
The first command saves the result of Get-EventLog in a variable called $SystemEvents. Then, in the second command, the Get-Date in the “Begin” block records when the command in the “Process” block starts.
Finally, when the command in the “Process” block is completed, the Get-Date in the “End” block records the time.
This command is useful if you need to track how long it takes a command to run.
By the way, the command in the “Process” block saves the events saved in the $SystemEvents to a text file.
4. Use ForEach to Iterate all Files in a Folder
In this example, I will use Get-Item to list all text files with .log extension in the path, F:\Inputs. Then, I’ll use PowerShell ForEach to loop through the log files and append today’s date to each file.
$Start = 0
$End = 10
Do {
New-Item -ItemType File -Path F:\Inputs -Name logfile_$Start.log -Force

$Start++
} Until ($Start -ge $End)
This script will create logfile_0 to logfile_9 in the path F:\Inputs. Change F:\Inputs to a path on your computer.
Now, to list all the files, I’ll use the command below:
$FilePaths = (Get-ChildItem "F:\Inputs" -Filter *.log).FullName
The last command lists the full path to all text files with the .log extension in the specified path and saves them in the $FilPaths variable. In the next step, I will use Set-Content to add today’s date to each file.
Here is the script that does this:
ForEach ($FilePath in $FilePaths) {
$DateEntry = Get-Date
  Set-Content -Path $FilePath -Value $DateEntry

}
5. Use ForEach to Display Characters in a String
In this example, I want to display all the characters in “victor” as strings. This can easily be done with the ToCharArray() Method as shown below:
'victor'.ToCharArray()
This command displays the letters in the string, ‘victor’ as individual characters…

This is the easy part and it is great – but what if I want to perform another task with the individual characters in the string? Say, create a folder with each character.
I can achieve this using a ForEach loop as shown below:
ForEach ($char in 'victor'.ToCharArray()) { New-Item -ItemType Directory -Path d:\Inputs -Name $char -Force }
As you can see from the last screenshot, the command creates a folder with each character and displays the names of the folders.
However, if you do not want the command to display the names of the folders after creating them, pipe the New-Item command to Out-Null…
ForEach ($char in 'victor'.ToCharArray()) { New-Item -ItemType Directory -Path F:\Inputs -Name $char -Force | Out-Null }6. Use ForEach with a “Do, Until” Statement
In this example, I want to count from 0 to 5. Then, start counting again from 1 to 5, from 2 to 5, and finally, from 3 to 5.
To achieve this, I’ll need to combine PowerShell ForEach with “Do” and “Until”. Here is the script that does this…
$CountFrom = 0,1,2,3
$CountTo = 5

ForEach ($Count in $CountFrom) {Do {Write-Host $Count; Start-Sleep 1; $Count++} Until ($Count -gt $CountTo)}
In the script, I defined the numbers to start counting from in a variable called $CountFrom. Then, I defined the number I wanted to count to at the foreach loop, in the $CountTo variable.
Finally, I write a “Do, Until” statement and wrap it in a ForEach block.
Here is the result of the script in PowerShell…
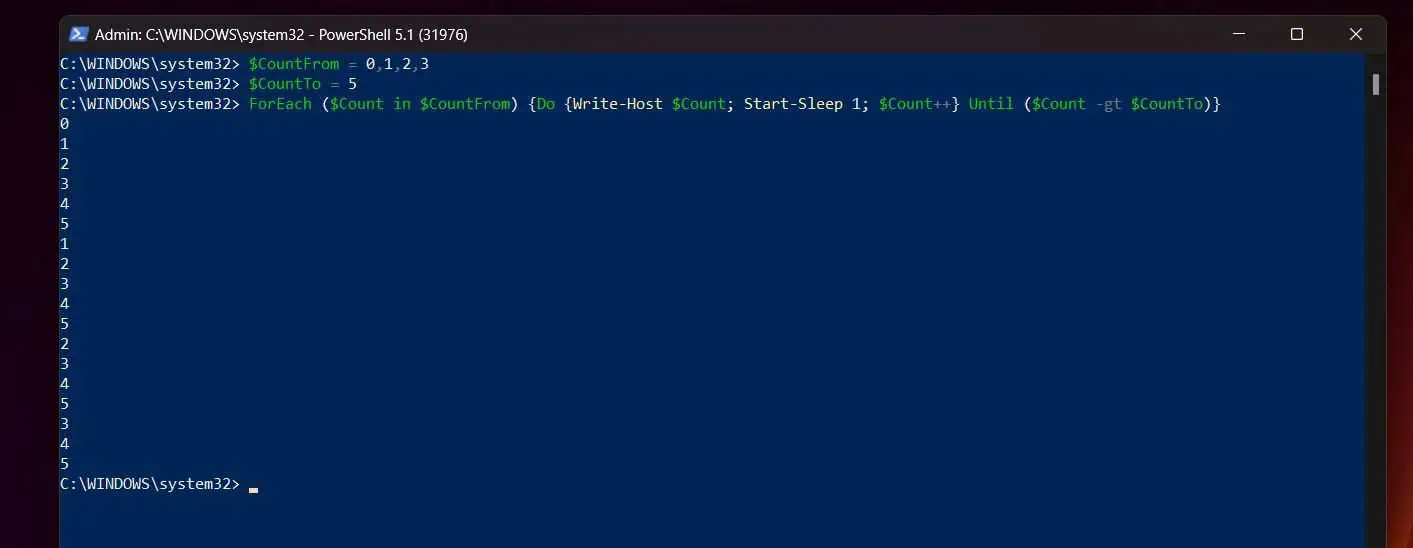
I have highlighted the numbers PowerShell started counting from…0, 1, 2, and 3
7. Use ForEach and Format-Table to Display Data in a Table
In this example, I want to customize the results of Get-EventLog for 3 log types with Select-Object. Then, format the output with Format-Table.
The first step is to create a script that pipes the output of Get-EventLog to Select-Object (for this to work, I must save the result to a variable):
$EventLogReport = ForEach ($LogName in ("System","Application","Security")) {Get-EventLog -LogName $LogName -Newest 5 | Select-Object @{Name='Log ID';Expression={$_.Index}}, @{Name='Event Log Time';Expression={$_.TimeWritten}}, @{Name='Event Source';Expression={$_.Source}},    @{Name='Event ID';Expression={$_.InstanceID}},
    @{Name='Event Details';Expression={$_.Message}} }
When you run the above script, it returns the expected results. To display the results, after running the script, execute the variable, $EventLogReport.
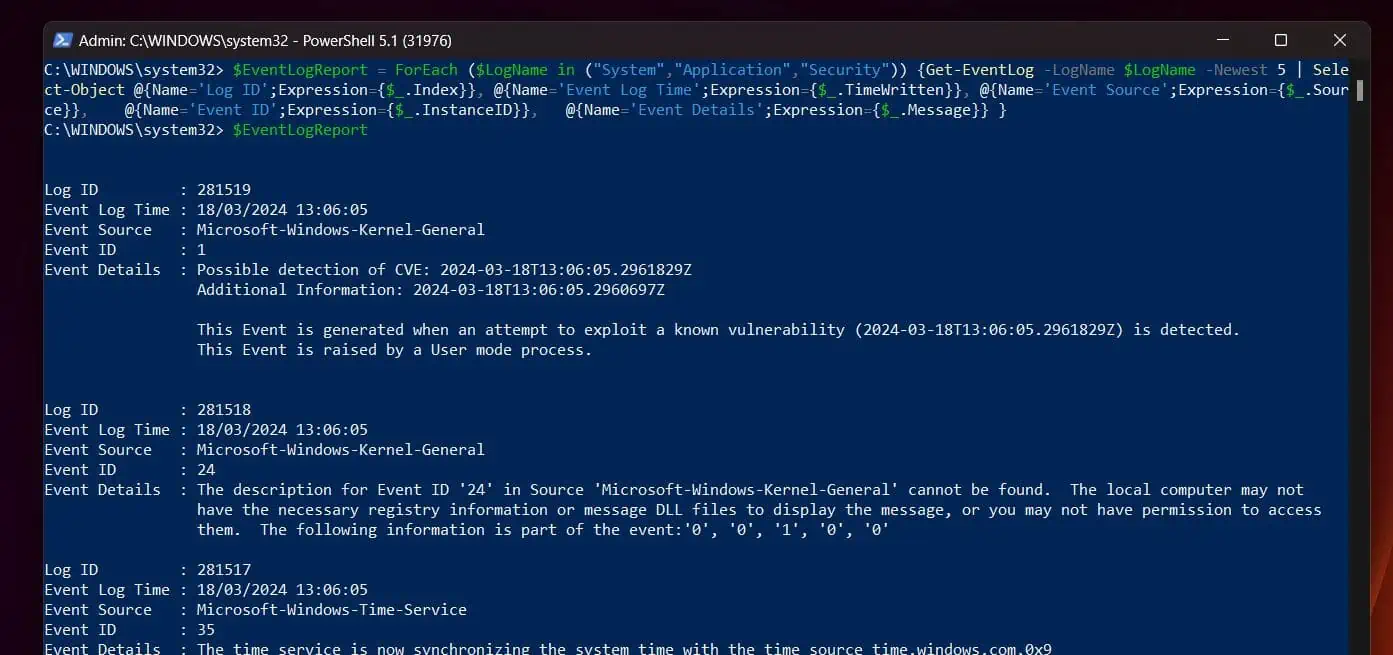
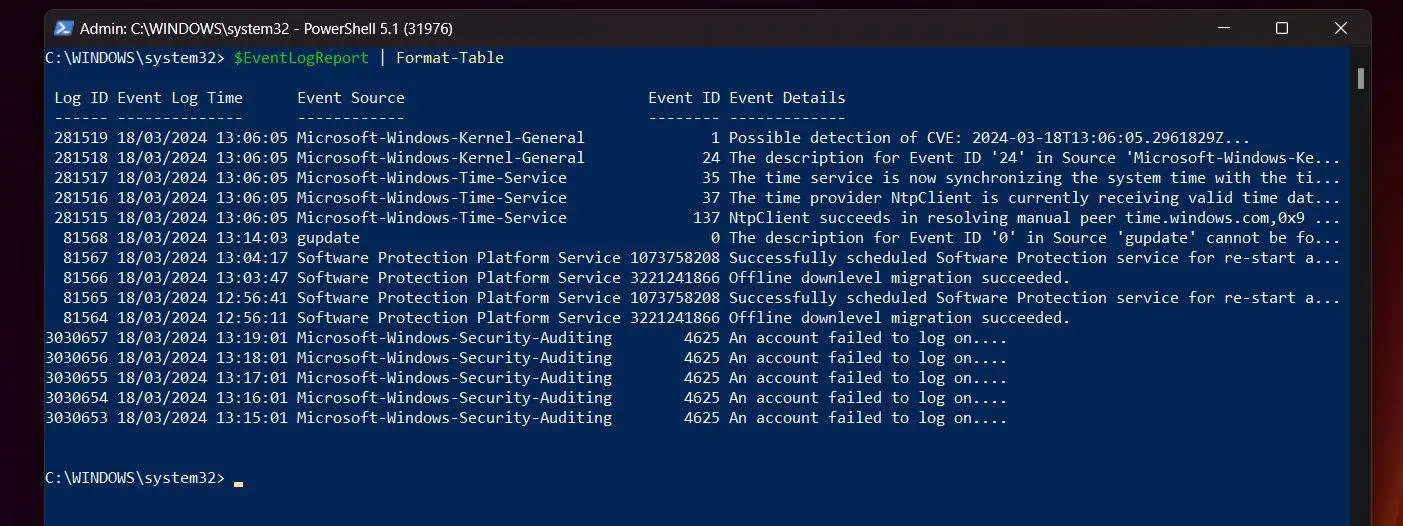
As you can see from the screenshot below, the command displayed the results. However, the result is not formatted properly. To display the result in a table, pipe the variable $EventLogReport to Format-Table
$EventLogReport | Format-Table
The report is now formatted in a table format as shown in the screenshot below…
8. Export the Output of a ForEach Object to CSV
If you need to export the output of PowerShell ForEach to CSV, the secret is to save the output of the ForEach loop to a variable. Then, export the variable to a CSV using Export-CSV.
Here is an example: say I want to export the newest 5 System, Application, and Security event logs in a computer to a CSV. I can use the command below to generate the report I need:
ForEach ($LogName in ("System", "Application", "Security")) {Get-EventLog -LogName $LogName -Newest 5 } When you run this script, it displays 15 entries – 5 each from the System”, “Application”, and “Security” logs.

The next question is this: how do you export this information to a CSV file?
The first step is to save the whole script in a variable:
$EventLogs = ForEach ($LogName in ("System", "Application", "Security")) {

   Get-EventLog -LogName $LogName -Newest 5

}
Next, you will pipe the variable to Export-Csv. Here is the final script:
$EventLogs = ForEach ($LogName in ("System", "Application", "Security")) {Get-EventLog -LogName $LogName -Newest 5 }

$EventLogs | Export-Csv -Path d:\Report\EventLogReport.csv -NoTypeInformation
10. Iterate the Content of a Text File with ForEach
In this final example, I accessed log names by adding them directly into the ForEach loop as shown below:
ForEach ($LogName in ("System", "Application", "Security")) {Get-EventLog -LogName $LogName -Newest 5 }Another way to do this is to save the names of the Event logs in a text file. Then, use Get-Content to list the log names in PowerShell.
Finally, use the result of Get-Content in the ForEach loop. In this example, I saved the event log names in a text file called EventLogNames.txt.
Here is the screenshot of the text file. Note that you must add each entry in a different line.
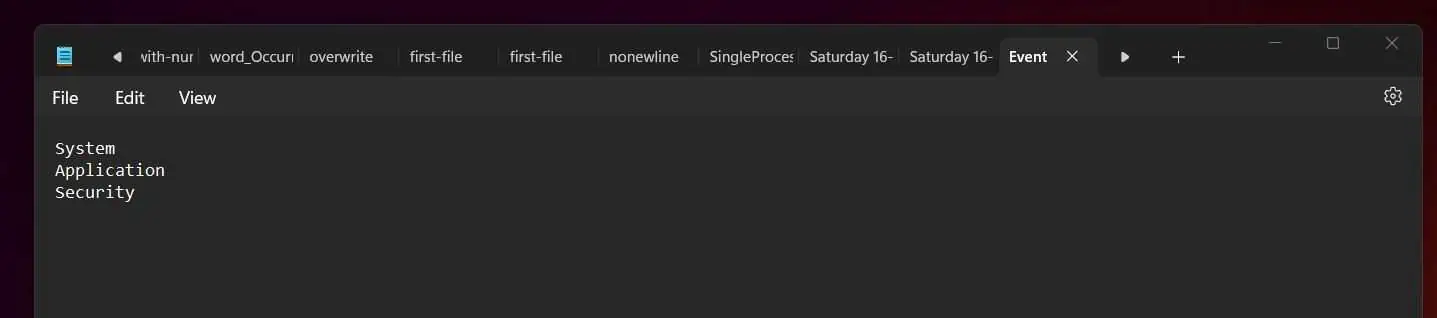
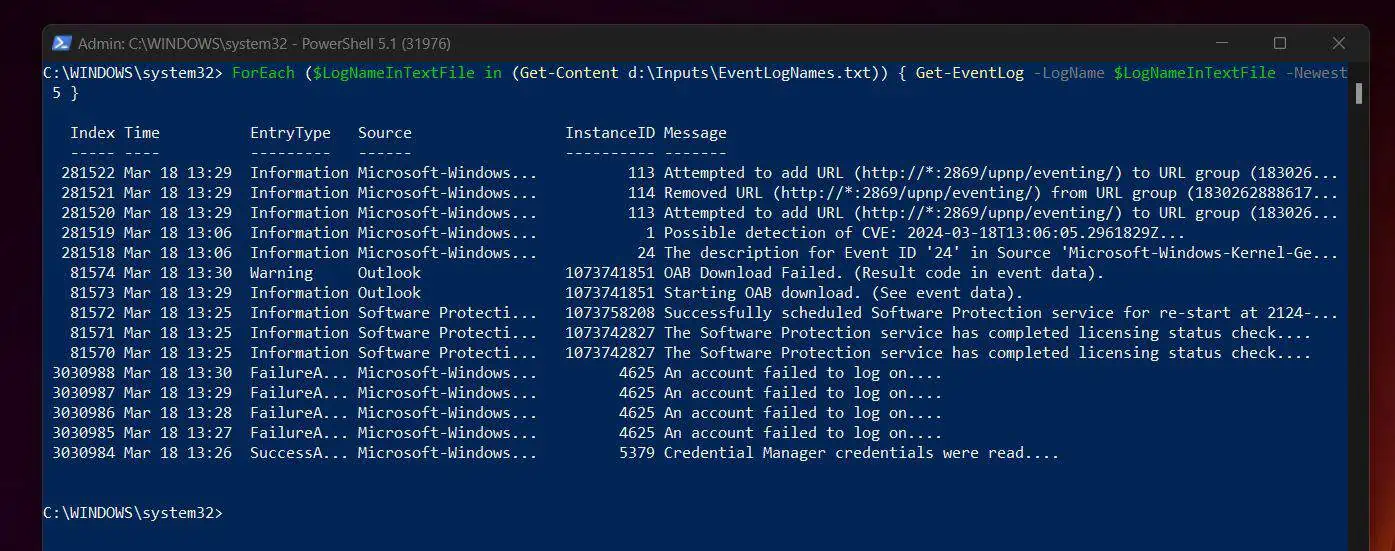
Finally, I can use the script below to list the newest 5 event entries in the event logs listed in the text file:
ForEach ($LogNameInTextFile in (Get-Content d:\Inputs\EventLogNames.txt)) { Get-EventLog -LogName $LogNameInTextFile -Newest 5 }Here is the result in PowerShell…
Conclusion
Whenever you need to iterate (loop through) a set of objects and perform a specific action, your go-to statement is ForEach. In this article, I have explained this versatile PowerShell statement and discussed various examples.
Thank you for reading and I hope you found the article enlightening! Let me know by responding to the “Was this page helpful?” question below.
Finally, if found this guide helpful, you may be interested in reading other guides on our PowerShell & CMD Explained page.