iTechGuides is reader-supported. When you buy through links on our site, we may earn an affiliate commission. As an Amazon Associate I earn from qualifying purchases. Learn more
In this Itechguide, Victor teaches you how to use Google Classroom. The guide covers steps to use Google Classroom for teachers and students.
Option 1: Use Google Classroom as a Teacher

This section covers steps teachers will use to create a classroom and invite students to join the classroom. It also covers steps to create and assign classwork, view assignments and manage class drive folder.
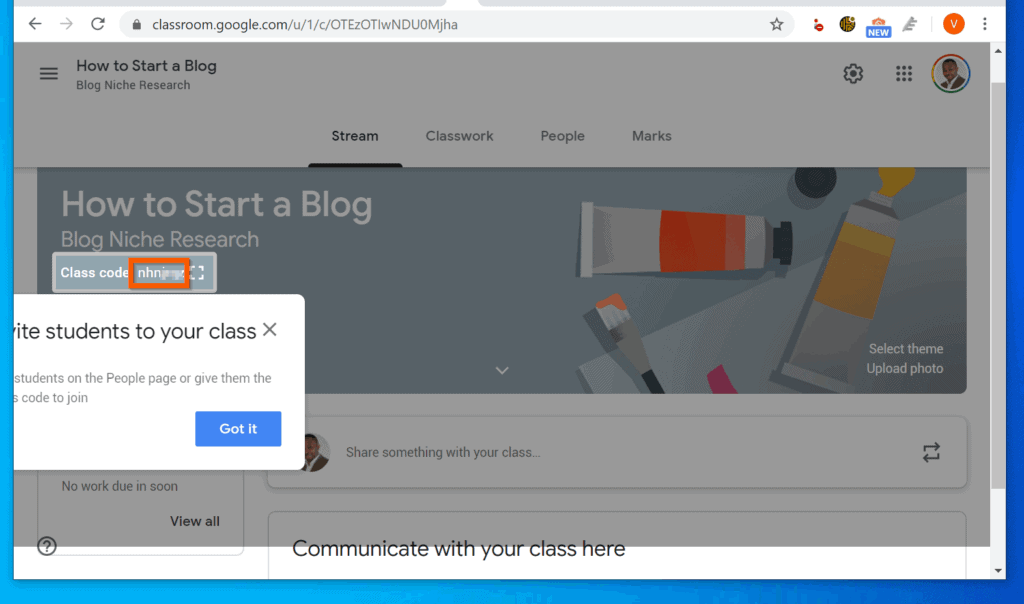
Step 1: Create a Google Classroom and Send Class Code to Students
The first step to use Google Classroom as a teacher is to create a classroom and send the class code to your students. Students will use the class code to join the classroom. Here are the steps to create a Google classroom…
Free tools Windows power users keep installed
One-click scans. No signup required.
- Open Classroom.Google.com from a browser on your PC or Mac Computer and sign in with your Google account.
- Then, on the top right of the page, click the + sign and select Create class. You will be required to accept the license agreement.

- On the license agreement pop-up, check the highlighted checkbox. Then, on the bottom right of the pop-up, click Continue. The form to Create class will open.

- On the Create class form, enter the class name (required) and other information (optional). Then, on the bottom right of the form, click Create and wait for the classroom to be created.


Step 2: Change Settings
After creating a Google classroom, you may want to modify some of the settings. Use the steps below…
Popular on Amazon

- Intel Celeron N4120: 4 Cores & Threads, 1.1GHz Base Clock, Up to 2.6GHz Boost Clock, 4MB Cache, Intel UHD Graphics 600. The perfect combination of performance, power consumption, and value helps your device handle multitasking smoothly and reliably with four processing cores to divide up the work.
- On the top right of the classroom, click the settings icon (looks like a gear). The classroom’s settings will open for editing.
- The Class details section has the details you entered when you created the classroom. You can change any of the class details. For more settings, scroll down.

- On the General Google Classroom setting section, you can display, copy, reset (change) or disable the Class code. You can also change the class Stream settings – this determines whether Students can Post and comment (default) or Students can only comment or Only teachers can post or comment.
- You can also configure how you want Classwork on the stream (notification) to be displayed.
- Finally, you can show or hide deleted items. For more settings scroll down.

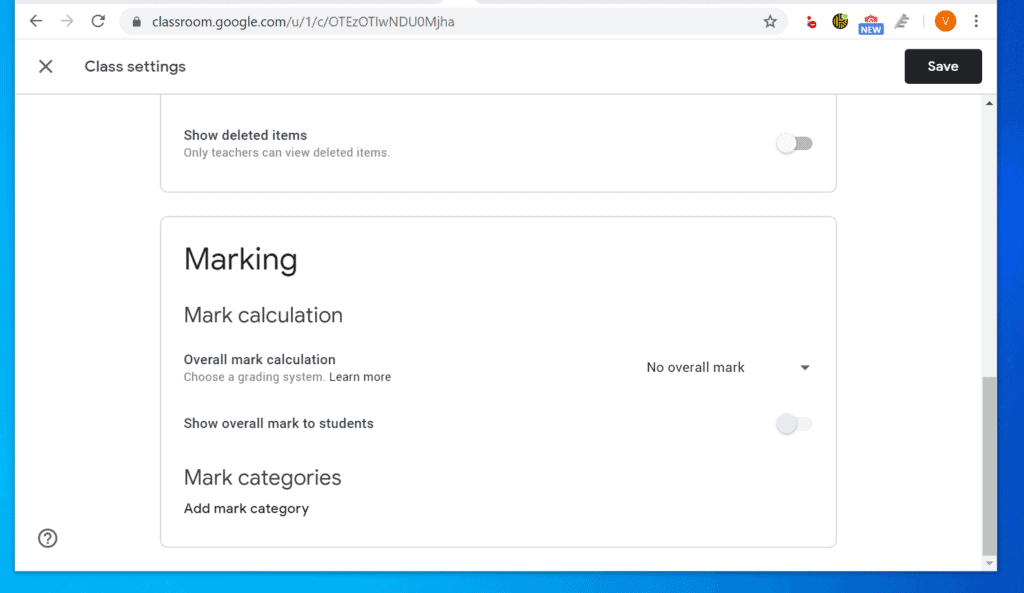
- Finally, the last Google classroom setting is Marking. In this section, you can determine how students’ grades are displayed. You can leave it at No overall mark (default), Total points or Weighted by category (applies if you add mark Categories).
- You may also set whether to Show overall mark to students or not (not shown by default).
- Finally, on the Marking section of the classroom settings, you can create Mark categories.
- When you finish making all the changes to the classroom settings, on the top right of the screen, click Save. Then, on the top left of the screen, click the X button to close the classroom settings.
Step 3: Add Students or Teachers
Another important step to use Google Classroom is to add students to the classroom. In the first sub-section of this section, you sent the Classroom code to the students. But if you want to add students yourself, follow the steps below…
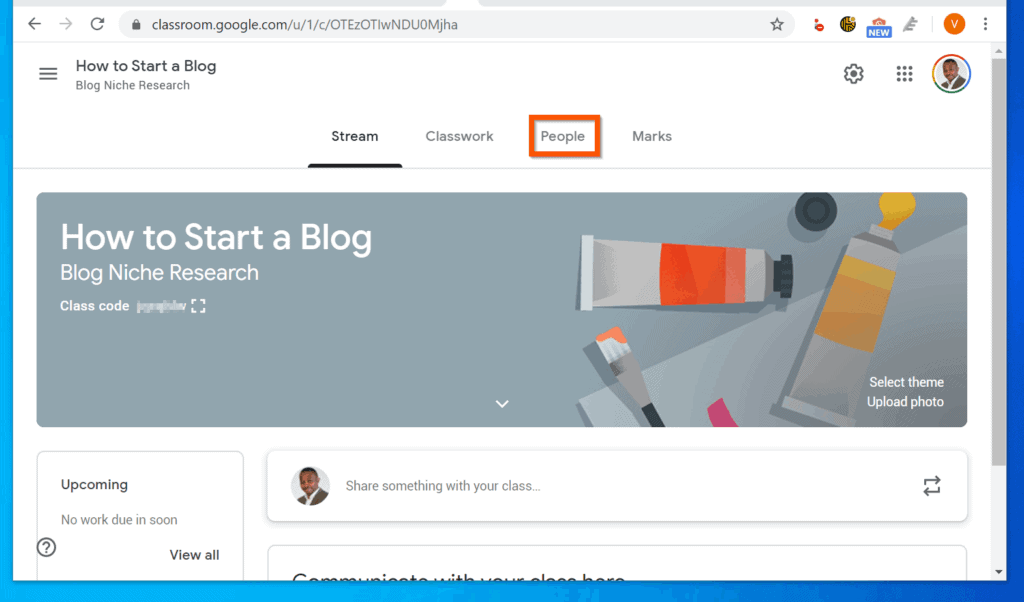
- On the classroom menu, click People.
- The People menu gives you the option to add somebody as a Teacher or a Student. To add a Teacher, click on the icon on the right side of Teachers. However, to add a student, click the icon beside Students.

- On the Invite window, type the Gmail address of the person you want to invite (1). Then select the person’s email from the SEARCH RESULTS (2). Finally, click Invite.

- The email will be displayed with “invited” beside it. If you want to delete a student, check the checkbox beside the student. Then, click the Action drop-down and select Remove.

Step 4: Create and Assign Classwork
As a teacher, one of your tasks is to create Classwork – create modules, assignments, questions. You may also order classwork on how you want the students to see the work.
Also popular on Amazon

- Storage: 16GB Flash Memory
- OS: Chrome OS
- Screen Size: 11.6"
Here are the steps to use Google Classroom to create and organize classwork.
- On the classroom menu, click Classwork.
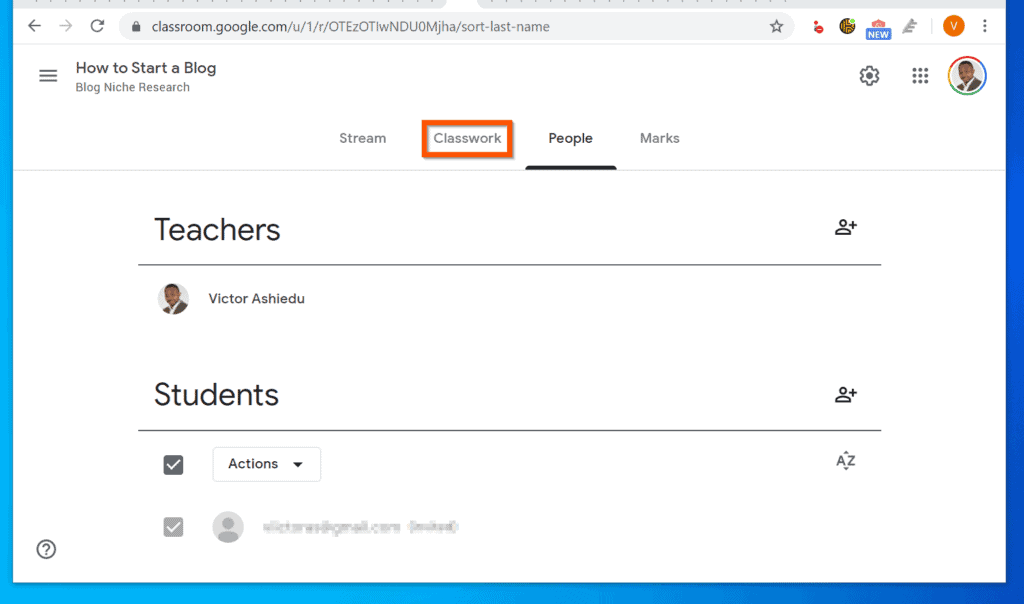
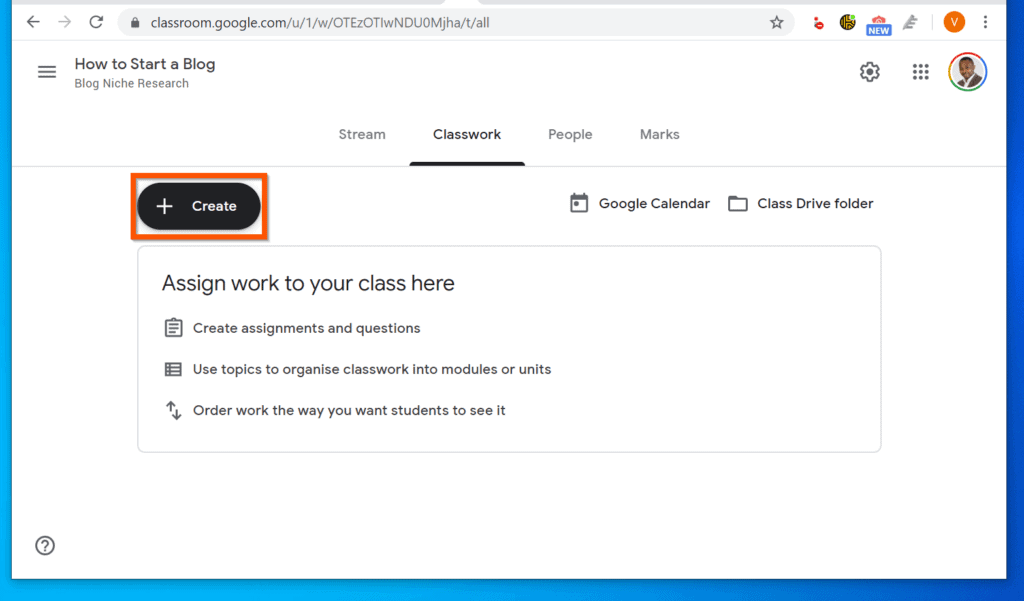
- Then, on the top left of the Classwork menu, click Create. Classwork options will be displayed.
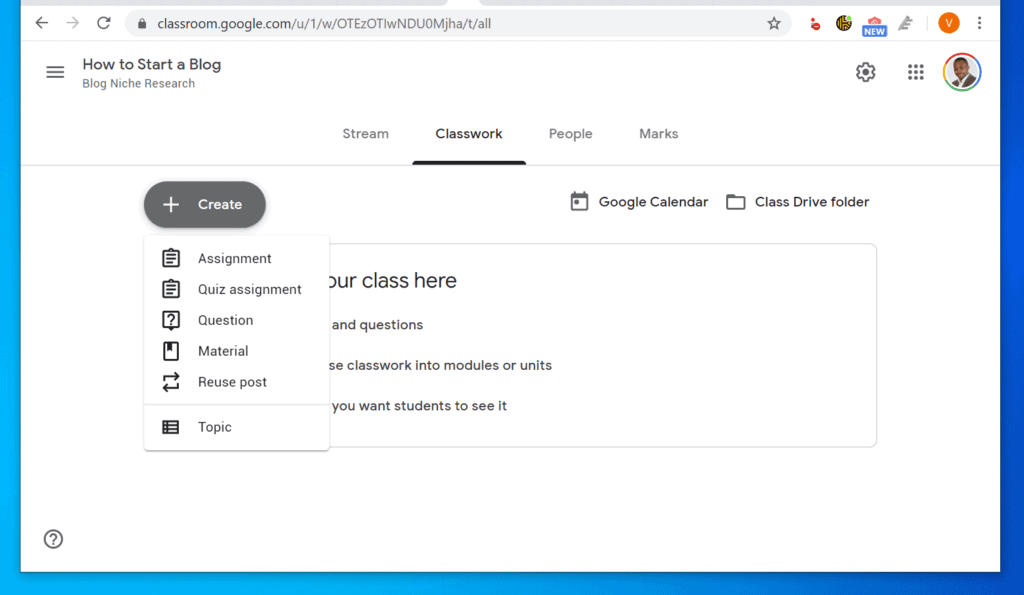
- On the displayed options, select an option – in this example, I will create a Material.
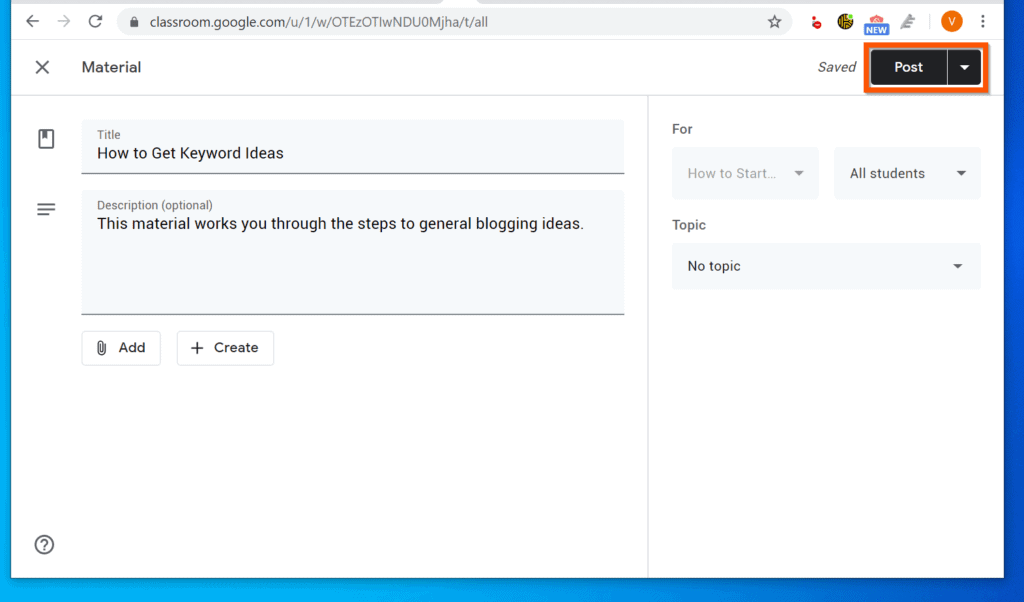
- Enter the details of the classwork and post. You can also click the Post drop-down and select the option to schedule the classwork or save it as a draft.
Step 5: View Students Marks
A teacher can also view students marks. Here is how…
Also popular on Amazon
- Intel Processor Up to 2.80GHz, 4GB DDR4, 128GB Storage
- 15" FHD IPS Display, Intel UHD Graphics
- 1x USB Type C, 1 x USB Type A, 1x Headphone/Microphone Combo Jack, HDMI
- Fast WiFi and Bluetooth, Integrated Webcam
- Chrome OS, AC Charger Included, Pastel Silver
- On the classroom menu, click Marks.
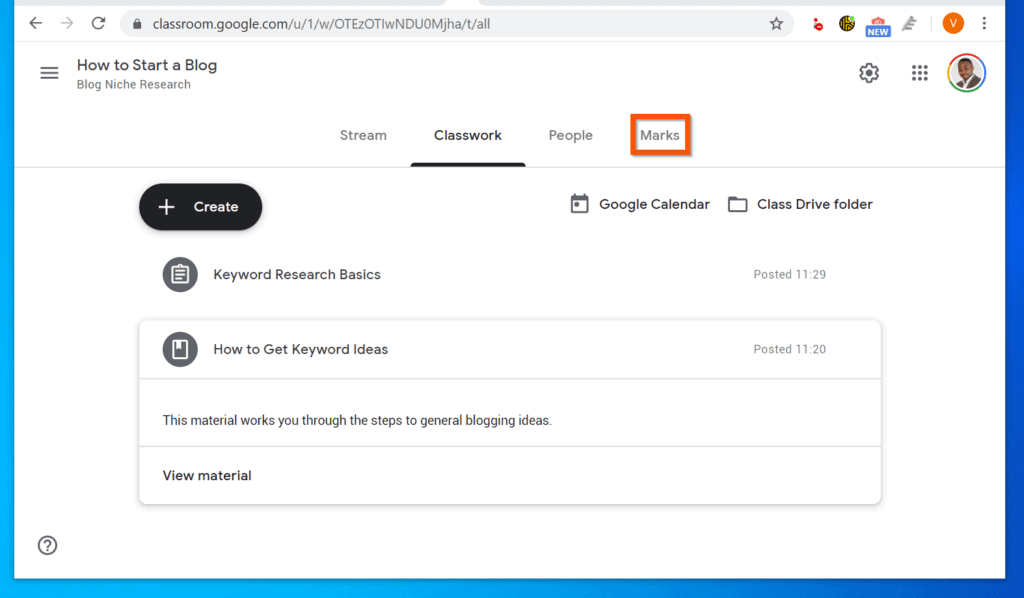
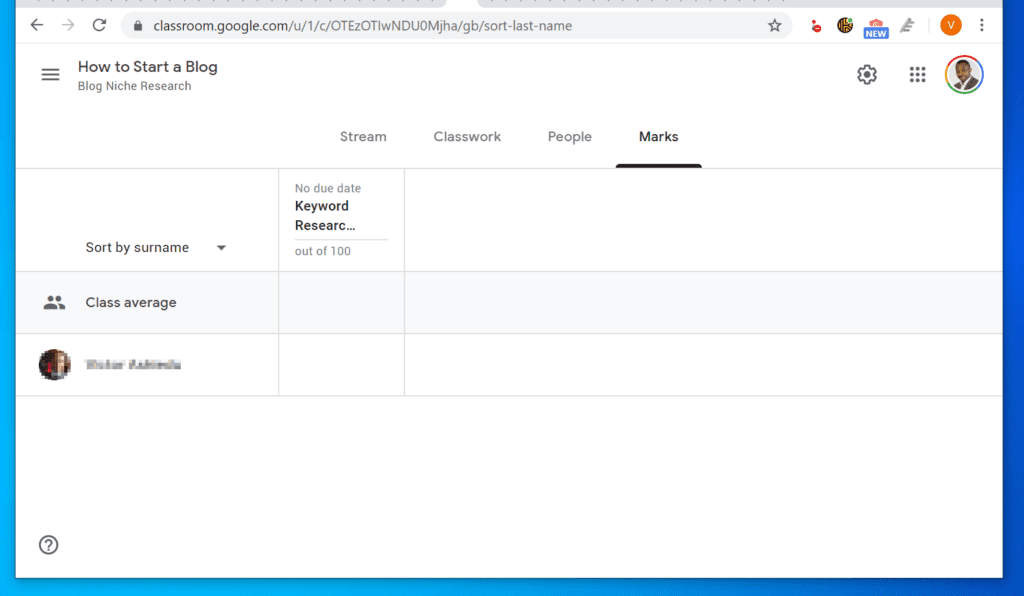
- The Marks menu will display the marks for all the students in the class. Your class MUST have at least one student and 1 quiz, assignment or question to display anything in this menu.
Option 2: Use Google Classroom as a Student

If you are a student, the steps in this section will walk you through how to use Google Classroom.
Step 1: Join the Classroom
To join a classroom, your teacher would have sent you the classroom code. Use the steps below to join the classroom.
Also popular on Amazon

- THE BETTER WAY TO LAPTOP – Imagine a Chromebook that’s as flexible as your day: thin and lightweight with built-in Google apps and stress-free security.
- TAKE HITS KEEP MOVING – Sleek, light, and built to last- the Chromebook 2-in-1 is just 0.69” thick and 3.3lbs. Enjoy long-lasting battery life, fast charging, and military-grade durability for nonstop productivity wherever life takes you.
- PERFORMANCE THAT MATCHES YOUR HUSTLE – Fuel your ideas with an Intel Core processor and 128GB storage. Boot up in under 10 seconds to start the day powerfully efficient.
- FLEX YOUR CREATIVITY ANYWHERE, ANYTIME – Create, work, or unwind your way with a versatile 2-in-1 design. Flip easily between laptop, tent, and tablet modes with a responsive touchscreen built for flexibility.
- BRILLIANT VIEWS AND IMMERSIVE AUDIO – See, hear, and create with awesome clarity. The WUXGA display brings rich detail to your work and play, while audio tuned by Waves MaxxAudio provides immersive, balanced sound.
- Open Classroom.Google.com from a browser and sign in with your Gmail.
- Then, on the top right of the page, click the + sign and select Join class.

- On the Join class window, enter the Class code you received from your teacher and click Join.

Step 2: View and Respond to Classwork
Once you join a classroom, you can view the classwork – class materials, quizzes, assignments and questions. Use the steps below…
Recommended Free Tools
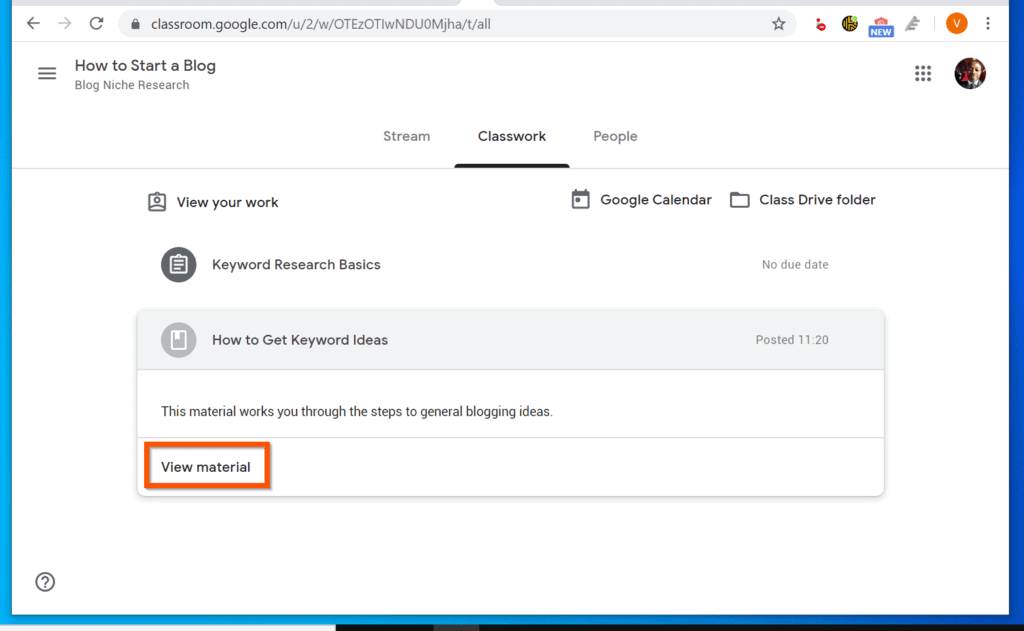
- On the classroom menu, click the Classwork menu. All the coursework assigned to you will be displayed.

- There are different types of classworks – materials, assignments, quiz assignments and more. One quick way to different a material from an assignment or question is that materials do not have due dates.
- In the image below, the classwork on top is a quiz – though it does not have a due date, it displays No due date. However, the second classwork is a material.
- To view a classwork, click on it. When the details of the classwork open, click View assignment or View material.
Step 3: Share Information with Other Class Members
Google Classroom allows students to share information and collaborate – unless the option is disabled by the teacher. Follow the steps below to learn various ways to share information in Google Classroom.
Also popular on Amazon

- FOR HOME, WORK, & SCHOOL – With an Intel processor, 14-inch display, custom-tuned stereo speakers, and long battery life, this Chromebook laptop lets you knock out any assignment or binge-watch your favorite shows..Voltage:5.0 volts
- HD DISPLAY, PORTABLE DESIGN – See every bit of detail on this micro-edge, anti-glare, 14-inch HD (1366 x 768) display (1); easily take this thin and lightweight laptop PC from room to room, on trips, or in a backpack.
- ALL-DAY PERFORMANCE – Reliably tackle all your assignments at once with the quad-core, Intel Celeron N4120—the perfect processor for performance, power consumption, and value (2).
- 4K READY – Smoothly stream 4K content and play your favorite next-gen games with Intel UHD Graphics 600 (3) (4).
- MEMORY AND STORAGE – Enjoy a boost to your system’s performance with 4 GB of RAM while saving more of your favorite memories with 64 GB of reliable flash-based eMMC storage (5).
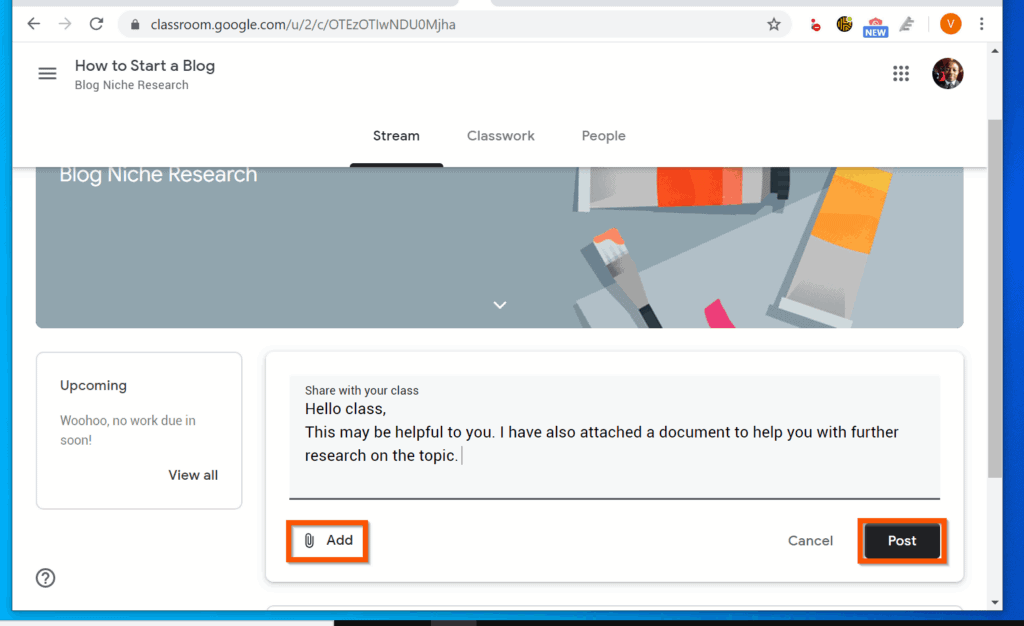
- On the classroom’s Stream menu, click Share something with your class.
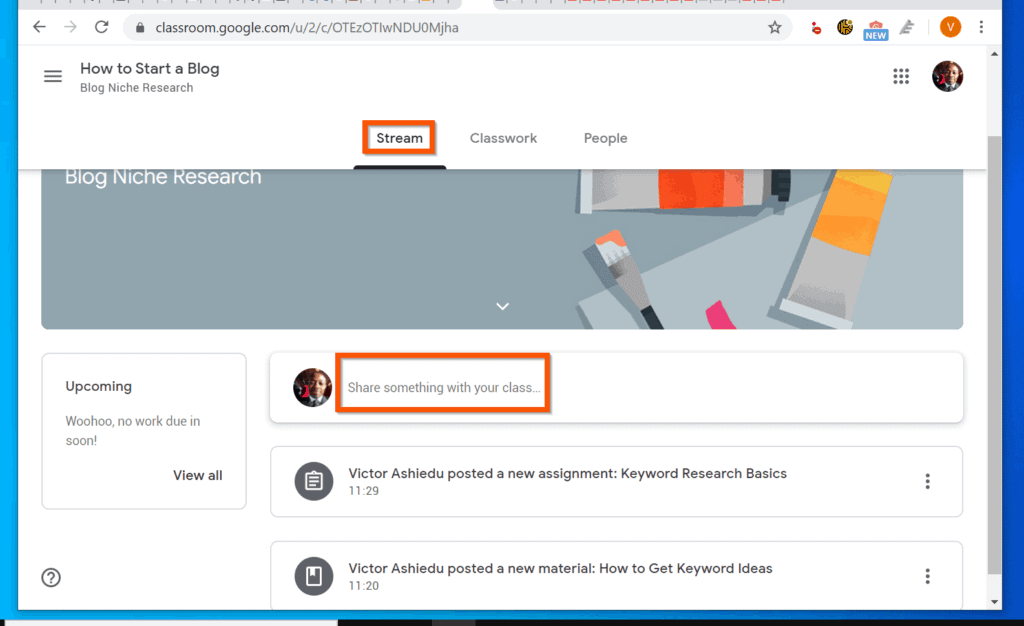
- Then, on the comment details, enter the information you want to share. You may also include an attachment by clicking the Attach button (bottom left). When you finish, click Post.
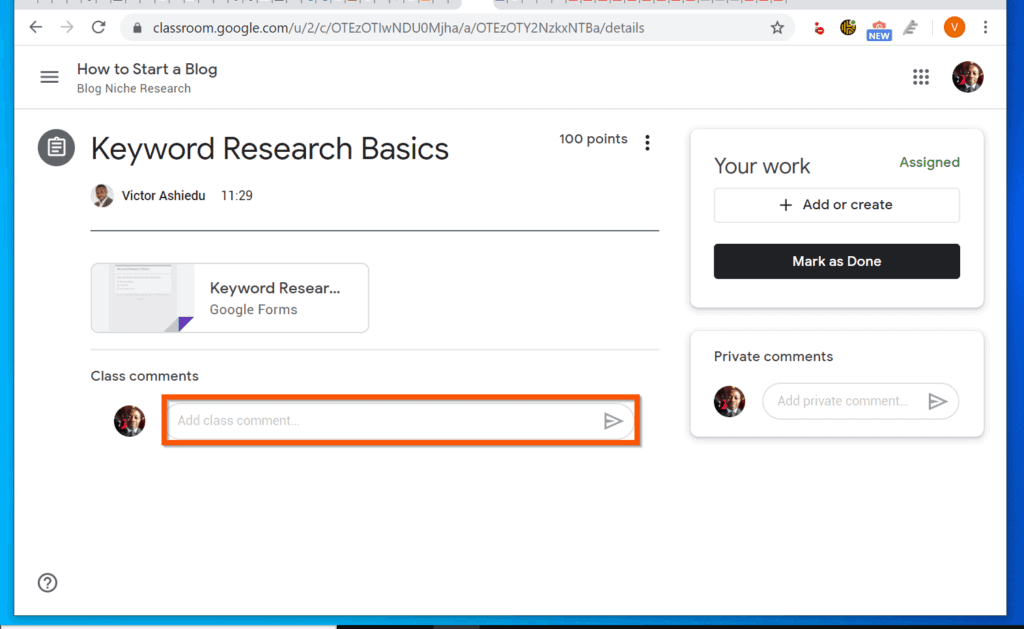
- You can also share information within a classwork. To do this, click the Classwork menu.
- Then, click on a coursework to expand it. To open the classwork, click the View link.

- When the coursework opens, click Add class comment. You can also add Private comments (personal notes) – this option is available on the right pane.
I hope you found this Itechguide helpful. If you found it helpful, kindly vote Yes to the “Was this post Helpful” question below.
Alternatively, you could ask a question, leave a comment or provide feedback with the “Leave a Reply” form found towards the end of this page.
Finally, for more online study tools Itechguides, visit our Online Study Tools & Apps page.
Quick Recap
Product prices and availability are accurate as of the date/time indicated and are subject to change. Any price and availability information displayed on Amazon at the time of purchase will apply.