Do you wish to enable auto login on your Windows 11 PC? This guide features multiple methods to enable this feature in Windows 11.
Option 1: Enable Auto Login Through Settings
One way to enable the auto login feature on your Windows 11 computer is through the Windows Settings app. The following steps and screenshot images illustrate how to accomplish that.
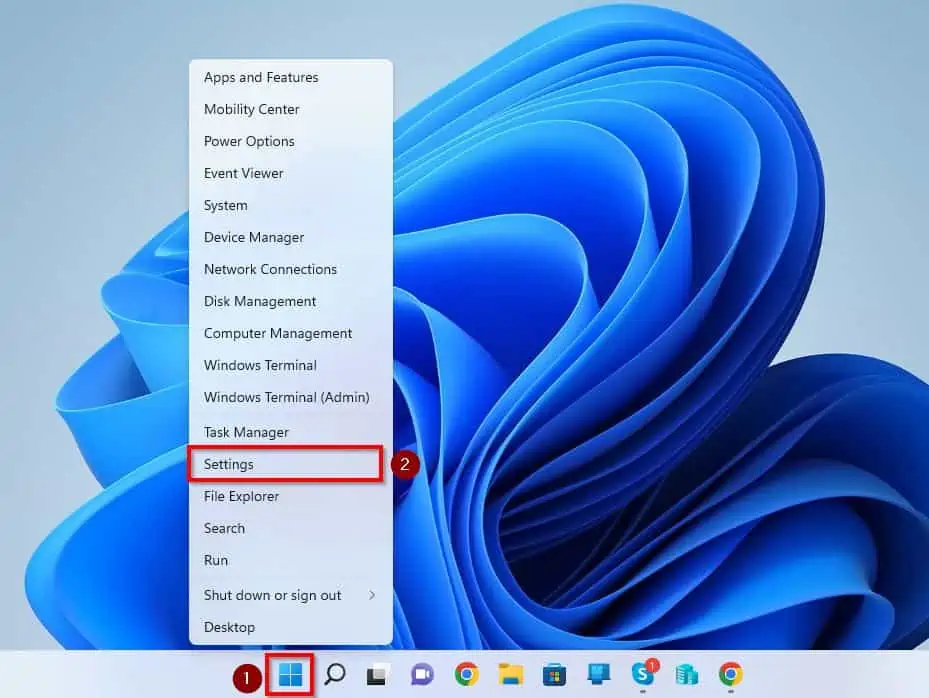
- Right-click the Start menu button on your Windows 11 taskbar and select Settings. You may also use the Windows + I keyboard shortcut to launch the Settings app on your Windows 11 PC.
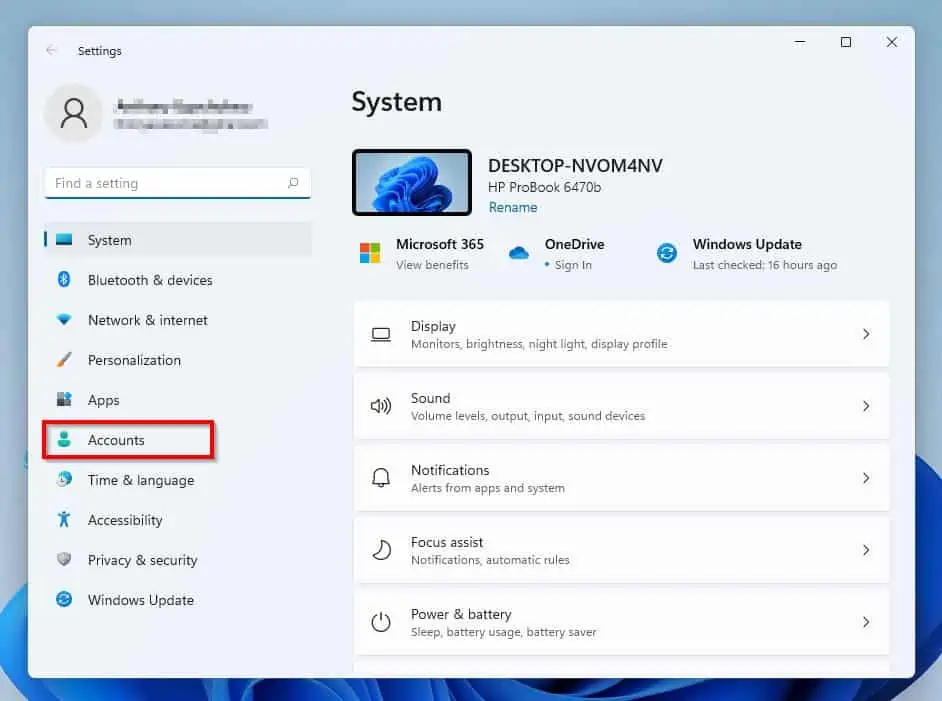
- After doing that, select Accounts on the left pane of the Settings window.
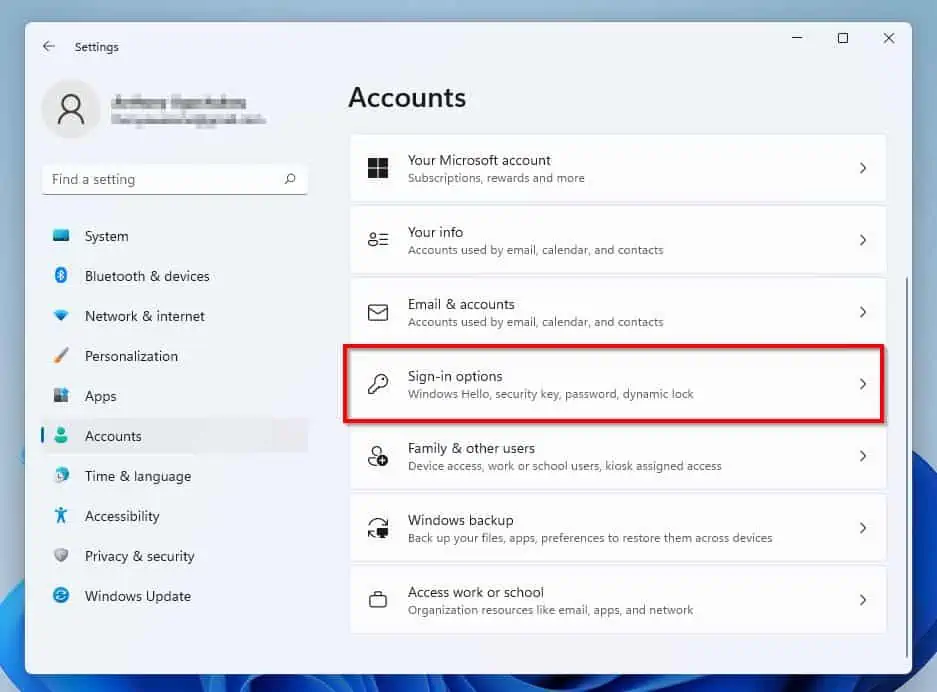
- Following that, click Sign-in options on the right pane of the window.
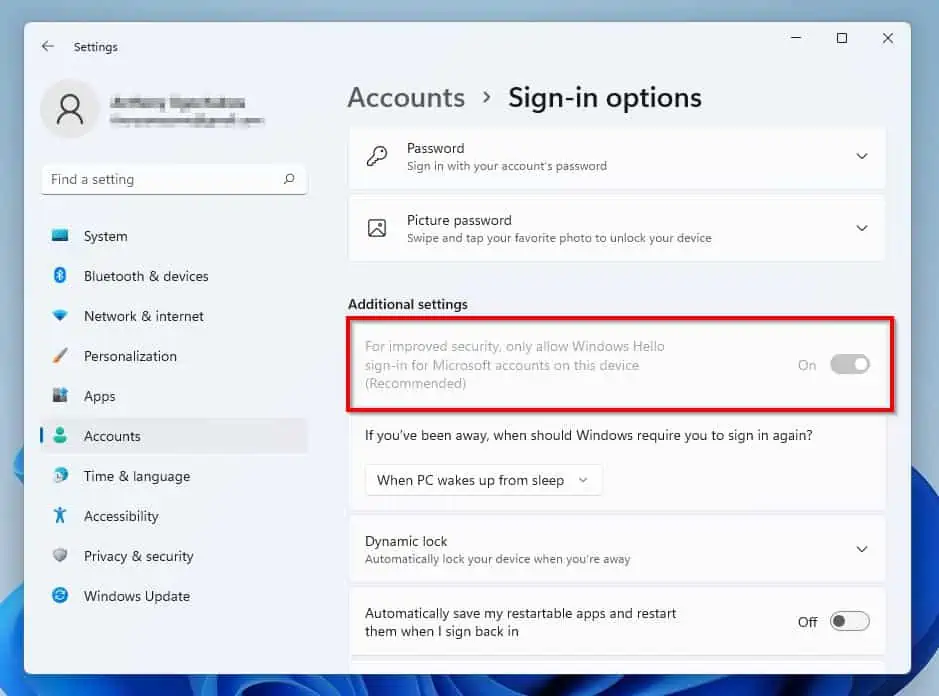
- Then, toggle off the For improved security, only allow Windows Hello sign-in for Microsoft account on this device (Recommended) option under Additional settings.
If that doesn’t work or the option turns out missing, you have to edit a registry in Windows Registry to toggle it off. The following steps demonstrate how to do that.
However, make sure you carry out the steps carefully or create a restore point before proceeding. This is because making a mistake while editing the Windows Registry can damage your PC.
a) Press Windows + R keys to launch the Run dialog, then input “regedit” in the input box and press the enter key. Hence, you will receive a prompt asking if you want to permit the app to make changes to your PC – click Yes to carry on.
b) When the Registry Editor opens, navigate to Computer\HKEY_LOCAL_MACHINE\SOFTWARE\Microsoft\Windows NT\CurrentVersion\PasswordLess\Device using the folder on the left pane.
c) Then, double-click the DevicePasswordLessBuildViersion registry on the right pane to edit it. Thus, change the Value data to “0” in the dialogue box that appears and click the OK button.
d) After doing all that, the For improved security, only allow Windows Hello sign-in for Microsoft account on this device (Recommended) option should turn off automatically.
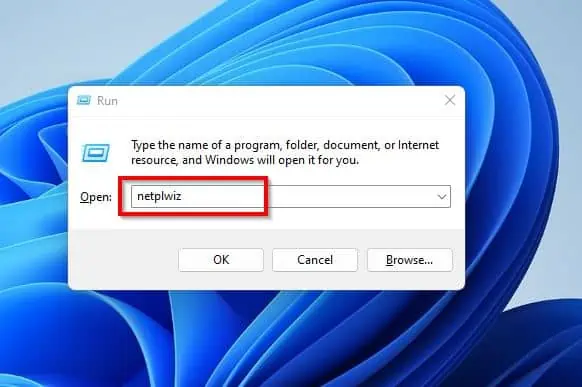
- After toggling off the option above, open the Run dialog by pressing the Windows + R keys. Then, type “netplwiz” (without the quotes) in the Run input field and press the enter key.
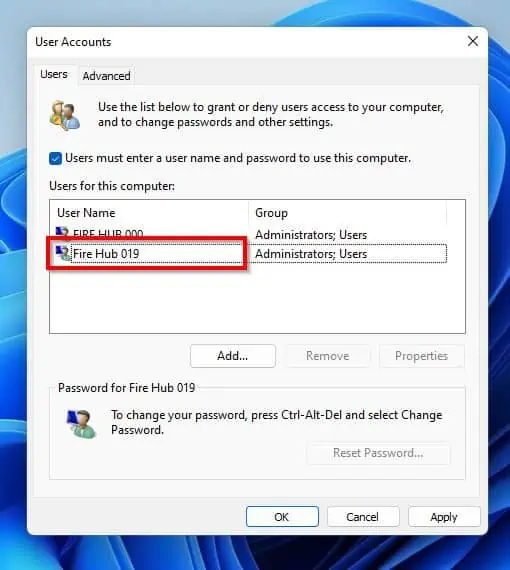
- If you use multiple accounts on your Windows 11 PC, select the account you wish to enable auto login in the Users for this computer field on the Users tab. For this demonstration, I will enable auto login for the Fire Hub 019 account.
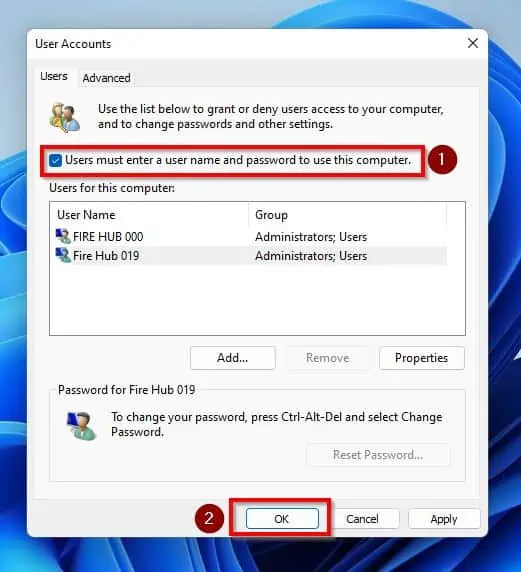
- Afterward, uncheck the Users must enter a user name and password to use this computer box. Next, click the OK button at the bottom of the window to save the change.
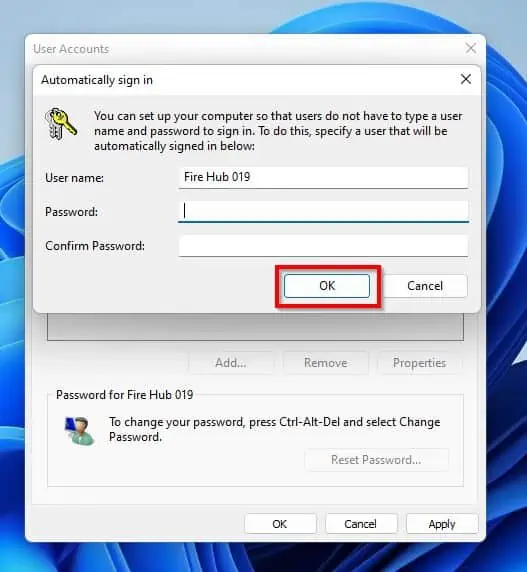
- Consequently, you will be prompted to input the password of the account you wish to enable the auto login feature. After inputting the password, click the OK button.
Option 2: Enable Auto Login via the Registry Editor
Interestingly, you can also enable auto login on your Windows 11 computer using the Windows Registry Editor tool. To do that, follow the steps below.
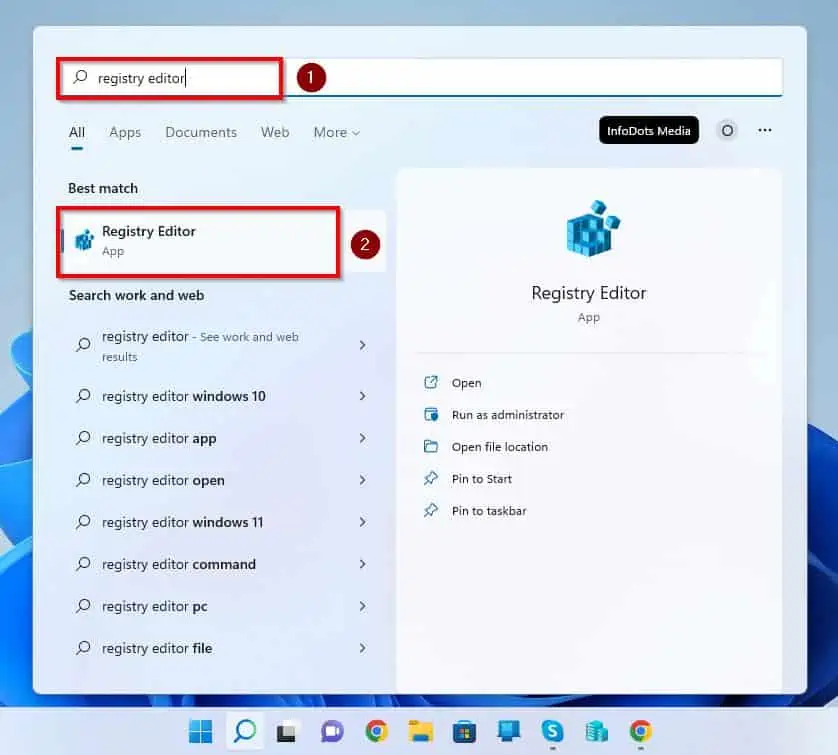
- On the taskbar, left-click the Windows 11 Search button.

- Thereafter, type “registry editor” (without the quotes) in the search field and select the Registry Editor app under Best match. Thus, you will receive a prompt requesting access to allow the app to make changes to your device – click Yes to proceed.
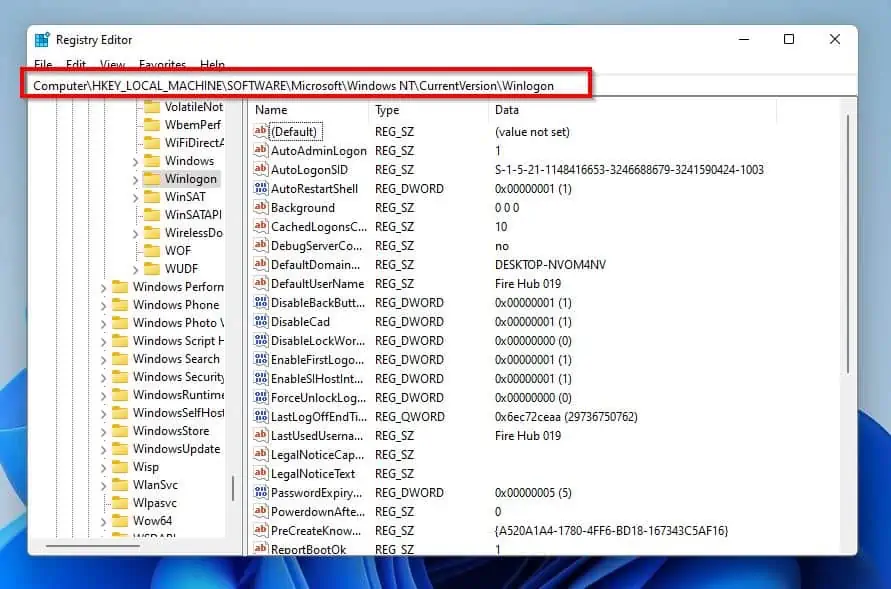
- When Registry Editor opens, navigate to the following path using the folders on the left pane.
Computer\HKEY_LOCAL_MACHINE\SOFTWARE\Microsoft\Windows NT\CurrentVersion\Winlogon
- Next, right-click the Winlogon folder on the left pane of the Registry Editor window and hover your mouse cursor on New. Then, select DWORD (32-bit) Value.
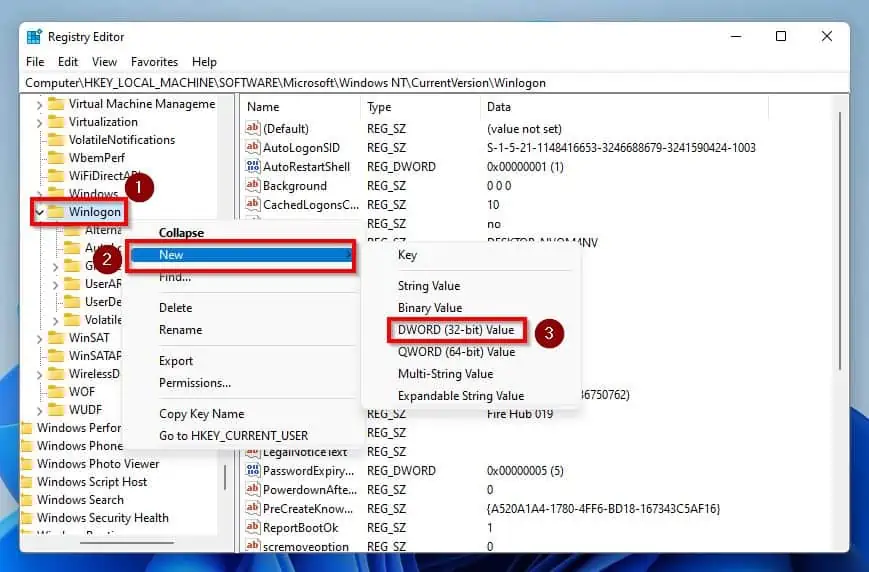
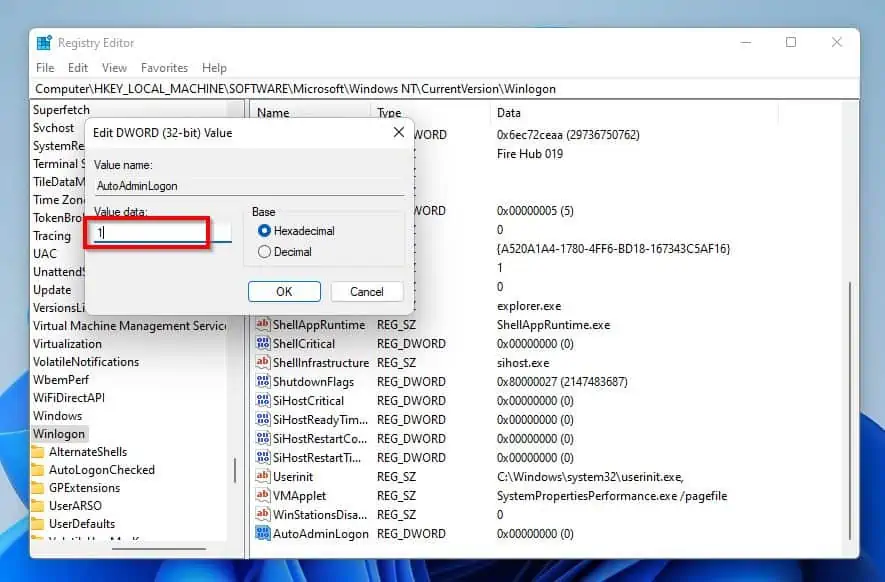
- Following that, name the new value “AutoAdminLogon” (without the quotes).
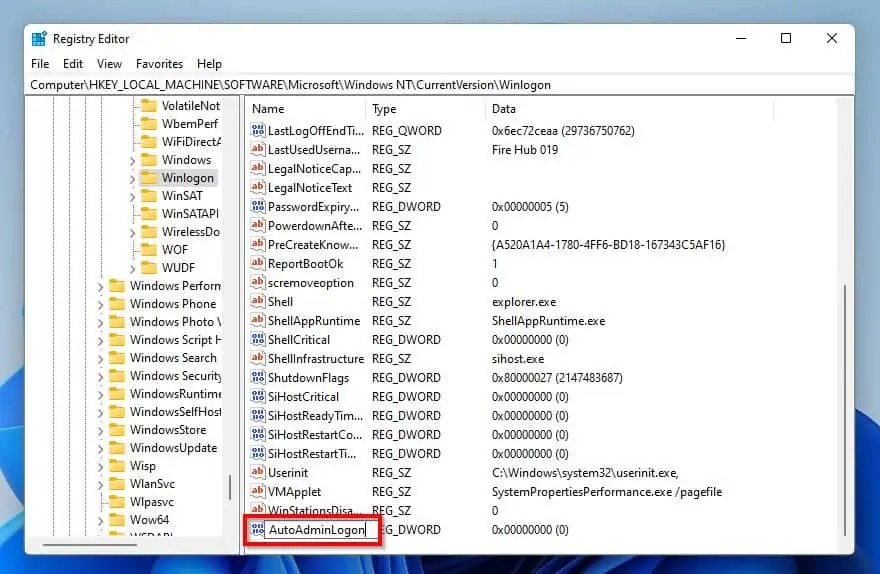
- Afterward, double-click AutoAdminLogon to edit it. Then, change the Value data to “1” and press the enter key on your keyboard.
- Again, right-click the Winlogon folder on the left pane and hover your mouse cursor on New. Then, select String Value from the options that appear.
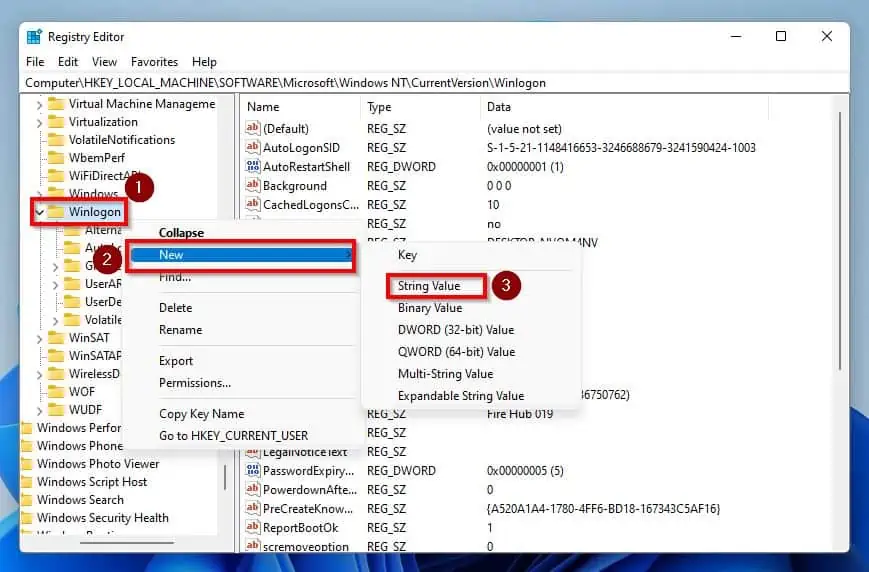
- Following that, name the new string value “DefaultUserName” (without the quotes).

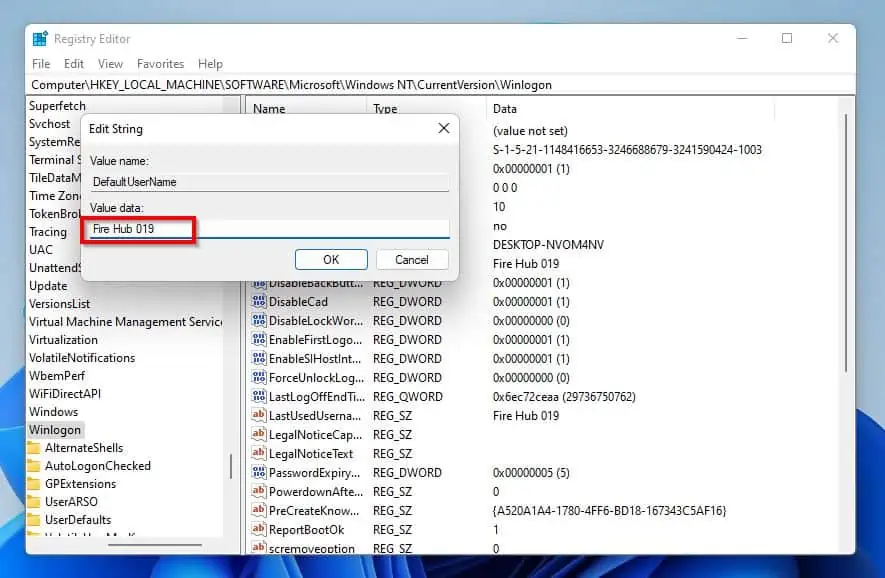
- Then, double-click DefaultUserName to edit it. Thus, input the name of the account you wish to enable the auto login feature for in the Value data box and press the enter key.
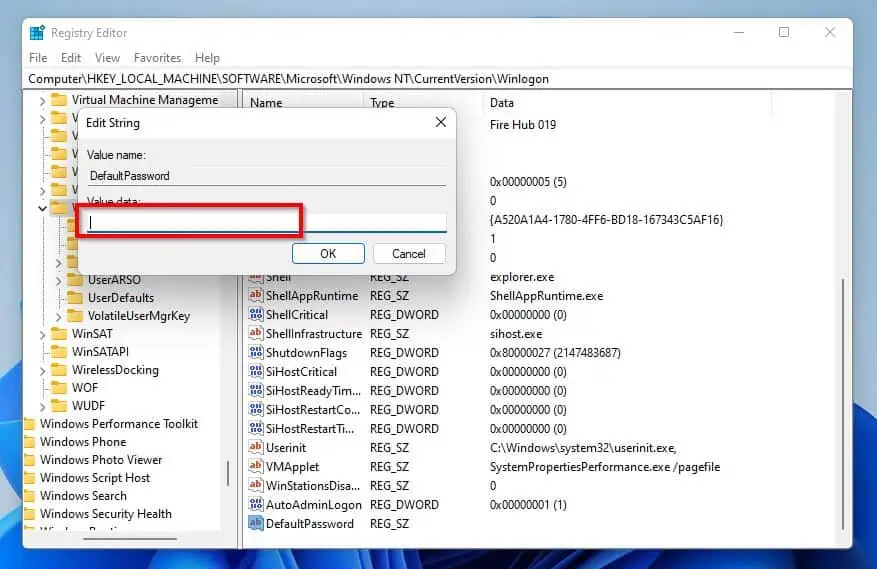
- Once again, right-click the Winlogon folder on the left pane and hover your mouse cursor on New. Then, select String Value from the options that show up.

- Thereafter, name the new string value “DefaultPassword” (without the quotes).
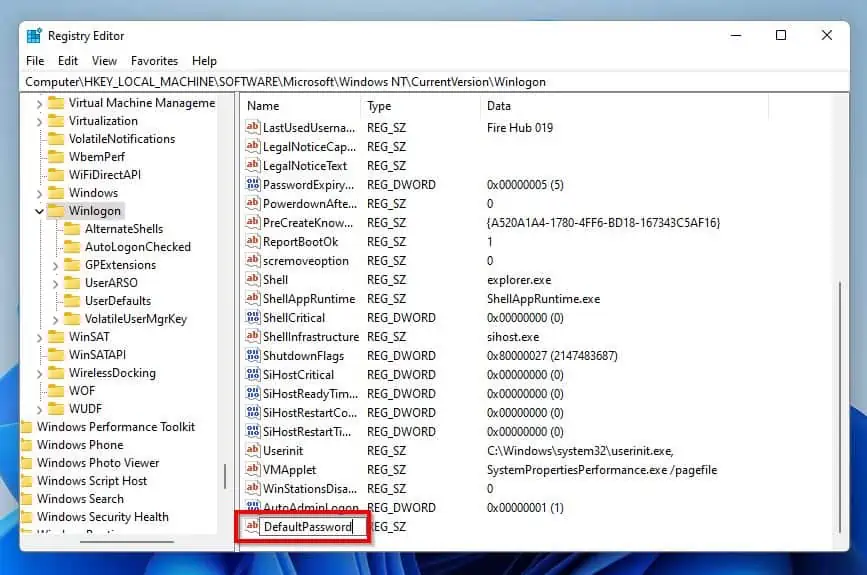
- After that, double-click the DefaultPassword value to edit it. Hence, input the password of the account you wish to enable auto login in the Value data field and press the enter key.
- After doing all that, your Windows 11 PC should automatically log in whenever you boot it.
Option 3: Enable Auto Login Using Computer Management
Another way to enable auto login in Windows 11 is through the Computer Management tool. To achieve that, observe the subsequent steps and screenshots.
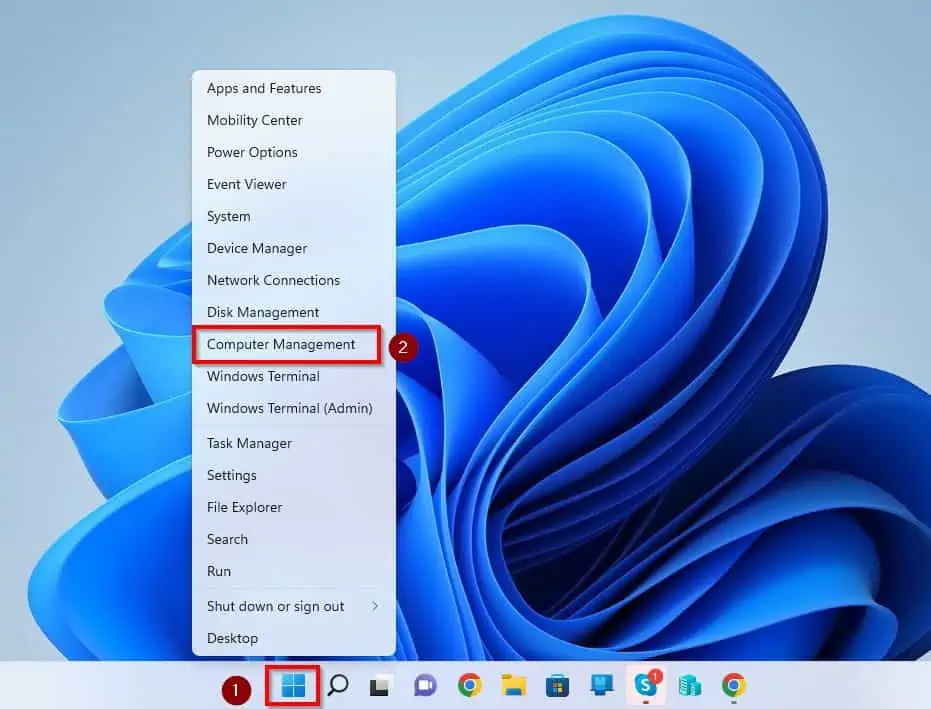
- On your Windows 11 taskbar, right-click the Start menu button and select Computer Management.
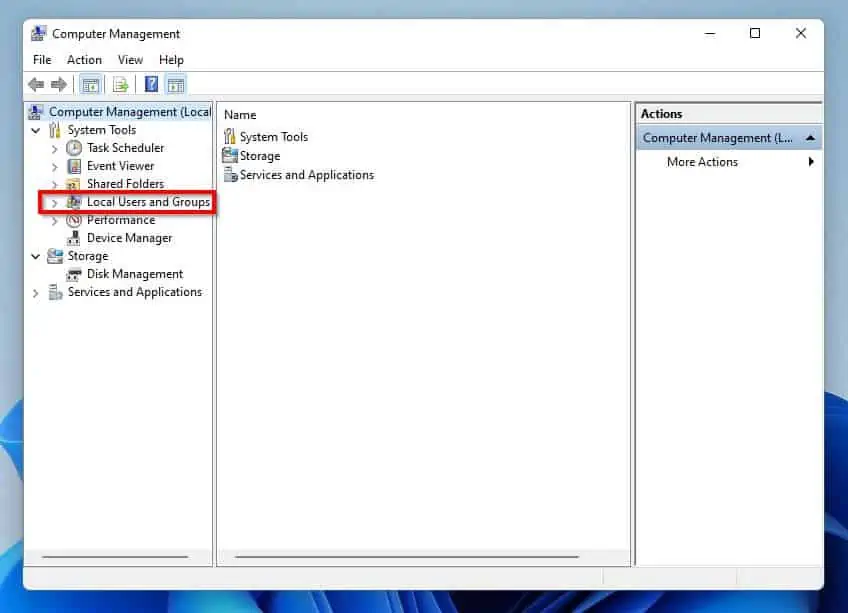
- When Computer Management opens, double-click Local Users and Groups on the left pane to expand it.
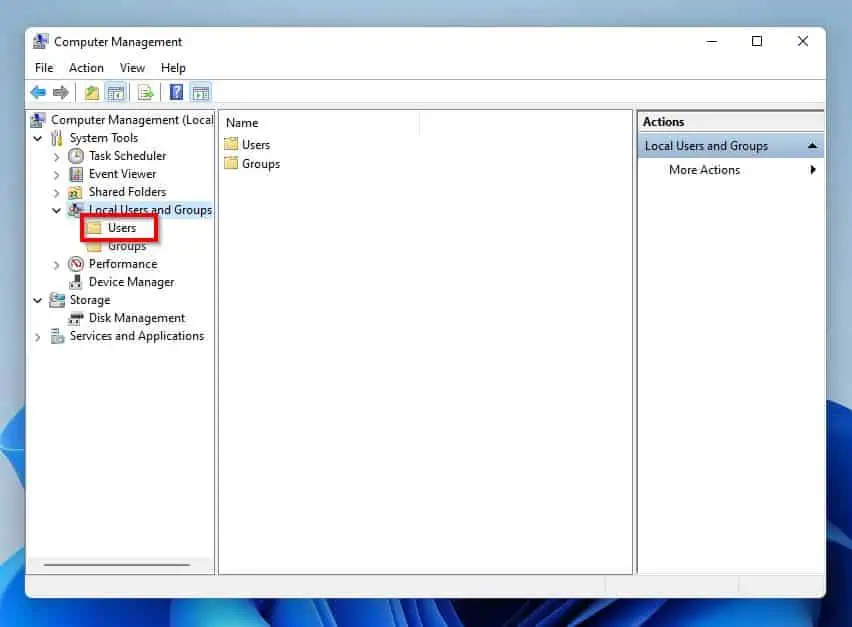
- Under Local Users and Groups, select the Users folder.
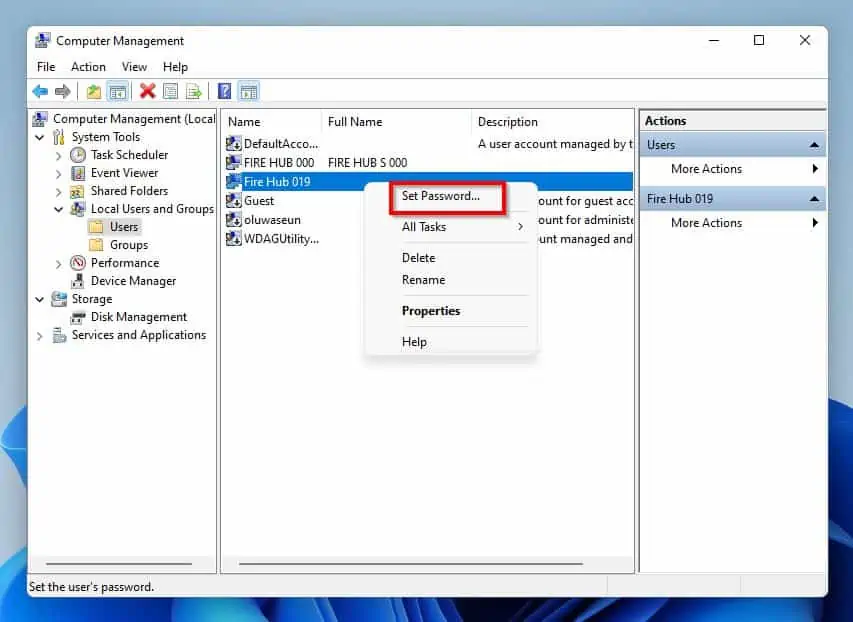
- Following that, right-click the account you wish to enable auto-login on the right pane and select Set Password….
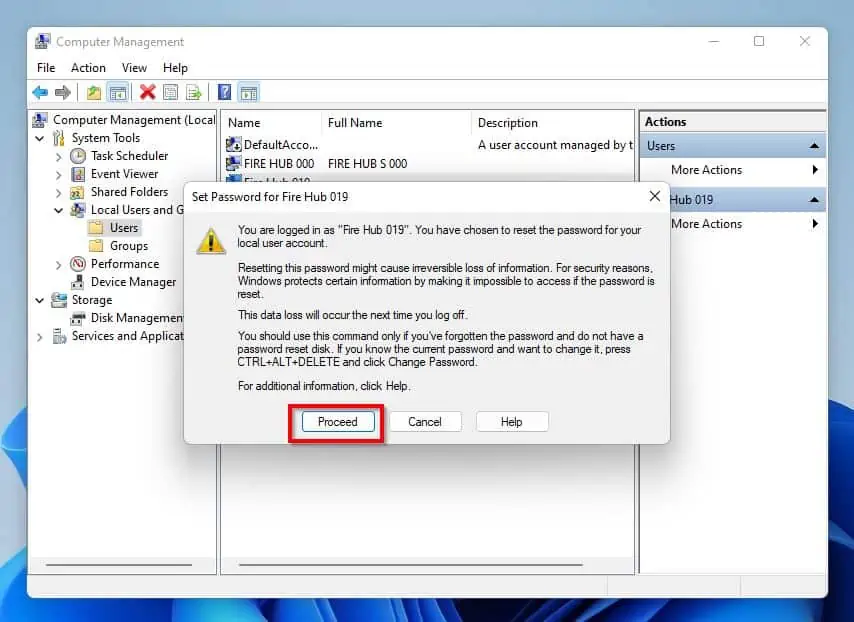
- Then, click the Proceed button on the Set Password prompt that appears.
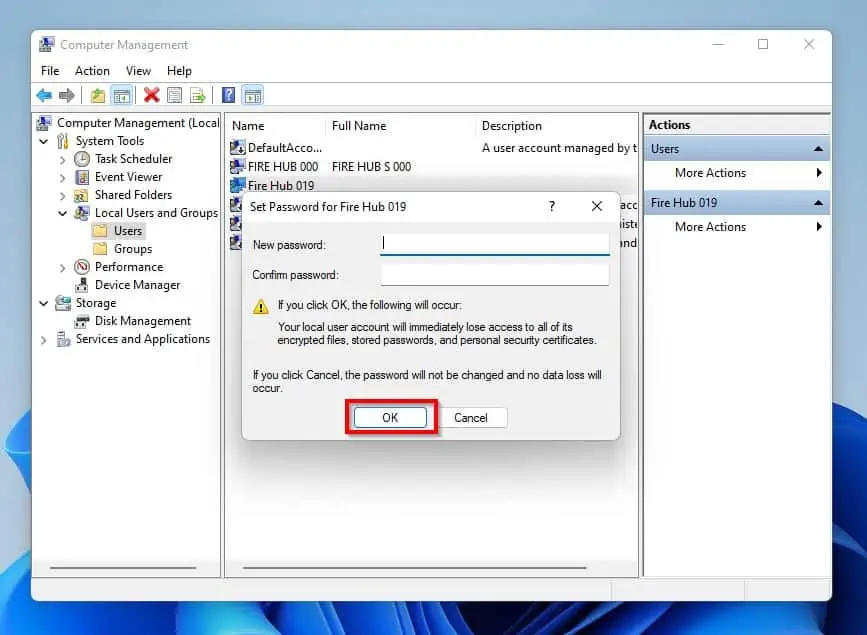
- Finally, click the OK button in the Set Password dialog without inputting a new password.
Frequently Asked Questions
a) Click the Start menu button on the taskbar.
b) Then, click the Power button at the bottom right of the Start menu.
c) Finally, select Shut down from the options that appear.
Your Windows 11 computer keeps locking because the Dynamic lock feature is enabled. This feature automatically locks your PC when you leave it idle for a long period of time.
Upgrading your Windows 10 computer to Windows 11 is free as long as your Windows 10 has a valid license key.
Yes, you can uninstall your Windows 11 operating system and roll back to your previous Windows OS.
The keyboard shortcut to lock your Windows 11 PC is Windows key + L.
My Final Thoughts
Enabling auto login on your Windows 11 computer reduces boot and saves you the stress of inputting your password all the time. Gladly, this guide provided various methods to enable the auto login feature in Windows 11.
To be more specific, we discussed how to enable this feature through Settings. This guide also taught how to perform the task via the Registry Editor.
Not only that, but we also learned how to enable the auto login feature via the Computer Management tool.
I hope this Windows 11 guide and its methods were helpful and easy to understand. If they were, click on “Yes” beside the “Was this page helpful” question below.
You may also express your thoughts and opinions by using the “Leave a Comment” form at the bottom of this page.
Lastly, for more Windows 11 how-to guides, visit our Windows 11 How-To page.