What’s actually slowing this PC down?
Pick the symptom - the matching free tool is one click away.
iTechGuides is reader-supported. When you buy through links on our site, we may earn an affiliate commission. As an Amazon Associate I earn from qualifying purchases. Learn more
In this Itechguide, Victor teaches you how to enable screen saver on Windows 10. The guide covers steps for 2 methods to enable screen saver on Windows 10.
Option 1: Enable Screen Saver from Windows Settings
- Right-click Windows 10 Start menu and click Settings.

- Then, on Windows Settings, click Personalisation.

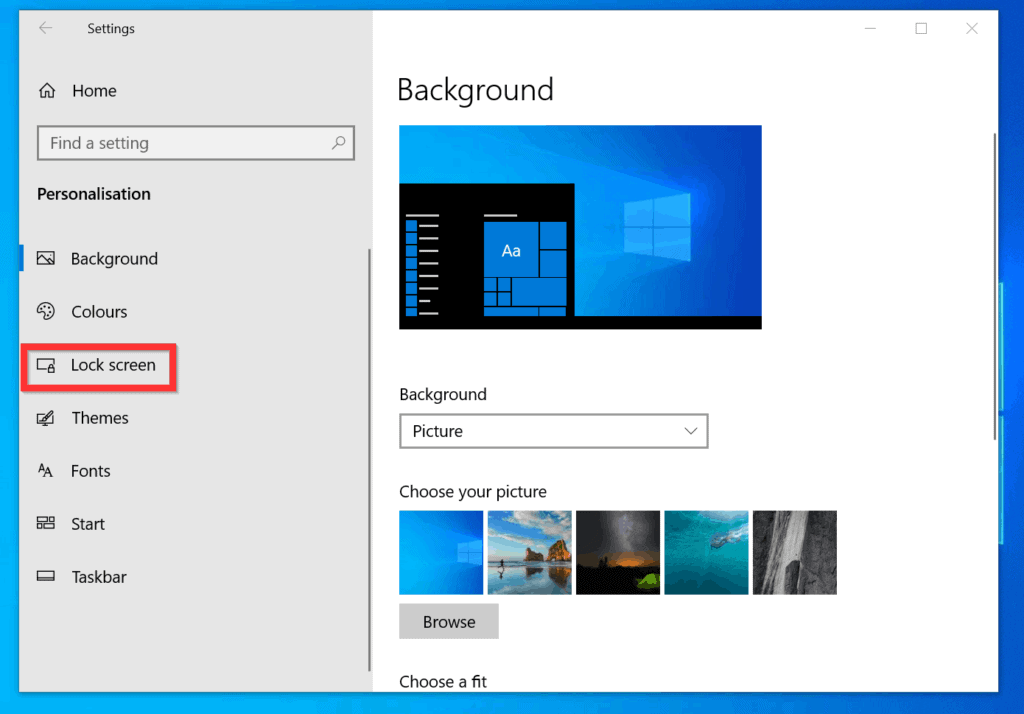
- On the left pane of the Personalisation settings screen, click Lock screen.
- On the Lock screen settings screen, scroll down to the bottom and click Screen saver settings.

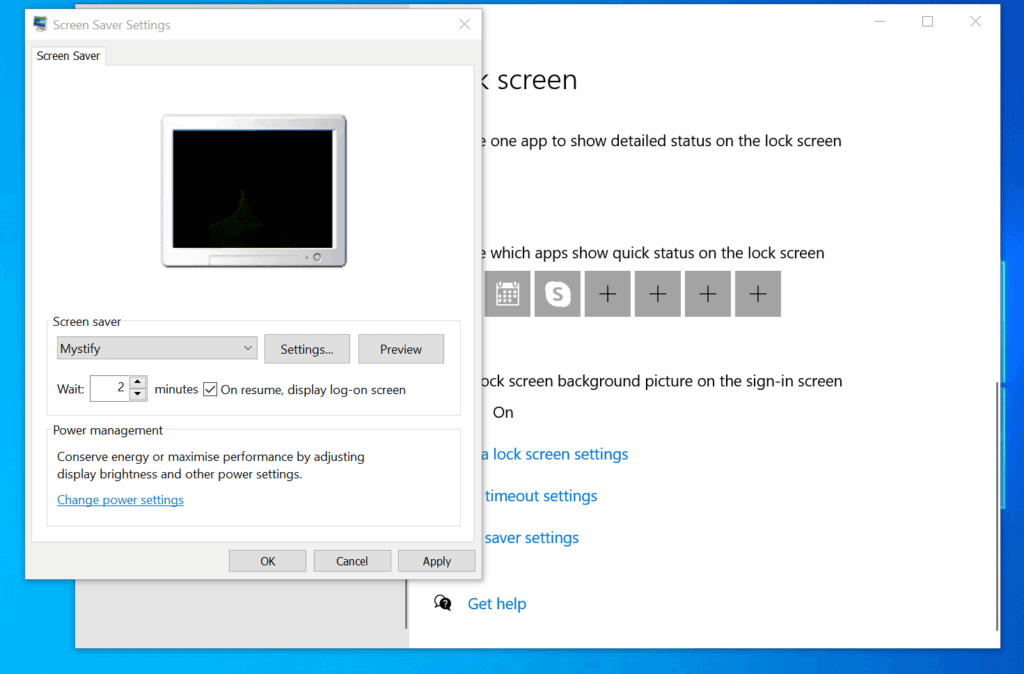
- When the Screen saver settings open, click the Screen saver drop-down and select a screen saver – the selected image will be displayed on your screen when the screen saver is activated.
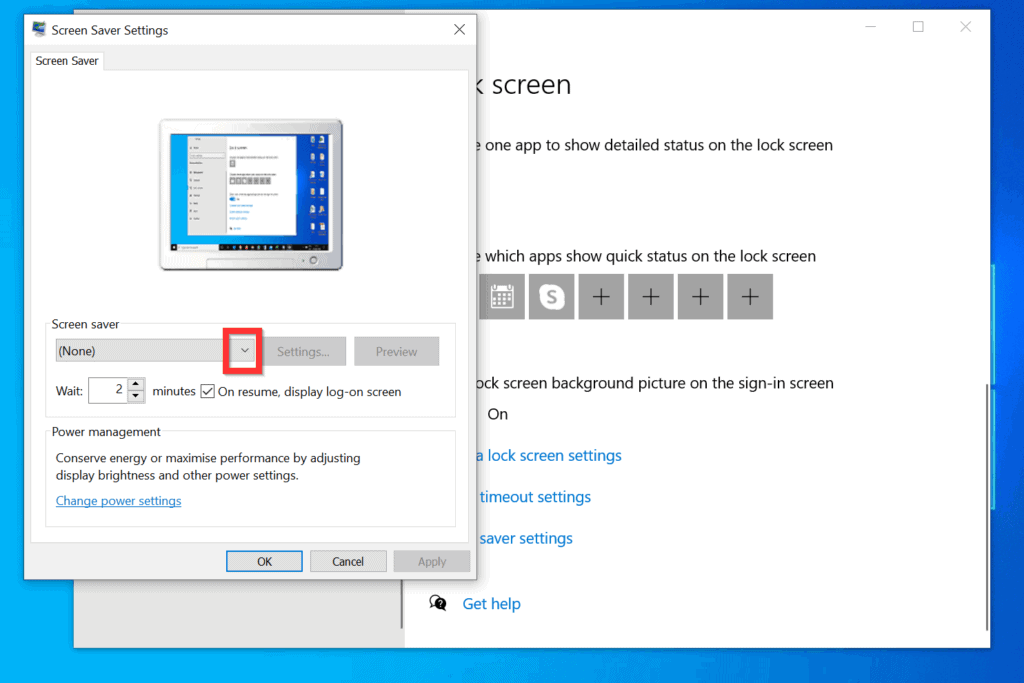
- On the Wait setting, select how many minutes your PC will be idle for the screen saver to be activated.
- Then, if you want your PC to activate the logon screen when you want to get back to using your computer, leave the On resume, display log-on screen checkbox. Otherwise, uncheck it.
- Finally, to save your changes and enable screen saver on Windows 10, click OK.
Option 2: Enable Screen Saver with Group Policy
There are 3 steps to enable screen saver with Group Policy:
| # | Preview | Product | Price | |
|---|---|---|---|---|
| 1 |
|
Windows 10 For Dummies (For Dummies (Computer/Tech)) | $13.31 | Buy on Amazon |
| 2 |
|
Windows 10 For Seniors For Dummies (For Dummies (Computer/Tech)) | $13.90 | Buy on Amazon |
| 3 |

|
Windows 10 for Dummies | $10.50 | Buy on Amazon |
| 4 |

|
Windows 10 All-in-One For Dummies,, 4th Edition | $30.32 | Buy on Amazon |
| 5 |

|
Windows 10 for Seniors for Dummies | $13.00 | Buy on Amazon |
- Copy the Default Domain Policy GPO to a New GPO
- Link the New GPO to an Active Directory Container
- Edit the GPO to Enable Screen Saver
For the first and second steps use the steps in Create a Group Policy Object (GPO) and Link the GPO to an Active Directory Container respectively.
Then, follow the steps below to edit the GPO and enable screen saver.
Popular on Amazon
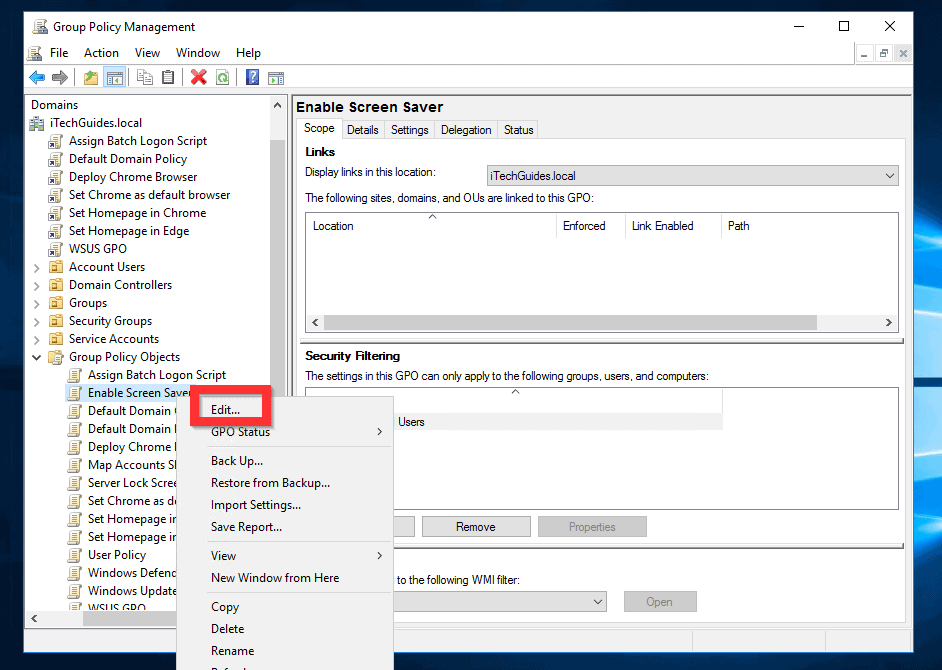
- Right-click the new GPO you copied and select Edit. The Group Policy Management Editor will open.
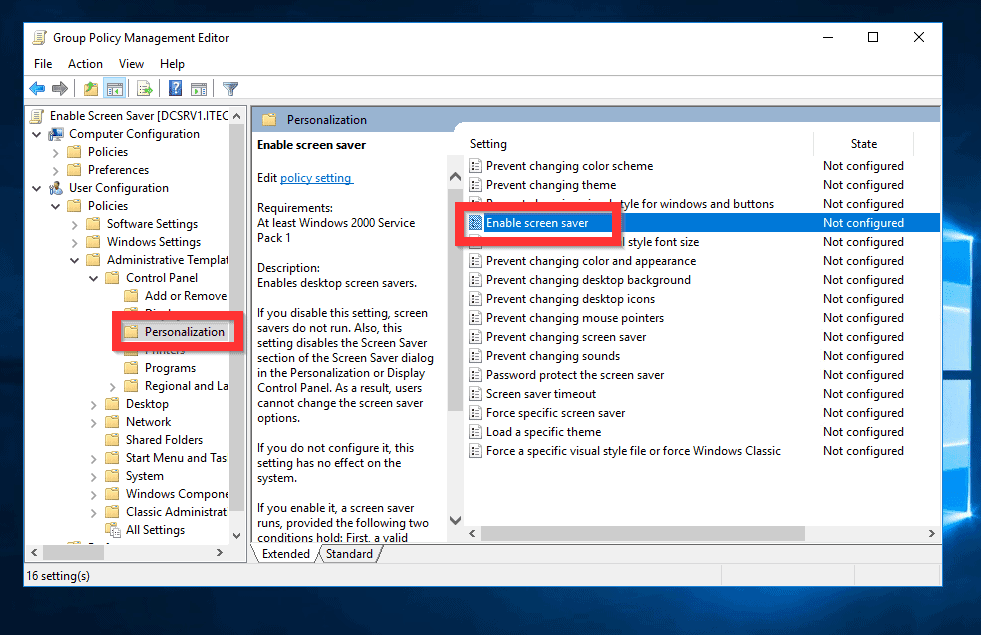
- On the Group Policy Management Editor, navigate to the following policy and click Personalisation folder.
User Configuration -> Policies -> Administrative Templates -> Control Panel
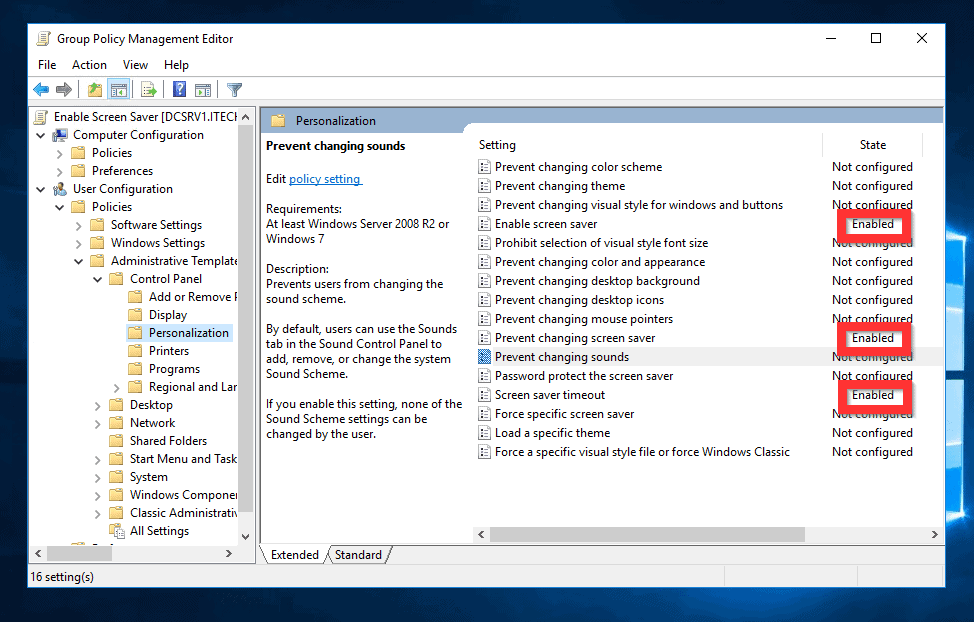
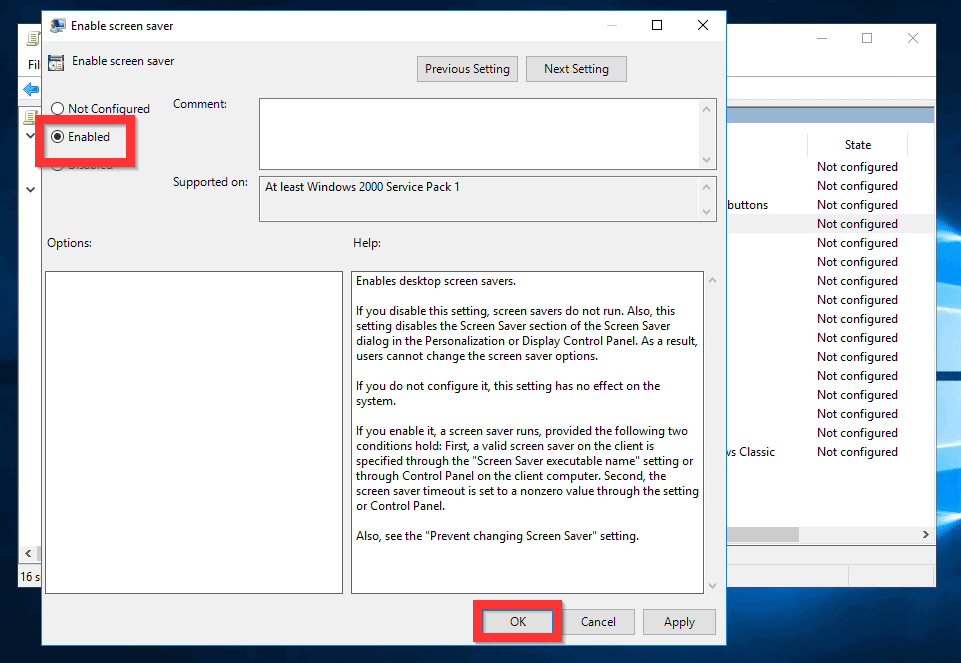
- Then, on the right (details) pane of the Personalisation folder, double-click the Enable screen saver policy. The policy will open for editing – the default setting is Not Configured.
- To enable the policy, on the top left, select Enable. Then, to save your changes, on the bottom right, click OK.
- Double-click Prevent changing screen saver policy and enable the policy.

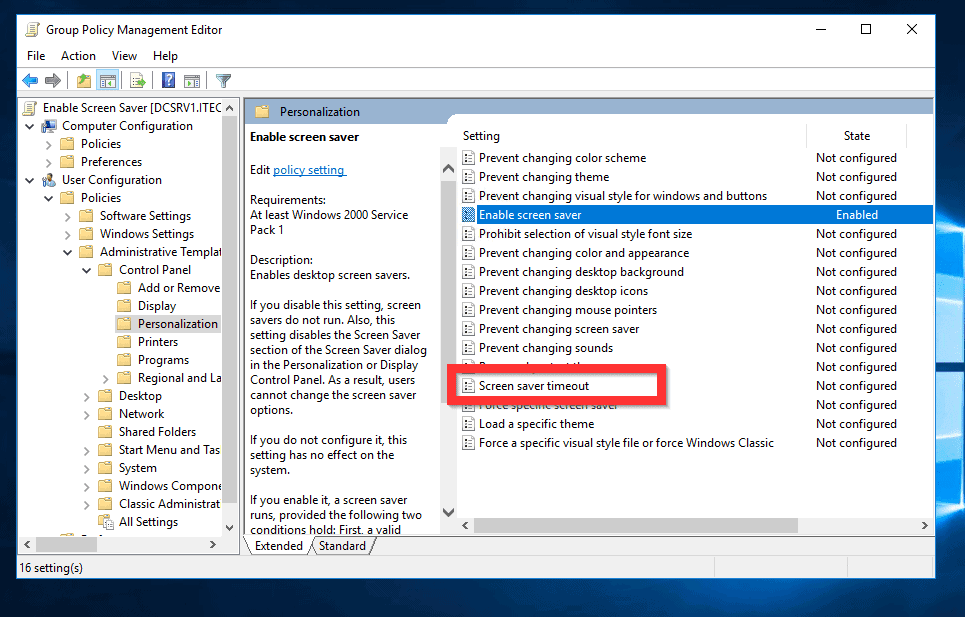
- Then, double-click the Screen saver timeout policy. By default, the policy is set to Not Configured.
- When the policy opens, on the top left of the policy settings, click Enabled. Then, set the screen timeout (default is 900 seconds – 15 minutes). Finally, to save your changes, on the bottom right of the policy, click OK.

As you can see, it is very easy to enable screen saver on Windows 10!
If you were able to enable a screen saver on your PC with these steps, click on “Yes” beside the “Was this page helpful” question below.
Also popular on Amazon
You may also express your thoughts and opinions by using the “Leave a Comment” form at the bottom of this page.
Do these 3 things before closing this tab:
1Repair Windows errors before they cause bigger problems2Scan for outdated or missing drivers - takes under a minute3Clear out junk files and repair common Windows errorsFinally, for more Windows 10 Itechguides, visit our Windows 10 How-To page.
Quick Recap
Also popular on Amazon
Also popular on Amazon
Also popular on Amazon
Product prices and availability are accurate as of the date/time indicated and are subject to change. Any price and availability information displayed on Amazon at the time of purchase will apply.
Independent reader supportYour contribution helps us test, update, and keep practical guides available for everyone.