Do you want to do a deep dive into the parameters of the PowerShell.exe command? I thought so, and that is why I wrote this article that explains the command line arguments of PowerShell.exe.
Overview
If you have been using PowerShell for a while, you may have had to use powershell.exe. If you did, then you may have come across the arguments of PowerShell.exe.
The PowerShell.exe command offers 17 arguments. As with any other Windows command, when you use an argument/parameter, it alters the behavior of the PowerShell.exe command.
For example, if you run a PowerShell command on a PowerShell console, the command uses the default Execution Policy. However, to run a command using a different execution policy, you run PowerShell.exe.
Then, specify the ExecutionPolicy argument, and declare the execution policy you wish the command to use. For example, I’ll run the command below to change the execution policy for the current PowerShell session to Bypass.
powershell.exe -ExecutionPolicy Bypass
I will give more examples later in this article, but first, I will discuss how the 17 PowerShell.exe arguments work.
How PowerShell Command Line Arguments Works
In the last section, I mentioned that PowerShell.exe has 17 arguments or command arguments. In the following sub-sections, I will explain how each command line argument works and what they do.
-ExecutionPolicy Command Line Argument
When you run the powershell.exe command, you can use the ExecutionPolicy command line argument to change the ExecutionPolicy for the current session.
The ExecutionPolicy is a security feature PowerShell uses to safeguard your computer. Moreover, this feature reduces the risk of you running malicious PowerShell scripts that could harm your computer.
When you use ExecutionPolicy command line argument, you can specify seven (7) execution policies. Specifically, you can specify AllSigned, Bypass, Default, RemoteSigned, Restricted, Undefined, or Unrestricted.
To read what these execution policies mean and the restrictions they apply, read the How PowerShell ExecutionPolicy Works section of my PowerShell ExecutionPolicy Explained: Important Safety Feature article.
Moving on, to set an execution policy with the ExecutionPolicy command line argument, run a command like the one shown below.
powershell.exe -ExecutionPolicy Unrestricted
The above command sets the PowerShell execution policy for the current session to Unrestricted.
Finally, another factor that affects how the ExecutionPolicy command line argument works is the Scope Of PowerShell ExecutionPolicy. For example, if you try to apply an execution policy that overrides an existing MachinePolicy set by Group Policy, you’ll receive an error message.
-NoExit Command Line Argument
Another powershell.exe command line argument is NoExit. Sometimes you may want to run a PowerShell command, but you do not want PowerShell to exit when it finishes running the command.
If you want to alter the behavior of the powershell.exe command so it does not close the console when it finishes running a command, use the NoExit argument.
Using the NoExit PowerShell.exe command line argument does not mean that the command prompt will be engaged. What it means is that the instance of PowerShell does not terminate.
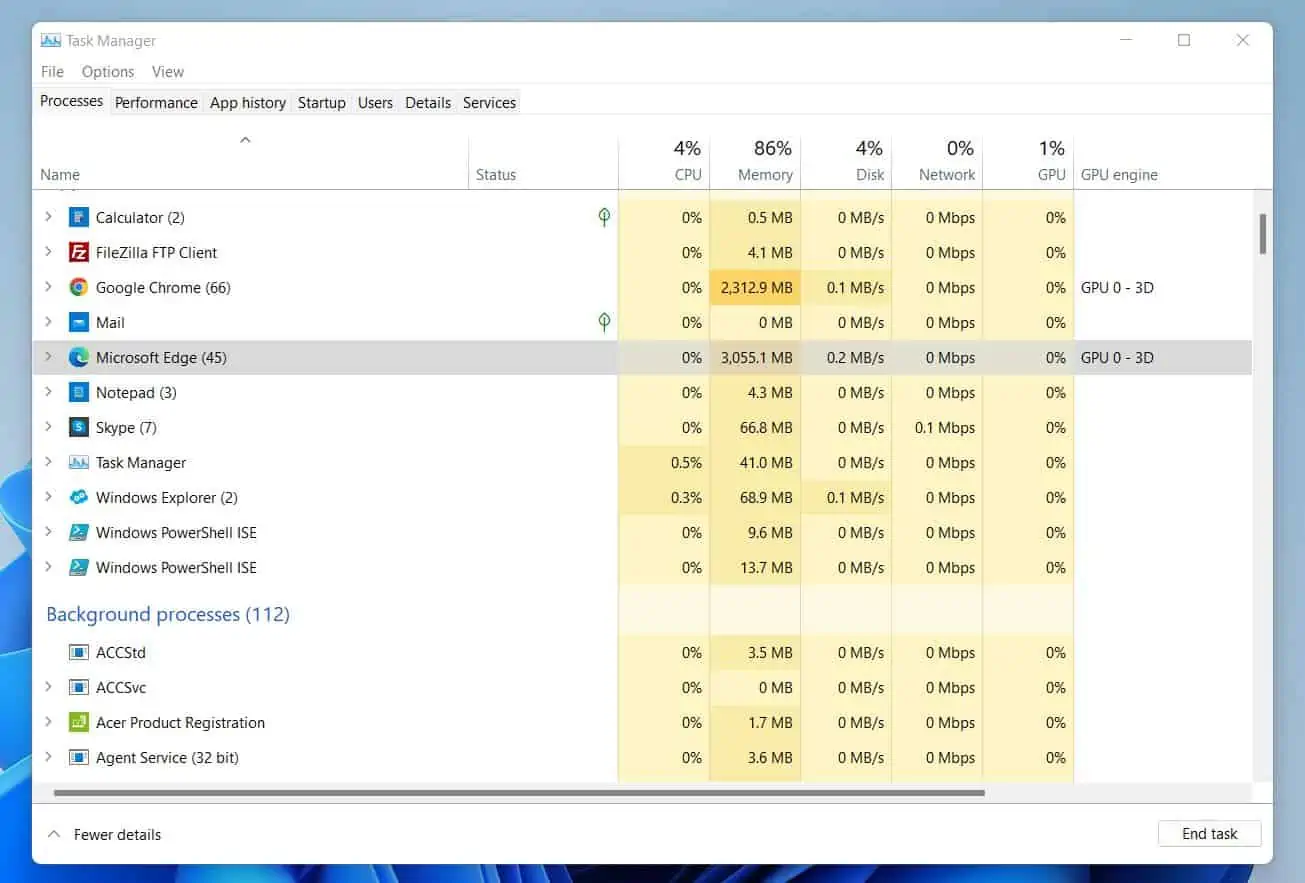
The best way to show you how this works is to look at the instances of PowerShell in Windows Task Manager. As you can see in the screenshot below, I do not have any instance of Windows PowerShell running on my PC.
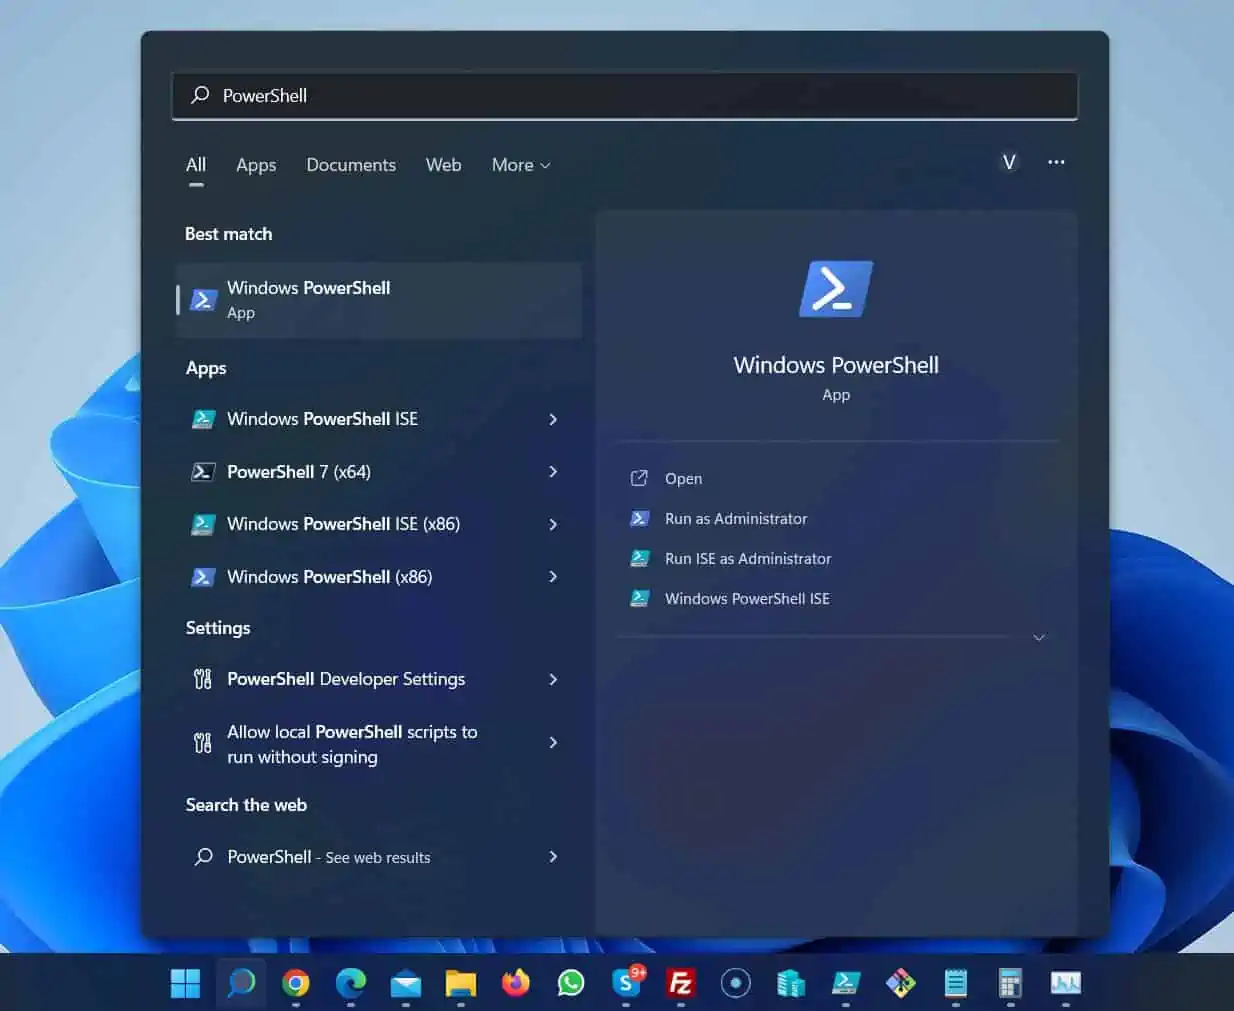
Now, I will open PowerShell by searching PowerShell.
Back to Windows Task Manager, I now have one instance of Windows PowerShell.
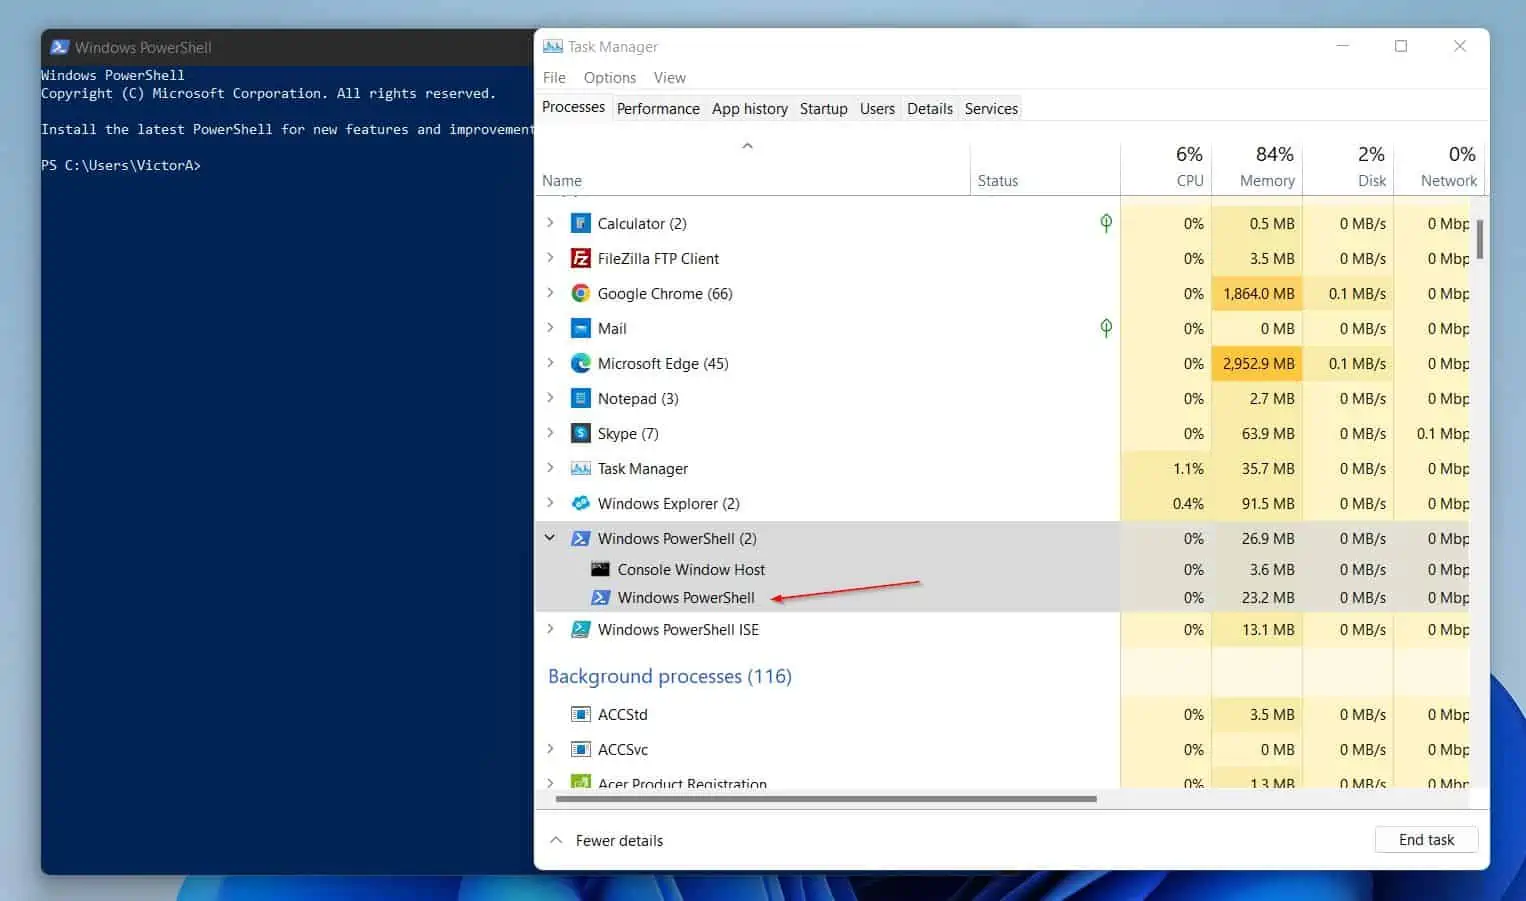
Then, in the PowerShell console, I will run the command below:
PowerShell.exe -NoExit -Command Start-Process Notepad
After running the above command, Windows Task Manager will display an extra instance of Windows PowerShell.
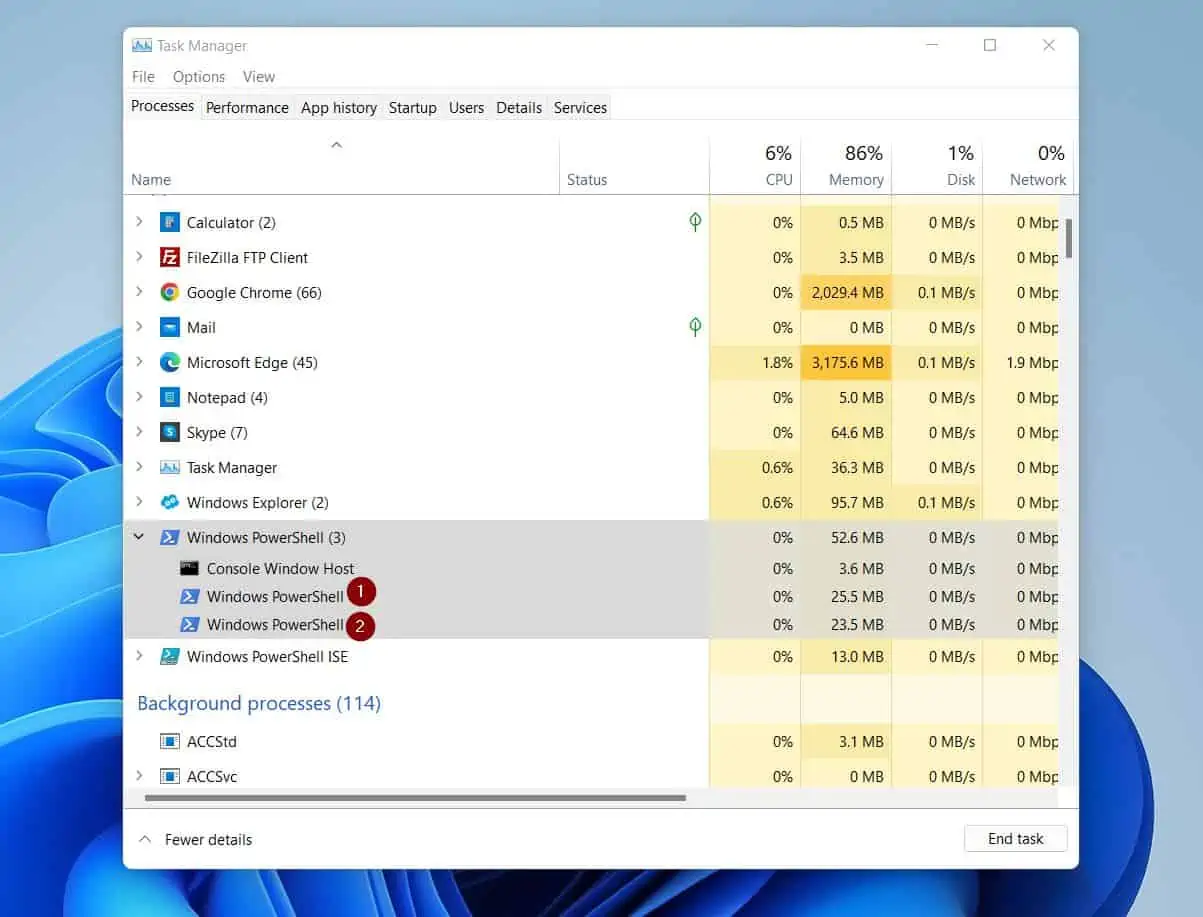
Next, I will run the last command without the NoExit command line argument.
PowerShell.exe -Command Start-Process Notepad
After running the last PowerShell.exe command without the NoExit command line argument, the instance of PowerShell in Task Manager does not increase. As you can see from the screenshot below, I still have two instances of Windows PowerShell in the Windows Task Manager.
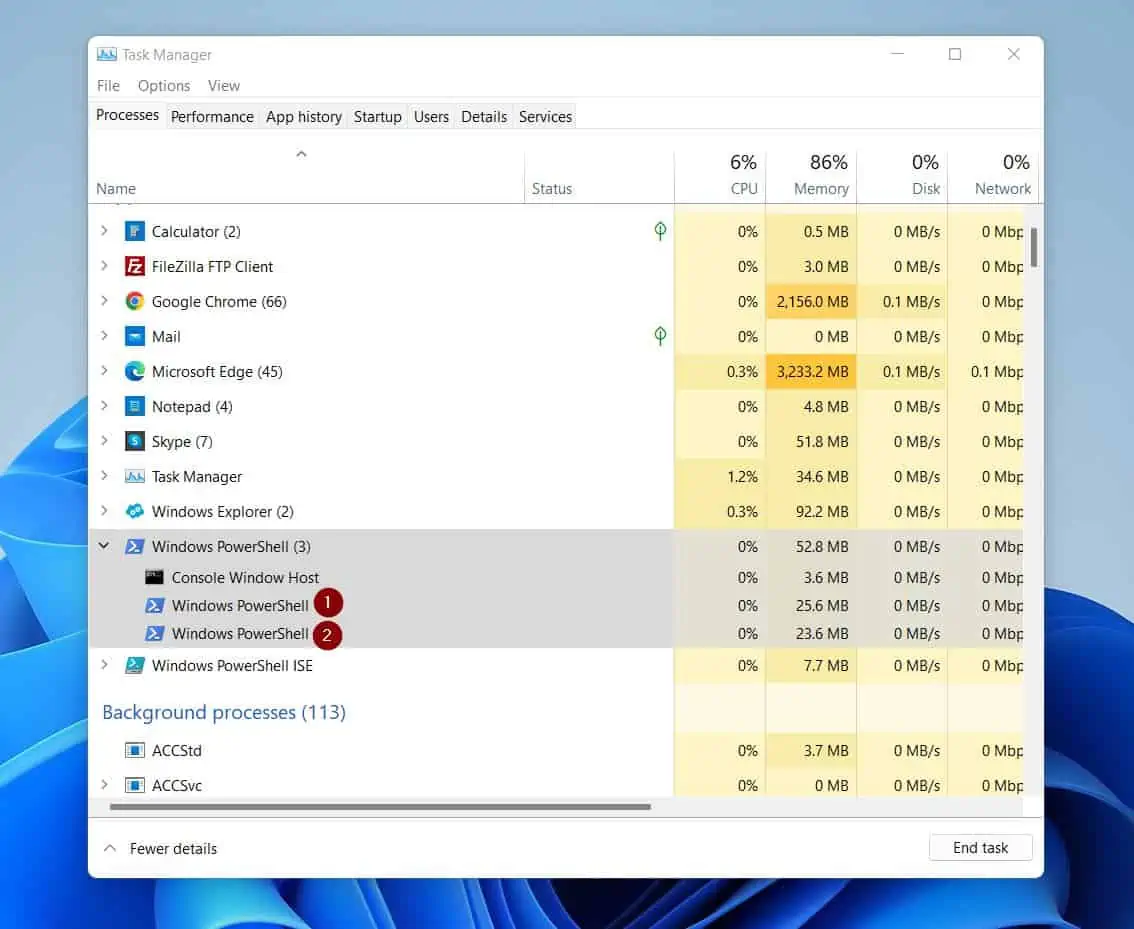
The above demonstration confirms that when you run the PowerShell.exe command with the NoExit command line argument, PowerShell does not close the instance after it runs the command.
However, if you do not include the NoExit command line argument, PowerShell terminates the instance after it runs the command.
-Command Command Line Argument
In the last sub-section, I showed several examples of how the NoExit command line argument works. In the examples, I used the Command PowerShell.exe command line argument.
The PowerShell.exe Command argument allows you to specify a command you want PowerShell to run. In addition to specifying a command, you can also specify the command’s parameter.
Having the Command argument as the last argument in a PowerShell.exe command is better. This is because PowerShell interprets characters after the command as the command arguments.
For example, to use PowerShell.exe to run the command below…
Start-Process Notepad -Wait
I will run the command below…
PowerShell.exe -Command Start-Process Notepad -Wait
As you can see, I had to have the -Wait argument of Start-Process after the command, NOT before. For example, if I run the command below, it will fail…
PowerShell.exe -Command -Wait Start-Process Notepad
Apart from running commands, you can also use PowerShell.exe Command argument to run a script block. However, to run a script block, you MUST specify the script block enclosed in braces {}.
For example, I can enclose the “Start-Process Notepad -Wait” command I ran earlier in braces as shown below:
PowerShell.exe -Command {Start-Process Notepad -Wait}
If you’re wondering why I did not include the enclosed braces when I first ran the command, it is because this script block is not complex. If you want to run a complex command, you must enclose it in braces.
For example, if I want to run the script block below using the Command PowerShell.exe command line argument, I MUST enclose the script block in braces. Otherwise, the command will fail.
See how I enclosed the script block below in braces {} within a PowerShell.exe command.
If (Test-Path "D:\Log Files" ) {
   Get-EventLog -LogName security | Out-File "D:\Log Files\eventlogs.txt"
}
PowerShell.exe -Command { If (Test-Path "D:\Log Files" ) { Get-EventLog -LogName security | Out-File "D:\Log Files\eventlogs.txt" } }
Finally, there are instances where you have to use the invoke operator (&) in a PowerShell.exe Command argument. For instance, if the command you specify is a string that runs a Windows PowerShell command, you can specify the command as shown below.
PowerShell.exe -Command "& {<command>}"
The quotation marks in the example command above indicate that the commands are strings. On the other hand, the invoke operator (&) causes PowerShell to execute the command.
-File Command Line Argument
In the last sub-section, I explained how you could use the -Command argument to pass a command or script block to PowerShell.exe. But what if you want to run a script instead of a command block?
If you do, instead of using the PowerShell.exe -Command command line argument, you would use the PowerShell.exe –File command line argument. When you specify the -File argument, you then specify the full path to the PowerShell script file, followed by the arguments of the script.
Using the –File command line argument has another benefit: the script runs in the local scope. The implication is that any variable or function the script creates is available in the current session.
Finally, if you use the –File argument, you must specify the –File argument last. This is because PowerShell interprets any text after the –File argument as the script file path followed by the script parameters.
For example, you cannot type the –NoExecutionPolicy argument after the –File argument.
-ConfigurationName Command Line Argument
Have you ever used the Invoke-Command command to connect to a remote computer? When you did, you connected to the computer’s remote session configuration called an endpoint.
A PowerShell endpoint is a set of configurations on a computer that customizes the environment a user connects to when the user remotes into the computer. The endpoint determines the level of access a connected user has on the remote computer.
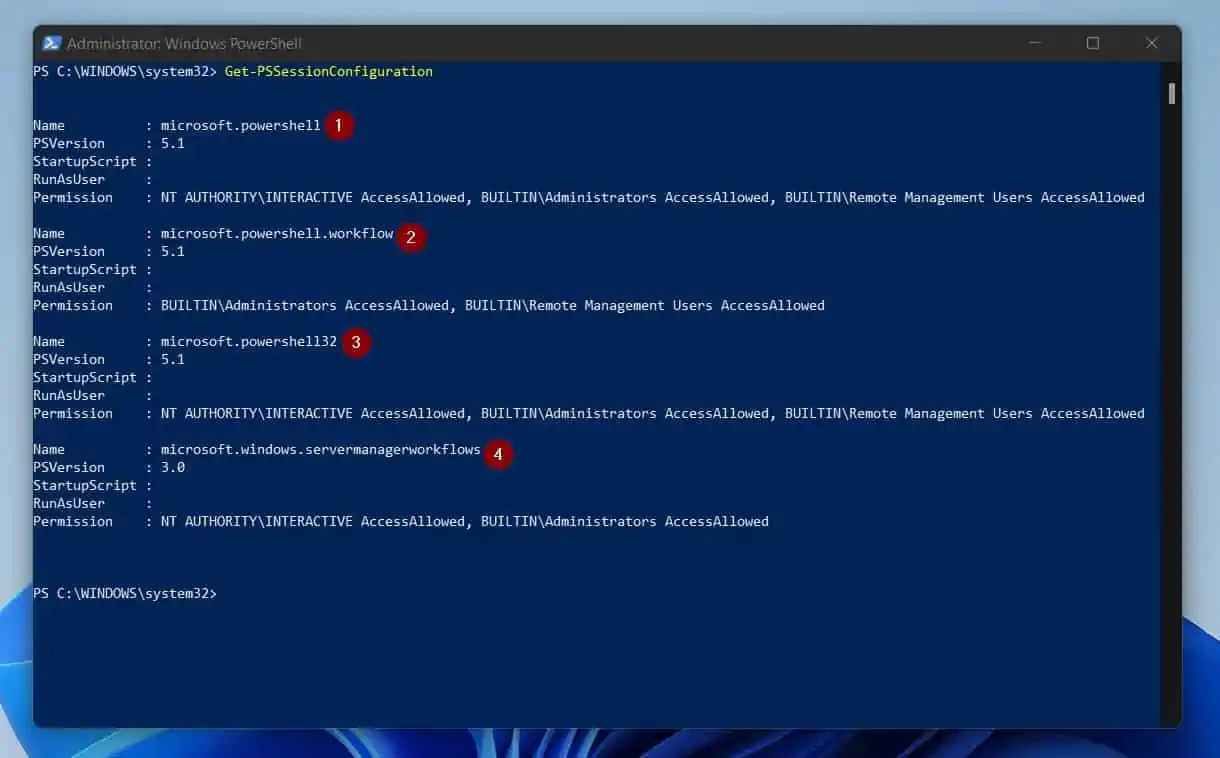
Furthermore, starting from PowerShell 3.0, PowerShell typically has four (4) built-in endpoints. These built-in endpoints are microsoft.powershell, microsoft.powershell.workflow, microsoft.powershell32 and microsoft.windows.servermanagerworkflows.
Each of these 4 endpoints defines who has what permission.
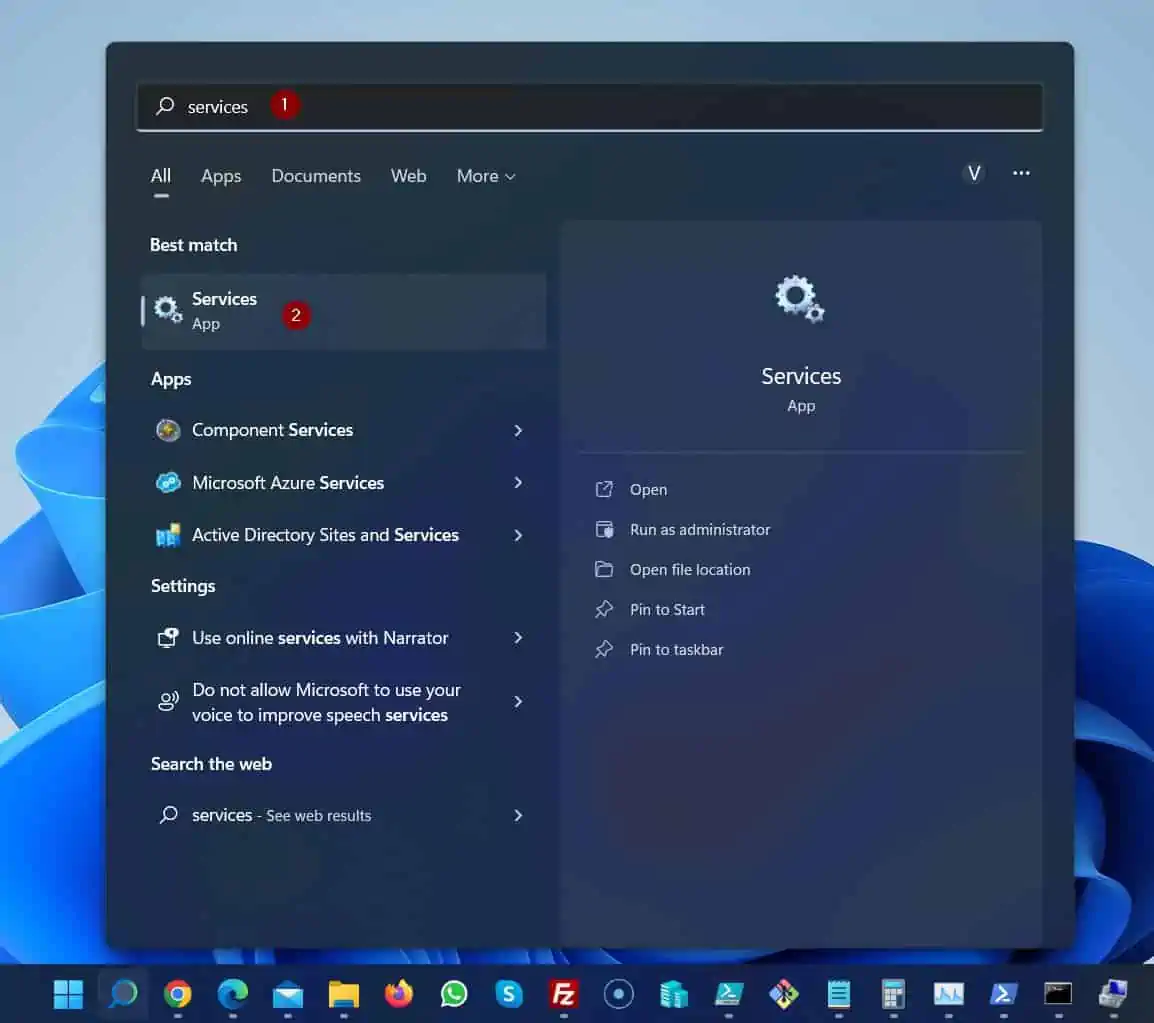
To list the built-end endpoints on your computer, follow the steps below:
- Search services, then open it.
- When the Services MMC opens, locate the Windows Remote Management (WS-Management) service, right-click, and select Start.
- After starting the WinRM service, run PowerShell as administrator. Finally, type the command below in the PowerShell console, and press the enter key on your keyboard.
Get-PSSessionConfiguration
The command displays the 4 built-in endpoints I mentioned earlier.
Now let’s talk about how these endpoints relate to the PowerShell.exe -ConfigurationName command line argument. When you want to connect to a computer remotely, you can use the -ConfigurationName argument of the PowerShell.exe command to specify the endpoint you want to connect to in the remote computer.
This is essential if you want to have some specific permission when you make the remote PowerShell connection. For example, if I want to remote to a computer called Computer1 with the microsoft.powershell.workflow endpoint, I’ll run the command below:
powershell.exe -ConfigurationName microsoft.powershell.workflow -Command {Invoke-Command -ComputerName Computer1 -Credential (Get-Credential)}
-EncodedCommand Command Line Argument
You can use the PowerShell.exe -EncodedCommand command line argument to specify a base-64-encoded string version of a command.
So, how do you create the base-64-encoded string version of a PowerShell command?
To encode a text string, use the following syntax:
[Convert]::ToBase64String([System.Text.Encoding]::Unicode.GetBytes("StringToEncode"))
To decode the base-64-encoded string version to a normal version, use the following syntax:
[System.Text.Encoding]::Unicode.GetString([System.Convert]::FromBase64String("StringToDecoded"))
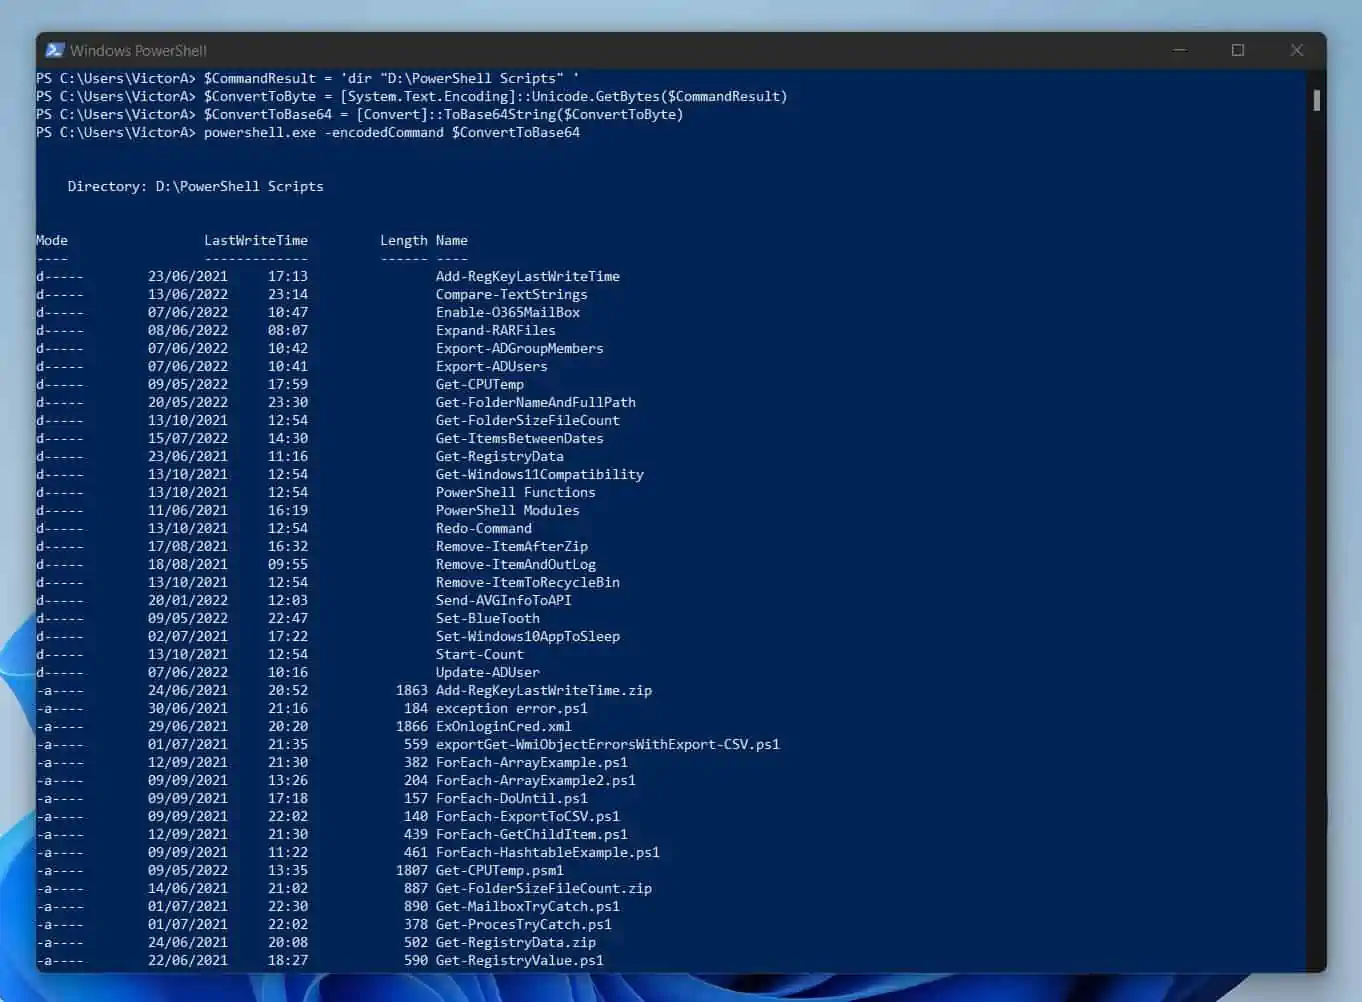
To give an example, if I want to run the base-64-encoded version of ‘dir “D:\PowerShell Scripts” ‘, with the -EncodedCommand command line argument, I will proceed as follows:
- Firstly, I’ll save the output of the “dir” command in a variable.
$CommandResult = 'dir "D:\PowerShell Scripts" '
- Next, I’ll convert the command into its base-64-encoded version by running the commands below:
$ConvertToByte = [System.Text.Encoding]::Unicode.GetBytes($CommandResult)
$ConvertToBase64 = [Convert]::ToBase64String($ConvertToByte)
- Finally, I’ll use the PowerShell.exe -EncodedCommand command line argument to run the base-64-encoded version of the command:
powershell.exe -EncodedCommand $ConvertToBase64
The last command displays the same result as the original decoded command – ‘dir “D:\PowerShell Scripts”. ‘
-WindowStyle Command Line Argument
When you run PowerShell.exe in a script, you may set how to display the console. Essentially, you can set the console to display Normal, Minimized, Maximized, or Hidden.
To set how PowerShell.exe displays the PowerShell console when it opens, use the WindowStyle PowerShell.exe command line argument.
As I mentioned earlier, you can set four PowerShell console display options. If you set Normal, the PowerShell console will open in its normal size, as shown in the screenshot below.
PowerShell.exe -WindowStyle Normal
In addition to selecting the Normal display WindowStyle, you can also select the Minimized style. If you select the Minimized style, PowerShell.exe will open a PowerShell but minimize it on the Taskbar.
PowerShell.exe -WindowStyle Minimized
Next up is the Maximized windows style. PowerrShell.exe will open its console in a maximized window if you select this option.
PowerShell.exe -WindowStyle Maximized
Finally, if you want PowerShell.exe to open a console but not display the window, use the Hidden WindowStyle PowerShell.exe command line argument.
-OutputFormat Command Line Argument
Powershell sends outputs in text format by default. However, you may also send the output in XML format.
Furthermore, to change the output format of PowerShell, use the PowerShell.exe OutputFormat command line argument. When you specify the OutputFormat argument, you can either specify two format types – “Text” or “XML.”
As I mentioned in the first paragraph of this subsection, the “Text” format is the default output for PowerShell. To force PowerShell to send its output in XML, use the OutputFormat argument.
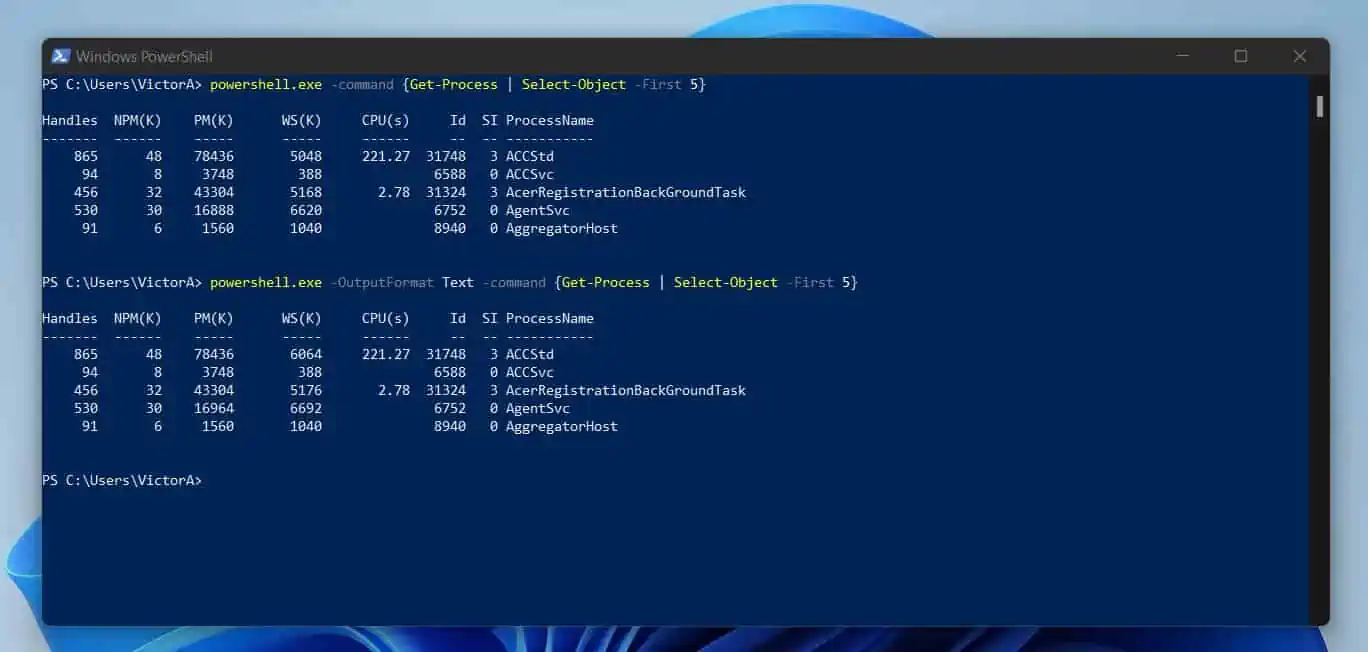
For instance, if I run the command below, PowerShell displays the result in normal text format.
powershell.exe -command {Get-Process | Select-Object -First 5}
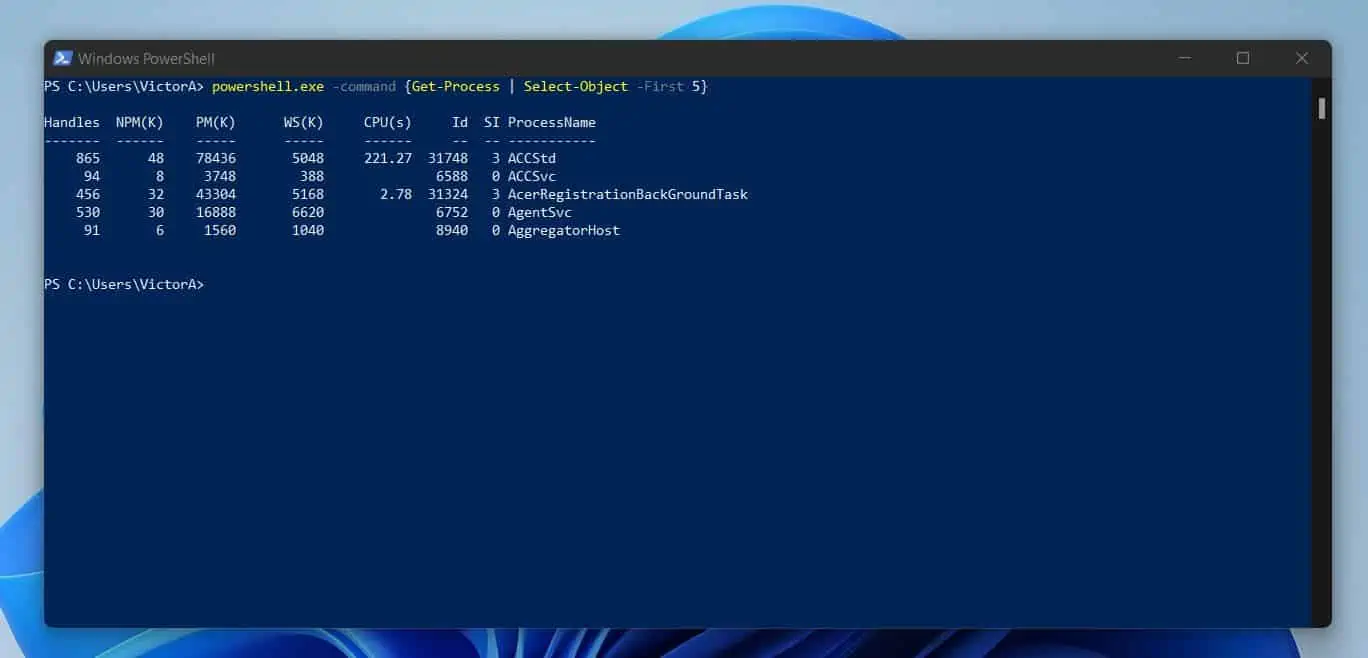
The last command is the same as using the OutputFormat argument with the “Text” format. Here is what the command looks like…
powershell.exe -OutputFormat Text -command {Get-Process | Select-Object -First 5}
In comp[arison, if I want to display the result of the last two commands in XML format, I will run the command below:
powershell.exe -OutputFormat XML -command {Get-Process | Select-Object -First 5}
As you can see from the screenshot below, PowerShell now displays the result in XML format. However, it is difficult to read.
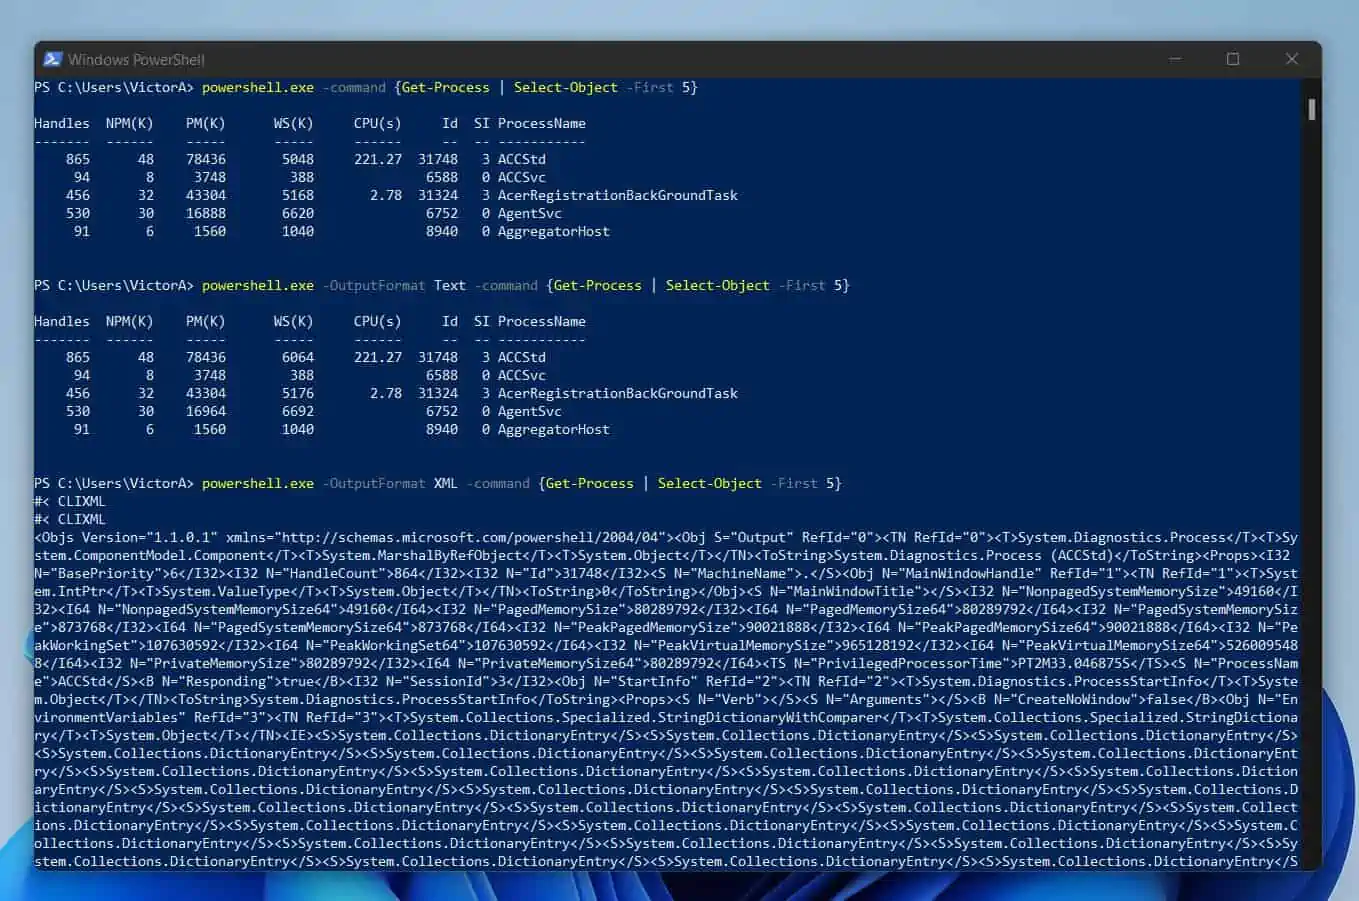
To make it easier to read, I will pipe the output to a file instead of displaying it on the console…
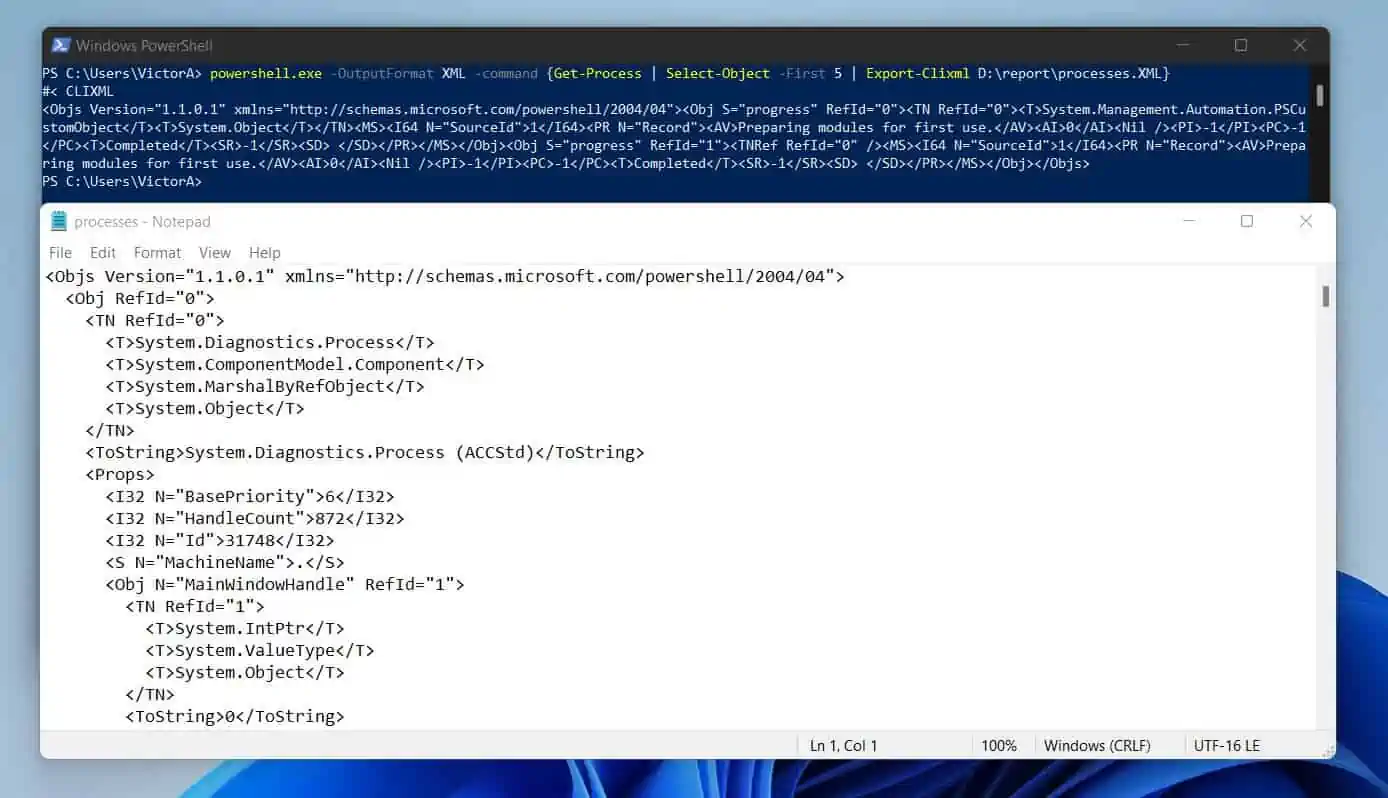
powershell.exe -OutputFormat XML -command {Get-Process | Select-Object -First 5 | Export-Clixml D:\report\processes.XML}
The above command will display the XML result on the console. In addition to that, it will send the result to a file called processes.XML.
Here are the results on the PowerShell console as well as the XML file.
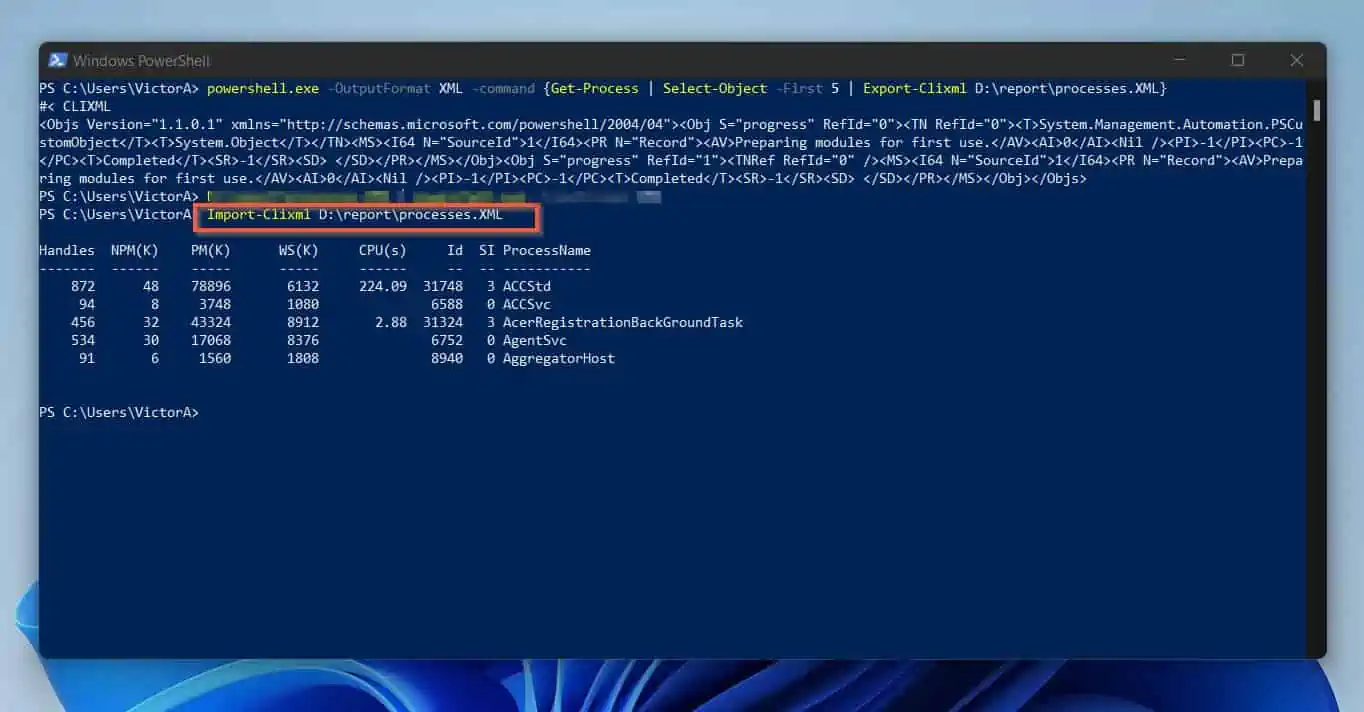
Before I move on, I’ll like to show you how to import the XML file to PowerShell and display it in a normal text format. To import an XML file into PowerShell, use the Import-Clixml command as shown below…
Import-Clixml D:\report\processes.XML
As expected, the command displays the result of the Get-Process command we ran in the previous command.
-InputFormat Command Line Argument
In the last subsection, I discussed the PowerShell.exe OutputFormat command line argument. While the OutputFormat determines how PowerShell formats its output, the InputFormat sets the format PowerShell receives data.
Like the OutputFormat argument, the PowerShell.exe InputFormat command line argument accepts two valid values – “Text” or “XML.”
When you specify “Text,” PowerShell will expect string data. On the contrary, when you specify “XML”, PowerShell will expect XML input data.
-NonInteractive Command Line Argument
By default, when you run a PowerShell command that requires a parameter, PowerShell will prompt you to provide the required parameter. In some other instances, PowerShell will prompt for confirmation if you use the Remove-Item command to delete a non-empty folder.
However, you may want to stop PowerShell prompting for user input in some scripting scenarios. To stop PowerShell interactively prompting for input, use the PowerShell.exe NonInteractive command line argument.
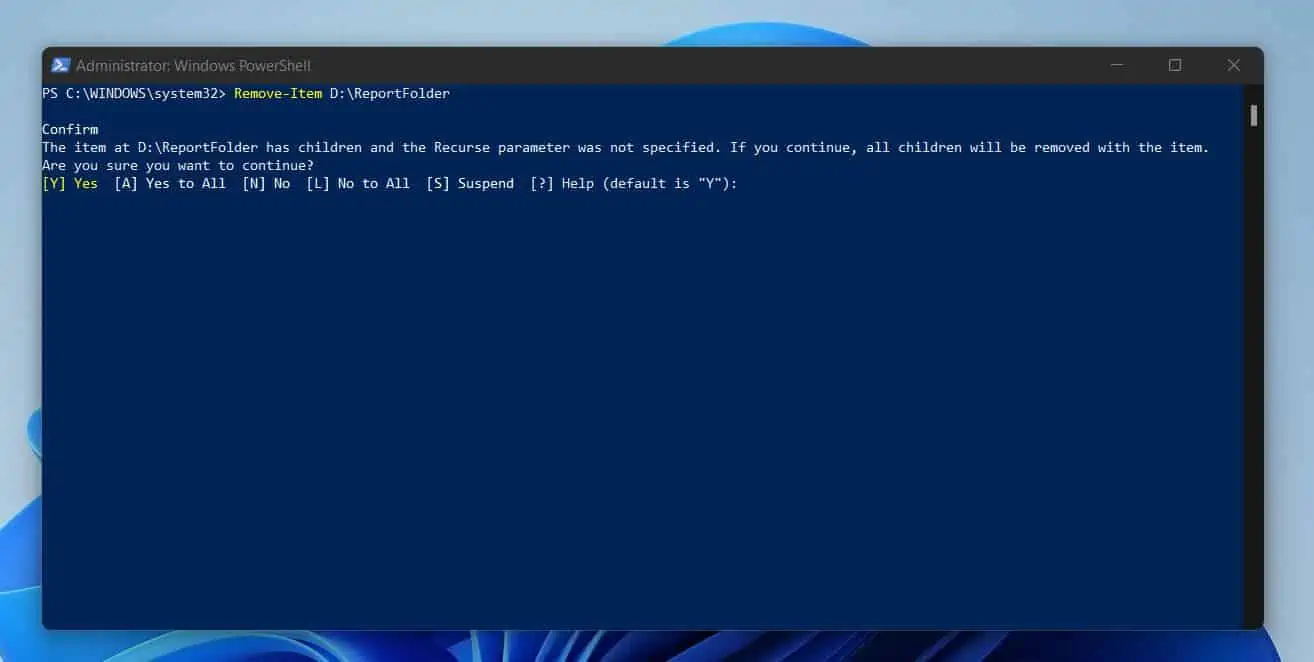
For example, I have a folder D:\ReportFolder that has other folders and sub-folders. If I run the command below, PowerShell will display a prompt informing me that the ReportFolder folder “has children and the Recurse parameter was not specified.”
Remove-Item D:\ReportFolder
PowerShell will also include an option for me to confirm that I want to delete the folder and all its sub-folders.
If this command was in a script, the script would stop executing. To change this default PowerShell behavior, I’ll run the command below…
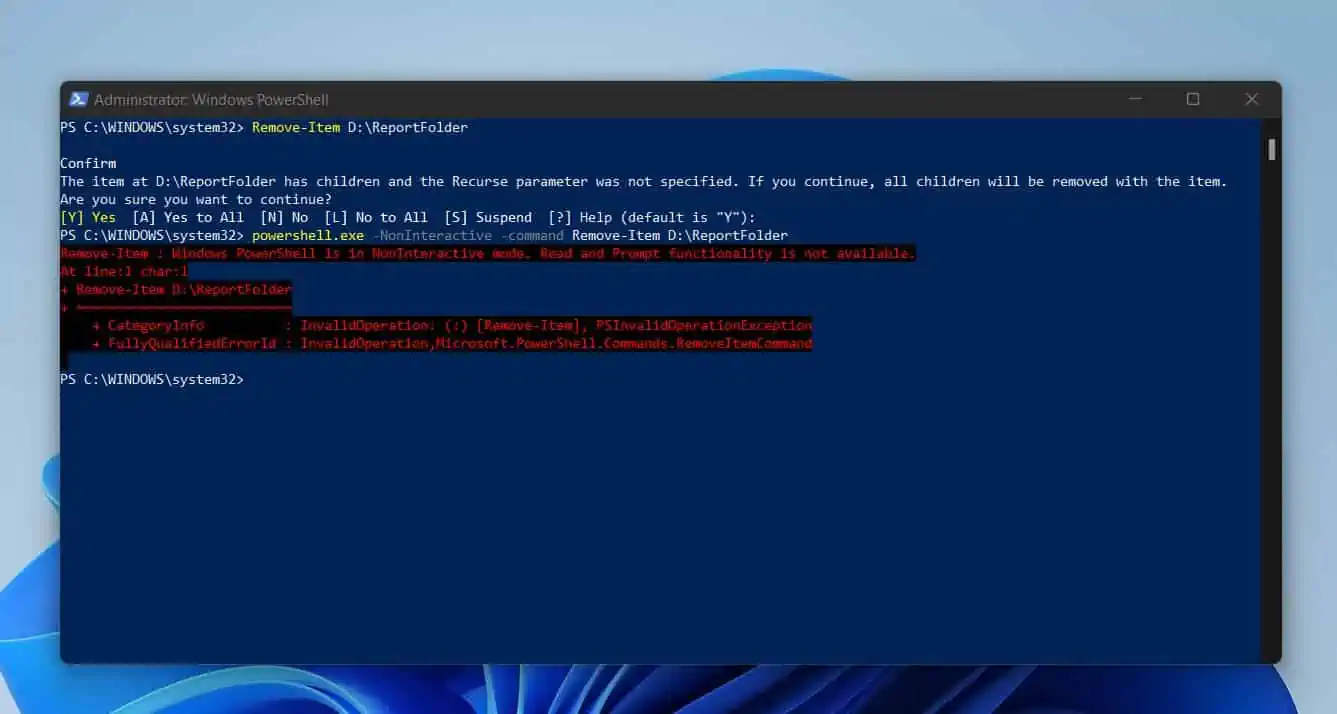
powershell.exe -NonInteractive -command Remove-Item D:\ReportFolder
The last command will not display the interactive prompt. Rather, it will display that “Windows PowerShell is in NonInteractive mode. Read and Prompt functionality is not available.”
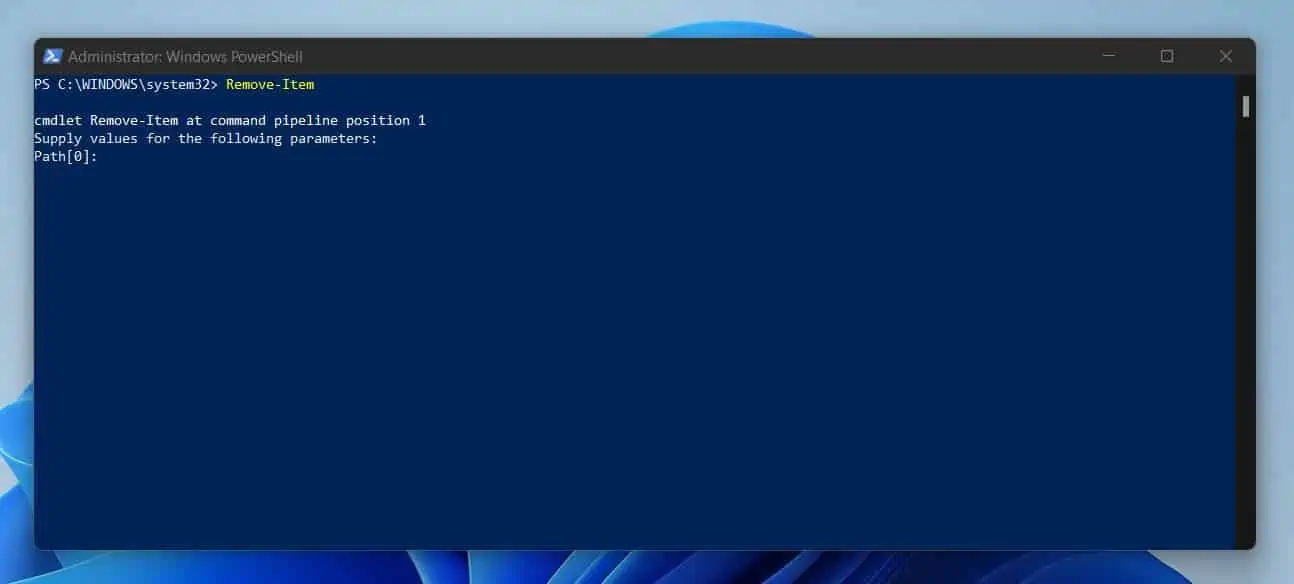
Moving on, as I mentioned earlier, another scenario that could force PowerShell to prompt is if you fail to provide a required parameter.
For example, if I run the command Remove-Item without providing the path to the item I wish to delete, PowerShell will prompt me to provide the required path…
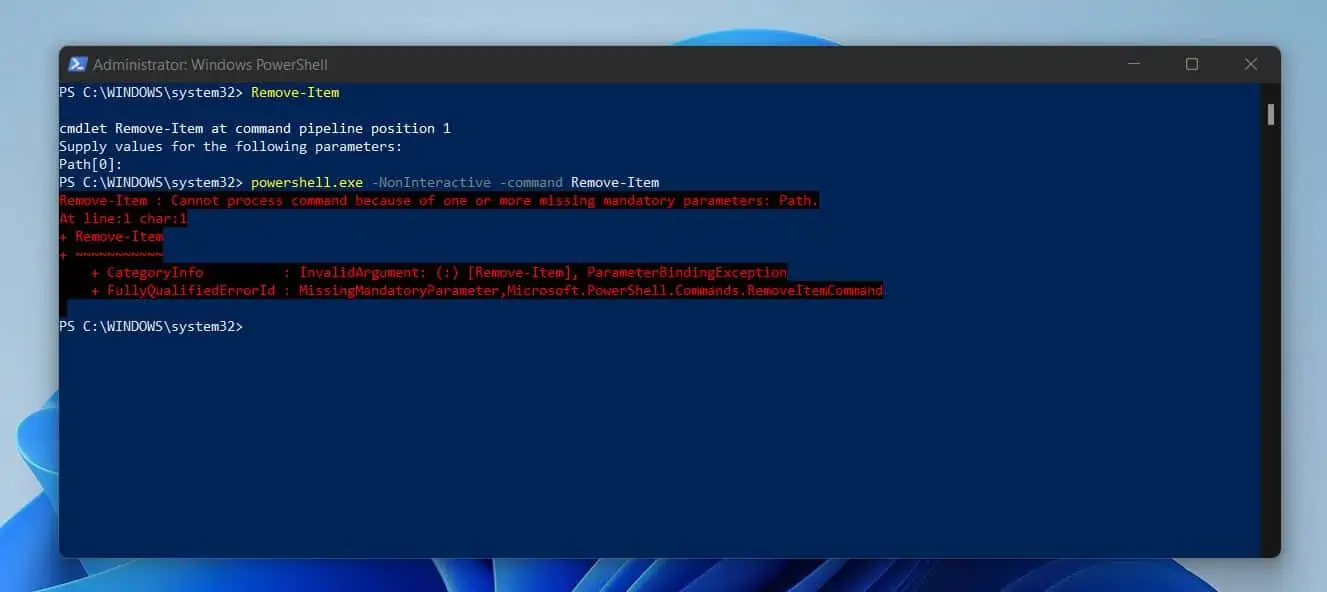
To stop PowerShell from prompting me to provide a required parameter, I’ll modify the last command as shown below.
powershell.exe -NonInteractive -command Remove-Item
This time around, PowerShell displays an error message, but it does not prompt me to provide the required parameter.
-NoProfile Command Line Argument
You may not realize this but each time you open PowerShell, it loads your default profile script. Similarly, you may also customize your default PowerShell profile script.
Specifically, you may add aliases, functions, variables, and commands to your profile script. So, when you customize your profile script, anytime you open PowerShell, these elements will load.
Therefore, you do not need to add them manually to every PowerShell session.
This sounds all well and good. However, there may be situations where you do not want PowerShell to load your default or customized PowerShell profile script.
If you want to stop PowerShell from loading your profile script, run PowerShell.exe, with the -NoProfile command line argument.
Here is a sample command…
PowerShell.exe -NoProfile
When you run the above command, the new PowerShell prompt will NOT load your profile script. So, PowerShell will NOT load any custom command, variable, or function that is in your profile script.
-Sta And -Mta Command Line Arguments
When you start with PowerShell scripting, there is a chance that you’ll run simple PowerShell scripts. However, as you progress in your scripting skills, you may get to a point where you run PowerShell scripts that require more resources.
In other words, you may need to speed up your PowerShell scripts.
This brings us to how PowerShell executes commands. By default, PowerShell runs one line of command, completes it then proceeds to the next.
This is called the single-threaded apartment. Obviously, if you run a PowerShell script that processes multiple data points at the same time, your script may benefit from running multiple lines of code simultaneously.
If PowerShell runs multiple lines of commands simultaneously, this is known as the multithreaded apartment.
So, if you need to start PowerShell run in a single-threaded apartment, you run the PowerShell.exe, with the –Sta command line argument. This is the default behavior of PowerShell.
So, even though you do not specify the –Sta command line argument, PowerShell will run in a single-threaded apartment. However, to run PowerShell in a multithreaded apartment, the PowerShell.exe, with the –Mta command line argument.
To read more about single-threaded and multithreaded apartments, see the Adamtheautomator.com article in my “References And Further Reading” section – number 7.
-NoLogo Command Line Arguments
When you open PowerShell or run a PowerShell instance using the PowerShell.exe command, PowerShell displays Microsoft’s copyright information. In addition to the copyright information, PowerShell also displays some other information.

If you want to open PowerShell without displaying this information, run PowerShell.exe with the –NoLogo command line argument.
PowerShell.exe -NoLogo
I’ll run PowerShell.exe without the NoLogo command line argument to show you the difference. Then, I’ll run PowerShell.exe with the –NoLogo command line argument.
As you can see from the screenshot below, when I ran PowerShell.exe without the NoLogo argument, it displayed the copyright and other information. On the contrary, PowerShell did not display this information when I ran the command with the –NoLogo command line argument.

-Version Command Line Arguments
Like any other tool, Windows PowerShell has different versions. Furthermore, each version offers specific features.
For example, Microsoft introduces new Cmdlets with new releases of Windows PowerShell. This means that some versions of PowerShell support some cmdlets while others will not.
So, if you create a PowerShell script that contains some cmdlets available from a PowerShell version, you may need to force PowerShell to run your script with that version.
To force PowerShell to run with a specific version, run PowerShell.exe with the –Version command line argument. For example, if I want to run a script with version 2.0, I’ll execute the command below.
PowerShell.exe -Version 2.0
It is important to mention that the version you specify must be installed on the computer.
-PSConsoleFile Command Line Arguments
Suppose you want to load a specified PowerShell console file (.psc1), you need to run PowerShell.exe with the –PSConsoleFile command line argument. A PowerShell console file stores the names of the Windows PowerShell snap-ins in the current session.
In the last subsection, I ran the “PowerShell.exe -Version 2.0” command. So, my current PowerShell session is version 2.0. If I want to make it easy to run subsequent sessions in version 2.0 and load all snap-ins in a specific section, I’ll export my current session names and snap-ins to a console file.
Ideally, you want to save your console files in “$pshome\Consoles”. So, the first step is to create the folder if it does not exist.
New-Item -ItemType Directory -Path $pshome\Consoles
Then, use the Export-Console command to export the names and snap-ins in the current PowerShell session to a console file.
Export-Console -Path $pshome\Consoles\ConsoleS1.psc1
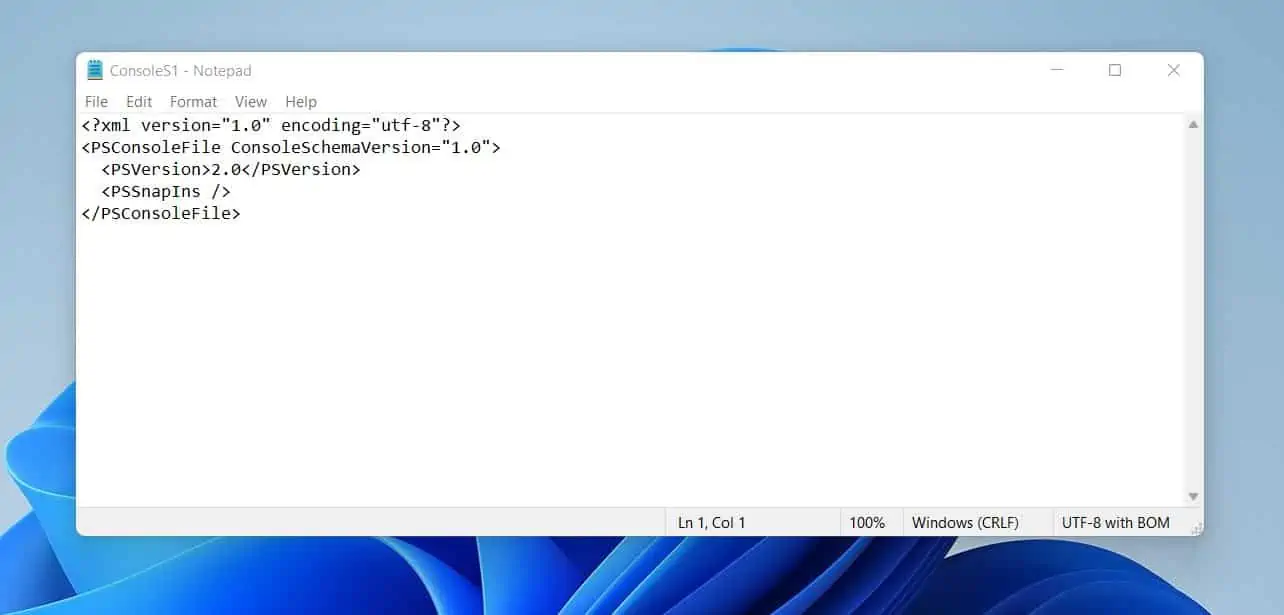
I’ll run the command below to read the information in the ConsoleS1.psc1 file.
notepad $pshome\Consoles\ConsoleS1.psc1
The last command displays the information in the screenshot below. Part of what the Export-Console command saved is the current PowerShell version in my current version.
So, if I want to load this console file, I will run the command below:
PowerShell.exe -PSConsoleFile $pshome\Consoles\ConsoleS1.psc1
Frequently Asked Questions
If you want to see the command line arguments of the PowerShell.exe command, run the command below.
PowerShell.exe /?
However, run the Get-Help command to see the command line arguments of a PowerShell cmdlet. For example, to see the command line arguments for the Get-ChildItem cmdlet, run the command below:
Get-Help Get-ChildItem
To pass command line arguments to a PowerShell ps1 file, run PowerShell.exe with the -File command line argument. Then, specify the ps1 file followed by its arguments (if any).
To set a parameter in a PowerShell script or function, specify the ParameterSetName keyword of the Parameter attribute for each parameter in the parameter set.
To learn more about how to set Parameters in PowerShell, read our article – PowerShell Param – Syntax, Types, Attributes, Examples.
The first step to using a variable in PowerShell is to define the variable. To define a variable, start with a dollar sign ($), followed by the name of the variable.
For example, to define a variable called “Victor”, I’ll use this code.
$Victor
Next, I’ll add an equal sign next to $Victor then specify what I want to save in the variable. You can save a string or the output of a command in a variable.
So, to save the string – this is a test variable – I will run the command below:
$Victor = “this is a test variable”
Once I have saved a value in a variable, I can use that variable in a command.
To create an array in PowerShell, you can start by creating an empty array. For example, if I want to save an empty array in a variable called “EmptyArray”, I will run the command below:
$EmptyArray = @()
After defining an empty array, you can then add values to the array. To read more about arrays and how to use them, read our article – PowerShell Array and Add to Array: Applications and Examples (www.itechguides.com)
Conclusion
The PowerShell.exe command provides SysAdmins the opportunity to customize the behavior of PowerShell. Like any other command, PowerShell.exe has command line arguments that make the command versatile.
This guide is a deep dive into the PowerShell.exe command line arguments. I covered arguments like ExecutionPolicy, File, and more.
I aimed to help you learn how these arguments work and how to use them, and I hope I achieved that! If I did, click on “Yes” beside the “Was this page helpful” question below.
You may also express your thoughts and opinions by using the “Leave a Comment” form at the bottom of this page.
Finally, to read more PowerShell articles, visit our Windows PowerShell How-To Guides or PowerShell & Windows Command Prompt Explained pages.