Does your Windows 11 computer WiFi turn off by itself after you turn it on? If that is the case, this guide shows you how to fix Windows 11 WiFI that won’t turn on.
Solution 1: Modify your Windows 11 Wireless Adapter’s “Channel Width for 2.4GHz” Property
The Channel Width setting of your WiFi adapter may be causing it to go off when you turn it on.
In this first method to fix this problem, I’ll show you how to modify your Windows 11 wireless adapter’s channel width settings. Follow the steps below to perform this task:
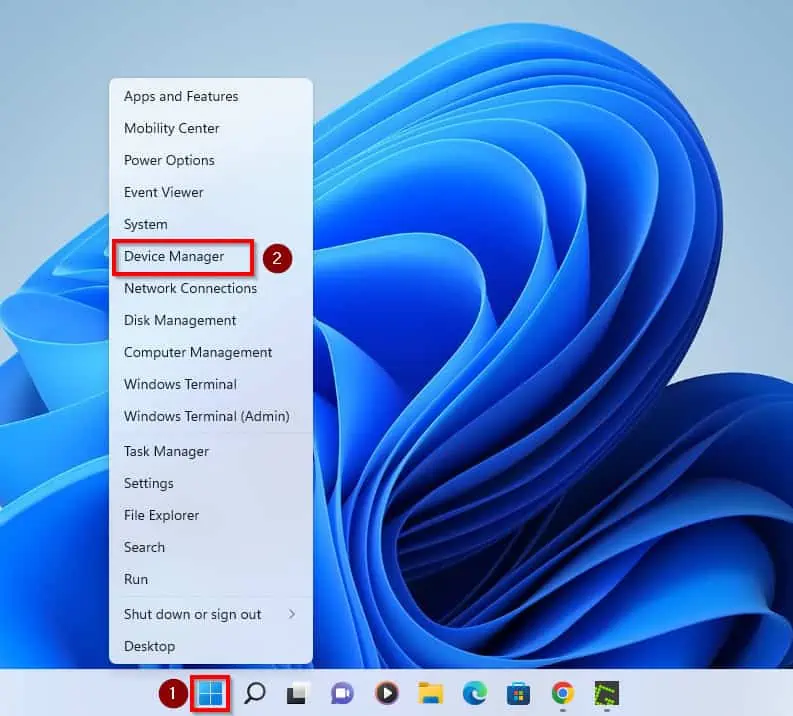
- Right-click on the Windows start menu on your taskbar and select Device Manager.
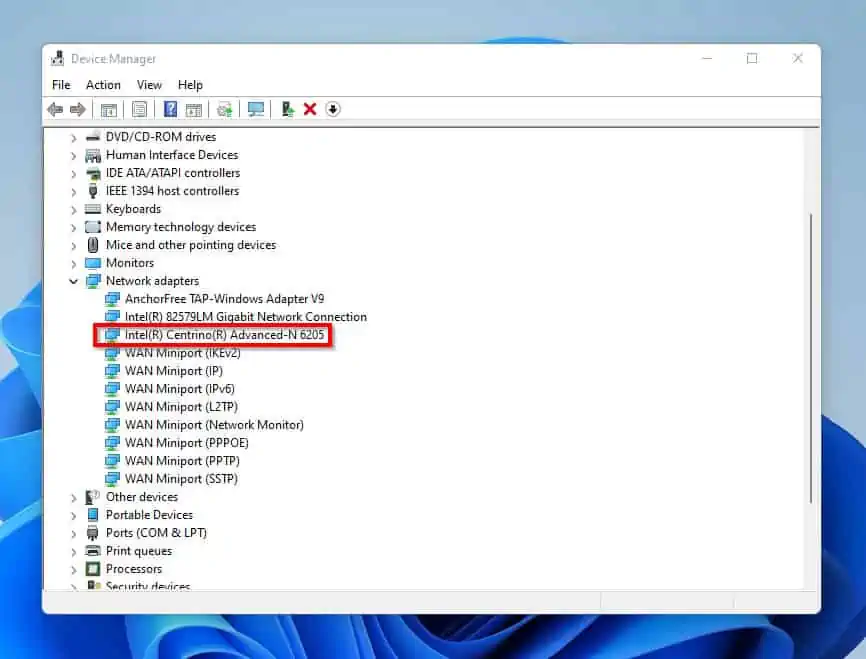
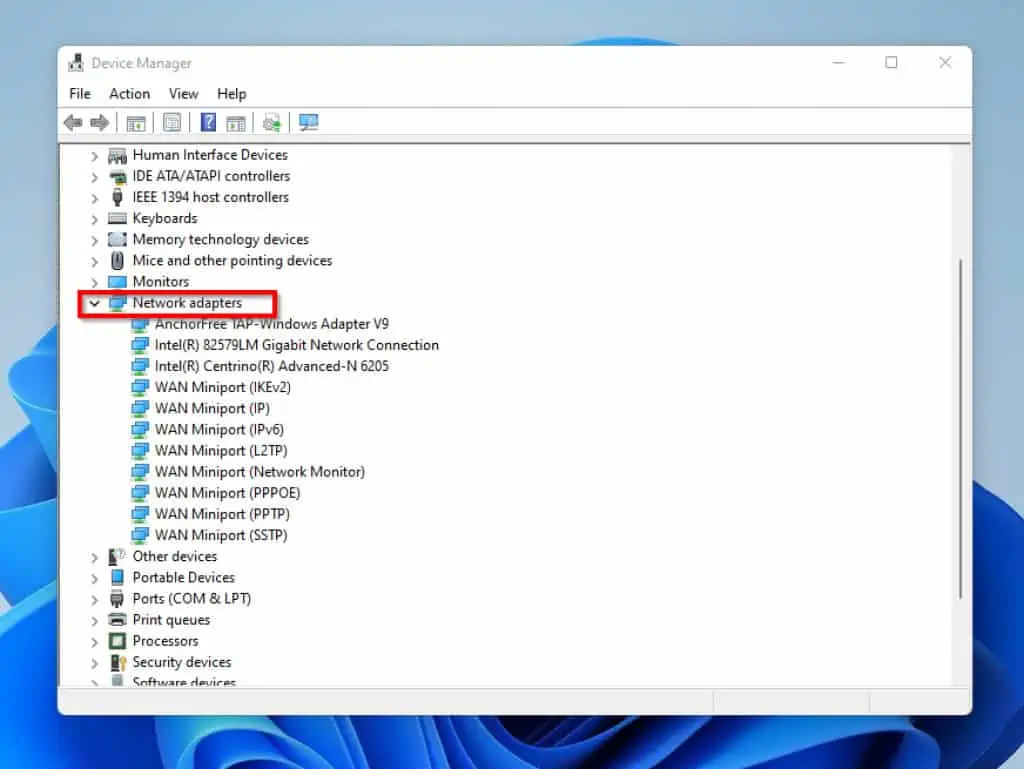
- When Device Manager opens, double-click Network Adapters to expand it.

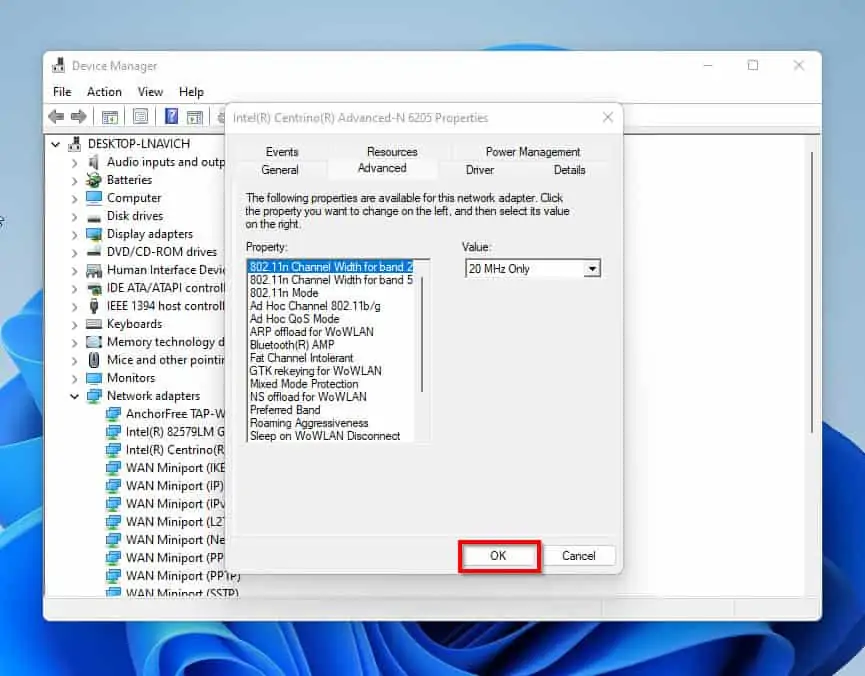
- Then, locate the adapter with the name. Mine is “Intel(R) Centrino (R) Advanced-N6205”. Your network adapter may be different!
- Right-click your network adapter name and select properties.

- Then on the Properties page, click the Advanced tab.
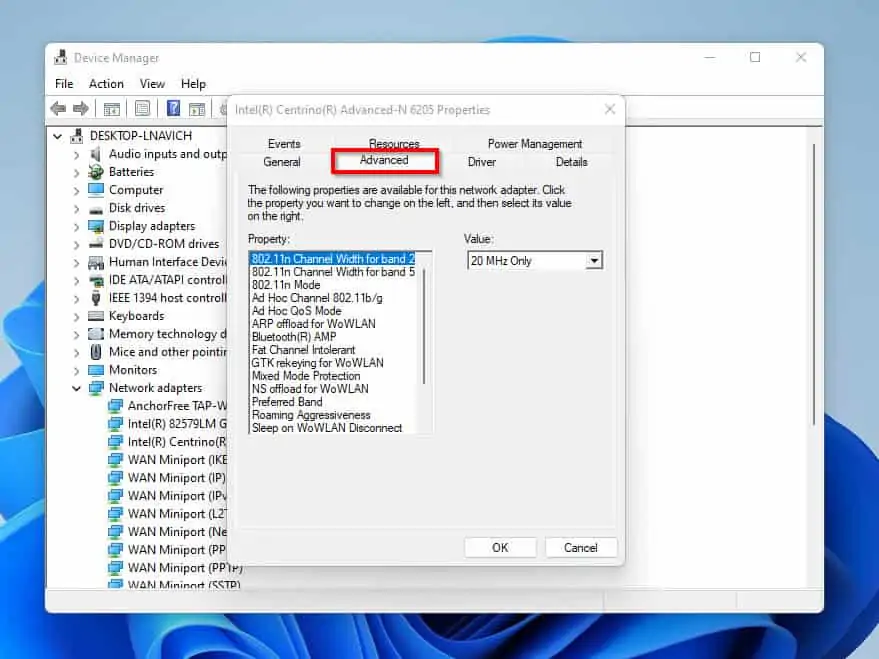
- Next, locate “Channel Width for 2.4GHz” and click on it. Then, if the value is set to auto, change it to 20 MHz Only.
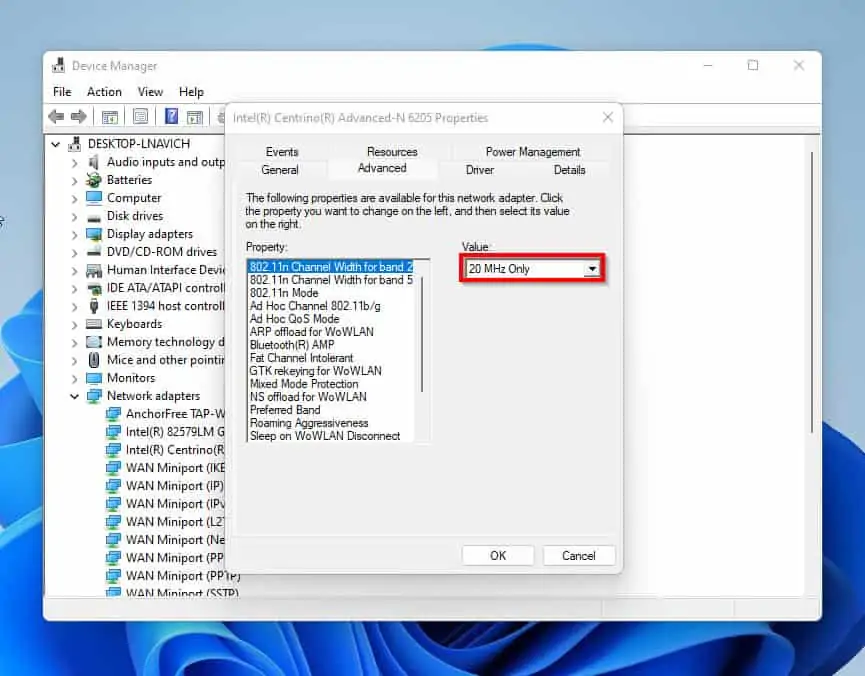
- Finally, click OK to save the changes.
Check whether this resolves the problem. If it does, you do not need to try any of the methods below.
However, if applying the last suggested fix did not solve the problem, try my next suggested fix below.
Solution 2: Restore BIOS Settings to System Default
The next method I want to show you is how to fix “wifi not turning on” by restoring BIOS to default settings. The steps are shown below:
- Shut down the computer.
- Unplug the power from the wall outlet. For laptops, remove the battery also.
- Once that is done, wait for 5 minutes.
- Then, fit your battery (for laptops) back. Furthermore, plug your power back on.
- Next, boot your computer to BIOS. In case you don’t know how to do this, click How to Boot to BIOS in Different Computers.
- On the BIOS, locate a place to reset BIOS settings to system defaults. Save the changes you made, then boot the Windows.
As usual, if this does not fix the problem, proceed to try my next suggested fix.
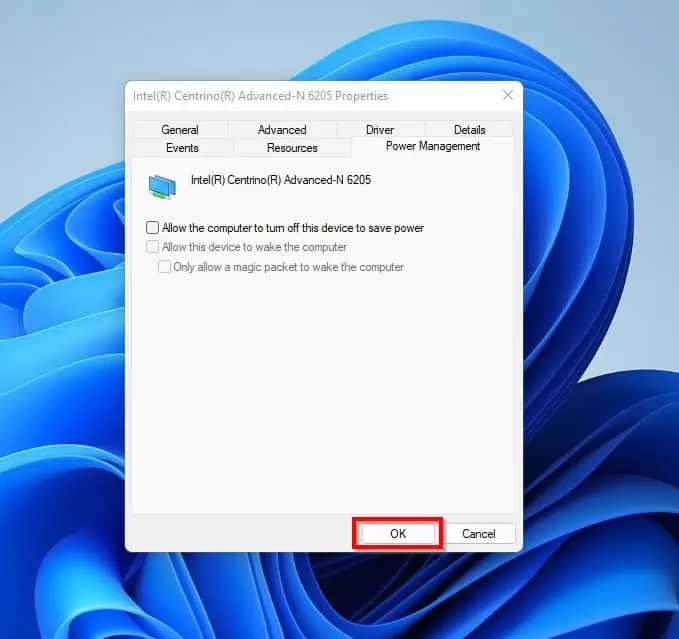
Solution 3: Disable “Allow the Computer to Turn Off This Device to Save Power”
Another method that may solve the problem of wifi not turning on is to try disabling the “Allow the computer to turn off this Device to Save Power” settings. Follow the steps below to perform this task:
- Right-click the Windows start menu and Device Manager.

- In Device Manager, expand Network Adapters.
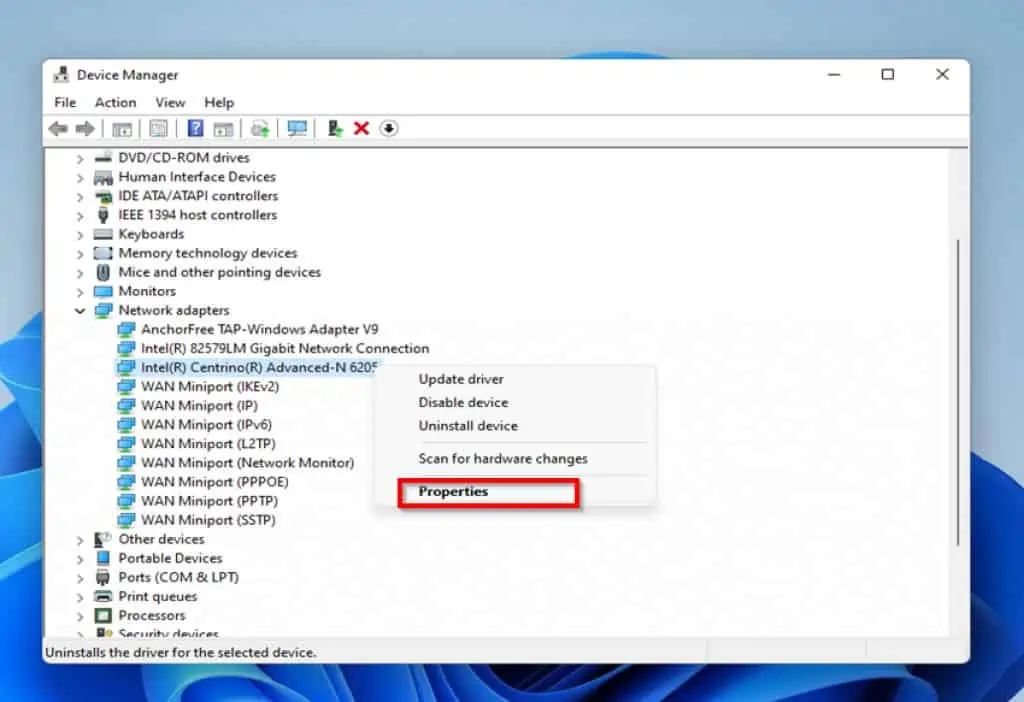
- Then, locate the network adapter with the name. Mine is “Intel(R) Centrino (R) Advanced-N6205”, yours may be different.

- Right-click this network adapter and select Properties.
- On the properties pop-up screen, click on the Power Management tab. Then, uncheck “Allow the computer to turn off this device to Save Power”.
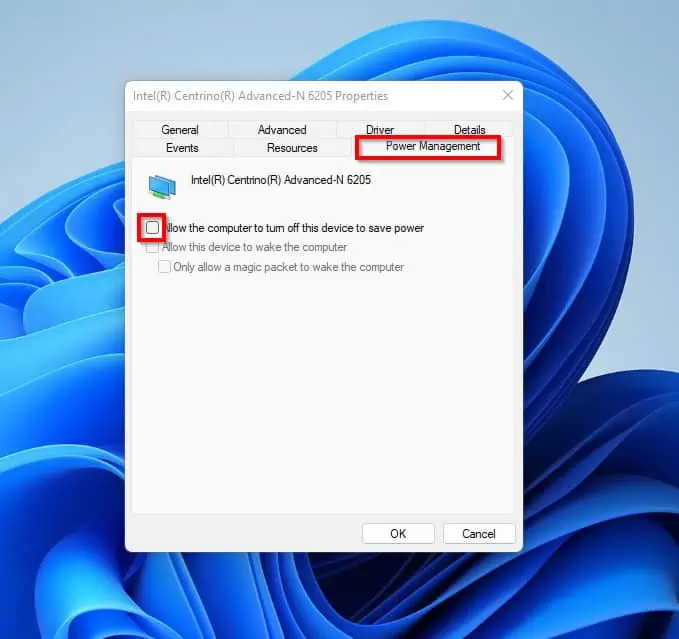
- Finally, to resolve Windows 11 Wifi not turning on, click OK to save your changes.
If any of the above-suggested fixes did not fix the problem, try this last one…
Solution 4: Roll Back to the Previous OS, Turn Off the Wi-Fi device, and Upgrade Again
The second method I would like to teach you in this guide is to roll back your OS to the previous version and install Windows 11 again. Here are the steps:
- Unplug your Wifi device from your PC (if it is an external device). However, for a built-in Wifi device, boot to BIOS and turn it off.
- Roll back to the previous operating system (Windows 8.1 or Windows 10).
- Repeat the upgrade back to Windows 11.
- When the upgrade is completed, turn your computer’s Wifi on or plug it back in.
- Windows 11 should detect the device automatically and install the driver.
Frequently Asked Questions
A WiFi network is a network that uses radio frequency signals to connect printers, computers, and smartphones wirelessly (without wires or cables). This connection can either be to each other or to the internet without a wired connection.
a) Navigate to Settings.
b) On the left pane of the Settings screen, click Network & Internet.
c) Then, on the right pane of the page, click on the toggle button beside WiFi to turn it On or Off.
If your computer doesn’t connect to the internet but other devices connect to that same internet, it means the problem is coming from your device and the WiFi adapter. Try resetting the WiFi adapter to fix the problem.
To know if your computer is capable of connecting to the internet via WiFi follow the steps below:
a) Navigate to Control Panel.
b) On the left pane click Network & Internet.
c) Then, click Network and Sharing Center.
d) On the left pane, click Change Adapter Settings
e) Finally, on the Network Connections pop-up page, if wireless/Wifi is on the list of available connections then, your computer can be connected to a wireless network.
Yes, it does. it is necessary for your Windows 11 computer to be connected to a Wifi or Ethernet to have an internet connection to be able to perform updates and download other useful features.
Conclusion
It can be a major setback to your business if your computer refuses to turn on Wifi or turn off automatically after it is turned on. Several underlying factors can cause this – it can be from the source of the network which is the router or from the computer.
Notwithstanding, this guide showed you four ways to solve this problem. To be more specific, this article taught you how to modify your wireless adapter and roll back to the previous OS, turn off Wifi devices and upgrade again.
Finally, it also showed you how to restore BIOS settings to default and disable “allow the computer to turn off this device to save power”. Hence, following the steps in any of the methods in this guide, you should be able to resolve the issue of Windows 11 Wifi not turning on.
I hope you found this post helpful? If you did, let us know by voting Yes to the Was this post helpful? question below.
Also, share your thoughts about this article by leaving us a comment in the “Leave a Reply” form at the bottom of this page.
Finally, for more guides on how to do stuff on Windows 11, please visit our Windows 11 How-To page.