

iTechGuides is reader-supported. When you buy through links on our site, we may earn an affiliate commission. As an Amazon Associate I earn from qualifying purchases. Learn more
This Itechguide teaches you different ways to get help with Windows Media player in Windows 10. The guide starts by teaching you how to open Windows Media Player.
How to Open Windows Media Player
The most logical place to start this Windows 10 Media Player help guide is to show you different ways to open Windows Media player. This section teaches you three methods to open Windows Media Player in Windows 10.
Method 1: Open Windows Media Player From Search
The fastest method to open Windows Media Player is via search. Here are the steps.
Free tools Windows power users keep installed
One-click scans. No signup required.
- Enter media player into the Windows 10 search box found at the bottom left of the Taskbar – usually close to the Start Menu.
- Then, from the search results, click Windows Media Player.

Method 2: Open Windows Media Player From Start Menu
Another method to open Windows Media Player is via the Start Menu. Follow the steps below to open Windows Media Player with this method:
Popular on Amazon
- 【SIMPLE, POWERFUL, COMPACT】- Easily play videos, photos, and music files from USB drives, hard drives, and SD cards. Simple and intuitive to use with no complicated settings. Takes up very little space - it’s smaller than a deck of playing cards!
- 【4K/UHD VIDEO PLAYBACK】- Stunning HDMI video quality up to 2160p/60Hz with support for the latest video formats such as H.265/HEVC. Feeds digital surround sound to home theater receivers for a cinema-like movie experience. Includes analog AV output for connecting to an older TV or for sending audio to a stereo system.
- 【READS USB DRIVES AND SD CARDS】- Reads USB flash drives and hard drives up to 8TB and SD cards up to 1TB. Supports FAT32, exFAT, and NTFS file systems. Automatic playback, continuous looping and repeat, and the ability to resume video playback from the last stop point.
- 【TRIGGER SENSOR INPUT】- Ability to loop one video continuously and play a different video when triggered by an optional push-button or motion sensor. Build an interactive digital signage display, art gallery or museum on-demand video player, or a Halloween special effect in just a few steps. Push-button and motion sensors sold separately.
- 【MEDIA FORMAT SUPPORT】 - Video: MP4, MKV, AVI, TS/TP, MOV, VOB, and M2TS files using H.265/HEVC, H.264/AVC, VC1, or MPEG2/4 codecs, up to 4096x2304p@30fps, 10-bit color, and 200mbps. Photos: JPG, JPEG, BMP, GIF (non-animated), PNG. Music: MP3, WMA, OGG, FLAC, APE, AAC
- Click the Start Menu.
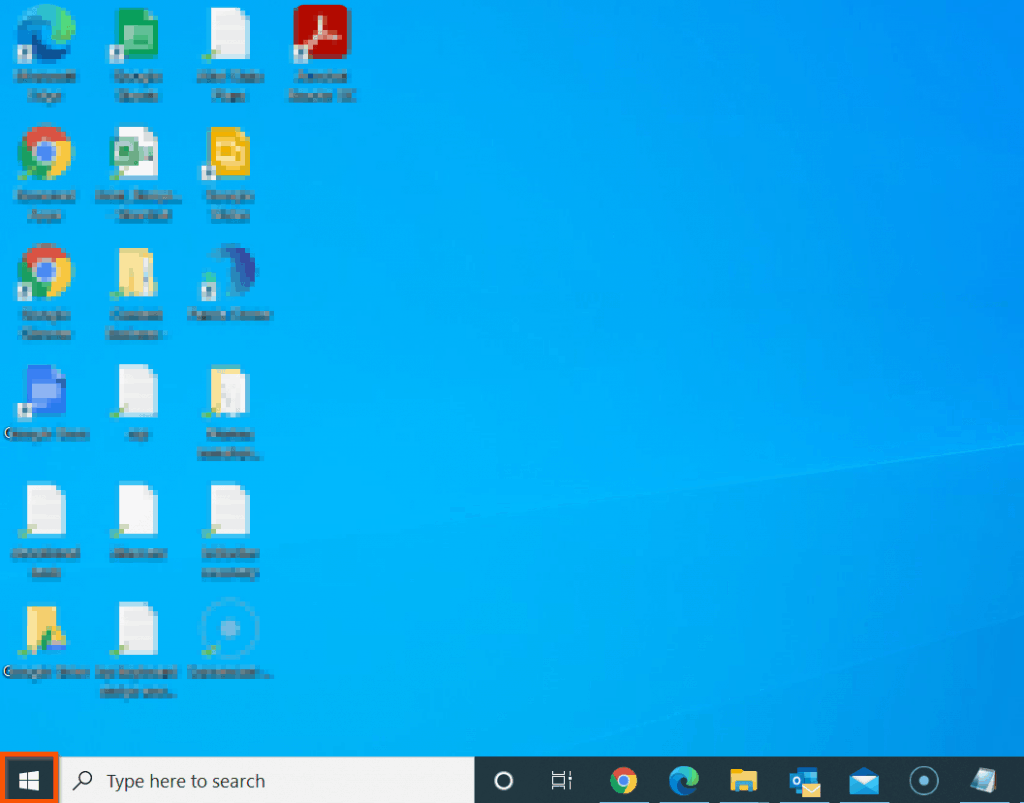
- Then, scroll down to the Start Menu items starting with W, locate Windows Media Player, and click it. If Windows Media Player is not displayed on its own, locate Windows Accessories and expands it. Then, click Windows Media Player.


Method 3: Open Windows Media Player From Run
You can also open Windows Media Player via the Run command. Here are the steps:
- Right-click Start Menu and select Run.

- Then, when Run opens, enter wmplayer.exe and click OK.

Set Up Windows Media Player For First-Time Use
When you open Windows Media Player for the first time, it displays Welcome to Media Player with 2 setup options – Recommended settings and Custom settings. Select Custom settings and click Next.


Then, on the final screen, click Finish.

How to Reinstall Windows Media Player
When I started writing this Windows 10 Media Player help guide, I tried opening Windows media player but couldn’t find the app.
What’s actually slowing this PC down?
Pick the symptom - the matching free tool is one click away.
Moreover, none of the methods of opening Windows Media Player discussed in the last section worked. If you tried opening Windows Media Player but can’t find the app, follow the steps below to reinstall the app.
- Right-click the Start Menu and select Settings.

- Then, on the Windows 10 Settings screen, click Apps.

- On the Apps & features screen, click Optional features.

- Then, on the Installed features section, search for media player, click on it – finally, click Uninstall.


- If Windows media player is not installed or if it was installed – after uninstalling it – click Add a feature.

- Finally, when the Add an optional feature screen opens, search for media player, check the checkbox beside Windows Media Player – then, click Install.

Wait for the installation to complete, then go back to section 1 above and try opening Windows Media Player with one of the methods. One quick method to open the app is to search for it – see the second screenshot below.

How to Enable Media Player Menu
Once you open Windows Media Player in Windows 10, you may discover that the menu is missing. See the screenshot below – the point my arrow is pointing suppose to display the menu.

If Windows Media Player menu is missing – well, maybe not “missing” – more like, “not displayed”, right-click anywhere on top of the app. Then, from the displayed options, click Show menu bar.
Do these 3 things before closing this tab:
1Scan for outdated or missing drivers - takes under a minute2Repair Windows errors before they cause bigger problems3Fix the driver behind crashes, sound loss and screen glitchesAlternatively, you can use the keyboard shortcut – pressing the Ctrl and M keys on your keyboard simultaneously.

The Windows Media Player menu – File, View, Play, Tools, and Help – will be displayed.

Working With Windows Media Player Menu
Need help with Windows 10 Windows Media Player menu? This section walks you through how to use the five menu options – File, View, Play, Tools, and Help.

This section is divided into five subsections – covering each of the Windows Media Player menu.
Windows Errors? Fix Them Before They Spread
Repair common Windows errors and clear accumulated junk for a smoother, more stable PC - no reinstall needed.Free scan · no reinstallOutdated Drivers Are Slowing You Down
One free scan finds every outdated or missing driver and matches the right update for your exact hardware.Free scan · exact hardware matchWindows Media Player “File” Menu
The File menu has additional options. Each item is discussed beneath this screenshot.

Open and Open URl

You can use the Open sub-menu to open a music or video file from your computer. When you click Open, it will display a dialogue box.
Navigate to the folder with music or video file, click on a file and click Open at the bottom right of the dialogue box.
Also popular on Amazon

- [Smooth 4K Ultra HD Playback] This 4K@30Hz HDMI digital media player utilizes H.265/HEVC decoding technology, enabling playback of videos up to 4096×2304 resolution compared to H.264 or 1080P, delivering a clearer and smoother picture.
- [Plug and Play] The HD media player is easy to use, requiring no WiFi or app. It supports direct playback/copying/deletion of videos, music, photos, PPTs, and PDFs from USB storage devices or Micro SD cards. Equipped with dual USB ports, this media player can also connect to a mouse/keyboard or speakers.
- [HDMI RCA Optical Outputs] This media player connects to TVs, digital signage displays, or projectors via an HDMI port for crisp 4K video playback. The player also comes with analog RCA output to hook up legacy older TVs and monitors, plus built-in optical audio port to transmit lossless digital surround sound to soundbars, amplifiers and home theater audio systems, delivering immersive high-fidelity audio without signal loss.
- [TV Projector or Digital Signage] This 4K media player supports autoplay, loop playback, and shuffle playback, and supports both landscape and portrait display modes. HDMI media player can run continuously, making it ideal for TV projector or digital signage such as restaurant welcome videos, reception videos, and art and museum installations.
- [Extensive Compatibility] This media player for TV can play media files from USB hard drives up to 8TB in capacity or micro SD cards up to 1TB in capacity. Supported file systems include FAT32, exFAT, and NTFS. Supported formats include: H.265/HEVC (MKV, MOV, AVI), MPEG, FLV, RM, 3GP, MP4, WMV, RMVB, DAT, MPG, TS, M2TS, JPG, JPEG, BMP, GIF, PNG, MP3, OGG, FLAC, APE, AAC, WMA, etc.

On the other hand, the Open URl sub-menu is used to open a music or video file from a web URL. Follow the steps beneath this screenshot to open a music or video file from a URL.

- Open the URL with the music you want to open. Then, right-click the file download link and select Copy link.

- Back to Windows Media Player, click File -> Open URL

- Finally, paste the link you copied from step 2 in the Open field, then click OK. If Windows Media Player finds a music or video file in the link entered, it will start playing – see the second screenshot below.


Save As and Close
Next to Open and Open URL in the File menu, are Save as and Close. The Save as sub-menu will only be active if you are playing a music or video from an online link.

To save the media you are streaming via an internet link to your computer:
1. Click File -> Save as.

- Finally, on the Save As dialogue box, select a folder and save the file.

While you can save streaming music or video with the File -> Save as sub-menu, the Close sub-menu is used to stop what you are playing. To stop stop a playing music or video, click the Close button.

There are more exciting Windows 10 Media Player help with how to use the File menu. To find out more, read on.
Quick wins for a faster PC:
Repair Windows errors before they cause bigger problemsFix Now →Fix the driver behind crashes, sound loss and screen glitchesFind Drivers →Clear out junk files and repair common Windows errorsFree Scan →Create Playlist and Create Auto Playlist
The use of the “Create playlist” button is straightforward – you use it to create playlist. Additionally, it is easy to use – more on how to use it later in this section.
. The use of the “Create auto playlist” button, however, may not be that straightforward. I will show you how to use this button shortly.

But first, let me show you how to create playlists.
- Click the File menu and select Create playlists. The playlist will be created in the Playlists category with the name


- Rename the playlist to whatever you want to call it. I called mine “Reggae”. Once you create a Playlist, you need to add titles to the playlist – see step 3 below.

- To add a song title to your playlist, under Music, click Artists, Album or Genre. Then, right-click any title in any of these categories, point to “Add to”, then select your playlist. The title will now be displayed in your playlist.


As I noted earlier, you can also create auto playlists. Unlike a playlist that you have to add titles to manually, an auto playlist automatically adds titles based on specified conditions.
Recommended Free Tools
To create auto playlists:
1. Click File and select Create auto playlist.

- Then, on the New Auto Playlist screen, give the new auto playlist a name, set conditions for the playlist and click OK.


Refer to the screenshot below. The new auto playlist I just created has the only Bob Marley title I have in my Windows 10 Windows Media Player automatically added to the playlist.
After creating an auto playlist, any new title added into your Windows Media Player – that meets the auto playlist criteria – will be added to the playlist.

Manage Libraries
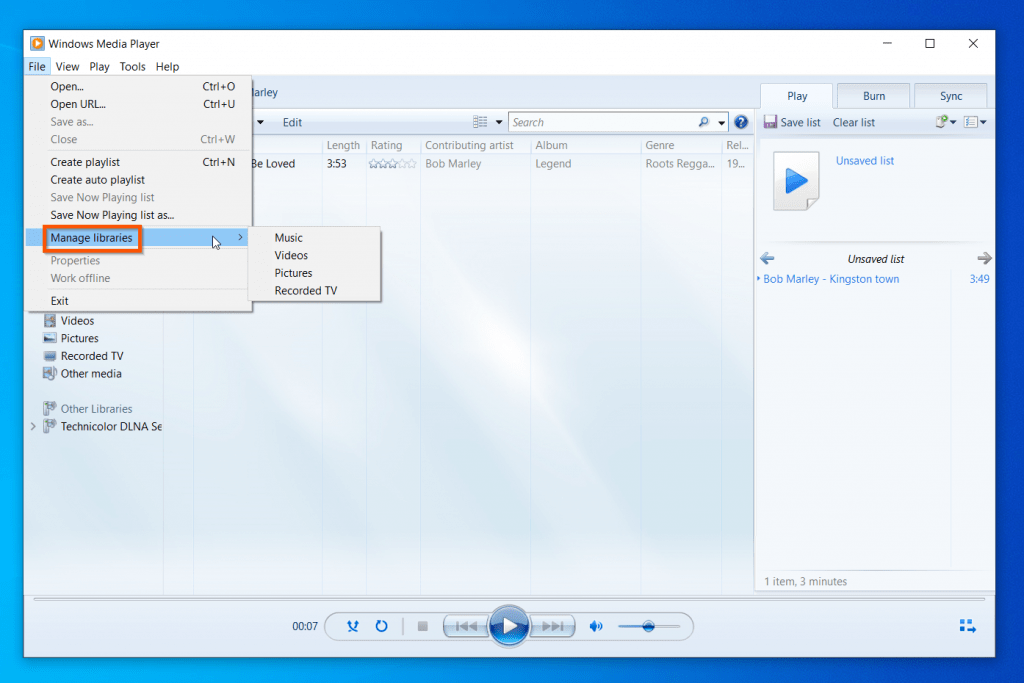
The final sub-menu of the File menu I will discuss is Manage Libraries.

When you hover over the Manage Libraries sub-menu, it displays options to manage Music, Video, Pictures, and Recorded TV libraries.
When you click any of these libraries, you can add or remove folders that Windows Media Player can pick up files from. For instance, you can add or remove new folders.
Also popular on Amazon
- 【Mini Portable Media player】-- Fits into the palm of your hand, It is a perfect travel partner for those short on space and sockets. Also compact and easy multifunction HD media player for office work and home entertainment;Aluminum alloy material, not easy to damage during carrying
- 【1080P MP4 Player】-- Full HD 1080p@60Hz supports most video decoding formats: RM, RMVB, AVI, DIVX, MKV, MOV, HD MOV, MP4, M4V, PMP, AVC, FLV, VOB, MPG, DAT, MPEG, TS, TP, M2TS, WMV, (H.264,H.263,WMV9/VC-1,MPEG1/2/4),Not support VPR files. Note: Please use our 4K player to play some videos taken with smart phones, ASIN: B07WPY8VKL
- 【HDMI or AV Output】-- Supports 1080p HDMI output, allowing you to transmit crisp, clear video and audio in a pure digital format to an HDTV; it also supports composite AV output for use with analog TVs. An analog AV cable is included. While using HDMI video output, you can also connect external speakers via the AV output. However, video cannot be output via both AV and HDMI at the same time.
- 【USB 2.0/3.0 Compability】-- Drive external USB 2.0/3.0 storage devices such as USB flash(up to 512G)/SD card(up to 128G) and hard drive(partition should be MBR, up to 8TB), you can also delete or copy files in the USB drive(FAT or FA32) directly, Also plays subtitle files as well as loop videos
- 【Support Multiple Formats of Files and Playback Modes&Multi-functional Remote Control】-- Supports most video, audio, and image formats on the market, supports random playback of video and image modes, and supports loop playback. Supports repeat, zoom, fast forward, fast rewind, rotation, breakpoint playback method, start from scratch playback method and time selection playback method. It is also equipped with a convenient remote control for easy navigation of menu screens (ASIN: B0C9PZPFL8)
Here is my Manage Music Library window. The default location that Windows Media Player saves music files is %userprofile%\Music folder. This folder opens to the drive your music folder is located – in the path \Users\<your user name.
To remove this folder click on it, then, click Remove. Additionally, you can add a new folder by clicking the Add button.

The first screenshot below shows my default Music library folder, %userprofile%\Music. Note that I have two music files here.
The Tool Desk
Outbyte Driver Updater FREEScan for outdated or missing drivers - takes under a minuteDriver Scan →Outbyte PC Repair FREERepair Windows errors before they cause bigger problemsFix Now →Now, look at my Windows Media Player Music library in the second screenshot below – it shows the same music in the folder. One more thing to note, the %userprofile%\Music folder has a folder called Playlists.
This folder saves all the Music Playlists you create in Windows Media Player.

Windows Media Player “View” Menu
As a reminder, this section is still about “Working With Windows Media Player Menu”. In the last sub-section I disused the File menu.

In this sub-section, I will be discussing the View menu.

The View menu may not be as complicated as the File menu. However, it offers equally important features.
While the File menu is used for configuring different aspects of Windows 10 Windows Media Player, the View menu menu controls the appearance of Windows Media Player.
In this section I will show you how to make your Windows Media Player more fun with the different View options. We will start with the default view – Library View.
Windows Media Player “Library” View
The “Library View” is the default Windows Media Player view. The first column (left pane) of this view displays Playlists, Libraries (Music, Video, Picture, and Recorded TV).
In the middle pane, you have the media titles with all the details about the title. Finally, on the right pane, you have three tabs – Play, Burn, and Sync.
The Play tab of the last pane displays a list of the recent titles you have played. Additionally, if there is a CD/DVD burner connected to your computer, it will be displayed in the Burn tab – you can drag and drop titles you want to burn to CD/DVDs via this tab.
Finally, and equally important is the Sync tab of the last pane of the Library View. If you connect your phone to your computer, Windows Media Library will display the device in the Sync tab.
Also popular on Amazon
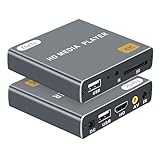
- 【UPGRADED 4K@30Hz H.265 HEVC Decoding】Equipped with advanced H.265/HEVC decoding technology, this 4K media player delivers sharper ultra-HD images and much smoother playback than conventional H.264 and 1080P players. It effectively reduces frame stuttering, blurriness and lagging visuals, bringing you fluent and immersive viewing experience for both commercial signage and home theater use.
- 【Versatile HDMI RCA Output & Multi-Media Playback】Featuring standard HDMI output, the player can be easily connected to TVs, monitors, projectors and more display devices. 4K media player supports direct playback of local videos, background music, photo slideshows and business presentations via USB drives or SD cards, meeting your daily entertainment and office demonstration needs.
- 【Large Storage Support & Broad System Compatibility】Digital media player supports USB hard drives up to 8TB and SD cards up to 1TB, and is fully compatible with mainstream file systems including FAT32, exFAT and NTFS. Supported formats include: H.265/HEVC (MKV, MOV, AVI), MPEG, FLV, RM, 3GP, MP4, WMV, RMVB, DAT, MPG, TS, M2TS, JPG, JPEG, BMP, GIF, PNG, MP3, OGG, FLAC, APE, AAC, WMA, etc.
- 【Smart Custom Playback Modes & Screen Orientation】Packed with practical playback functions: auto-play on power-up, resume playback from last stopped point, repeat/loop playback, sequential photo/video display and random music playback. It supports both horizontal and vertical screen display, perfectly fitting customized advertising broadcast and daily playback demands.
- 【Wide Application Scenarios】Built with high-quality zinc alloy shell, this compact and portable HDMI media player features outstanding heat dissipation, wear resistance and stable long-term operation. It is ideal for home theater, office presentations, restaurant digital signage, lobby welcome screens, art galleries and museum exhibition installations.

Windows Media Player “Skin” and “Now Playing” Views
The “Skin View” display a tiny black Window (default) that displays information about the media you are playing. At the bottom of this view you can control the play – fast forward, pause, increase volume, and more.
Do these 3 things before closing this tab:
1Fix the driver behind crashes, sound loss and screen glitches2Repair Windows errors before they cause bigger problems3Scan for outdated or missing drivers - takes under a minute
To return to the default “Library View”, click the View menu, then select Library. Alternatively, you can use the keyboard shortcut keys – pressing the Ctrl and 1 keys on your keyboard simultaneously.

Moving on, similarly to the “Skin” view is the “Now Playing” view. To display your Windows 10 Windows Media Player in the “Now Playing” view, click View, then select Now Playing.

The “Now Playing” view looks like the “Skin” view but instead of displaying a Windows Media Player “skin”, its displays the album information.

If you hover your mouse over the “Now Playing” view, on the top right, you have an icon – clicking this icon returns Windows Media Player to the “Library” view.
Recommended Free Tools
Then, at the bottom of the view, you can stop, rewind, fast forward, and mute the title playing.

Windows Media Player “Skin Chooser”
Windows Media Player skins is a hot help topic most Windows 10 users need help using. Well, here it is! To choose a different skin, click View, then select Skin Chooser.

The Skin Chooser screen displays available Windows Media Player skins. To change to a new skin, on the left pane, click the skin, then click Apply Skin.

To return to the default “Library” view, click View on the menu, then select Library.
The Tool Desk
Outbyte PC Repair FREERepair Windows errors before they cause bigger problemsFix Now →Outbyte Driver Updater FREEScan for outdated or missing drivers - takes under a minuteDriver Scan →
Refresh and Adjust Windows Media Player Video Size
Before I move on from the “View” tab, I want to show you two more essential features of this tab – Refresh and Video size.

Refresh does exactly what is says – refreshes the items in the Windows Media Player. You can also use the refresh keyboard shortcut – F5.
Another hot Windows 10 Windows Media Player help topic is adjusting video sizes. See available options in the screenshot below.

Windows Media Player “Play” Menu
This section is still discussing “Working With Windows Media Player Menu”. The first two sub-sections covered the “File” and “View” menus.

In this sub-section, I will be discussing another Windows 10 Windows Media Player topic – getting help with the “Play” menu!
Also popular on Amazon

- One-Click Easy Recording Operation: Simple ON/OFF sliding switch design, slide to ON to start instant recording, slide OFF to auto-save files, friendly for novice to operate without complex setup.
- 16GB Large Built-in Storage Capacity: Pre-installed 16GB internal memory, stores thousands of hours of audio recordings and hundreds of MP3 songs, no extra memory card needed for daily use.
- 3-in-1 Multifunctional: This all-in-one device functions as a 16GB USB flash drive, professional voice recorder and a music player (MP3/WMA/WAV).Crafted from robust zinc alloy, the tiny 45×17×6mm, 7.5g design slips easily into pockets for meetings, classes and interviews.
- Super Long Battery Life & Fast Charging: Stay powered for longer with the built-in polymer lithium battery. A quick 1-hour charge provides up to 13 hours of continuous recording or 8 hours of music playback. The high-sensitivity microphone supports long-distance capture up to 50 meters, ensuring no detail is missed in the classroom or office.
- Plug & Play USB Data Transfer: Come with USB to 3.5mm charging&data cable, connect with PC directly to transfer/backup recordings or charge the recorder, driver-free for Windows/Mac system. Compact thumb-drive size fits in pocket, great for class, meeting, interview & daily use.

The simplicity of the “Play” menu does not minimize its importance. You can access the common media play buttons – like Play/Pause, Previous/Next – via the Play menu.

However, the Play view has some other not-so-common buttons like Audio and language tracks and Lyrics, captions and subtitles settings. Finally, you can adjust volume, Shuffle, Repeat and Eject a CD/DVD from the Play menu.

Windows Media Player “Tools” Menu
Still discuss the Windows Media Player menu, next is the all important “Tools” Menu.
What’s actually slowing this PC down?
Pick the symptom - the matching free tool is one click away.

The first sub-menu in the “Tools” menu is Download. If you hover over the Download sub-menu, it displays Visualisations, Plug-ins, and Skins.

When you click Visualisations, Windows Media Player opens the Visualizations for Windows Media Player (link opens in a new browser tab) page in your default browser. You can download additional Visualizations from this page.

Furthermore, when you click Plug-ins, Windows Media Player opens the Downloads for Windows (link opens in a new browser tab) page in your default browser.

To download plug-ins, click the Windows Media Player plug-ins (link opens in a new browser tab) link.
Quick wins for a faster PC:
Fix the driver behind crashes, sound loss and screen glitchesFind Drivers →Clear out junk files and repair common Windows errorsFree Scan →Scan for outdated or missing drivers - takes under a minuteDriver Scan →
Moving on, the next Tools menu sub-menu worth mentioning is the Plug-ins sub-menu. This sub-menu has two options – Download plug-ins (which takes you to the same link discussed earlier), and Options.

Use the Plug-ins Options to configure plug-ins and Visualisations (discussed earlier in this sub-section).

There are two more important items in the “Tools” menu – Options and Advanced.

Click Options to change your Windows Media Player settings. To see what you can change, click each tab.
Crashes, No Sound, or Screen Glitches?
Random freezes, missing sound and display glitches usually trace back to one bad driver. Find and replace yours safely.Free scan · under a minutePC Slower Than It Used to Be?
A free scan shows the junk files, broken settings and background clutter dragging Windows down - then fixes them in one click.Free scan · Windows 10 & 11
Finally, the Advanced sub-menu allows you to Restore media library and Restore deleted library items.

Windows Media Player “Help” Menu
The final item in the Windows Media Player menu is the Help menu. You can play around the items in the Windows 10 Windows Media Player “Help” menu to get additional help.

Windows Media Player Shortcuts
You can perform most of the actions discussed so far in this guide with keyboard shortcuts.
The table below is a full list of the Windows Media Player keyboard Shortcuts:
| S/N | Windows Media Player Keyboard Shortcuts | Keyboard Shortcuts Details |
|---|---|---|
| 1 | Ctrl and O keys | OPens the “Open” dialogue box. Also available in the File -> Open menu |
| 2 | Ctrl and U keys | Open the “Open URL” dialogue box. The dialogue box can also be accessed via the File -> Open URL menu |
| 3 | Ctrl and W keys | Stops playing the music or video currently playing |
| 4 | Ctrl and N keys | Create a new playlist. You can also perform this action via File -> Create playlist menu |
| 5 | Ctrl and 1 keys | Displays Windows Media Player “Library” View – also available via the View -> Library menu |
| 6 | Ctrl and 2 keys | Displays Windows Media Player “Skin” View – also available via the View -> Skin menu |
| 7 | Ctrl and 3 keys | This keyboard shortcut displays Windows Media Player “Now Playing” View – also available via the View -> Now Playing menu |
| 8 | Ctrl and M keys | Displays or removes the Windows Media Player menu bar. You can also access this via View -> Show menu bar menu |
| 9 | Alt and Enter keys | Displays Windows Media Player in Full-screen mode. This option is also available via View -> Full screen menu |
| 10 | F5 key | Refreshes Windows Media Player items |
| 11 | Alt and 1 keys | Sets the Windows Media Player video size to 50% |
| 12 | Alt and 2 keys | Sets the Windows Media Player video size to 100% |
| 13 | Alt and 3 keys | Sets the Windows Media Player video size to 200% |
| 14 | Ctrl and P keys | Play/Pause. Also available from the Play -> Play/Pause menu. If a music track or video is playing, pressing Ctrl and P keys pauses the track. Pressing the keyboard shortcut resumes play. |
| 15 | Ctrl and S keys | Stops playing a track or video. This option is also available in the Play menu. |
| 16 | Ctrl, Shift and G keys | Controls Play Speed – plays the track Fast. You can also access this via the Play -> Play Speed menu. |
| 17 | Ctrl, Shift and N keys | Controls Play Speed – plays the track Normal. You can also access this via the Play -> Play Speed menu. |
| 18 | Ctrl, Shift and S keys | Controls Play Speed – plays the track Slow. You can also access this via the Play -> Play Speed menu. |
| 19 | Ctrl and B keys | Plays the Previous track – available in the Play -> Previous menu |
| 20 | Ctrl and F keys | Plays the Next track – available in the Play -> Next menu |
| 21 | Ctrl, Shift and B keys | Rewind. You can also access this from the Play menu |
| 22 | Ctrl, Shift and F keys | Fast forward – also available in the Play menu |
| 23 | Ctrl and H keys | Shuffle – you can also access Shuffle from the Play menu |
| 24 | Ctrl, Shift and C keys | Adjust Lyrics, captions and subtitles settings |
| 25 | F7 key | Mute – also accessible from Play -> Volume menu |
| 26 | F8 key | Volume Down – also accessible from Play -> Volume menu |
| 27 | F9 key | Volume Up – also accessible from Play -> Volume menu |
| 28 | Ctrl and J keys | Eject CD/DVD. You can also eject a CD/CDV by clicking Play -> Eject menu |
| 29 | F1 key | Opens search results for “get help with windows media player in windows 10” in Bing.com |
Conclusion
I hope you found this Windows 10 guide helpful. If you did, kindly spare 2 minutes to share your experience by responding to the “Was this page helpful?” question below.
Finally, for more Windows 10 Itechguides, visit our Windows 10 How-To page.
Quick Recap
Product prices and availability are accurate as of the date/time indicated and are subject to change. Any price and availability information displayed on Amazon at the time of purchase will apply.



how to change the thumbnail image for a particular album
Why does Media Player convert music format from wav to cda. How can I make cd with wav format music?