
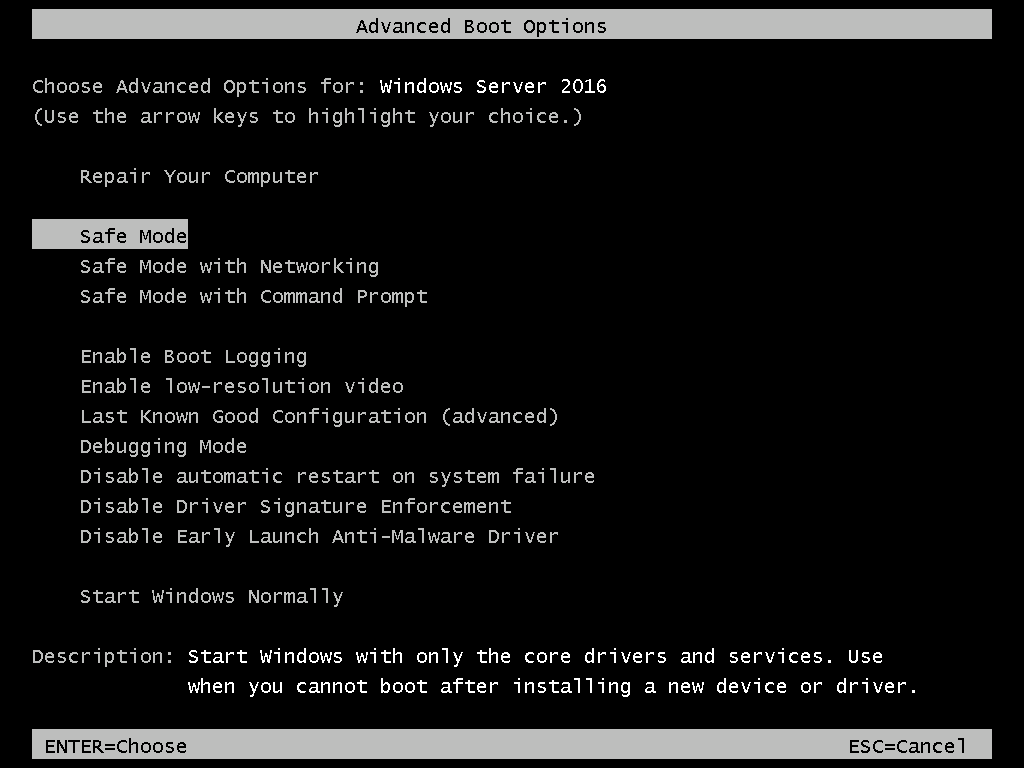
Booting Windows Server 2016 to Safe mode provides the option to fix a broken OS. Learn how to do this in two ways.
Option 1: Boot to Safe Mode From Within Windows
Use this method if you can still boot to and login to Windows. This method is useful if you need to perform certain tasks from safe mode.
Here are the steps:
- Press Windows logo + R key. This will open Run command.

- At Run command type MSConfig and click OK.

- When Microsoft System Configuration tool opens, click the Boot tab. Then, on Boot options, check the box beside Safe boot and select Minimal (default). When you finish, click Apply. Then OK.

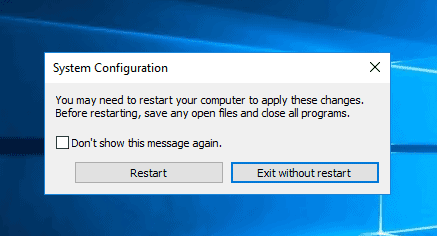
- Restart your server.
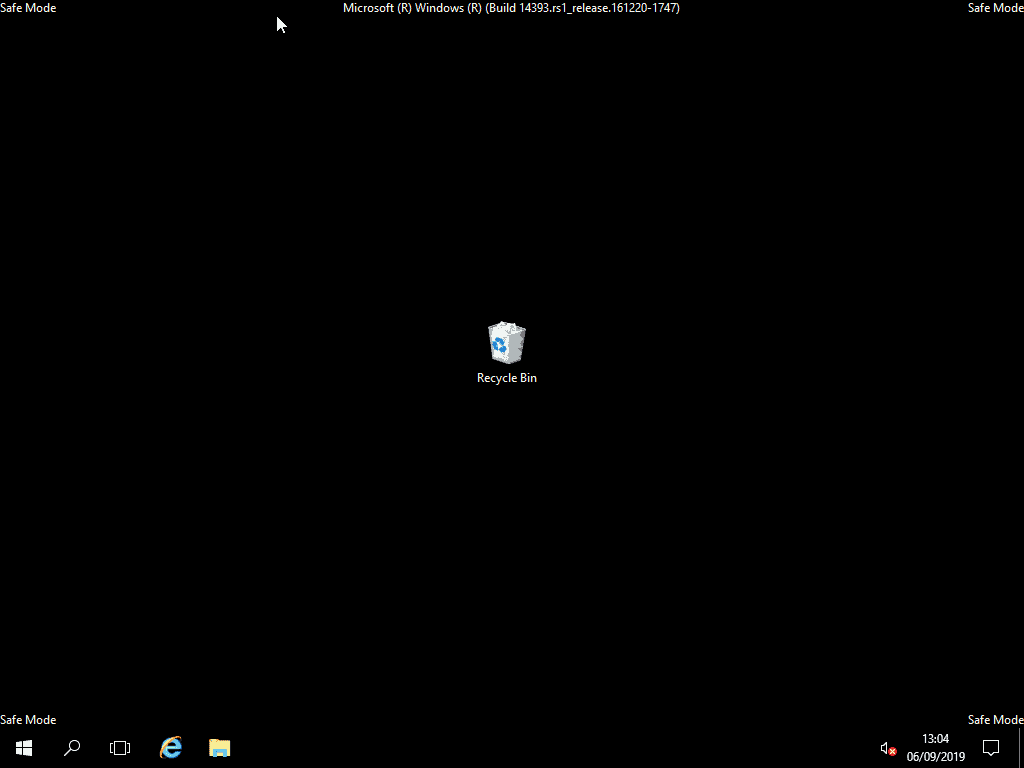
- When your server restarts and you login, you will see that it is now in Safe Mode.
- When you finish with Safe mode, open MSConfig again, Boot tab and uncheck Safe boot. Click OK. Then restart your server in normal mode.
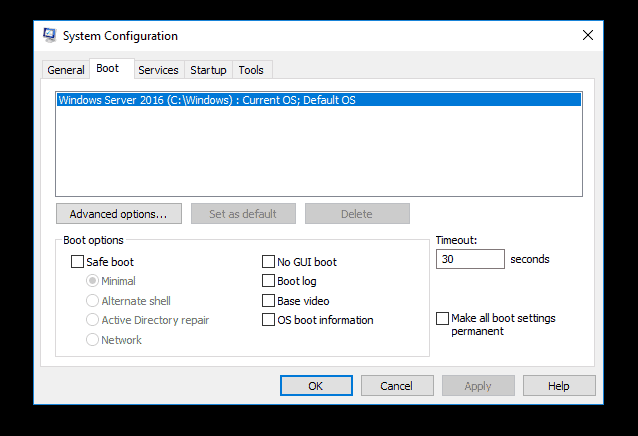
If you do not revert your configuration with this last task your computer will continue to boot to safe mode!
Option 2: Boot to Safe Mode From the Recovery Environment
The second method to boot to Server 2016 Safe Mode is via recovery environment. Use this method if your server is broken and cannot boot.
Here are the steps:
- Open this link – Boot to Windows Server 2016 Recovery Mode Without Installation Media (DVD or USB) (opens in a new browser tab).
- When the link opens, follow the steps to boot your server to Windows Server 2016 recovery environment.
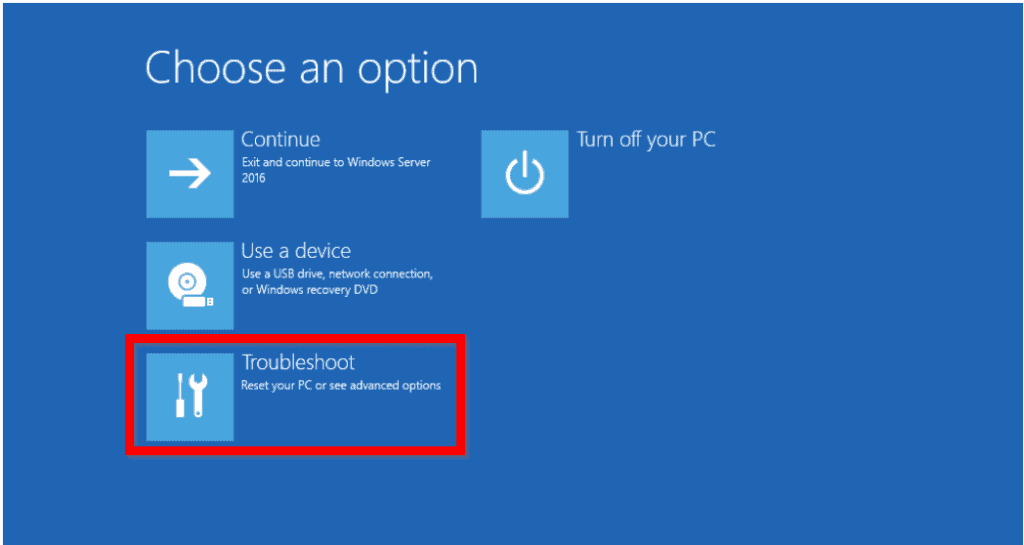
- When you get to the Choose an option screen, click Troubleshoot. Then proceed with the rest of the steps below the image.
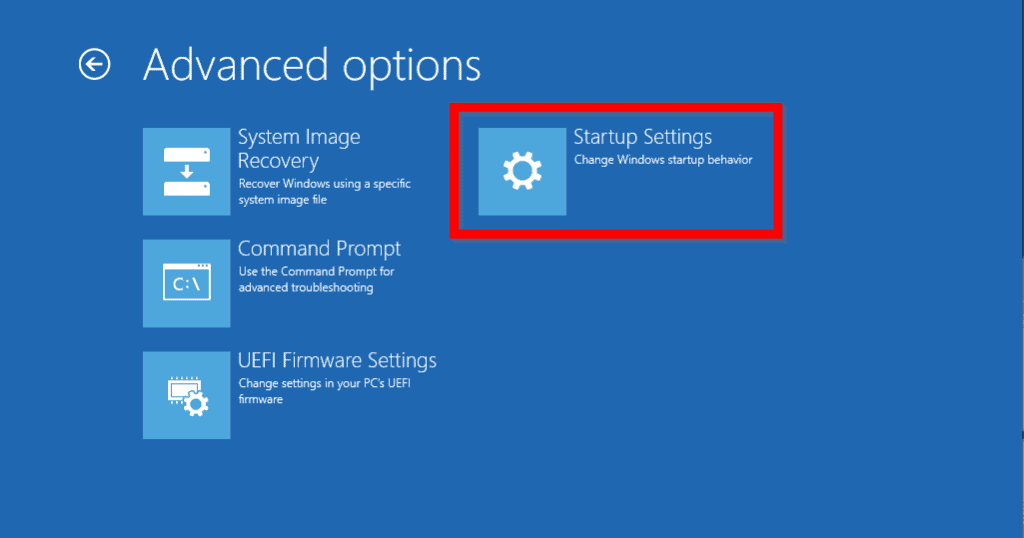
- At Advanced options screen, select Startup Settings.
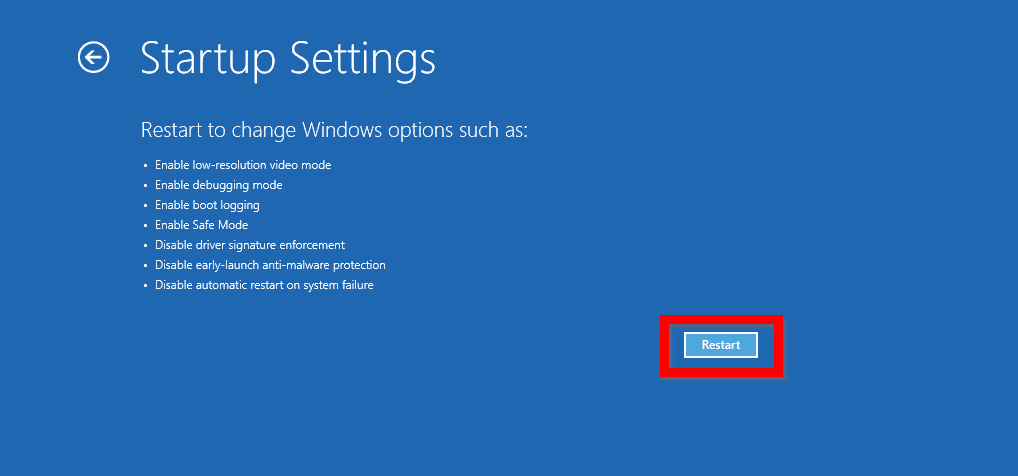
- When the Startup Settings screen opens, click Restart.
- Your server will restart and display Advanced Boot Options.
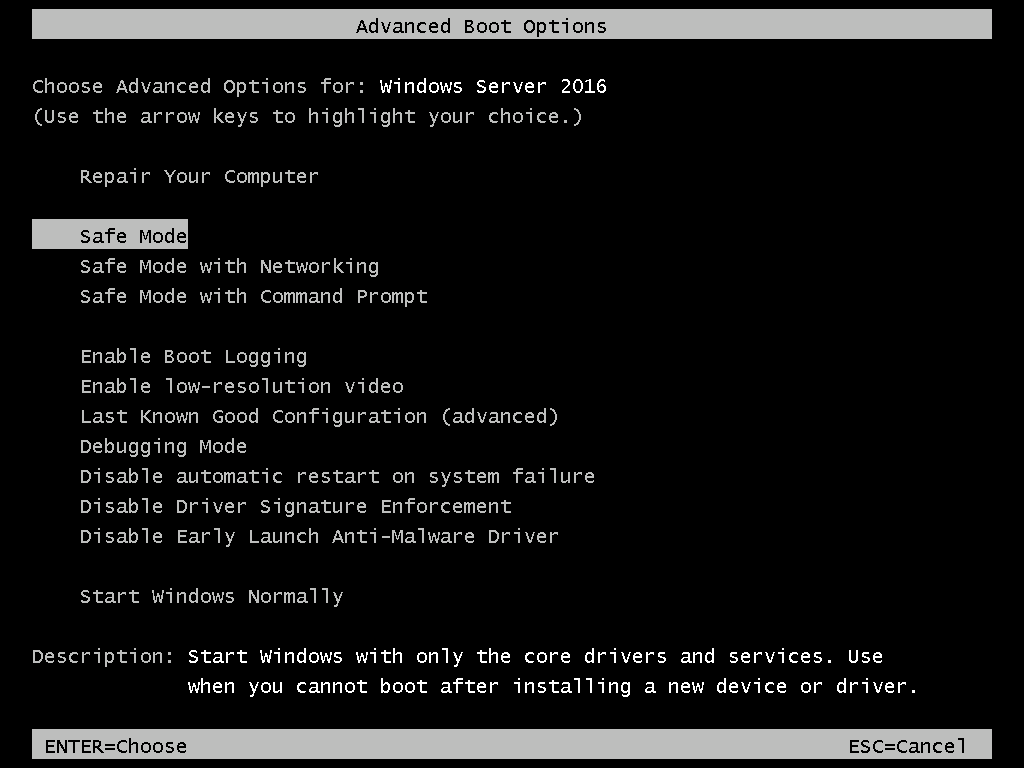
- Use the Up/Down arrow keys to select your Safe Mode option. To boot the option, click Enter on your keyboard. If you are not sure what option to select, see my explanation of each option below:
- Safe Mode: This loads Windows with minimal drivers and services – Use this option if you are having trouble booting Windows.
- Safe Mode with Networking: Boots safe mode but now includes network drivers. Use this option if you need to get to the internet or access a network resource.
- Safe Mode with Command Prompt: Similar to Safe mode but instead of booting to GUI (Windows logon), it displays a command prompt. Use this option if you need to run a command to fix Windows. Some commands that may be helpful to fix Windows are DISM, SFC, DISKPART.
- Last Known Good Configuration: This is a very useful boot option. Use this to restore your server to the last known clean boot to Windows. This method is useful if you experience a blue screen or boot failure after update, installing a new software or device driver.
To read about the remaining Windows Server 2016 safe mode options click Advanced startup options (including safe mode).
Free tools Windows power users keep installed
One-click scans. No signup required.
#1 Best Overall

- ✅8-IN-1 USB drive 3.2: Big Sur 11.7、Catalina 11.15.7、Mojave 11.14.6、High Sierra 11.13.6、El Capitan 10.11.6、Yosemite 10.10.5、Mavericks 10.9.5、Mountain-Lion 10.8.5, Can be fully installed on your Mac
- ✅1. Plug-In USB Drive
- ✅2. Holding the "Option" key , and Power On
- ✅3. it will appear startup menu, choose USB drive from startup menu
- ✅4. After that, the installation will begin.
Conclusion
This guide discussed 2 options to boot Windows Server 2016 safe mode.
I hope you have been able to fix the problem with your server! If you did, we would like to hear the details; kindly share by responding to the “Was this page helpful?” question below.
Rank #2

- ✅4-IN-1 USB drive 3.2: Tahoe 26、Sequoia 15、Sonoma 14、High Sierra 10.13.6, Can be fully installed on your Mac
- ✅Support Type-C and USB Port, Included instruction and technical support
- ✅1. Connect USB Drive and Power off Mac
- ✅2. Holding the "Power Button" for 12 seconds, it will appear startup menu
- ✅3. Choose USB drive from Startup Menu, it will be booting and install macos
For more Windows Server 2016 guides, visit our Windows Server How-Tos page.
Quick Recap
Rank #4

- ✔ Powerful System Recovery Toolkit Fix boot issues, repair corrupted systems, and recover lost data with SystemRescue 13, a professional-grade Linux rescue environment trusted by IT experts.
- ✔ Bootable USB – No Installation Required Run directly from the USB drive without installing anything on your system. Compatible with BIOS & UEFI systems for maximum flexibility.
- ✔ Advanced Disk & Partition Tools Includes essential utilities like GParted, TestDisk, PhotoRec, and fsarchiver for partition management, file recovery, and disk imaging.
- ✔ Cross-Platform Compatibility Supports recovery and repair for Windows, Linux, and mixed environments—ideal for home users, technicians, and IT professionals.
- ✔ Fast, Lightweight & Reliable Optimized for speed and stability, allowing you to troubleshoot systems even on older or low-resource machines.
Rank #3

- Floppy Disk Reader for PC: As most modern laptops and desktop computers no longer come equipped with internal floppy disk drives for reading diskettes, this 3.5 inch external USB floppy disk drive is an excellent solution to reading and writing your old floppy disks as easy as a built-in floppy disc reader. Retrieve Your Memories, for all the people that grew up with floppy disks, this is a return to the past.
- Portable Ultra thin USB Floppy Drive: With ultra-slim (Only 0.63inch thick) design and lightweight(Only 0.52Ib), you can easily carry and use this compact USB floppy disk reader to retrieve your wedding photos, childhood photos, favorite poetry you collected, university graduation thesis, novel manuscript, favorite songs you often listen to before, your cookbook collection, etc. at anywhere, no matter in the office, at school, at home, or during travel. It's also a great gift idea for someone.
- Plug and Play Floppy Disc Reader: No extra driver program is required, powered by the USB cable. Just insert your floppy diskette into floppy disk drive, then plug the USB type A/C connector to your computer and it will be automatically detected. Bring up "Windows File Explorer", you will see drive A icon under "Devices and Drives", right click it and select open option, you could cut, paste, copy the files in your floppy disks as you would other files in the system. Easy to USE!
- Floppy Disk Drive With Reliable Performance: This external floppy disk drive is made of high-quality materials, shockproof, low noise and strong fault tolerance Intelligent. and with low impedance and anti-interference capability for a smooth and fast experience. Listening to the nostalgic sound of reading floppy disks is like going back to a bygone era, good memories are revived.
- 3 1/2 Floppy Disk Reader With Wide Compatibility: Not compatible with MAC, Support PC Laptops and Desktop With Windows 11/ 10/ 8.1/ 7/ 2000/ XP OS.
Product prices and availability are accurate as of the date/time indicated and are subject to change. Any price and availability information displayed on Amazon at the time of purchase will apply.
Do these 3 things before closing this tab:
1Clear out junk files and repair common Windows errors2Scan for outdated or missing drivers - takes under a minute3Repair Windows errors before they cause bigger problems


Thanks for this clear guide! I followed Method 1 and had my server booting into Safe Mode in no time. Your step-by-step instructions made it super easy. Keep up the great work!
Thanks for the detailed guide! I found the step-by-step instructions very helpful. Booting into Safe Mode can be tricky, so the clear explanations for both methods were a lifesaver. Keep up the great work!
These are not the only methods to change Safemode settings. There are probably a few other trails not well traveled such as registry guessing/hacks. On 2016 server core, bcdedit makes quick work disabling Safemode on the next reboot:
bcdedit /deletevalue {default} safeboot
Thanks for sharing your thoughts.