Have you heard that the “DISM.exe /Online /Cleanup-Image /Restorehealth” command can fix serious Windows errors and want to learn about the command? This guide will teach you all you need to know about this dism command.
Overview
DISM is a versatile Windows command tool. SysAdmins use DISM to manage and update Windows Operating Systems images.
DISM lists, installs, or uninstalls features and packages in Windows images. In addition to that, with DISM, you can also update and configure features and packages in Windows images.
Because of this command’s versatile use, it has many parameters and switches. However, there are two primary command-line options.
DISM.exe [dism_options] {Imaging_command} [<Imaging_arguments>]
DISM.exe {/Image:<path_to_offline_image> | /Online} [dism_options] {servicing_command} [<servicing_arguments>]
For the purposes of this guide, I am only interested in the second command option. If you look closely, you’ll notice that that command-line option has two sub-options.
Specifically, you can run DISM with the /online or the /image options.
So, what is the difference between DISM.exe /Online vs /Image?
When you use DISM with the /Online option, DISM will be servicing the running Operating System you’re running the command on. On the contrary, when you specify the /Image option, DISM will be working on an offline Operating System image.
For the avoidance of doubt, an offline operating system image could be a .VHD, .VHDX or a .WIM image.
How DISM.exe /Online /Cleanup-Image /Restorehealth Works
As I hinted in the last section, the /Online option of the DISM command allows you to perform actions on a running Operating System image.
By “running Operating System image,” I mean the Windows OS from which you’re running the DISM command.
So, what happens when you run the “DISM.exe /Online /Cleanup-Image /Restorehealth” command?
In the next subsections, I have explained what each switch means and does.
DISM.exe /Cleanup-Image
For the DISM.exe command to work, the /Online or /Image switch must be followed by other image servicing commands. One of the command-line options for the DISM.exe /Online switch is the /Cleanup-Image switch.
So, what does the /Cleanup-Image switch do in our “DISM.exe /Online /Cleanup-Image /Restorehealth” command? The /Cleanup-Image switch performs cleanup and recovery operations on the running Operating System.
To put it together to this point: when you run the command “DISM.exe /Online /Cleanup-Image”, you are asking the Deployment Image Servicing and Management tool to:
- Target the running Operating System
- Perform cleanup and recovery operations on the running Operating System
DISM.exe /Restorehealth
The last switch in the “DISM.exe /Online /Cleanup-Image /Restorehealth” command is the /Restorehealth switch. The /RestoreHealth switch scans the Operating System for corrupt files.
If DISM finds corrupt files, it attempts to repair them automatically.
Features of DISM.exe /Online /Cleanup-Image /Restorehealth
Having discussed an overview of the “DISM.exe /Online /Cleanup-Image /Restorehealth” command and also how its works, let’s now look at some of its key features.
The DISM Operating System Image Servicing Command Has Two Main Options
As I mentioned earlier, if you want to use DISM to service a Windows OS image, you’ve two options. Specifically, you can either use the /Online switch to manage the running operating system.
Alternatively, you can use the /Image switch to service an offline OS image. Another important feature of these DISM switches is that you cannot use both in the same command.
You Cannot Use The /Online Option Within Windows PE
One of the most common Windows problems of Windows refusing to start after an update. When this happens, you may need to start Windows in recovery console.
Then, within the recovery console, you may run the DISM command to fix the Windows start-up problem. One common command you can use to fix such problems is the “DISM /Cleanup-Image” command.
However, you cannot use the /Online switch of the DISM command within the Windows recovery console command prompt. This is because the recovery console operates in the Windows PE (WInPE) environment.
In this situation, you have to use the /image switch.
You Can Use DISM With The “/Online /Cleanup-Image” Or “/Image /Cleanup-Image” Switches to Repair Windows Images
If you’re a Windows SysAdmin or even a Windows user, you will agree that, like other Operating Systems, Windows has its fair share of problems.
So, it is good to know all the tools you need to fix Windows problem. One important tool is the DISM command.
Specifically, when you combine either the “/Online /Cleanup-Image” Or “/Image /Cleanup-Image” switches, you can use DISM to check for and fix Windows OS errors.
The /Restorehealth is a Sub-Switch of the /Cleanup-Image Switch
The /Restorehealth switch is a sub-switch of the /Cleanup-Image switch. This means you have to specify the /Cleanup-Image switch before the /Restorehealth.
For example, if you run the command below, it will return error 87 – “The restorehealth option is unknown”
DISM.exe /Online /Restorehealth /Cleanup-Image
However, if you run the command below, it will work as expected.
DISM.exe /Online /Cleanup-Image /Restorehealth
There are two more sub-switches of the Cleanup-Image switch – /CheckHealth and /ScanHealth. The /CheckHealth switch checks whether the OS image has been flagged as corrupted by a failed process.
In addition to that, the /CheckHealth switch also checks whether the corruption (if any) can be repaired.
On the other hand, the /ScanHealth checks scans and OS image for component store corruption.
Pros of the DISM.exe /Online /Cleanup-Image /Restorehealth Command
DISM Offers a PowerShell Module
If you prefer to work with PowerShell, DISM offers a PowerShell module that you can use to manage Windows Operating System images via PowerShell.
The /Cleanup-Image Switch offers Two Sub-switches
The /Cleanup-Image switch offers two switches you can use to check an OS image’s health. In the last section, I mentioned that the /Cleanup-Image switch has two sub-switches.
Specifically, you can use the /CheckHealth and the /ScanHealth sub-switches of the /Cleanup-Image switch to check the health of your OS images.
Then, if any of the first sub-switches found errors, you can use the /RestoreHealth to scan the image for component store corruption. In addition to scanning for component store corruption, the /RestoreHealth sub-switch of the /Cleanup-Image switch performs repair operations automatically.
It is important to mention that you do not necessarily have to run the /CheckHealth or the /ScanHealth sub-switches before running the /RestoreHealth sub-switch.
DISM Automatically Creates a Log File
When you run the DISM command (including the DISM.exe /Online /Cleanup-Image /Restorehealth command), DISM creates a log file called dism.log.
The log file – located in \WINDOWS\Logs\DISM\ – is useful for troubleshooting DISM command errors.
DISM Command Offers Detailed Help Information
The DISM command-line tool offers robust help.
Moreover, you can access this help information by adding /? after a DISM command. For example, the command below displays the help information for the /Cleanup-Image parameter.
DISM.exe /Online /Cleanup-Image /?
Limitations of the DISM.exe /Online /Cleanup-Image /Restorehealth Command
The DISM Command is Fairly Complex
With so many switches and parameters, this command is not for the faint-hearted. One of the disadvantages of the DISM.exe command is its complexity.
There are also too many switches and sub switches and the order you have to use them. For example, as I mentioned earlier, you must specify the /Cleanup-Image switch before /Restorehealth.
Complex Help Information
Following up on the last subsection, the complexity of the command extends to its help information. Its help information is sometimes too complex to understand.
The complexity and amount of information make reading and understanding this help information can be tasking. This is made particularly difficult by the too many switches and sub-switches of the DISM command.
DISM.exe /Online /Cleanup-Image /Restorehealth Examples
In this section, I have discussed some examples and applications of the DISM.exe command.
How to Use DISM.exe to Check Your Operating System Health
In the Pro subsection of the “Pros and Cons” section of this guide, I mentioned that the /Cleanup-Image switch offers two sub-switches you can use to check an OS image’s health.
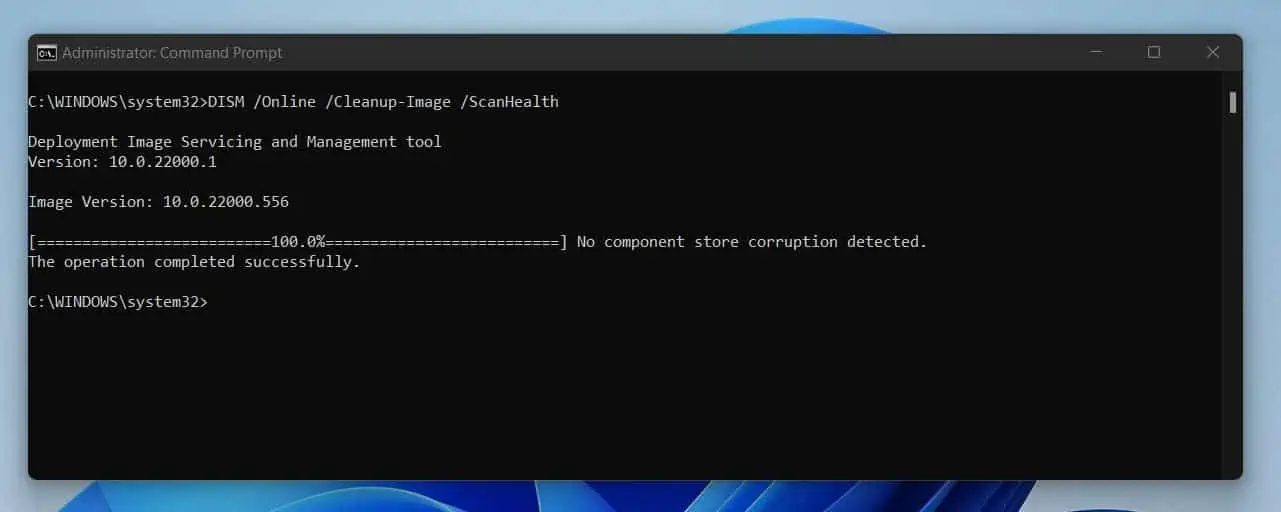
One of the sub-switches of the /Cleanup-Image switch is /ScanHealth. If you want to scan an Operating System image for component store corruption, run the command below:
DISM /Online /Cleanup-Image /ScanHealth
The command will take a while to complete. When the command is completed, DISM will return a result.
From the screenshot below, DISM reports, “No component store corruption detected.”
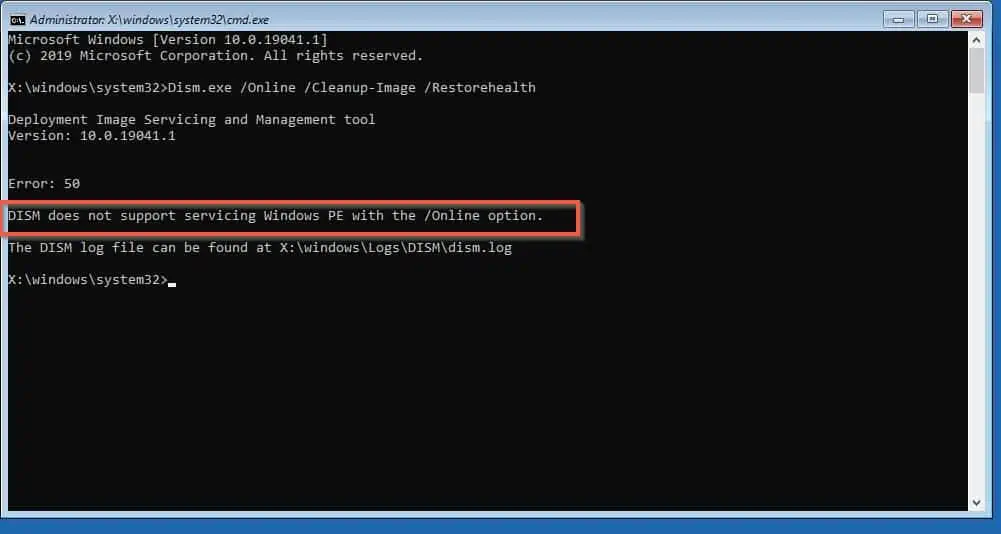
How to Run DISM.EXE from Windows 10 Recovery Console and Avoid DISM Error 50
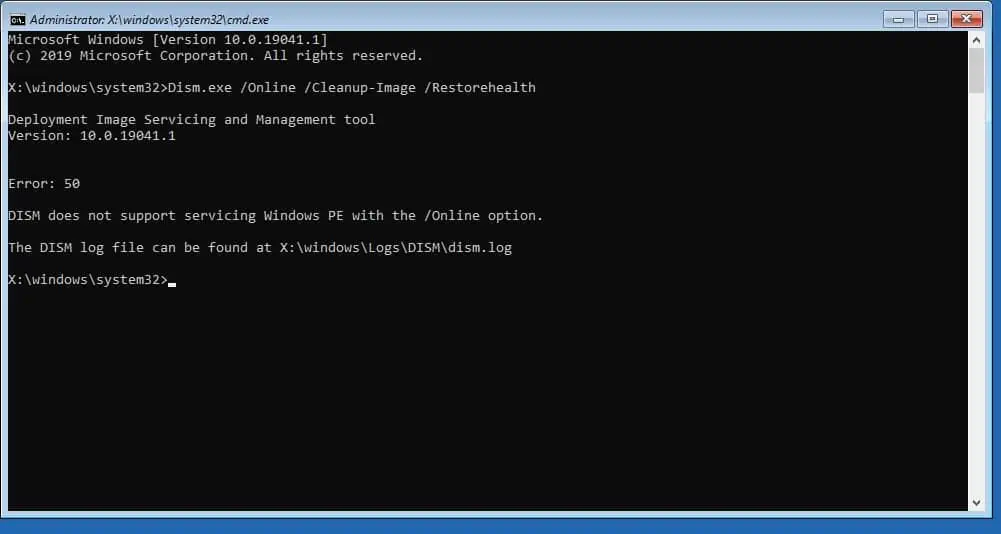
You cannot run Dism with the /online switch from the Windows 10 recovery console. If you do, you’ll receive an error message “DISM does not support servicing PE with the /online option.”
So, how do you use DISM from the command prompt of the Windows 10 recovery console?
To avoid the dism error 50 and successfully run the “dism /Cleanup-Image /RestoreHealth” command from the Windows 10 recovery console command prompt, follow the steps below:
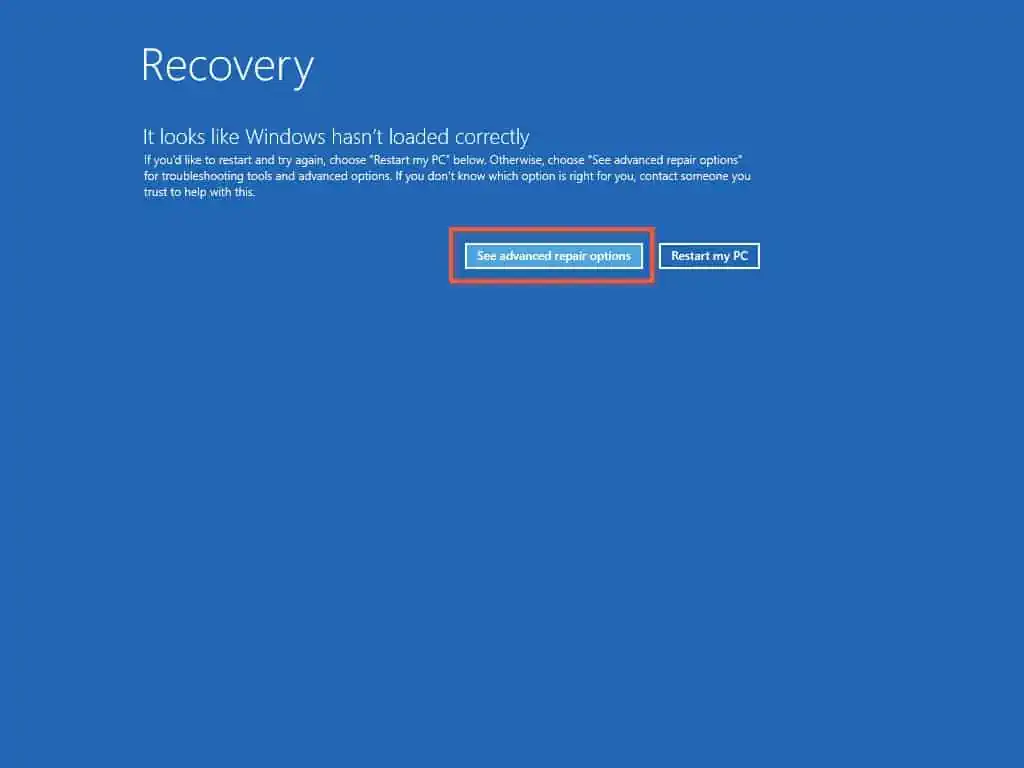
- Boot Windows 10 to the recovery console. Then, click “See advanced options.”
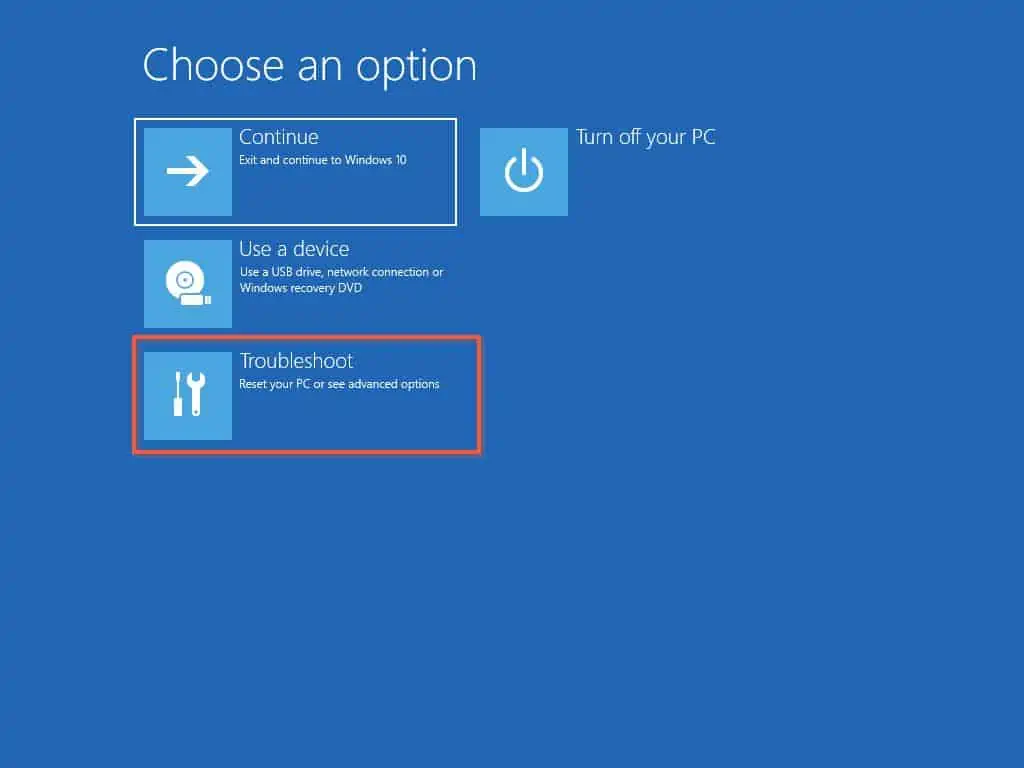
- When Choose an option window opens, select “Troubleshoot”.
- On the Troubleshoot page, click “Advanced”.
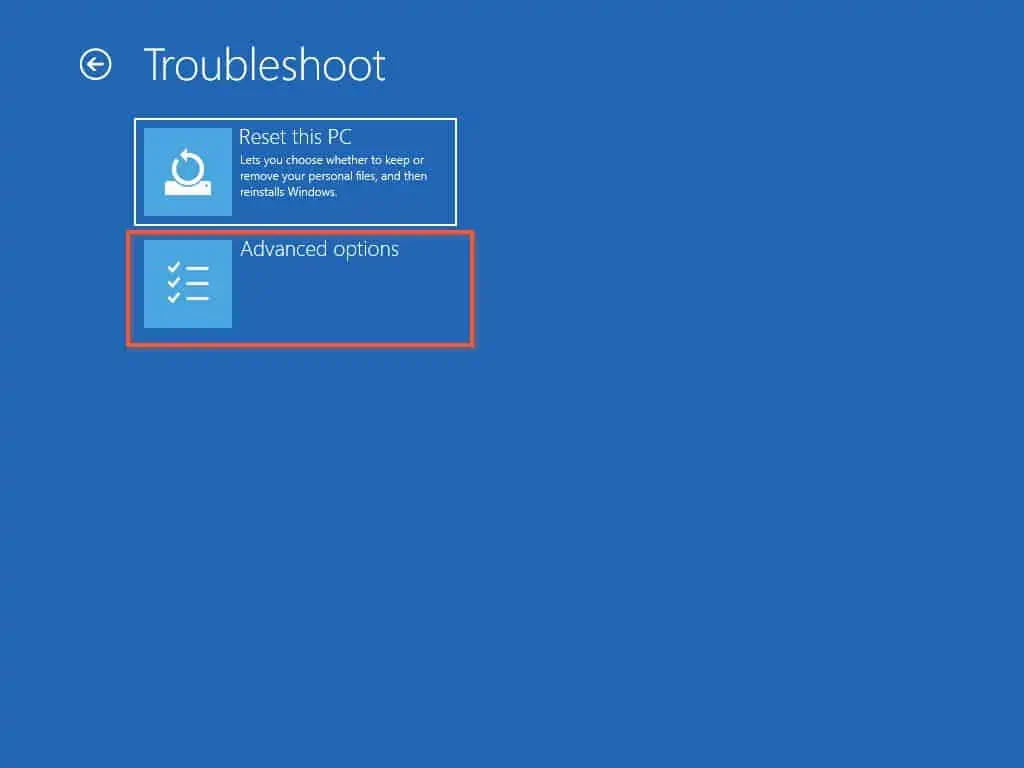
- Finally, when the Advanced options page opens, click “Command Prompt”
- When the Command Prompt opens, run the dism command below:
DISM /image:c:\ /Cleanup-Image /Restorehealth /ScratchDir:c:\Scratch
The second command attempts to repair Windows 10. Specifying the /ScratchDir is optional. However, not specifying may cause unexpected behavior due to insufficient scratch directory size.
If your Windows 10 is installed in a drive other than C:\, change C:\ in the command above to the drive.
Then, wait for the command to complete. When it completes, close the Command Prompt window.
How to Fix DISM Error 50
If you receive error 50 in the last command, resolve it with the steps below:
- From the command prompt, type Regedit and press enter. Registry editor opens.
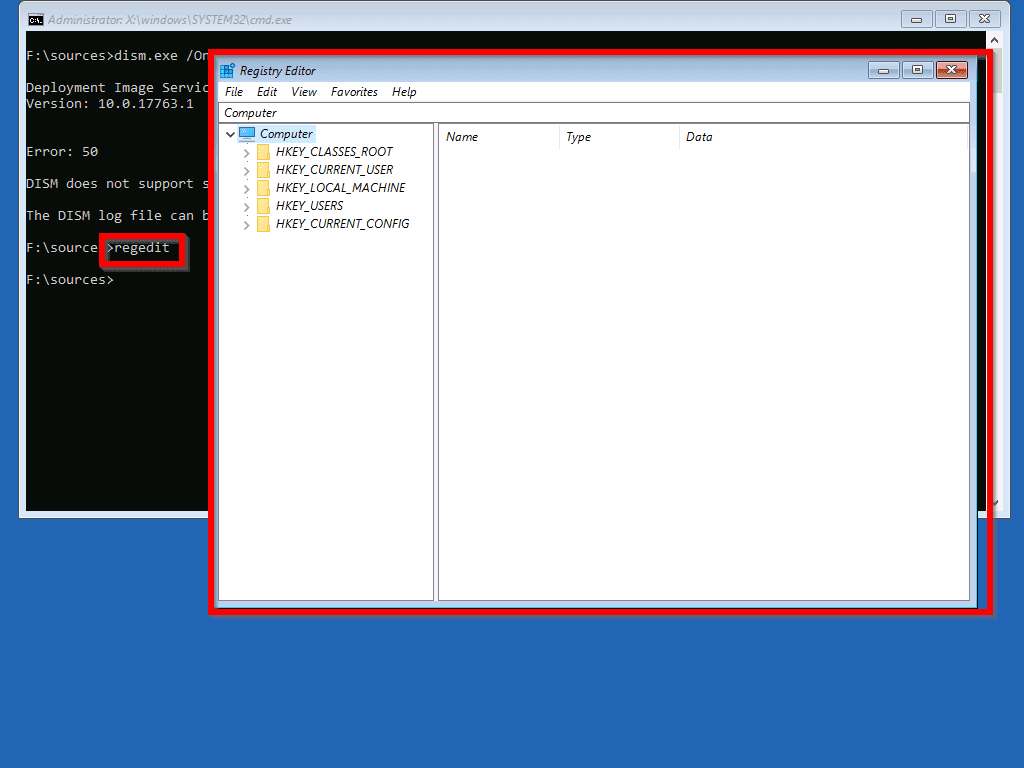
- Navigate to HKEY_LOCAL_MACHINE\SYSTEM\ControlSet001\Control. Right-click MiniNT key and delete it. On the delete confirmation, click Yes.
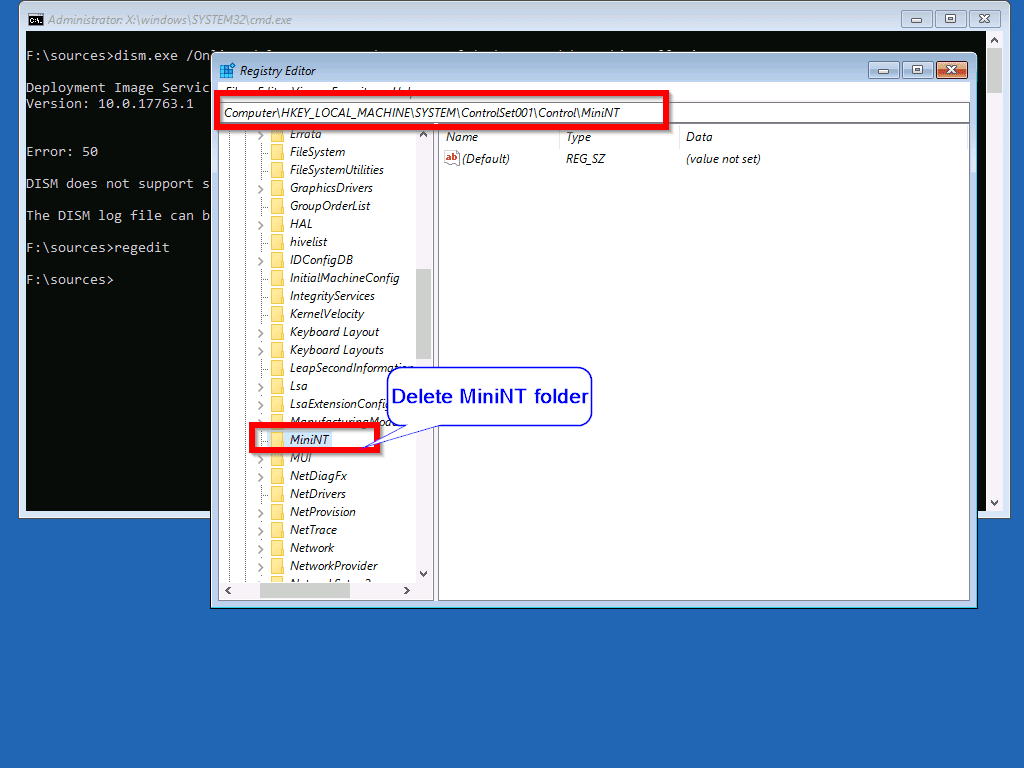

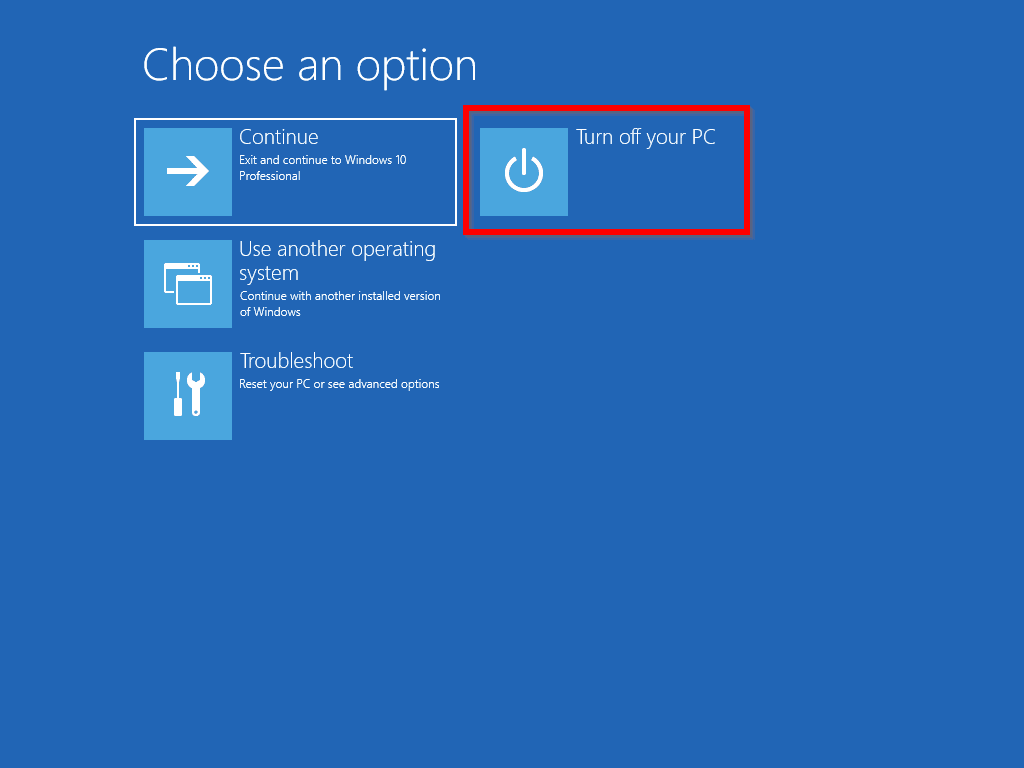
- On the command prompt, type Exit and press Enter. Then Select Turn Off your PC.
- When your PC restarts, Boot Windows 10 to the recovery console. Then, use the steps in the last example to open Command Prompt.
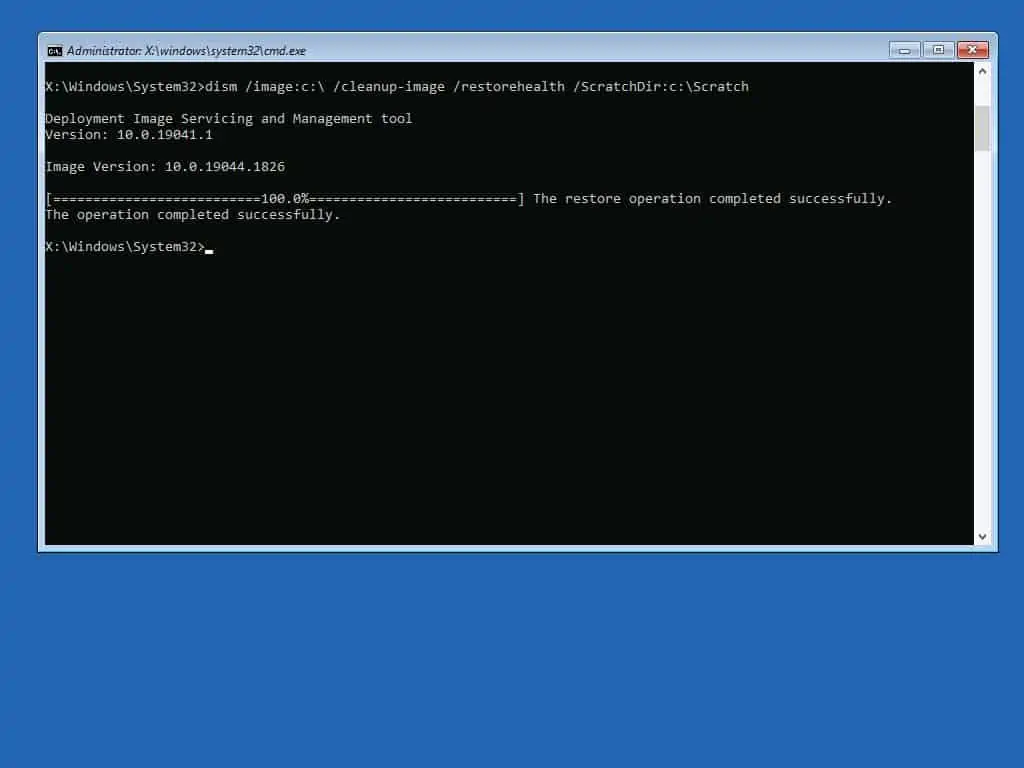
- When the command prompt opens in Windows 10 recovery console, run the command below:
mkdir c:\Scratch
DISM /image:c:\ /Cleanup-Image /Restorehealth /ScratchDir:c:\Scratch
The command should be completed successfully.
How to Extract Install.WIM From Install.ESD and Use Install.WIM as a DISM Source File to Repair Windows 10
In the first example, I showed you how to run DISM from Windows 10 Console. In that section, you ran the command below.
DISM /image:c:\ /Cleanup-Image /Restorehealth
This command is intended to fix the Operating System. However, sometimes, it may not work.
If the command fails to fix the problem you’re having with your Windows 10 PC, you may need to specify a source file for DISM to pick up the OS repair file.
However, the source file that DSISM accepts is a WIM file. Unfortunately, the Windows 10 OS installation media does not come with a WIM file by default.
So, you will need to create it. Follow the steps below to create an Install.WIM from the Windows 10 Install.ESD file.
- Boot Windows 10 to the recovery console.
- Then, navigate to “See advanced options -> Troubleshoot -> Advanced options -> Command Prompt”
- When the Command Prompt opens, create two folders with the commands below.
mkdir c:\WinInstall
mkdir c:\Scratch
- To determine the drive your Windows 10 installation files are mounted, start by checking drive d. Enter the command below and press the enter key on your keyboard.
D:
The command prompt will change the directory to D: if there is a drive D.
- If the command prompt changes to D:, type the command below and press the enter key on your keyboard.
DIR
The command will display a list of files and folders in D:. If the drive contains Windows 10 installation files, the command will display a folder called “sources.”
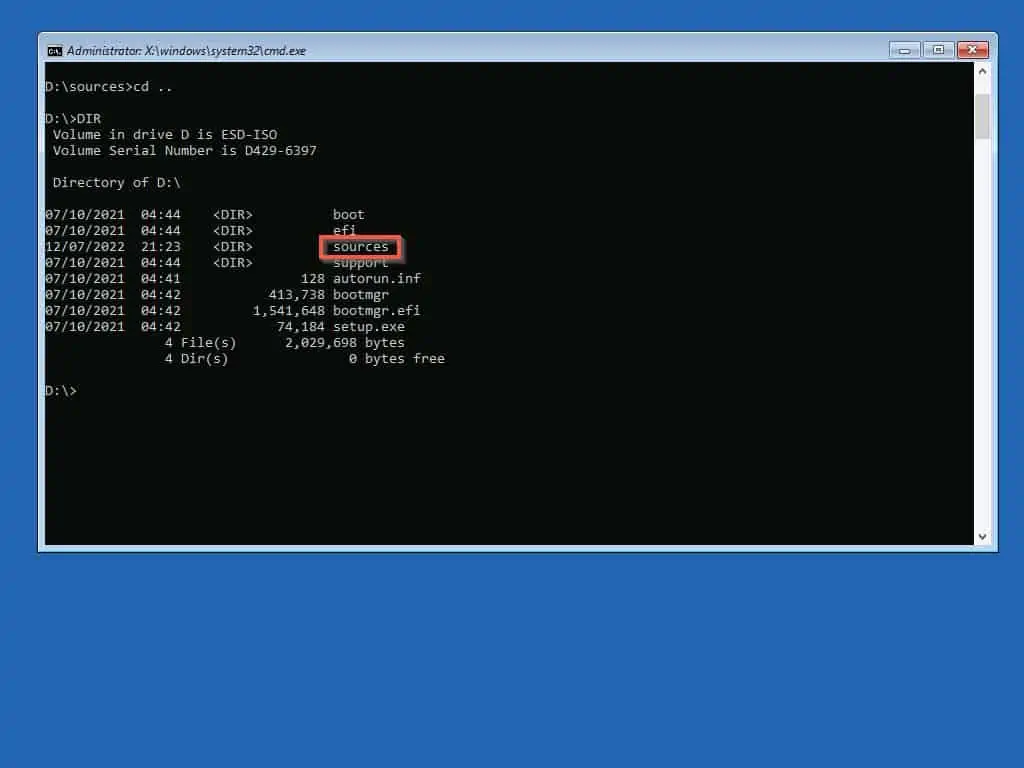
- Change the directory to the “Sources” folder…
CD sources
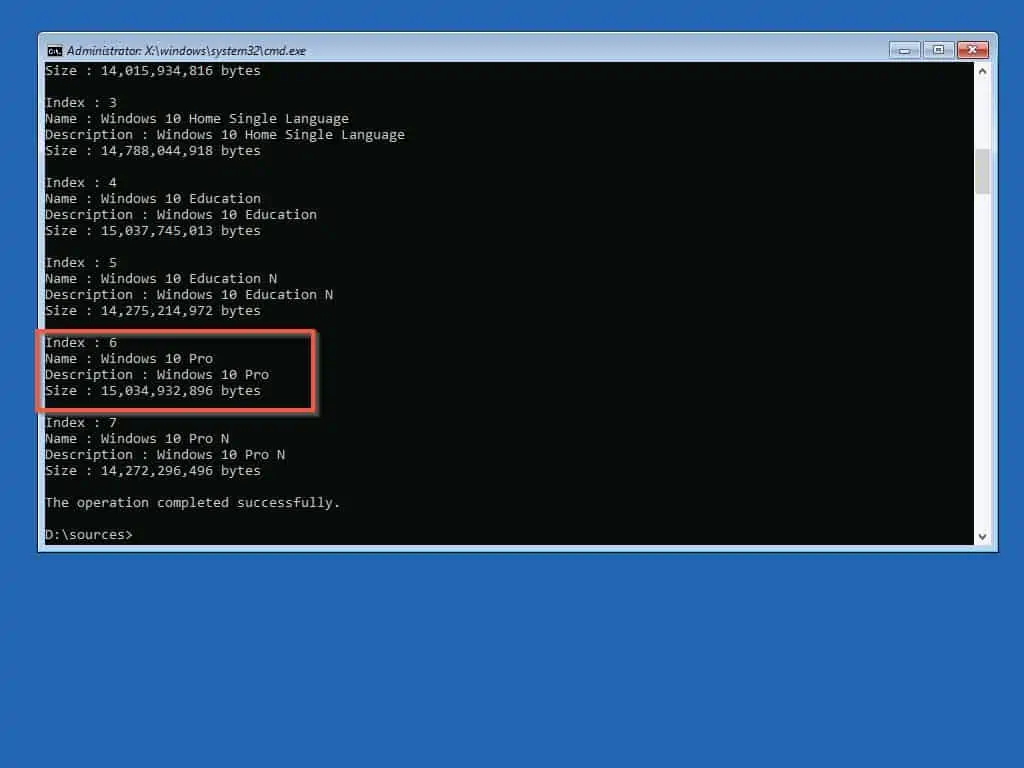
- Next, you need to get information about the Windows 10 installation image in the “Sources” folder. To display this information, run the command below.
dism /Get-WimInfo /WimFile:install.esd
The command displays all the versions of Windows 10 in the image and their index number. Note the version of Windows 10 similar to the version installed on your PC.
Similarly, note the index number of the Windows 10 version. In this example, mine is Windows 10 Pro, and the index number is 6.
Once you have determined this information, proceed to step 8 below.
- Now it is time to extract Install.WIM to the c:\WinInstall folder you created in step 3. To do this, run the command below:
Dism /Export-Image /SourceImageFile:install.esd /SourceIndex:6 /DestinationImageFile:c:\WinInstall\install.wim /Compress:max /CheckIntegrity
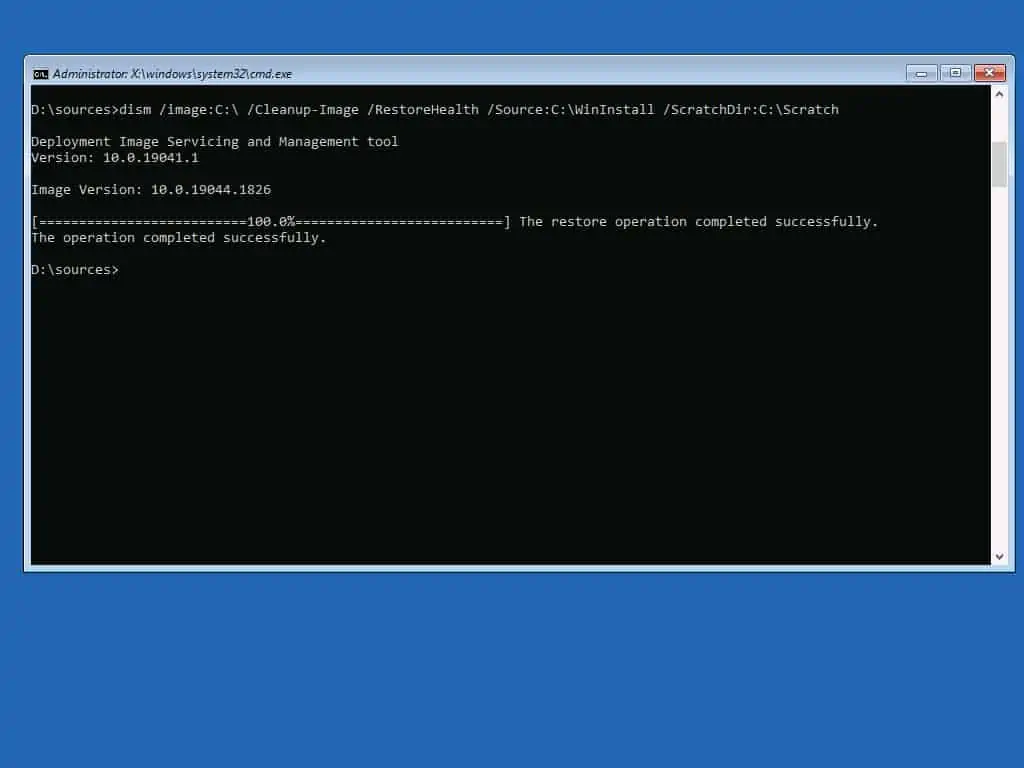
- After creating the install.WIM file, run the command below to repair your Windows 10 installation from the recovery console command prompt.
Dism /Image:C:\ /Cleanup-Image /RestoreHealth /Source:C:\WinInstall /ScratchDir:c:\Scratch
When the command completes successfully, your Windows 10 should be fixed.
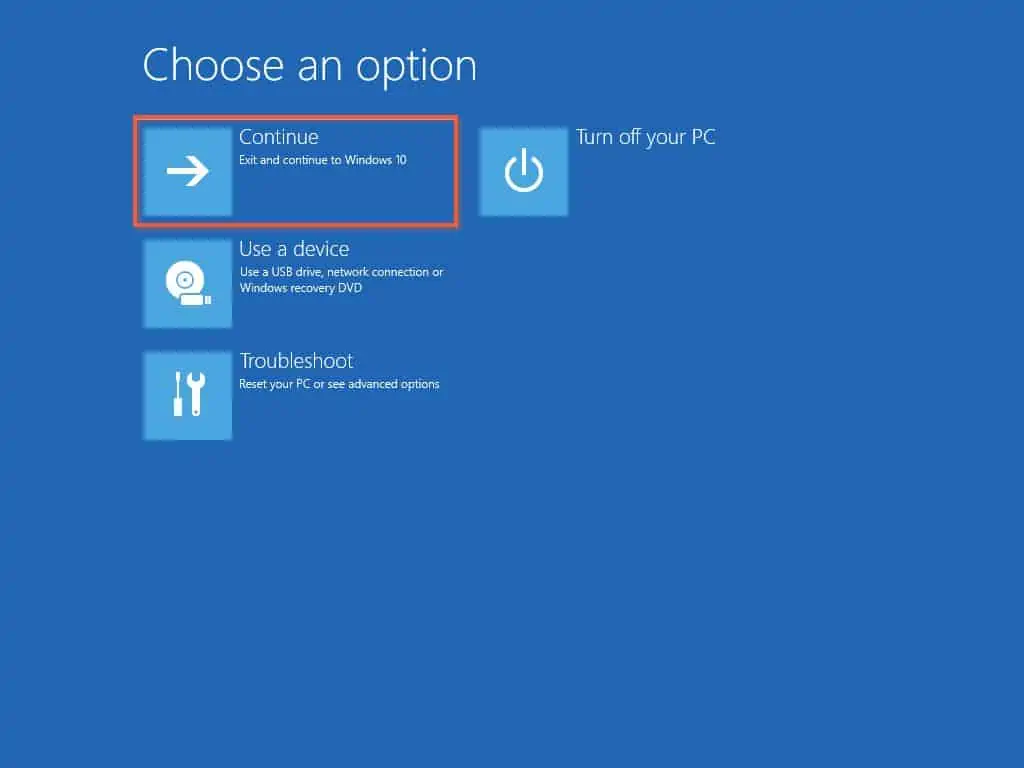
- Close the Command Prompt. Then, Continue to start your Windows 10 PC normally – see the second screenshot below.
Frequently Asked Questions
DISM.exe (Deployment Image Servicing and Management) is a Windows command-line tool used to manage Windows images. The tool can be used to manage running operating systems or Operating System images and VHDs.
This DISM command repairs the windows operating system it runs on. The /Online switch forces DISM to scan the operating system for errors – it fixes any errors.
DISM.exe is a legitimate Windows command that manages both online and offline Windows images. It is completely safe to run DISM.exe
It takes between 10 minutes to a few hours for DISM /Online /Cleanup-image /RestoreHealth to run. How long it takes depends on how many errors it finds and needs to fix
It is recommended to run SFC first. Then, run “DISM /Online /Cleanup-image /RestoreHealth”. SFC checks for Windows file integrity violations and tries to fix them. However, DISM is more effective at fixing corrupt Windows Operating System files.
Conclusion
In the overview section of this article, I said that DISM is a versatile Windows command tool. There is no option that buttresses this versatility more than the “/Online /Cleanup-Image /Restorehealth” switches.
In fact, I have used this “DISM.exe /Online /Cleanup-Image /Restorehealth” command so much that it is beginning to look like it can fix any Windows 10 problem!
This command does not fix all Windows 10 problems. But, I’ll not be exaggerating if I claim that it fixes MOST Windows 10 problems.
As a matter of fact, I have fixed most Windows 10 problems by combining this DISM command and the “SFC /scannow” command!
I hope that I have been able to explain the “DISM.exe /Online /Cleanup-Image /Restorehealth” command and how to use it.
If you found this guide helpful or still have a question about any DISM command, reply to this article using the “Leave a Reply” form at the bottom of this page.
Alternatively, you can respond to the “Was this page helpful?” question below.
Finally, you may also find more of our Windows Command Prompt guides helpful.


Hi, I see you are way smarter about all this than most people, but I would like to have some assurance that running DISM is
not going to destroy my data files ?
not going to destroy my installed applications ?
not going to delete my Windows 10 Home license ?
not going to delete my Office 365 license ?
and not going to mess up the Windows Registry files ?
It would take me 2 weeks or more to reinstall all programs and data
on my computer, so I’d rather avoid that kind of “business interruption”
courtesy of Microsoft.
The last time I could install or fix an operating system without wreaking
havoc on my programs and data was some time in the early 1990’s, when MSDOS
version 6.22 came out. Ever since Windows 3.11, or Win 95,Microsoft has sown confusion, destruction, false promises and lack of information about what their software does or does not do.
So, would you be able to provide the kind of assurance about DISM I am looking for?
Hi William,
Thanks for your question. If you give me some details about what you want to use DISM for, I may be able to provide you some specific guidelines
Yeah! More effective use of DISM versus blind use.
But in the above guide it was UNCLEAR in your WIM unpack example…were you then running DISM against the CD booted instance of OS (/Online switch)? If so why? Guess that assumes R/W media.
TBH I was expecting you to use the /Image switch to run DISM against the crashed OS instance on hard drive that you started the example discussion. That would have been more useful and instructive for most real world situations.
Guess I got a little lost.
Hi Clay,
Thank you for your comment.
The simplest way to answer your question is that the /Online switch is used to run DISM commands against the running OS. However, the /Image switch is used to run commands against a Windows image (.wim) file or virtual hard disk (.vhd or .vhdx) file.
Regarding your comment “TBH I was expecting you to use the /Image switch to run DISM against the crashed OS instance on hard drive that you started the example discussion” – following my previous statement in this comment, once you run DISM against a LIVE or RUNNING OS, yoU CANNOT use the /Image switch
I hope I was able to clarify things!
Thanks for your explanation. I tryed to run the command DISM.exe /Online /Cleanup-Image /Restorehealth, on a pendrive boot with the windows 10 installer, but It returns error. But now, with your help, I undestood what happend.
THANK YOU VERY MUCH !!!!!
Thank you for the feedback. I have noticed that the last time a windows update ran on this specific server was late 2017. I dont know what happened since then. But this Covid-19 virus has resulted in many networking issues being resolved, but I am currently under lockdown and would not really want to travel the 35km/10mi to the office to check up on it.
It is very possible that the restart is completely unrelated to the DISM command! If you are not in the office, I strongly recommend that you avoid running any command on your server as if it breaks you will not be able to manually start it up. Regarding Covid-19 virus, we are all on lockdown – please take care of yourself.
Hi Victor, thank you. And take care of yourself.
Bye Marius!
Hi, Thank you for the layman’s terms explanation. Quick follow up question: I am running the dism /online /cleanup /restorehealth on a windows server, and the server simply restarted itself running windows updates. Do I need to be worried?
Thank you for your kind feedback. Regarding your question, running dism /online /cleanup /restorehealth does not normally restart the computer. Though it is important to note that when the command runs, it connects to Windows update to pick up some files. This may lead to the computer restarting – though I have never experienced this personally but as far as the server restarted successfully, I will not be worried.