
Do these 3 things before closing this tab:
1Clear out junk files and repair common Windows errors2Fix the driver behind crashes, sound loss and screen glitches3Repair Windows errors before they cause bigger problemsiTechGuides is reader-supported. When you buy through links on our site, we may earn an affiliate commission. As an Amazon Associate I earn from qualifying purchases. Learn more
This Itechguide teaches you how to insert GIF into Google Slides. The guide covers steps to insert GIF into Google Slides from a PC, Android or iPhone.
Option 1: Insert GIF from a PC
- Open Slides.Google.com from a browser on your PC. Then, login with your Google Account.

- Open the Presentation you want to insert GIF and select the slide you want to insert the GIF.
- Then, at the menu click Insert, point to Image and select where you want to insert your GIF from. For steps to insert GIF from each source, see the steps below…

Method 1: Upload from Computer
- To insert from your computer, click Upload from computer.

- Then, navigate to the folder you saved the GIF on your computer and double-click the image.

- To resize the inserted image, click and drag any of the highlighted edges.

Method 2: Search the Web (Insert by Searching Google Images)
- To find a GIF from Google search and insert into your slide, click Search the web. A search field will pop up on the right side of the slide.

- Type the name of the GIF you want to insert. Then, select an option from the suggested list.
- In this example, I types geek gif and selected the same phrase from the list. Google search will return a list of images that match your search.

- From the search result, select the image you want to insert. When you select an image, a set of options will be displayed beneath the search results.

- To insert the selected GIF, beneath the image, click INSERT. The image will be inserted. See the second image below…


Method 3: Insert GIF from Google Drive
- If you saved the GIF you want to insert in Google drive, select Drive. Your Google Drive will open on the right side of the screen.

- The default tab that opens is RECENT tab. If the GIF is located in this tab, scroll down and select the image. However, you can click MY DRIVE tab to find a GIF in your entire drive.

- When you select the image, an option will be displayed beneath the image. To insert the GIF into your slide, click INSERT.

Method 4: Insert GIF from Google Photos
- Google Slides also offers the option to insert GIF images from Google Photos. To insert GIF into Google Slides from Google Photos, select Photos from the list. Your Google Photos will open on the right side of the presentation.
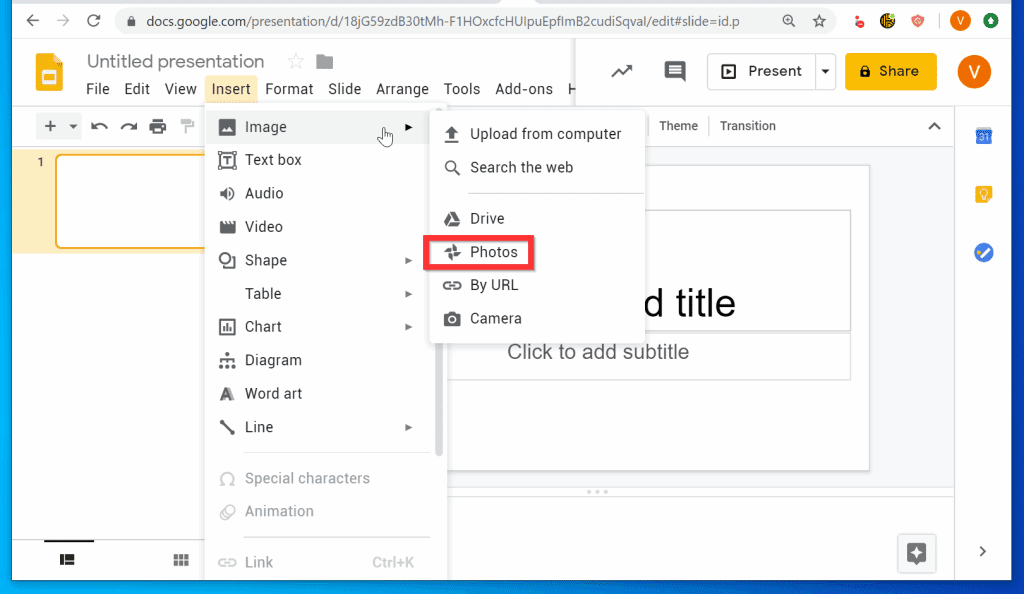
- To insert a GIF from Photos, click on the image you want to insert. Then, beneath the image, click INSERT.

Method 5: Insert GIF from a URL or Camera
- To insert a GIF from a website, click By URL.

- The Insert image pop up will open. Paste the URL of the GIF you want to insert in the Paste URL of image…field. Google Slides will download a preview of the image.

- Once the preview of the image is displayed, at the bottom right of the image, click INSERT.

- You can also insert an image by taking a picture with the camera on your computer. To insert an image with the option, click Camera.

- Google Slides will request access to the Camera on your computer. To use the camera, click Allow. Then, take a picture with the camera and insert it to your presentation.

Option 2: Insert GIF from Android or iPhone
- Open Google Slides App on your phone. Then, sign in with your Google Account.
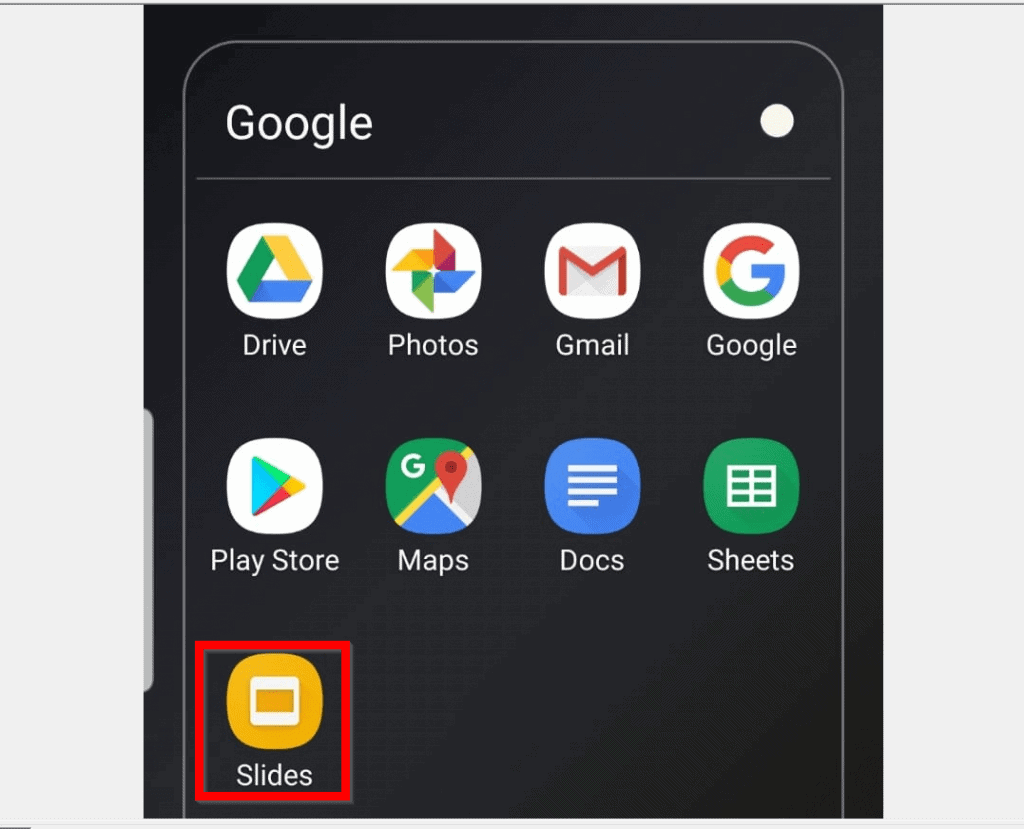
- When the App opens, open the Google Slides presentation you want to insert GIF.
- Then, on the top right of the screen, tap Insert (+ sign). A list of options will be displayed at the bottom of the screen.

- From the displayed options, tap Images. You will be offered 2 options to insert GIF image into your presentation – From Photos and From Camera.

- To insert GIF into Google Slides, select an option. In this example, I will select From Photos. Google Slides App will open Google Photos App on your phone.

- Tap on the photo/image you want to insert. It will be inserted immanently.

It is this easy to insert GIFs into Google Slides! I hope you found this Itechguide helpful. If you found it helpful, click on “Yes” beside the “Was this page helpful” question below.
You may also express your thoughts and opinions by using the “Leave a Comment” form at the bottom of this page.
What’s actually slowing this PC down?
Pick the symptom - the matching free tool is one click away.
Finally, for more Google Itechguides, visit our Google How To page.
Quick Recap
Also popular on Amazon

- 【USB Port Expander】:This 4-Port USB hub can easily expand one of your computer’s USB ports into 3 USB port and 1 Type C port. Support 4 ports to work at the same time, without any pressure, and keep the temperature in the middle range. Plug and play, no need driver, easy to use.
- 【USB C Power & Data Port】: The USB C female port supports 5V Power supply for the hub, as well as the data transfer, which allowing you to connect to Type C phones, mobile hard drives, and other devices for data transfer has solved the problem of your laptop and computer lacking USB C interfaces. (Note: this usb c port only support power input for the hub, not support power output for charging).
- 【Wide Application】: Ideal for Mac Pro, iMac, MacBook Air, MacBook Pro, MacBook, and Mac mini. And this is also very suitable for use in the car. It extends the USB interface in the car, compatible with esla Model Y 2021-2024 and Model 3 2021-2023 and other Car. (Note: not support audio & video transfer, not compatible with any sound devices)
- 【SuperSpeed Transmission】:With 1 x USB 3.0 port and 2 x USB 2.0 ports. The USB 3.0 interface has a data transfer speed of up to 5Gbps, and can download a high-definition movie in just a few seconds. It is very suitable for inserting USB drives, mobile hard drives, cameras, and other devices for fast data transfer. Two USB 2.0 interfaces with a speed of 480Mbps, suitable for inserting USB peripheral devices such as mice, keyboards, printers, etc.
- 【Plug & Play】: Support hot-swappable on Windows 7/ Vista/ XP/ 2000/ ME/ 98/ 8/ 10; Mac OS 8.6-9.2/ OSX-10.6, and Linux.
Also popular on Amazon

- 5-in-1 Connectivity: Equipped with a 4K HDMI port, a 5 Gbps USB-C data port, two 5 Gbps USB-A ports, and a USB C 100W PD-IN port. Note: The USB C 100W PD-IN port supports only charging and does not support data transfer devices such as headphones or speakers.
- Powerful Pass-Through Charging: Supports up to 85W pass-through charging so you can power up your laptop while you use the hub. Note: Pass-through charging requires a charger (not included). Note: To achieve full power for iPad, we recommend using a 45W wall charger.
- Transfer Files in Seconds: Move files to and from your laptop at speeds of up to 5 Gbps via the USB-C and USB-A data ports. Note: The USB C 5Gbps Data port does not support video output.
- HD Display: Connect to the HDMI port to stream or mirror content to an external monitor in resolutions of up to 4K@30Hz. Note: The USB-C ports do not support video output.
- What You Get: Anker 332 USB-C Hub (5-in-1), welcome guide, our worry-free 18-month warranty, and friendly customer service.
Also popular on Amazon

- 【Plug and Play】No software, drivers or complicated installation process requirement
- 【USB Expansion】This USB Hub tansfer a single USB port into 4 USB data ports. you can get 1 USB 3.0 and 3 USB2.0 ports with your new USB C laptop
- 【Wide Compatibility】This USB adapter has a wide range of compatibility, including USB cables, flash drives, mice, keyboards. Also works with hubs for MacBook Pro 2021/2020/2019, Google Chromebook Pixelbook, Samsung series and laptops and more USB Type-C devices (charging not supported)
- 【4 in 1 USB Hub】USB Hub Multiport Adapter contains 1*USB 3.0 and 3*USB 2.0,supports super faster data transfer up to 5Gbps which is 10X faster than USB 2.0 (480 Mbps), which allows you to transfer datas in just seconds; USB extension hub was built in OTG function chip, it can easily connect the mouse, keyboard, USB disk, and other USB devices to your USB-C phones and tablets
- 【Easy to Carry】The USB extension cable multiple port has been Special designed to be as slim and light as possible, ideal for your working and traveling with ultrabook. easy to store and use
Also popular on Amazon

- The Anker Advantage: Join the 80 million+ powered by our leading technology.
- SuperSpeed Data: Sync data at blazing speeds up to 5Gbps—fast enough to transfer an HD movie in seconds.
- Big Expansion: Transform one of your computer's USB ports into four. (This hub is not designed to charge devices.)
- Extra Tough: Precision-designed for heat resistance and incredible durability.
- What You Get: Anker Ultra Slim 4-Port USB 3.0 Data Hub, welcome guide, our worry-free 18-month warranty and friendly customer service.
Popular on Amazon

- 【4 Ports USB 3.0 Hub】Acer USB Hub extends your device with 4 additional USB 3.0 ports, ideal for connecting USB peripherals such as flash drive, mouse, keyboard, printer
- 【5Gbps Data Transfer】The USB splitter is designed with 4 USB 3.0 data ports, you can transfer movies, photos, and files in seconds at speed up to 5Gbps. When connecting hard drives to transfer files, you need to power the hub through the 5V USB C port to ensure stable and fast data transmission
- 【Excellent Technical Design】Build-in advanced GL3510 chip with good thermal design, keeping your devices and data safe. Plug and play, no driver needed, supporting 4 ports to work simultaneously to improve your work efficiency
- 【Portable Design】Acer multiport USB adapter is slim and lightweight with a 2ft cable, making it easy to put into bag or briefcase with your laptop while traveling and business trips. LED light can clearly tell you whether it works or not
- 【Wide Compatibility】Crafted with a high-quality housing for enhanced durability and heat dissipation, this USB-A expansion is compatible with Acer, XPS, PS4, Xbox, Laptops, and works on macOS, Windows, ChromeOS, Linux
Product prices and availability are accurate as of the date/time indicated and are subject to change. Any price and availability information displayed on Amazon at the time of purchase will apply.
Independent reader supportYour contribution helps us test, update, and keep practical guides available for everyone.