Do you wish to rename the built-in administrator account or change a standard user account to an administrator in Windows 11? This guide demonstrates various methods to achieve both.
How To Change (Rename) The Administrator Account
Every Windows 11 computer features a built-in administrator account. This account has full permission to make changes to the computer and also has other administrator privileges.
However, not everyone knows that the name of this built-in administrator account can be changed at any time. Well, this section provides various ways to rename the built-in administrator account in Windows 11.
Option 1: Rename the Administrator Account Through Computer Management
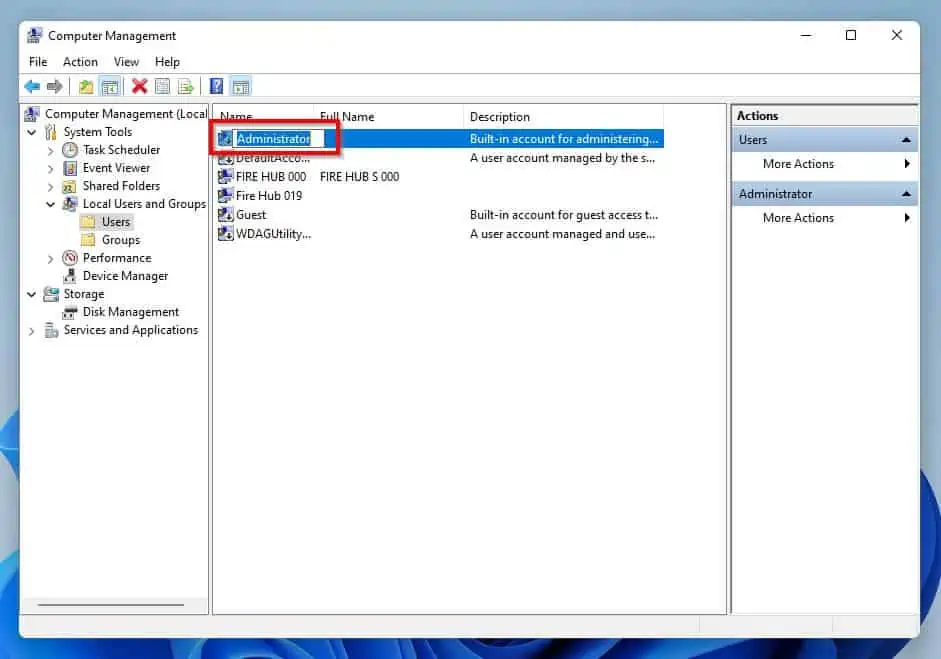
One method to rename the administrator account in Windows 11 is through the Computer Management tool. The following procedures and screenshot images illustrate how to achieve that.
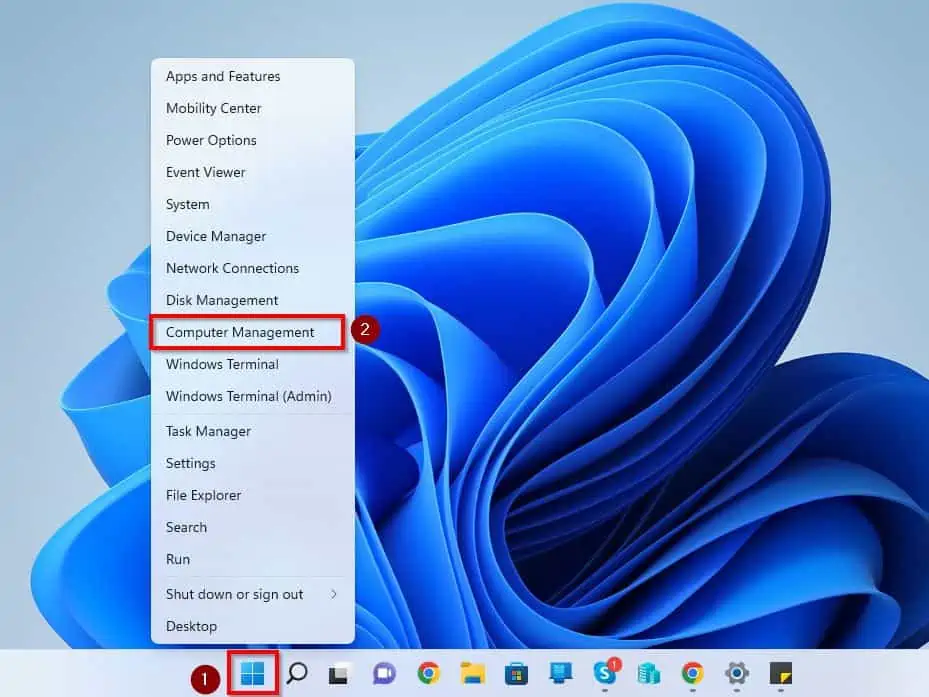
- Right-click the Start menu button on the Windows 11 taskbar and select Computer Management.
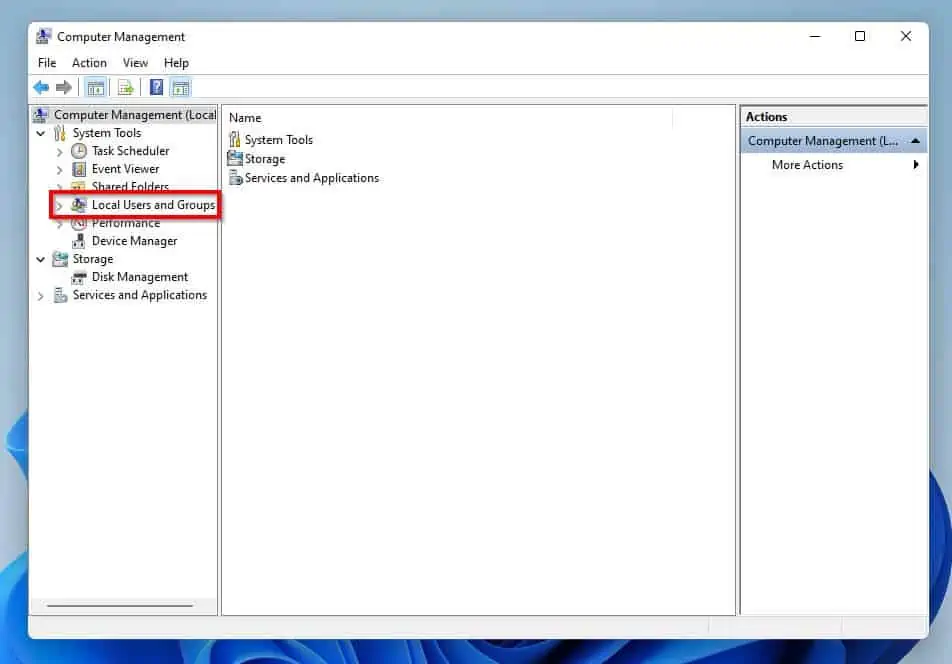
- Following that, double-click Local Users and Groups on the left pane of the Computer Management window to expand it.
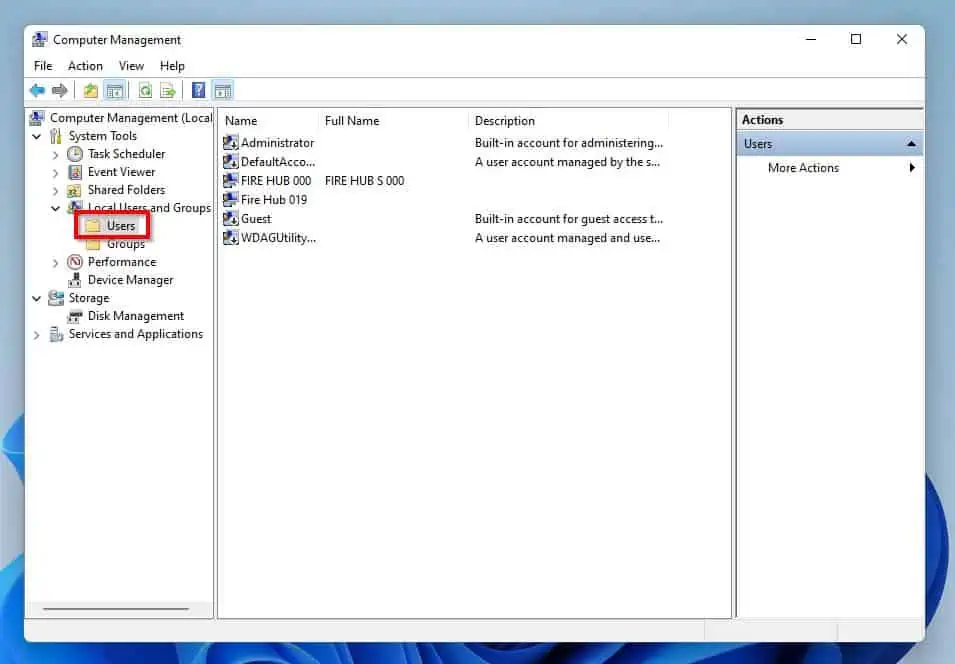
- Then, select the Users folder under Local Users and Groups.
- Afterward, right-click Administrator or whatever the current administrator name is on the right pane and select Rename.
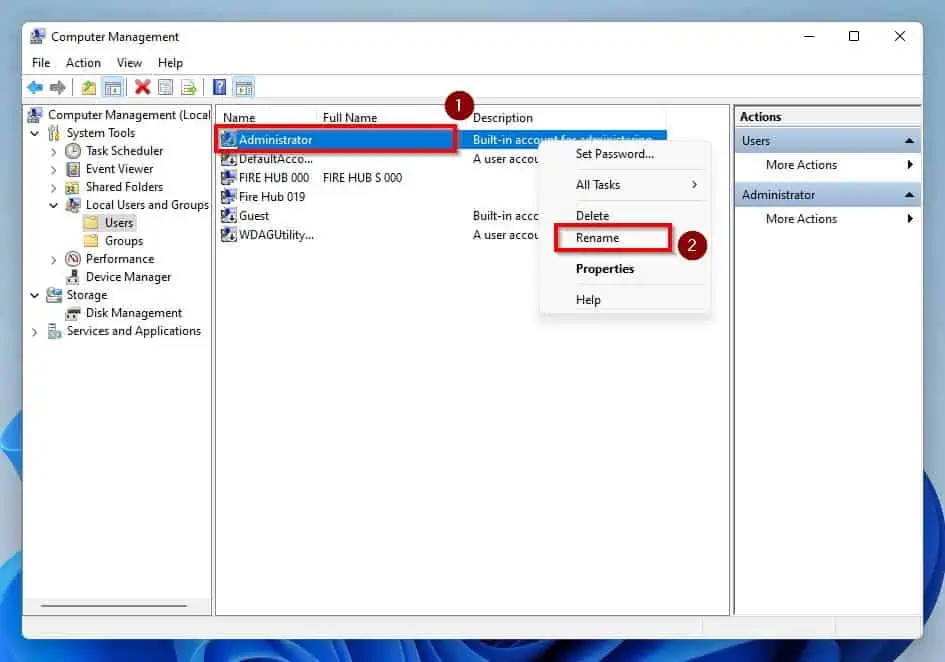
- Next, type a new name and press Enter on your keyboard.
Option 2: Rename the Administrator Account via Command Prompt
Interestingly, you can also rename the built-in administrator account on your Windows 11 computer through Command Prompt. The following procedures explain how to do that.
- On the taskbar in Windows 11, left-click the Windows 11 Search button.

- Afterward, type “cmd” (without the quotes) in the search field. Next up, right-click the Command Prompt app under Best match and click Run as administrator.
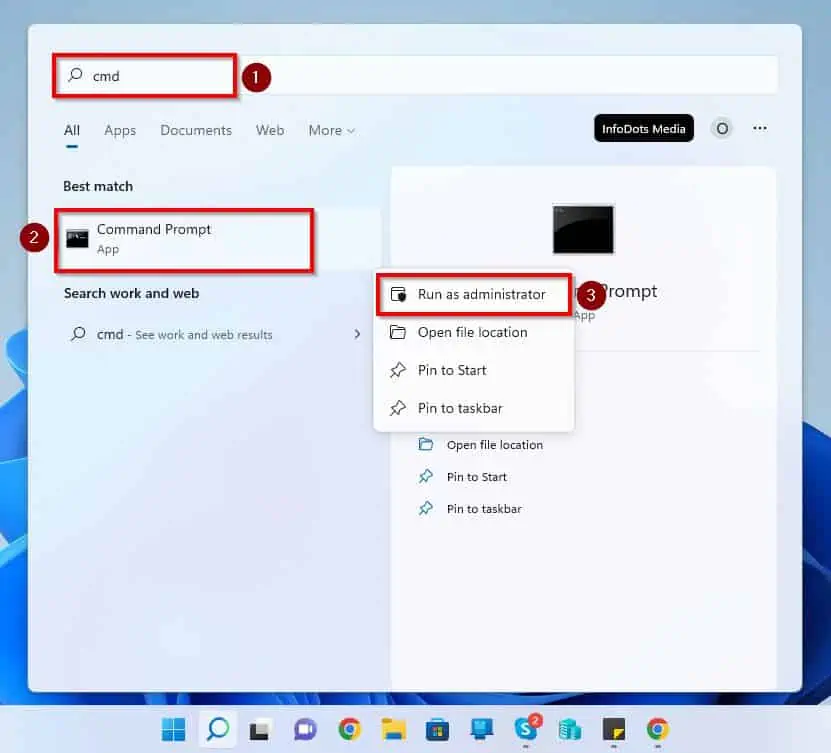
- Then, you will receive a prompt on your computer screen. This User Account Control prompt should ask if you want to allow the application to make changes to your device – click Yes to continue.
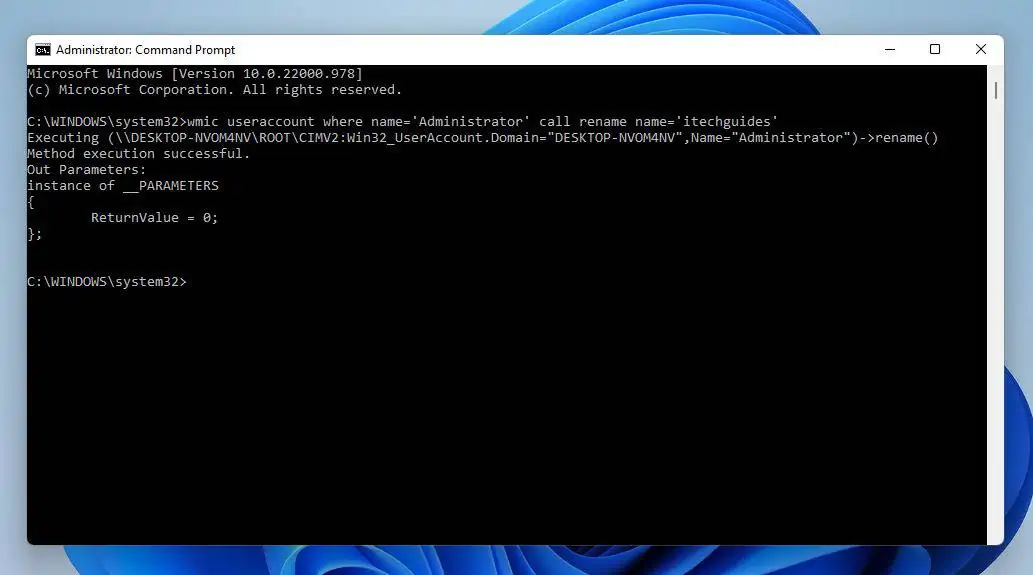
- After doing that, run the subsequent command below in the Command Prompt window to rename the built-in administrator account.
wmic useraccount where name='Administrator' call rename name='newAdministratorName'
However, before running the command, replace ‘newAdminstratorName’ with the name you wish to rename the built-in administrator account. Also, change ‘Administrator’ to the current name of the built-in admin account.
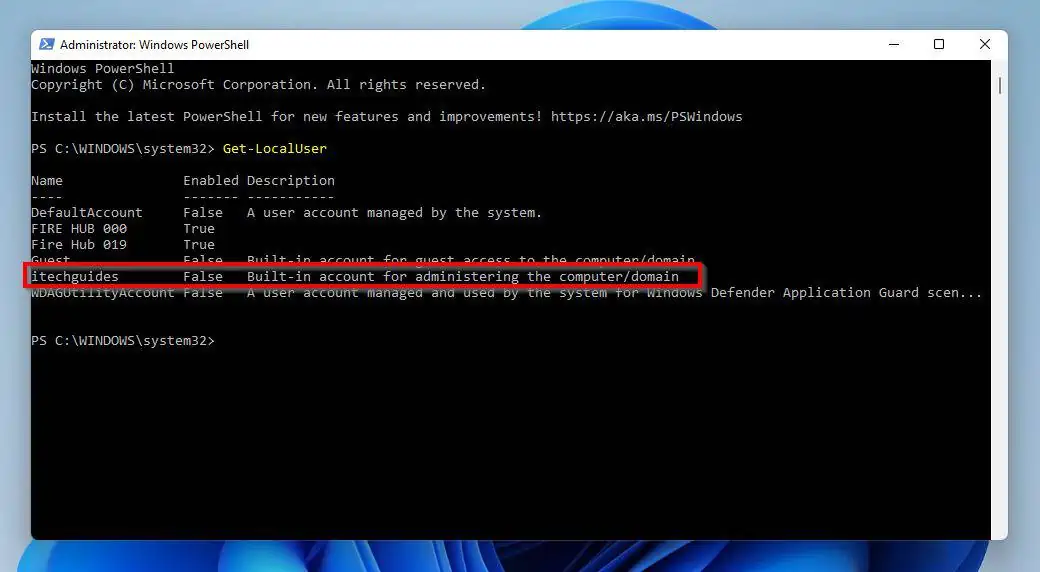
Nonetheless, the current name of the built-in administrator account on my Windows 11 computer is still “Administrator.” Hence, if I want to rename the account to “itechguides,” below is what the command will look like.
wmic useraccount where name='Administrator' call rename name='itechguides'
Option 3: Rename the Administrator Account Using Windows PowerShell
Another method to rename the built-in administrator account in Windows 11 is through the Windows PowerShell application. To do that, observe the following steps, including screenshots.
- Click the Search button on the Windows 11 taskbar.
- Then, input “powershell” (without the quotes) in the search box. Next, right-click the Windows PowerShell app under the Best match section and select Run as administrator.
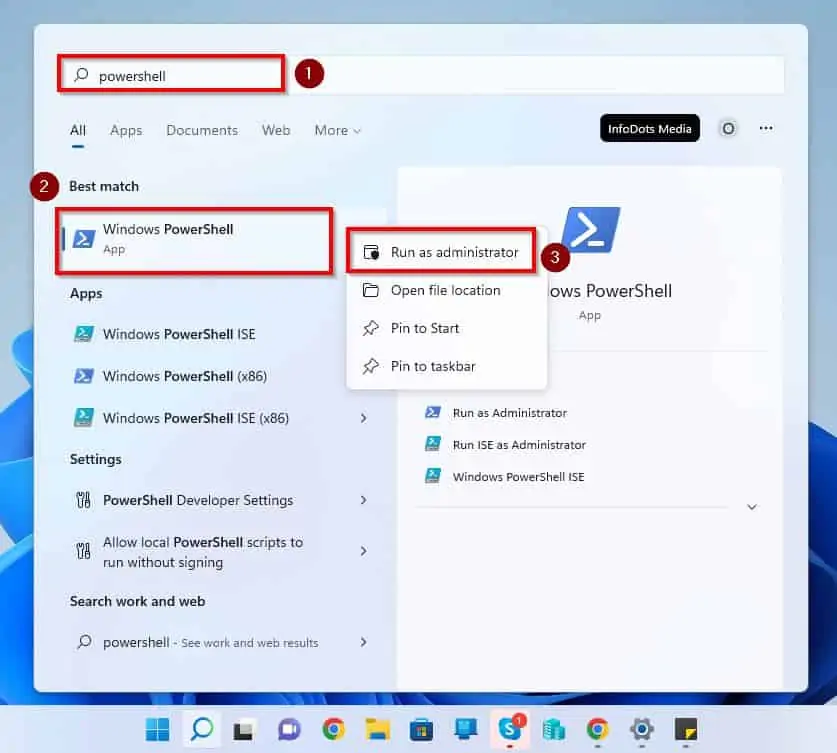
- Consequently, you will receive a User Account Control prompt requesting to permit the app to make changes to your device. Click Yes to continue.
- Then, run the command below in the Windows PowerShell window to get the current name of the built-in administrator account.
Get-LocalUser
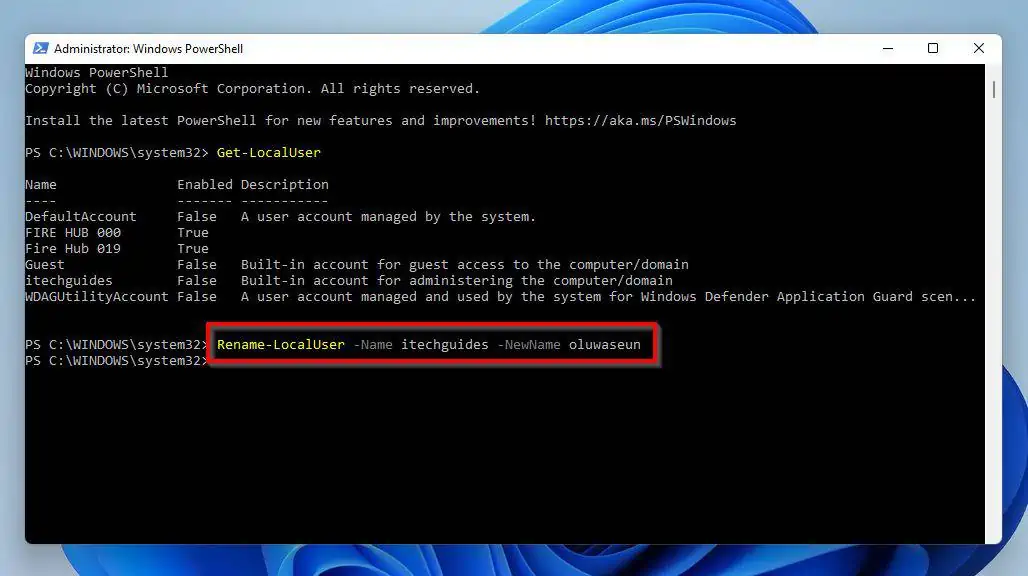
- Following that, run the command below to change the current name of the built-in administrator account.
Rename-LocalUser -Name Administrator -NewName NewAdminName
However, replace “Adminstrator” with the current name of the built-in administrator account. Also, replace “NewAdminName” with the new name you wish to rename the current name of the built-in administrator account.
For example, the current name of my built-in administrator account is “itechguides.” Hence, if I want to change the name to “oluwaseun” below is what the command will look like.
Rename-LocalUser -Name itechguides -NewName oluwaseun
How To Change A Standard User Account To An Administrator
There are various ways to change a standard user account to an administrator in the Windows 11 operating system. The following sub-sections demonstrate how to accomplish that.
Option 1: Change a Standard User Account to an Administrator Through Settings
One way to change a standard user account on your Windows 11 PC to an administrator is via the Settings app. To accomplish that, follow the procedures below.
- On your taskbar in Windows 11, right-click the Start menu button. You may also use the Windows key + I shortcut to launch Settings in Windows 11.
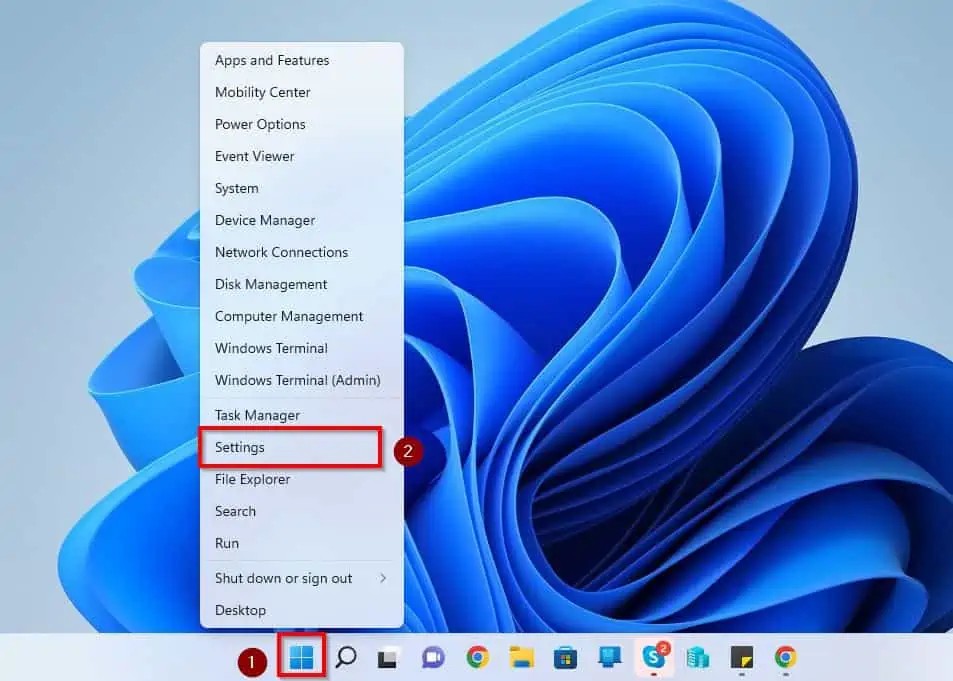
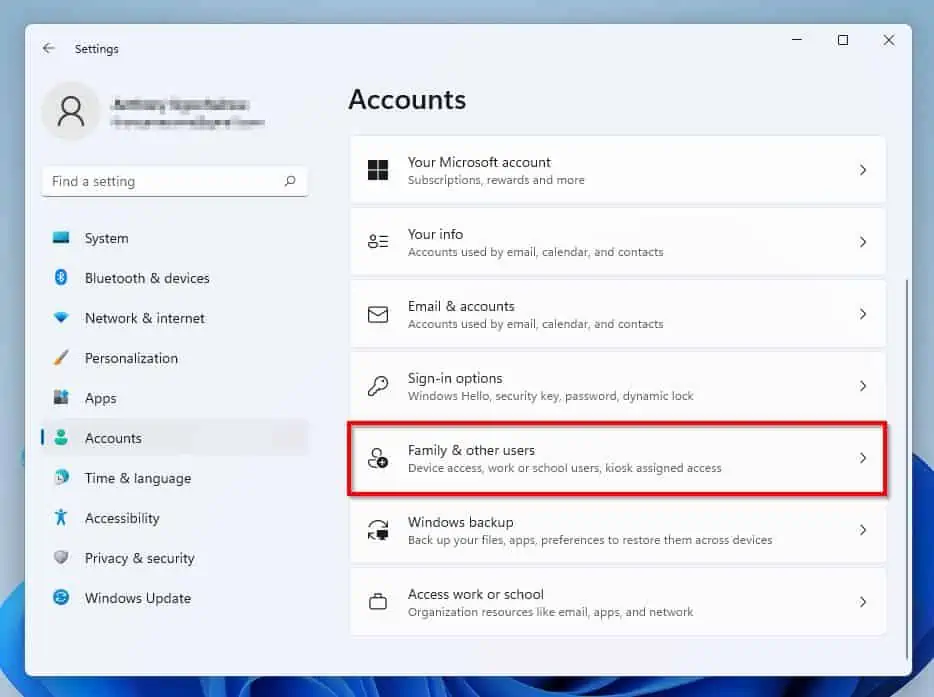
- Then, select Accounts on the left pane of the Settings window.
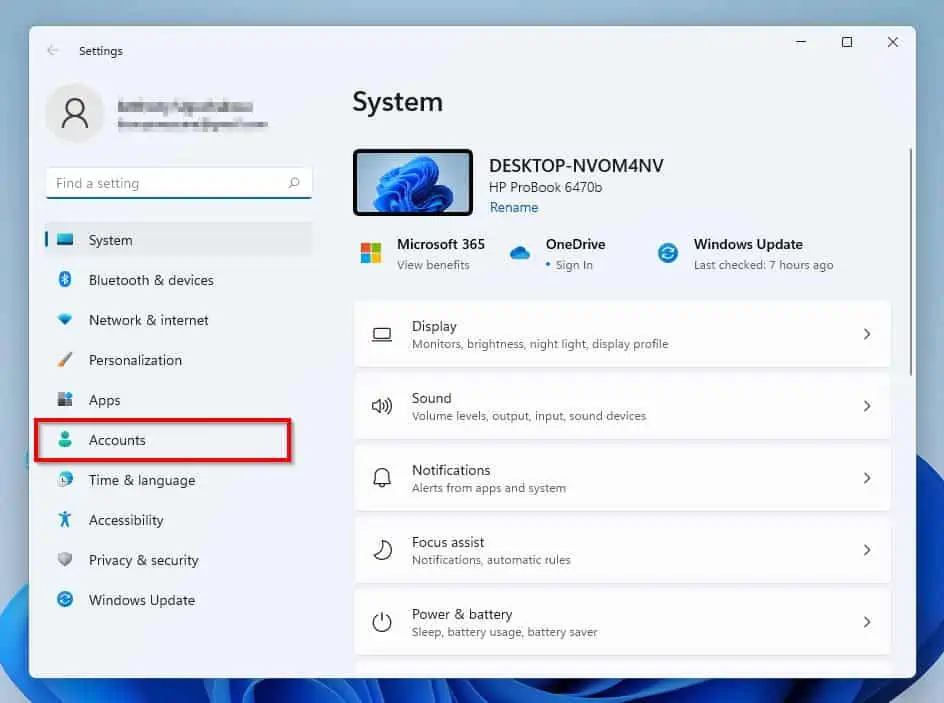
- Following that, click Family & other users on the right pane of the window.
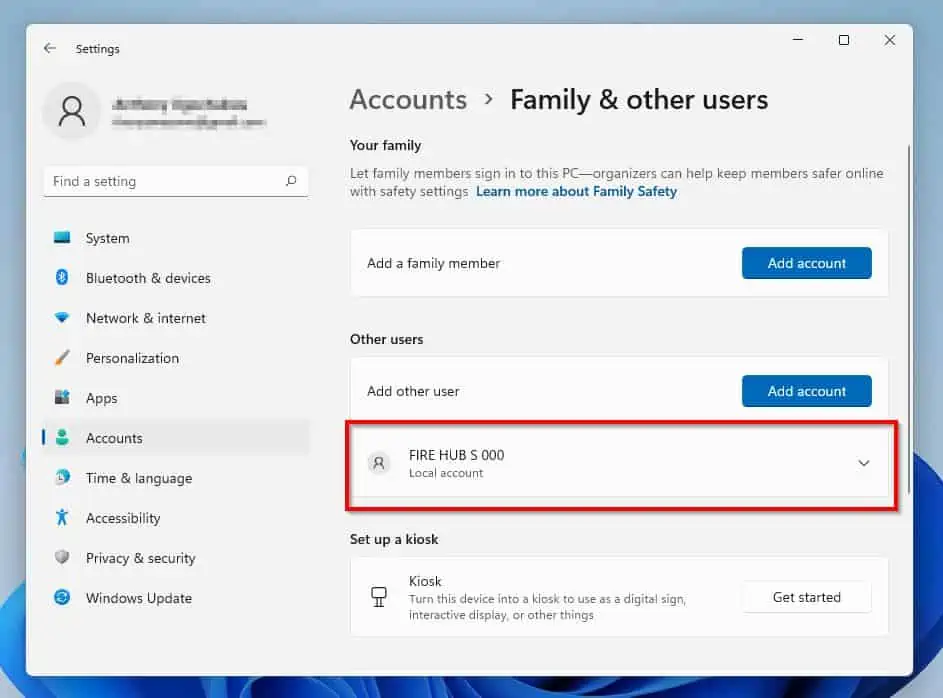
- Then, under Other users, select the user account you wish to change to an administrator – for this example, I want to change the FIRE HUB S 000 account to an administrator.
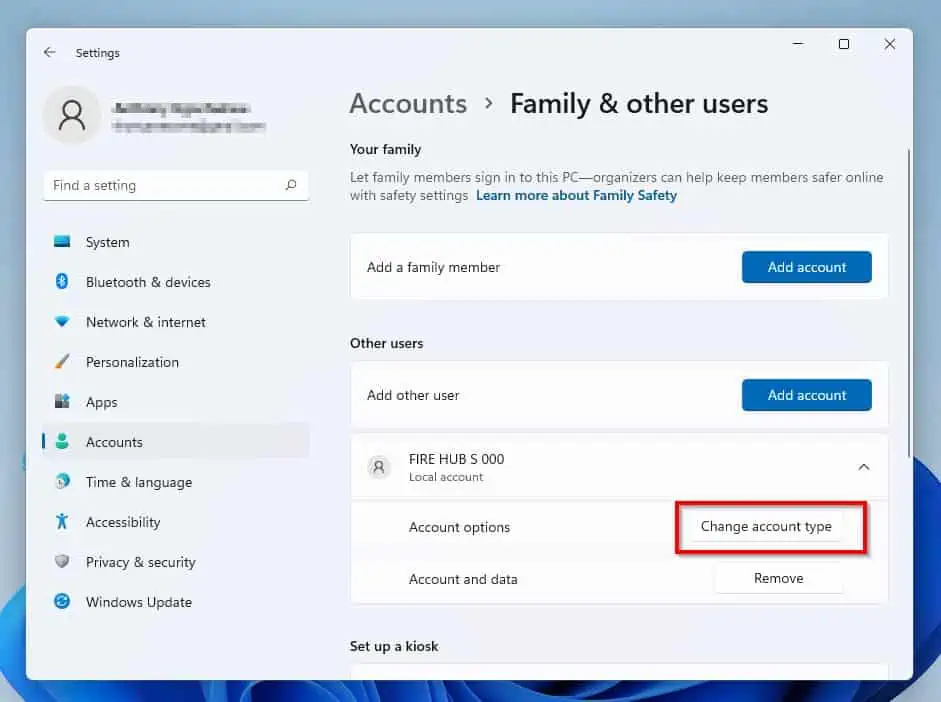
- Next, click the Change account type button opposite Account options.
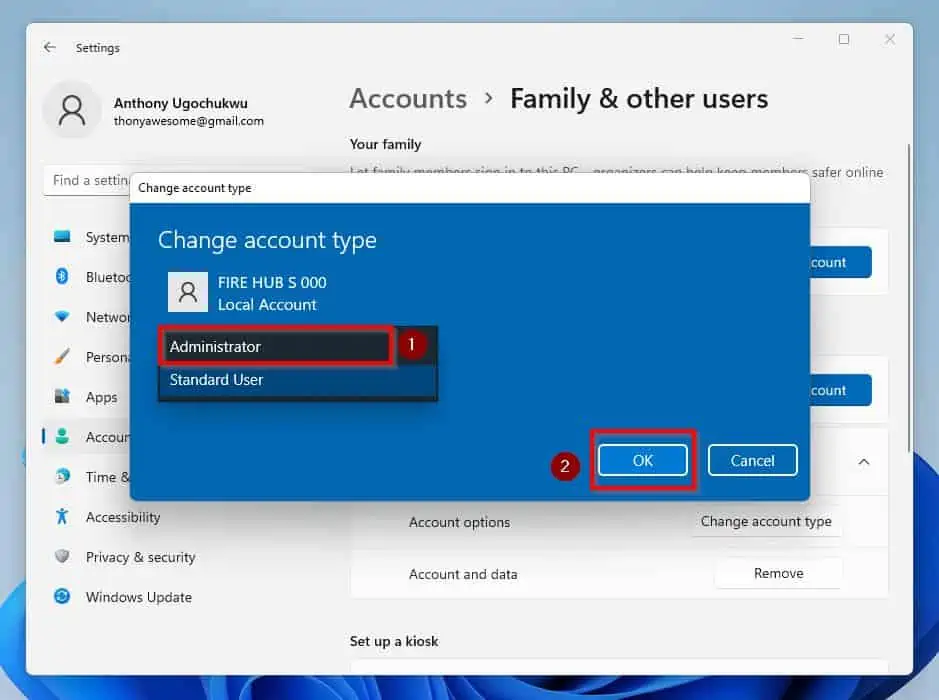
- On the Change account type window, click the Account type drop-down and select Administrator. Finally, click OK to save the change.
Option 2: Change a Standard User Account to an Administrator via Control Panel
Using the control panel, you can also change a standard user account to an administrator on your Windows 11 computer. The following procedures explain how to accomplish that.
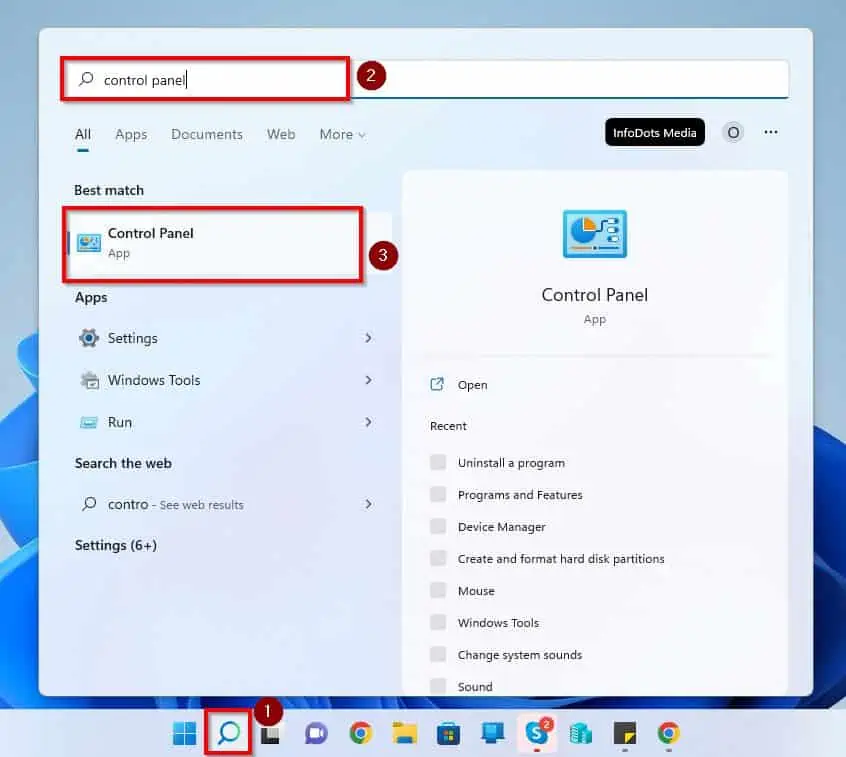
- Click the Search button on your Windows 11 taskbar. Then, type “control panel” (without the quotes) in the search field and select the Control Panel application from the search result.
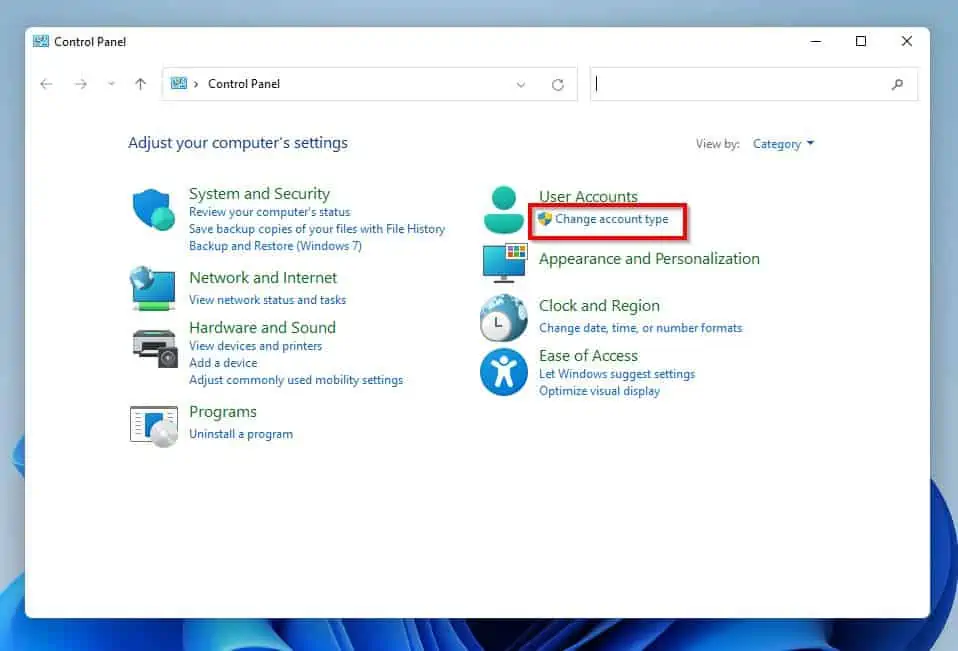
- When Control Panel opens, select Change account type under User Accounts.
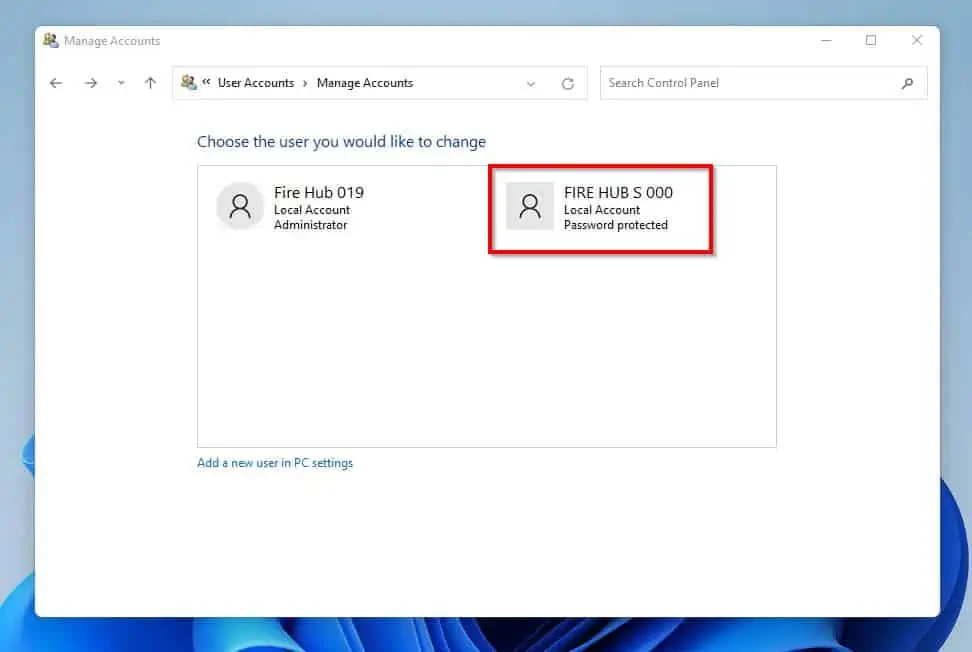
- Then, select the account you wish to change to an administrator. For this example, I will change the FIRE HUB S 000 account to an administrator.
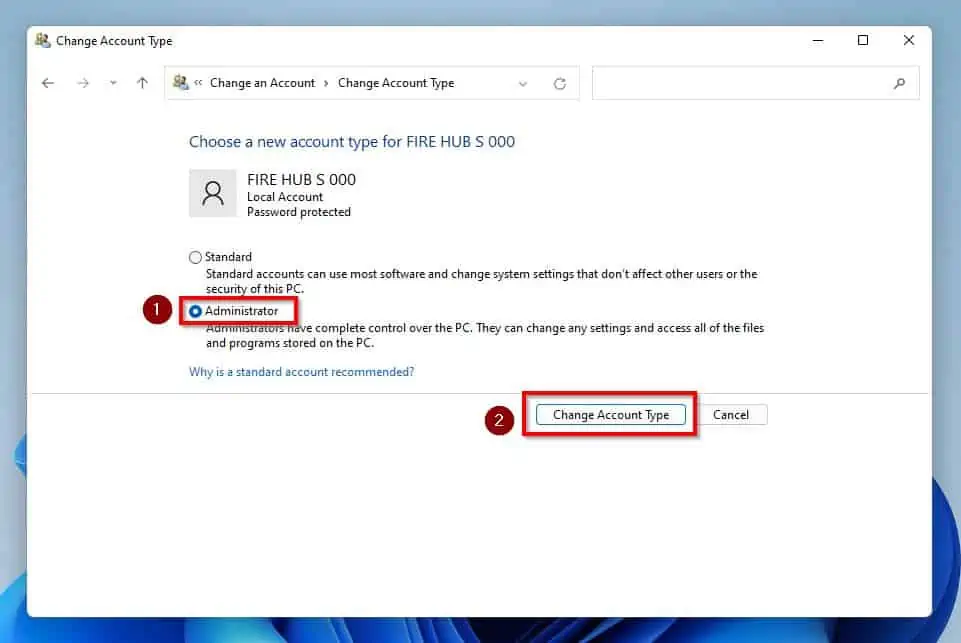
- After doing that, click Change the account type.

- Finally, select Administrator, then click the Change Account Type button.
Option 3: Change a Standard User Account to an Administrator Using Command Prompt
Interestingly, you can also change an account in Windows 11 to an administrator using Command Prompt. Follow the steps below to achieve that.
- On the taskbar in your Windows 11 computer, click the Search button.
- Then, input “cmd” or (without the quotes) in the search box. Consequently, right-click the Command Prompt app under the Best match category and select Run as administrator.
- Following that, a UAC (User Account Control) prompt will appear on your PC screen. This prompt should ask if you want to let the app make changes to your device – select Yes to proceed.
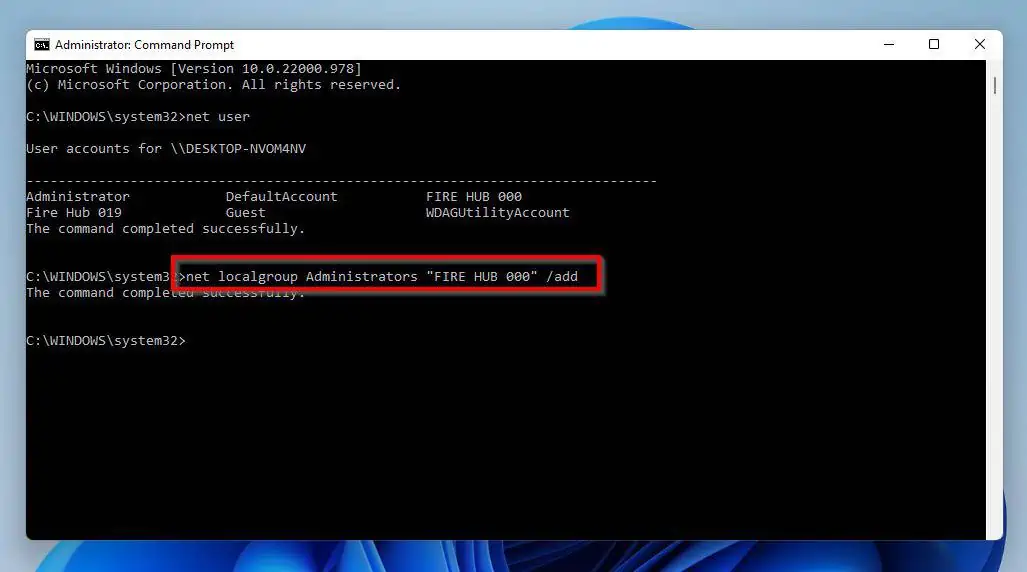
- When Command Prompt opens, run the subsequent command to list out the accounts on your Windows 11 PC. Thus, note the name of the account you want to change to an administrator.
net user

- Afterward, run the following command.
net localgroup Administrators "name" /add
However, replace “name” with the name of the user account you wish to change to an administrator. For instance, if I want to change the FIRE HUB 000 account to an administrator, below is what the command will look like.
net localgroup Administrators "FIRE HUB 000" /add
Frequently Asked Questions
a) Click the Search button on your Windows 11 taskbar. Then, type “control panel” in the search field and select the Control Panel application from the search result.
b) When Control Panel opens, select Change account type under User Accounts.
c) Then, select the account you wish to change to an administrator.
d) After doing that, select Change the account type.
e) Finally, select Administrator and click Change Account Type.
As with the previous versions of the Windows OS, Windows 11 features a built-in administrator account.
An admin account in Windows 11 is a user account that can make changes on a computer that will affect other user accounts. Also, an admin account can change security settings, install software and hardware, and access all files on a computer.
No, it’s not compulsory for an admin account to be passworded. However, it is recommended so that other users won’t have access to it.
Microsoft released the Windows 11 OS on October 5, 2021.
Conclusion
Being an administrator in Windows 11 gives a user access to make various changes and open numerous files on a computer without restriction. Besides, every Windows 11 computer comes with a built-in administrator account by default.
Well, this guide taught us several ways to rename the built-in administrator account in Windows 11. We also learned various methods to change a standard user account to an administrator in Windows 11.
I hope the methods featured in this guide were helpful and explanatory enough. If they were, click on “Yes” beside the “Was this page helpful” question below.
You may also express your thoughts and opinions by using the “Leave a Comment” form at the bottom of this page.
Finally, for more Windows 11 guides, visit our Windows 11 How-To page.


