
What’s actually slowing this PC down?
Pick the symptom - the matching free tool is one click away.
An ESP8266 NeoPixel ring clock uses individually addressable WS2812 LEDs to show the hour, minute, and second as colored positions around a ring. The ESP8266 can get time over Wi-Fi from an NTP server, then update the LEDs to match. For a straightforward starting point, use a development board such as a D1 Mini, a compatible 24-LED ring, and a sketch whose GPIO setting matches your data wire.
What an ESP8266 NeoPixel ring clock does
Each WS2812-compatible LED is independently addressable, so the controller can light different pixels in different colors. A clock sketch translates time into pixel positions—for example, one color for hours, another for minutes, and a third for seconds. The ring is the display; it does not have mechanical hands or a conventional numeric face.
These builds are variations on a design, not one universal schematic. Published examples use 12-LED or 24-LED rings, multiple rings, and different ESP8266 board forms. The chosen LED count affects how finely the display can represent a full hour or minute.
Choose a ring and controller
| Build approach | Documented configuration | Practical trade-off |
|---|---|---|
| Single 12-pixel ring | ESP-12-series ESP8266, 12 WS2812B LEDs, and NTP time; Hackaday.io’s EspRing project was created in 2019. Source | A compact, simple display. With 12 positions, a full 60-second or 60-minute cycle maps to five-second or five-minute steps. |
| Single 24-pixel ring | D1 Mini, 24 WS2812 LEDs on a 90 mm ring, and an NTP helper in the ShillehTek project guide; publication date not stated. Source | More positions for time mapping, with the convenience of a development board. |
| Multiple rings | NodeMCU with 12- and 24-pixel rings plus an 8-pixel strip in Craig and Heather’s project guide; publication date not stated. Source | More display area and separate visual channels, with additional wiring and configuration. Its software-version instructions are historical. |
For a first build, a D1 Mini or NodeMCU is generally easier to wire and program than a bare ESP-12 module because the development board provides USB and power/programming conveniences. Check the labels on the exact board you have: pin names vary by board and are not interchangeable with GPIO numbers in every context.
Quick wins for a faster PC:
Clear out junk files and repair common Windows errorsFree Scan →Fix the driver behind crashes, sound loss and screen glitchesFind Drivers →Repair Windows errors before they cause bigger problemsFix Now →#1 Best Overall
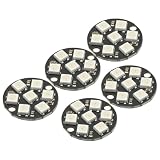
- 5Pcs WS2812 7-Bit 7 Bits WS2812B LED 5050 RGB LED Ring Lamp Light with Integrated Drivers For Arduino ESP8266 Raspberry Pi ESP32 Reverse Polarity Protection IC Control
- Intelligent reverse polarity protection, power supply reverse polarity will not damage the IC.
- Built-in power-on reset and brown-out reset circuit.
- Data transmission speeds of up to 800Kbps.
- Transfer transmission distance between any two points in less than 5 meters without any additional circuitry.
How pixel count changes the time display
A 12-pixel ring has 12 physical positions. If the sketch uses the whole ring to represent 60 seconds or 60 minutes, each position stands for five units. A 24-pixel ring can represent more increments; the cited 24-pixel project divides seconds and minutes by 2.5 and maps 12 hours to 24 positions. The exact appearance still depends on the sketch’s mapping and colors.
One pixel per indicator can make overlapping values less obvious. Check how your chosen sketch handles hour, minute, and second values that map to the same LED—some projects may use distinct colors or another visual convention. Do not assume a particular display behavior without checking the code.
Parts for a basic D1 Mini build
- ESP8266 D1 Mini development board.
- 24-LED WS2812-compatible ring; the referenced ShillehTek project specifies a 90 mm ring.
- Jumper wires and soldering supplies for secure connections.
- Micro-USB cable compatible with the board and a suitable power arrangement.
- Wi-Fi access for obtaining network time, plus the network name and password for the sketch.
The ShillehTek example lists Adafruit_NeoPixel and a TimeClient helper, along with ESP8266WiFi from the ESP8266 Arduino core. Library, helper, and core versions can change; use the versions required by the sketch you select rather than assuming that all clock projects share one software setup.
Wire the ring to the ESP8266
For the cited D1 Mini configuration, the project connects ring 5 V to board 5 V, ground to ground, and the ring’s data input to D5. This is a project-specific pin choice, not a universal ESP8266 prescription. Other examples use NodeMCU D6 or GPIO 5 on an ESP-12-based design.
Recommended Free Tools
Rank #2

- Each pixel is individually addressable
- Application: Full-color module, Full color soft lights a lamp strip, LED decorative lighting, Indoor/outdoor LED video irregular screen
- Any question please contact seller as follows: click "DIYmall"(you can find "Sold by DIYmall" under Buy Now button), in the new page, click "Ask a question"
- Any question please contact seller as follows: click "DIYmall"(you can find "Sold by DIYmall" under Buy Now button), in the new page, click "Ask a question"
- Identify the ring’s input and power pads. Use the ring’s labels or documentation to distinguish data input from data output; connect the controller to the input.
- Connect power and ground. The D1 Mini example uses 5 V and a shared ground. Confirm the requirements of your particular ring and board before powering it.
- Connect the data wire to the selected pin. If following the ShillehTek wiring, use D5 and verify that the sketch defines the same pin. For another board or sketch, follow that project’s pin mapping instead.
- Check connections before powering up. Confirm polarity, the ring’s data direction, and that no exposed conductors can short together.
LED current depends on how many pixels are lit and their colors and brightness. The ShillehTek guide says its 24-pixel ring is used at 50% brightness and claims this stays within a USB-port current budget; that is guidance for that project, not a universal safety guarantee for other rings, brightness settings, or power sources. Do not infer that any ring can be powered safely from a board’s USB connection without checking the hardware and load.
Set up Wi-Fi time and the display sketch
- Install the ESP8266 board support and libraries required by the sketch. Follow the instructions for the selected project and verify the board and library versions it expects.
- Enter Wi-Fi credentials. Configure the network name and password in the sketch if it uses them to connect to Wi-Fi.
- Set the data pin and LED count. Match the sketch’s GPIO selection and pixel count to the physical board and ring. A D5 wiring choice must not be paired with a sketch configured for a different pin.
- Configure time-zone behavior. Set the correct local offset and daylight-saving behavior if the sketch exposes those settings. A multi-ring NodeMCU project asks users to configure standard and daylight offsets; its specific behavior is not a default for all sketches.
- Upload and observe the ring. Check that it joins Wi-Fi, obtains time, and lights the expected pixels. If time or pixels are wrong, recheck credentials, time-zone settings, LED count, data direction, and pin agreement.
What Wi-Fi and NTP mean for the clock
NTP lets the ESP8266 obtain or refresh time over a network. That means the clock needs Wi-Fi connectivity to acquire corrected network time; if the connection is lost, it may not be able to resynchronize until connectivity returns. The cited project pages describe periodic updates or retry behavior, but do not establish a measured accuracy result or a guaranteed duration of correct timekeeping without network access. Behavior during an outage depends on the specific sketch.
A GPS-based NeoPixel clock is a separate alternative, not a required component of an ESP8266/NTP design. Adafruit’s guide, last updated June 3, 2024, describes a FLORA and GPS module with 12- and 24-pixel rings; it does not document the ESP8266 architecture discussed here. Adafruit’s guide
Common build problems to check
- No LEDs light: verify power polarity, shared ground, the ring’s data-input end, and the sketch’s configured data pin.
- Only some LEDs behave as expected: check that the configured LED count matches the ring and that the selected library and code support the hardware.
- Time does not appear or is offset: confirm Wi-Fi credentials and the sketch’s time-zone and daylight-saving settings.
- Instructions disagree about pins: treat pin assignments as specific to their board and sketch. For example, published examples use D5, D6, and GPIO 5; follow only the mapping that matches your own wiring and code.
- Copying an older tutorial’s code: the MakerBotics tutorial contains an apparent typo in its written instruction about changing LED_COUNT for a 12-LED module. Check the actual code and physical pixel count instead of copying that sentence blindly. MakerBotics tutorial
Craig and Heather’s multi-ring guide names Arduino IDE 1.6.8 and ESP8266-Arduino 2.2.0, which are historical versions rather than current-version recommendations. Use its wiring and display ideas as a project reference, but check current compatibility requirements for the software you install. Project guide
Quick Recap
Product prices and availability are accurate as of the date/time indicated and are subject to change. Any price and availability information displayed on Amazon at the time of purchase will apply.

