
The ULX3S Project is an open-source FPGA research and learning board, not a single-purpose device. Its Lattice ECP5 FPGA can be programmed for different digital-hardware projects, while onboard peripherals provide ways to connect memory, storage, displays, audio, and external devices. The project’s community index links new users to the ULX3S Manual, a Quickstart (Blink LED), and a range of Projects and Examples.
What is the ULX3S Project?
ULX3S is an open-hardware FPGA development board intended for education, research, makerspaces, and general-purpose projects. The project describes it as a successor to ULX2S and expands the name as “University digital Logic Learning Xtensible board release 3.” It was developed in part for f32c system-on-chip research, but the project presents it as useful for other work as well. The ULX3S project repository describes the board as compact and standalone, measuring 94 × 51 mm; the page does not state a publication year for that measurement.
An FPGA is programmable hardware: rather than running only a fixed application, it can be configured to implement digital logic and systems. That makes ULX3S a platform for learning and experimenting, but it does not mean every example is preinstalled, turnkey, or compatible with every board configuration.
What hardware does a ULX3S board include?
The repository lists Lattice ECP5 FPGA variants with capacities of 12K, 25K, 45K, and 85K LUT. The detailed component list identifies the LFE5U-85F-6BG381C for the 85F configuration. These are variant-dependent options, not a claim that every ULX3S has the largest FPGA.
Free tools Windows power users keep installed
One-click scans. No signup required.
#1 Best Overall

- Development board open source Linux ECP5 ULX3S
| Feature | What the project lists |
|---|---|
| FPGA | Lattice ECP5 variants at 12K, 25K, 45K, or 85K LUT |
| Memory | 16-bit SDRAM in listed 8, 16, 32, or 64 MB configurations |
| Storage and configuration | Quad-SPI flash and microSD |
| Connectivity and I/O | FTDI USB interface and 56 GPIO pins |
| Onboard controls and output | LEDs and buttons, analog audio, GPDI digital-video connector, and an OLED footprint |
| Additional components | ESP32 Wi-Fi/Bluetooth module support, ADC, onboard antenna, clock, switching regulators, and low-power sleep circuitry |
These component details come from the project repository; check the specific board revision and populated components before relying on a capacity or feature. In particular, ESP32-related Wi-Fi and Bluetooth support is separate from the ECP5 FPGA; it should not be mistaken for a wireless feature built into the FPGA itself.
What can you use ULX3S for?
The project and its community index show a broad range of possible uses rather than one required application. Examples include digital-logic experiments, embedded projects, retro-computer implementations, and soft-core systems. Listed projects and ports include 6502 systems, Amiga/Minimig, ADC and DVI experiments, JTAG, OLED, camera, PS/2, SDRAM, SPI RAM, and USB work.
Rank #2

- Designed for students and beginners looking to understand Digital Logic, fundamentals of FPGAs
- Features the Xilinx Artix 7 FPGA compatible with Vivado Design Suite WebPACK Edition (free download available from Xilinx)
- On board user interfaces include 16 user switches, 16 LEDs, 5 user pushbuttons, and a
- Expansion opportunities with four Pmod ports including 3 standard 12-pin Pmod ports and 1 dual
- Does NOT ship with micro USB cable
These examples indicate what people have explored in the ecosystem; they are not guarantees that a project is maintained, works identically on every revision, or fits every FPGA variant. Before choosing one, check its capacity and I/O requirements, needed peripherals, toolchain, board revision, and maintenance status.
How do you get started?
- Identify your board. Check its revision and FPGA variant, along with the memory and peripherals actually present. Those details affect which examples and instructions apply.
- Read the ULX3S Manual. Use it to identify connectors and board-specific operating details before connecting power or programming hardware.
- Follow the Quickstart (Blink LED). The community index points beginners to a blink-LED quickstart as an initial board exercise.
- Move on to extensions and examples. The project index links to an extension quickstart and Projects and Examples, where you can choose work suited to your board and goals.
The manual identifies the main micro-USB connection for power, programming, and communication, and describes the GPDI connector for digital-monitor or TV output. Powering through the auxiliary USB connector behaves differently across revisions, so follow the manual for your specific board rather than applying a universal connection instruction. The community project index provides the onboarding links; it does not establish one mandatory workflow for every project.
The Tool Desk
Outbyte Driver Updater FREEFix the driver behind crashes, sound loss and screen glitchesFind Drivers →Outbyte PC Repair FREERepair Windows errors before they cause bigger problemsFix Now →Rank #3

- Arty A7 comes in two FPGA variants: Arty A7-35T features Xilinx XC7A35TICSG324-1L. Arty A7-100T features the larger Xilinx XC7A100TCSG324-1.
- Internal clock speeds exceeding 450MHz, On-chip analog-to-digital converter (XADC), Programmable over JTAG and Quad-SPI Flash
- 256MB DDR3L with a 16-bit bus @ 667MHz, 16MB Quad-SPI Flash, USB-JTAG Programming circuitry, Powered from USB or any 7V-15V source
- 10/100 Mbps Ethernet, USB-UART Bridge
- 4 Switches, 4 Buttons, 1 Reset Button, 4 LEDs, 4 RGB LEDs, 4 Pmod connectors, shield connector
What should you check before choosing a ULX3S board or project?
- FPGA capacity: Match the 12K, 25K, 45K, or 85K LUT variant to the project’s stated requirements.
- Memory and peripherals: Confirm the installed SDRAM configuration and required connections or components rather than assuming all boards are identical.
- Revision: Consult the manual for connector behavior and operating details specific to your board.
- Toolchain and documentation: Check the project’s setup instructions and whether its example is maintained.
- Project status: Treat community examples as possible implementations, not a promise of support or performance on every configuration.
The repository establishes multiple variants and a set of board features, but does not provide a current apples-to-apples comparison with competing FPGA boards. Availability and price are also not established by the project documentation.
Quick Recap
Best Value

- The best way to get started with FPGAs: Using a simple board with projects that build on eachother, now anyone can get started with FPGA development!
- Fun peripherals available: With 4 LEDs, 4 push-buttons, 7-segment display, USB connector, a VGA connector, and a PMOD (for expansion) you can have dozens of fun projects available to you out of the box!
- Works with Verilog and VHDL: No matter which programming language you want to get started with, the Go Board will work for you!
- No extra device required: Simply plug the Go Board into a USB port and go! Getting started with FPGAs has never been easier.
- Works with all operating systems: Windows, Mac, Linux
Rank #4
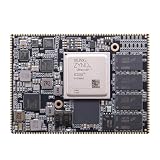
- Core board: M3EG
- FPGA Chip: XCZU3EG
- RAM: 4GB DDR4, 64bit
Product prices and availability are accurate as of the date/time indicated and are subject to change. Any price and availability information displayed on Amazon at the time of purchase will apply.

