
To send a vMix program to YouTube, enable live streaming for your channel, copy the stream URL and key from YouTube Studio, then enter them in vMix under Streaming Settings. For an always-on broadcast, the key is only the connection credential: your computer, vMix, media or production sources, power, and internet connection must also keep running. The steps below cover both YouTube’s integrated vMix destination and manual RTMP setup, along with settings and limits that matter for continuous operation.
Before you set up the stream key
- Your YouTube channel must be verified and have no live-streaming restrictions in the previous 90 days. First-time live-stream enablement can take up to 24 hours. YouTube Help: Get started with live streaming.
- Install and open vMix on the computer that will produce the stream. Available encoders and quality options can depend on the vMix installation and computer hardware.
- Decide whether you will create or schedule the YouTube stream in Studio, or use vMix’s integrated YouTube workflow. Keep access to YouTube Live Control Room so you can preview and monitor the incoming feed.
Get the YouTube server URL and stream key
- Open YouTube Studio and go to the Live Control Room.
- Create a stream or select the scheduled stream you intend to use.
- Open the Stream tab and copy the server URL and stream key shown for that stream. YouTube describes stream keys as “your YouTube stream’s password and address.” YouTube Help: Manage live stream settings.
- Keep the key private. Do not include it in screenshots, public guides, logs, or chat. If it is compromised, an owner or manager can reset it in YouTube; update vMix with the replacement key before streaming again.
Enter the key in vMix
Use the integrated YouTube Live destination
- In vMix, click the cog beside the Stream button to open Streaming Settings.
- Select YouTube Live as the destination and follow the displayed connection and channel-selection prompts.
- Choose whether to create a stream from vMix or select an existing scheduled event, as the available workflow permits. vMix documents both creating a stream and selecting a scheduled event through its YouTube Live Stream Now destination.
- Choose a suitable quality profile, then start the vMix stream. Check Live Control Room to confirm that the incoming preview appears and the stream is going to the intended event.
Use Custom RTMP Server
- Open Streaming Settings using the cog beside Stream.
- Choose Custom RTMP Server.
- Paste YouTube’s server URL into the URL field and the stream key into Stream Name or Key. Copy both values from the same YouTube stream.
- Select an encoding quality that suits the program and the upload capacity available at the streaming location.
- Start the vMix stream and verify the preview and stream health in YouTube Live Control Room.
The integrated route can reduce manual copying and can create a stream or select a scheduled one. Custom RTMP gives you direct control over the destination URL and key. vMix’s documentation says ending a stream through its YouTube Live Stream Now destination also ends the YouTube stream, so account for that when choosing how to manage a planned broadcast. See the vMix 29 Streaming guide and vMix instructions for streaming to YouTube Live.
Check the encoder settings YouTube recommends
YouTube’s current encoder guidance recommends RTMP or RTMPS transport, constant bitrate (CBR), and a two-second keyframe interval; do not exceed four seconds. It lists H.264, HEVC, and AV1 video, frame rates up to 60 fps, and AAC or MP3 audio. These are YouTube ingestion recommendations, not a guarantee that every codec or profile is available in every vMix installation or hardware configuration. YouTube recommends RTMPS for encrypted transport. Use the options supported by your setup and the destination workflow. YouTube Help: Choose live encoder settings, bitrates, and resolutions.
| H.264 output example | Minimum bitrate listed by YouTube | Recommended bitrate listed by YouTube |
|---|---|---|
| 720p at 30 fps | 3 Mbps | 8 Mbps |
| 1080p at 30 fps | 5 Mbps | 14 Mbps |
| 1080p at 60 fps | 6 Mbps | 17 Mbps |
These are YouTube’s H.264 recommendations; consult its encoder table for other resolutions, frame rates, and codecs. Select the row that matches your output, then leave enough upload capacity for a stable stream rather than setting bitrate at the full measured connection speed.
#1 Best Overall
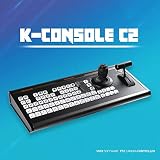
- Supports all vMix versions for broadcast live, youtube, twitch live streaming.
- The joystick for pan, tilt and zoom of PTZ camera, T-bar for video switcher.
- There are 69 piece of LED back light buttons for various vMix function like video switching, recording. Audio mixer for sound volume can be adjusted instantly during live streaming.
- Various connection ports for V-COM, USB, COM, PTZ and Tally. Supports 12-channel PGM and PVW switching preview.
- If you buy vMix console with vMix products, we will offer you vMix licsence keys.
What “always-on” requires in practice
A vMix stream is produced locally. Unless you have a separate managed system, the computer, vMix process, source media or live inputs, power, network equipment, and internet connection remain part of the broadcast chain. YouTube recommends allowing 20% upload bandwidth headroom and testing the stream, previewing it, monitoring stream health, and checking audio and video quality. A wired Ethernet connection may be useful where supported, but it does not guarantee continuity. YouTube Help: Troubleshoot your live stream and YouTube encoder settings.
- Test the actual resolution, frame rate, and bitrate you plan to use before leaving the channel unattended.
- Watch Live Control Room health indicators and verify that the intended watch page is accessible.
- Plan how an operator will restore the feed after a power, internet, computer, source, or vMix interruption. The cited guidance does not establish a vMix-specific unattended restart or failover guarantee.
- If you need a recording, keep a separate recording plan. YouTube says streams under 12 hours are automatically archived; its help does not promise a complete automatic archive for a continuous stream that exceeds 12 hours. YouTube Help: Create a live stream with an encoder.
Do not confuse a live vMix program with a prerecorded loop
vMix is the local production route when you want to assemble or produce a program on your computer. If your goal is instead to loop uploaded, prerecorded videos continuously, YouTube’s encoder list names Gyre as a cloud-based option for 24/7 prerecorded YouTube streams that does not need a dedicated PC or camera. That listing does not establish Gyre as a drop-in vMix production workflow or establish an uptime comparison. YouTube Help: encoder guidance and supported encoders.
Rank #2

- Designed for instant slow motion replay
- Supported natively by vMix 22 and newer
- Controls up to four cameras for instant replay
- Completely configurable - any key can be mapped to any vMix function and additional keys are easily added
- Heavy duty extruded aluminum, powder coated case
Or let it run in the cloud
If the channel should loop uploaded videos rather than carry a locally produced vMix program, StreamNeo keeps a YouTube channel live from the cloud: upload a recording or build a playlist, add your YouTube stream key, and go live. Your computer does not have to stay on at home. It streams your uploaded files as made, up to 4K 60fps, at one price per slot regardless of quality, and automatically recovers if YouTube drops the stream. The first day is free with no card; the monthly option is $9.99 per month. Start your free day with StreamNeo.
Quick Recap
Best Value

- T-bar Video Switcher controller for Live Streaming
- Instant setup with integrated software such as vMix with a built-in template for plug and play set-up
- Smooth action T-bar for transitions
- Heavy-duty extruded aluminum case with powder coated finish
- USB connection to computer
Rank #4

- DUAL ROW DESIGN: Features dedicated Program and Preview rows with 8 buttons each for efficient video switching and monitoring
- PROFESSIONAL CONTROLS: Equipped with 4 rotary knobs for precise adjustments and dedicated CUT and TAKE buttons for smooth transitions
- FUNCTION KEYS: Includes 4 customizable function keys (F1-F4) plus specialized REC, STR, LED, and FTB buttons for quick access
- COMPACT LAYOUT: Space-efficient design with clearly labeled buttons and intuitive control arrangement for streamlined operation
- STREAMING INTEGRATION: Purpose-built for vMix software with specialized controls for live production and streaming workflows
Rank #3
- Supports all vMix versions for broadcast live, youtube, twitch live streaming.
- The joystick for pan, tilt and zoom of PTZ camera, T-bar for video switcher.
- There are 69 piece of LED back light buttons for various vMix function like video switching, recording. Audio mixer for sound volume can be adjusted instantly during live streaming.
- Various connection ports for V-COM, USB, COM, PTZ and Tally. Supports 12-channel PGM and PVW switching preview.
- If you buy vMix console with vMix products, we will offer you vMix licsence keys.
Product prices and availability are accurate as of the date/time indicated and are subject to change. Any price and availability information displayed on Amazon at the time of purchase will apply.

