
Windows Errors? Fix Them Before They Spread
Repair common Windows errors and clear accumulated junk for a smoother, more stable PC - no reinstall needed.Free scan · no reinstallOutdated Drivers Are Slowing You Down
One free scan finds every outdated or missing driver and matches the right update for your exact hardware.Free scan · exact hardware matchThe Chain Production Add-on is a DIY system for a Prusa i3 printer that uses OctoPrint status monitoring, an Arduino, fans and stepper motors to cool and sweep a finished print off the bed. It is a documented build—not a verified off-the-shelf kit—and its published production figures come from the creator’s comments in 2020, not independent testing.
How the Chain Production Add-on works
The setup separates job monitoring from the physical removal mechanism. The printer is controlled through OctoPi, while an OctoPi script monitors OctoPrint’s status and communicates with an Arduino over USB serial. The Arduino controls the steppers and fans that perform the cooling and ejection sequence. Project repository
- OctoPrint reports that a print job has finished.
- The OctoPi script sends a command to the Arduino over USB serial.
- Fans cool the finished part before removal.
- A motorized arm swings up and behind the bed, then moves forward to scoop the part off.
The motion sequence is described in Hackaday’s account of Damien Weber’s Prusa i3 MK3/S build. That description explains the mechanism; it is not an independent reliability or safety assessment. Hackaday’s build description
What the documented build requires
This is a mechanical and electronic add-on, not just an OctoPrint plugin. The repository assembly bill of materials specifies:
Do these 3 things before closing this tab:
1Repair Windows errors before they cause bigger problems2Scan for outdated or missing drivers - takes under a minute3Clear out junk files and repair common Windows errors#1 Best Overall

- [REWARDING DIY EXPERIENCE] Master your 3D printer by building it yourself with our detailed step-by-step photographic guide. This kit includes 1:1 scale hardware templates for easy part identification and features a completely solder-free assembly. Gain deep technical knowledge of your machine while transforming from a hobbyist into a true expert. While build times vary by experience, most users complete the assembly in 15–20 hours.
- [PRO-GRADE SPEED & QUALITY] Elevate your workshop with this high-speed CoreXY professional 3d printer. The all-steel exoskeleton frame ensures maximum stability for lightning-fast printing without sacrificing detail. Get consistent, industrial results for every project.
- [SMART PLUS UPDATES] The CORE One+ features a redesigned easy-flex loading system and bayonet spool holder. Enjoy a smoother, autonomous experience with the latest firmware updates and access to over one million models on Printables.com. Print your first model in minutes thanks to intuitive software and one-click printing.
- [ADVANCED THERMAL CONTROL] Perfect 3d printer for hobby and pros. The enclosed chamber reaches 55°C with active control. The automatic top vent regulates airflow for Carbon Fiber, Nylon, ASA, and PC-Blend while keeping PLA and PETG prints crisp and beautiful.
- [SECURE OFFLINE OPERATION] Protect your intellectual property with a 100% offline-capable system. Features a removable Wi-Fi module and local processing. Ideal for schools and businesses—your designs stay on your machine, not in the cloud.
- Two NEMA 17 stepper motors and two TMC2130 SPI StepStick drivers.
- Two 350 mm 2040 V-slot aluminum profiles, one 300 mm 2020 V-slot profile, and two mini V-slot gantries.
- Angle brackets, GT2 idler and motor pulleys, and two 1 m GT2 belts.
- Two 120 mm, 12 V fans.
- Two Arduino Pro Micro clones, plus the specified screws and nuts.
- A custom ejector PCB, which the repository says can be ordered through JLCPCB or a similar service.
The repository estimates “approx $100” for most assembly parts. That is an undated project estimate, not a current quote or a complete landed cost; it does not establish current stock or prices. Check the documented specifications and compatibility before sourcing components. Repository assembly bill of materials
What performance has—and has not—been reported
In a July 20, 2020 Hackaday discussion, creator Damien Weber said the system was designed for batch production of an IoT-device case at WeMaintain. He reported that the team could print 100 cases per week using two printers, and that cooling took 15 minutes to bring a part to about 25–30°C. These are historical creator statements, not independently verified results or a guarantee for another printer, part or environment. Weber’s Hackaday comment
Rank #2

- [MULTI-MATERIAL DUAL TOOL SYSTEM] Enables seamless switching between materials for complex prints, functional prototypes, and soluble support structures.
- [LARGE-SCALE PROFESSIONAL OUTPUT] Built for engineering teams, studios, and advanced makers requiring reliable industrial-grade performance at scale. Build Volume of 14.17×14.17×14.17 in.
- [SEGMENTED HEATED BED SYSTEM] Intelligent heating zones improve energy efficiency and reduce warping on large prints for reliable first-layer adhesion across the entire platform.
- [REDUCED MATERIAL WASTE WORKFLOW] Intelligent tool switching minimizes purge waste while maintaining high-quality transitions between materia
- [COREXY PRECISION & SPEED] Stable CoreXY motion system ensures accurate, fast printing even during complex multi-material operations.
In a separate comment, Weber said the full cooling-and-ejection routine took about 20 minutes during testing. He described the single-object demonstration as a repetition test and said the approach made more sense for longer prints. The 20-minute figure is therefore a creator-reported test cycle, not a general cycle-time specification. Weber’s cycle-time comment
Independent reader supportYour contribution helps us test, update, and keep practical guides available for everyone.What to check before building
The available project documentation describes a Prusa i3-oriented add-on, and Hackaday’s report covers an MK3/S implementation. It does not establish broad compatibility with other printer models or bed surfaces, nor does it document long-term reliability or formal safety testing. Before building, verify the assembly dimensions, electrical requirements, firmware and OctoPrint control flow against the repository instructions and your exact printer setup.
Quick Recap
Best Value
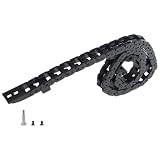
- 1. Drag Chain Cable Carrier: a necessary upgraded part for your K1 Max CNC Machine, special design, so will not for other printing project like SV07 SV06 SV08 Ender 3 V3 5 Plus Neptune4 3 LK5 Tin2S MegaS Kobra2 KobraMax Vyperr Qidi 5M Pro Voron2.4
- 2. Durable and accurate, worked great to manage wires on a K1 or K1 Max 3d printer moving part
- 3. Drag Chain Cable is robust, great access to add wire, avoid any sag, no more run-ins with the cables
- 4. Upgrading design, add extra print model, easy to fix the ptfe tubing
- 5.What will you get? 1 pcs cable chain with fixing screws, if you need other k1 max spare clone replacement part, like hot end extruder stepper motor heat sink - 6015 4010 4020 fan cooling - silicone cleaning nozzle tool - print bed - heatbed mounted bottom - LCD FPC Cable - timing belt 2gt - controller thermistor, please welcome
Rank #4

- A necessary backup for DIY or fixing your printing project once the stock one breaks. Special design, so will not for other FDM machine like K1 Max Ender 3 E3 5 pro plus SV08 SV07 SV06 5M Pro MK4 MK3S+ A1 Mini X1C P1P P1S.
- Easy to install: you need to repair the wrench by yourself. Use a hex wrench to remove the three screws on the old chain cover and take out the drag chain cover; Remove the protective cover of the nozzle board; Pull out the nozzle cable; Use a straight screwdriver to pry open the it; Pull out a small section of the nozzle line to make room for operation; Use a hex wrench to remove the three screws of chain; Separate the nozzle line from the it; Install a new one with the screw but please note hole facing backwards.
Rank #3

- The XL Enclosure is designed for seamless integration with the rest of the printer.
- Original Prusa XL Enclosure makes printing from certain materials easier, and at the same time, it adds a lot of other benefits.
- Everything is included in the package including plastic parts, you don’t need to print anything on your own.
- The Original Prusa Enclosure is shipped disassembled as a kit. Prusa Research offers lifetime technical assistance and 24 hours professional customer service.
- Confirm that the frame and moving arm can be mounted and travel without colliding with the printer.
- Check the specified fans, drivers, motors, controller boards and PCB against the build documentation.
- Account for cooling and ejection time when deciding whether this fits your batch workflow.
- Test the motion and removal behavior cautiously with your printer and build surface; performance on one setup does not establish compatibility with another.
Product prices and availability are accurate as of the date/time indicated and are subject to change. Any price and availability information displayed on Amazon at the time of purchase will apply.

