
Windows Errors? Fix Them Before They Spread
Repair common Windows errors and clear accumulated junk for a smoother, more stable PC - no reinstall needed.Free scan · no reinstallOutdated Drivers Are Slowing You Down
One free scan finds every outdated or missing driver and matches the right update for your exact hardware.Free scan · exact hardware matchThe Asus V6800V is a legacy Pentium M notebook, so identify the exact machine before ordering parts or following a teardown. Read the model label on the underside next to the barcode. Do not confuse this notebook with ASUS V6600/V6800 graphics cards, which belong to a different product family.
How to identify an Asus V6800V
On the underside, look beside the barcode for the model number. The iFixit repair page describes the chassis as gunmetal gray with silver accents and uses “V6800V” for the notebook model. Regional versions, previous repairs and refurbished systems can differ, so the label and the parts actually installed in your computer take priority over any reference specification.
Reference configuration
The following is the configuration documented by iFixit, not a guarantee that every V6800V is identical.
| Component | Documented configuration |
|---|---|
| Processor | Intel Pentium M 750 at 1.86 GHz |
| Display | 15.1-inch, 1400 × 1050 SXGA |
| Memory | 512 MB DDR2-400 RAM listed; 2 GB maximum stated |
| Storage | 60 GB, 5400 RPM hard drive |
| Optical drive | DVD±RW |
| Graphics | ATI X600 with 64 MB |
| Operating system | Windows XP Professional SP2 |
| Ports | USB 2.0, PCMCIA, FireWire, Ethernet, VGA, infrared and audio |
Repair work documented for the V6800V
iFixit provides replacement-guide categories for the battery, CD/DVD drive, display, fan, hard drive, keyboard, lower case, RAM, speakers and wireless card. A repair normally requires only the tools specified for that guide; the page lists Phillips #00 and #0 screwdrivers, an opening tool and a spudger as common possibilities and warns that every tool is not needed for every procedure.
#1 Best Overall
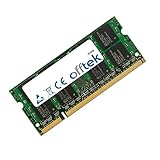
- Boost Your System’s Performance: Increase available memory for smoother multitasking, improved responsiveness and better performance when running memory-intensive applications.
- Matched Specifically to Your Machine: OFFTEK selects the correct memory configuration for the computer shown in this listing, removing the uncertainty from choosing a compatible upgrade.
- We Do the Technical Checking for You: There is no need to compare memory speeds, voltages, form factors or other technical details, as the upgrade has been matched to the machine’s supported requirements.
- Extend the Life of Your Computer: Increasing the available memory can help your existing machine remain productive for longer, offering a cost-effective alternative to replacing the complete system.
- Quick and Straightforward Upgrade: Memory is normally simple to install and requires no software installation; shut down and disconnect the machine before fitting and follow the manufacturer’s instructions.
Before opening the notebook
- Shut down the computer, disconnect the AC adapter and remove the battery if it can be removed safely.
- Work on a clean, static-safe surface and keep screws grouped by location.
- Photograph cable routing and connector orientation before disconnecting anything.
- Read the component-specific guide first; screw lengths and disassembly order can vary.
Battery, fan, display and keyboard
These assemblies have dedicated guide categories, but a battery that physically fits is not automatically electrically compatible. Match the pack’s voltage, connector, shape and part number. For display, fan or keyboard work, verify the connector and mounting arrangement against the installed part before purchase. Avoid forcing old plastic clips or ribbon-cable locks, which can break after years of aging.
RAM upgrade: what is documented
The underside has a middle access panel. iFixit specifies 200-pin SODIMM memory rated at 400 MHz or higher and states a 2 GB maximum. Confirm the installed module and the system’s current memory before buying: an individual machine may have been upgraded, may contain a different module, or may have a fault unrelated to capacity.
- Turn the notebook off, unplug it and remove the battery.
- Remove the screws securing the middle underside panel with the appropriate Phillips driver.
- Discharge static, release the module’s side clips and remove the existing SODIMM at an angle.
- Install a compatible 200-pin SODIMM, align the notch and press it down until both clips lock.
- Replace the panel, reinstall the battery and check the detected memory in the BIOS or operating system.
Do not assume that a larger module will work merely because it is physically similar; stay within the documented 2 GB maximum and verify the memory standard and module condition.
Rank #2

- Power4Laptops Branded Car Charger
- Input Voltage: 12V DC
- Output Voltage: 18.5V
- Output Amperage: 2.7A
- Plug Size: 4.8mm X 1.7mm
Storage replacement: 2.5-inch ATA, not a modern SATA assumption
The documented drive hatch is below the keyboard, and iFixit recommends a 2.5-inch ATA hard drive. “2.5-inch” describes the size only; the interface is critical. Inspect the existing drive or its connector and verify the replacement’s interface, thickness, mounting rails and caddy before ordering. Current listings frequently use SATA, which is not interchangeable with the documented ATA interface without hardware specifically designed for the conversion.
- Back up files and create installation or recovery media before removing the old drive.
- Power down, disconnect AC and remove the battery.
- Open the drive hatch below the keyboard and note the caddy, screws and connector orientation.
- Transfer the caddy or mounting hardware to a compatible 2.5-inch ATA replacement.
- Reassemble, enter the BIOS to confirm detection, then reinstall or restore the operating system.
A replacement drive does not by itself solve a failing controller, damaged connector or corrupted software installation. If the BIOS does not detect a known-good compatible drive, inspect the connector and caddy before repeatedly reinstalling software.
Using ASUS support information
ASUS’s V6V support entry exposes categories for drivers and tools, FAQs, manuals and documents, warranty and service. The available result does not prove that every V6V document applies to every V6800V configuration. Start with the underside model label, select the matching support entry and verify the exact machine designation before using a download or service document. Windows XP-era drivers may also be unsuitable for a different operating system or a modified unit.
Rank #3
- Boost Your System’s Performance: Increase available memory for smoother multitasking, improved responsiveness and better performance when running memory-intensive applications.
- Matched Specifically to Your Machine: OFFTEK selects the correct memory configuration for the computer shown in this listing, removing the uncertainty from choosing a compatible upgrade.
- We Do the Technical Checking for You: There is no need to compare memory speeds, voltages, form factors or other technical details, as the upgrade has been matched to the machine’s supported requirements.
- Extend the Life of Your Computer: Increasing the available memory can help your existing machine remain productive for longer, offering a cost-effective alternative to replacing the complete system.
- Quick and Straightforward Upgrade: Memory is normally simple to install and requires no software installation; shut down and disconnect the machine before fitting and follow the manufacturer’s instructions.
Compatibility checklist for parts
- Exact model printed on the underside, including regional or submodel markings.
- Interface: documented 2.5-inch ATA storage and 200-pin DDR2 SODIMM memory.
- Physical dimensions, connector position, mounting hardware and cable layout.
- Electrical ratings for batteries, adapters and fans.
- Part number and photographs compared with the part removed from your notebook.
- Seller return policy and the possibility that the used component is untested or worn.
Common failure decisions
The computer powers on but shows no image
Connect an external display if available and check whether the machine completes its startup sequence. If external video works, investigate the panel, cable or backlight; if there is no startup activity, begin with power, memory seating and board-level diagnosis rather than ordering a screen immediately.
It cannot find the replacement drive
Recheck that the drive is ATA rather than SATA, confirm the caddy and connector are fully seated, and look for BIOS detection. A drive that is the wrong interface can fit the bay while remaining unusable.
Quick wins for a faster PC:
Clear out junk files and repair common Windows errorsFree Scan →Scan for outdated or missing drivers - takes under a minuteDriver Scan →The memory upgrade is not recognized
Power off, reseat the SODIMM and test one module at a time. Confirm that the module is a 200-pin DDR2 part within the documented 2 GB system limit. If the original module also fails, the socket or motherboard may be the problem.
Rank #4

- Stunning 16-inch WUXGA Display Indulge in stunning visuals in breathtaking 1920 x 1200 resolution (16:10) and a 300-nit sustained brightness with brilliant life-like colors and an ultrasmooth 144Hz refresh rate for gaming and video editing
- Ultrafast Intel Core 7 Processor 240H Processor Built with performance hybrid architecture for real-world multitasking, stunning graphics, and more reliable connectivity, powered by 10 cores and 16 threads. Computing you can count on while instilling confidence that your laptop will keep up with you, no matter what you’re doing or where you’re going
- Powerful NVIDIA GeForce RTX 5060 GPU with 8GB of GDDR7 With powerful discrete graphics, climb your way to victory or fully enjoy a cozy game with vividly smooth gaming and tackle anything from 8K video processing to AI-accelerated photo editing
- Multitask Effortlessly with 32GB of Fast Memory and 1TB of Supersized Storage Experience lightning-fast performance and speedy multitasking, whether you're gaming, editing, or browsing. Save files quickly and store vast amounts of data. With extensive storage and advanced communication power, PCIe 4.0 SSDs excel in major gaming applications, multiple servers, daily backups, and more
- WiFi 6 and Bluetooth 5.3 Quickly connect all of your devices, anywhere and anytime
What to expect from a restored V6800V
This is an early-2000s platform with a Pentium M processor, a small parallel-ATA hard-drive interface and legacy ports. It can be worthwhile for preservation, vintage software or repair practice, but modern operating systems, browsers and batteries may require compromises. Evaluate the actual unit’s condition—especially display, hinges, cooling, storage health and battery safety—before investing in parts.
Independent reader supportYour contribution helps us test, update, and keep practical guides available for everyone.Frequently Asked Questions
Where is the V6800V model number located?
The model number is printed on the underside next to the barcode. Use that label to distinguish the notebook from similarly numbered ASUS graphics cards and to select the correct support information.
What RAM can an Asus V6800V use?
The documented specification is 200-pin SODIMM DDR2 rated at 400 MHz or higher, with a stated system maximum of 2 GB. Verify the module installed in your individual machine before purchase.
What’s actually slowing this PC down?
Pick the symptom - the matching free tool is one click away.
Best Value
- Boost Your System’s Performance: Increase available memory for smoother multitasking, improved responsiveness and better performance when running memory-intensive applications.
- Matched Specifically to Your Machine: OFFTEK selects the correct memory configuration for the computer shown in this listing, removing the uncertainty from choosing a compatible upgrade.
- We Do the Technical Checking for You: There is no need to compare memory speeds, voltages, form factors or other technical details, as the upgrade has been matched to the machine’s supported requirements.
- Extend the Life of Your Computer: Increasing the available memory can help your existing machine remain productive for longer, offering a cost-effective alternative to replacing the complete system.
- Quick and Straightforward Upgrade: Memory is normally simple to install and requires no software installation; shut down and disconnect the machine before fitting and follow the manufacturer’s instructions.
Can I install a SATA SSD in the V6800V?
The documented upgrade is a 2.5-inch ATA drive. A SATA drive is not automatically compatible; verify the interface and any conversion hardware before buying.
The Bottom Line
Identify the underside label first, then match every replacement to the installed part. The documented upgrade path is 200-pin DDR2 SODIMM memory up to 2 GB and a 2.5-inch ATA drive, but an individual refurbished or modified V6800V may differ.
Quick Recap
Product prices and availability are accurate as of the date/time indicated and are subject to change. Any price and availability information displayed on Amazon at the time of purchase will apply.

