
Quick wins for a faster PC:
Scan for outdated or missing drivers - takes under a minuteDriver Scan →Clear out junk files and repair common Windows errorsFree Scan →To build a Planck, choose a compatible Planck board or kit, a plate, switches, and keycaps, then configure the firmware for the board’s exact revision. Planck describes a compact ortholinear layout: QMK documents it as a 40% keyboard with a 12-by-4 grid. A useful example is Drop’s Planck V7, but its plate, switches, and keycaps are separate from the disassembled kit.
What makes a keyboard a Planck?
Planck is a small ortholinear keyboard design: its keys sit in straight rows and columns rather than the staggered arrangement common on conventional keyboards. QMK documents the Planck as a 40% layout with a 12-by-4 grid. The name covers multiple PCB revisions as well as variants such as Planck Light and Planck EZ, so hardware details can differ by model.
Drop lists its Planck V7 as a 48-key keyboard with USB-C and a choice of aluminum or polycarbonate case. Those specifications describe the V7 listing, not every Planck. QMK’s Planck documentation covers revision-specific firmware targets; Drop’s V7 listing describes that kit’s parts and options.
What parts do you need to buy?
If you are asking, “What do I need to buy to make this keyboard?”, start by separating the board kit from the parts it leaves out. The Planck build-help discussion reflects that practical question; the checklist below uses Drop’s V7 as a concrete example.
#1 Best Overall
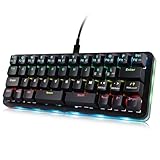
- 🟩【40 Percent Mechanical keyboard】: The latest 40% mini keyboard compared with the popular 60% keys, 87% keys and 104 keys in the market, this 42-key keyboard is more miniature and compact, saving desktop space and making it easy to carry. It's designed for gamer, office worker, copywriter, programmer, video lover, typing teacher and editors.】The latest 40% mini keyboard
- 🟩【Full Programmable Macro Keyboard】: Programmable key functions include conventional 104 buttons, Web navigation buttons, multimedia shortcut keys, keyboard lock, Windows lock, etc. Each button can be set to any of these buttons. You can connect a keyboard (plug and play) and multiple keyboards to the same computer at the same time and they won't interfere with each other.
- 🟩【Macro Keys for PC】: There are 16 advanced macro function buttons. The macro function can be used in series, it can support up to 349 key commands, and delay commands can be added to meet various complex usage situations, such as: Office, CAD/Ae/Pr/Ps shortcuts, various user accounts and passwords, game skills , the basic code for programmers. For example, a settings button triggers a chain of actions like "Ctrl + A 0.5s Ctrl + C 0.5s Ctrl + V".
- 🟩【Wide Applications】This one handed keyboard is a huge time saver, you can do programming for a living, for office works, for play gaming, for music, media, industrial control, laboratory, production line testing and other fields. It is easy and quick way to control scenes without needing to move a mouse around. You can use a lot of keyboard shortcuts all day, and you can program each key to be 1 key or a macro of key combinations
- 🟩【RGB Backlight Mechanical Keyboard】RGB backlight with multiple effects can be customized to the player's desired color. The backlight brightness can be adjusted/turned off. Dynamic effects can be summarized into 8, each dynamic light effect can be adjusted to 3 different speeds; In addition, you can adjust 30 levels of brightness, 32 levels of saturation, and 32 different colors (including 32 static monochrome and 32 static color) in the light effect
| Part | What to check | V7 details |
|---|---|---|
| Board or kit | Choose a Planck model and confirm its PCB revision, case, and included components. | Drop says the disassembled kit includes the PCBA, case, assembly hardware, and a USB-A-to-USB-C cable. Check the selected configuration because product options can change. |
| Switch plate | Match the plate to the PCB and intended bottom-row layout; older-generation plates should not be assumed compatible. | Drop describes an MX plate in heavy steel or lighter POM, supporting 1×2u, 2×2u, and grid bottom rows. |
| Switches | Choose by preferred feel, sound, and operating force, and confirm the installation method for the selected configuration. | Drop says north-facing configuration is hot-swappable; south-facing switch installation requires soldering. |
| Keycaps | Verify the set’s key count, profile, and support for your chosen bottom row. A set described as full-size may not have the arrangement you need. | Ortholinear keycaps are sold separately in Drop’s listing. |
Drop puts the kit’s exclusions plainly: “Note: This kit comes disassembled and does not include a switch plate, keycaps, or switches.” Read the listing for the configuration you select before ordering; do not treat the kit price or contents as covering those separate components.
How to choose a plate, switches, and keycaps
Match the plate to your bottom row
Decide whether you want a 1×2u, 2×2u, or grid bottom row before buying a plate or keycaps. The V7 plate options listed by Drop support those arrangements, but compatibility is specific to the V7; confirm the plate fits the board you selected.
Rank #2

- Model Compatibility: Fits JJ40 and BM40 custom mechanical keyboards requiring a forty percent layout plate.
- Material Composition: Constructed from carbon fiber to match the equipment specifications for this edition.
- Switch Support: Designed specifically to support MX edition switches within the designated keyboard chassis.
- Functional Purpose: Serves as a direct replacement plate to restore standard structural support function.
- Layout Specification: Matches the forty percent form factor required for compatible JJ40 and BM40 builds.
Steel is the heavier plate option and POM is the lighter one in Drop’s description. The listing does not establish that one is universally better. Treat material as a preference, and prioritize compatibility with your PCB and layout.
Pick switches with soldering in mind
Your V7 configuration affects installation: Drop describes north-facing as hot-swappable and south-facing as requiring soldering. Choose switches for the feel, sound, and force you prefer, and check that the selected plate and PCB orientation support the installation you expect. A switch puller is optional for a hot-swappable build.
Rank #3

- Ultra-Compact Mechanical Keyboard: The Keychron Q9 is a 40% ultra-compact, 52-Key premium all-metal keyboard designed to elevate your typing experience. With a full CNC-machined aluminum body, double-gasket structure, and QMK/Launcher support, it’s the ultimate ultra-compact solution.
- High-Speed Wired Performance: Enjoy a stable, lag-free experience with the Q9’s detachable Type-C cable and an impressive 1000 Hz polling rate, ensuring ultra-fast response times for smooth typing and gaming performance.
- Fully Programmable: With QMK/Launcher support, you can customize each key on every layer, remap keys, create macros and shortcuts, and fully personalize your keyboard via the Keychron Launcher web app. Designed for both Mac and Windows, the Q9 includes a system toggle, extra keycaps for each OS layout, and two separate profiles for seamless multi-device use.
- Tactile Gateron G Pro Switches: Equipped with Gateron G Pro Brown switches for reduced wobble and a smoother feel, the Q9 delivers a gentle tactile response. Pre-lubed for consistency, they’re ideal for both office work and gaming enthusiasts.
- Non-Shine-Through PBT Keycaps & Vibrant RGB: Featuring durable double-shot PBT keycaps for excellent oil resistance and long-lasting legends, the Q9’s south-facing RGB LEDs provide a brighter, more natural backlight glow for an enhanced typing experience.
Check the keycap set, not just its name
Count the keys and inspect the sizes and arrangement the set supports, especially along the bottom row. Confirm the profile as well, since that affects how the caps feel across the board. “Ortholinear” in a product name is not a substitute for checking its actual layout support.
Independent reader supportYour contribution helps us test, update, and keep practical guides available for everyone.How to assemble and configure the keyboard
The V7 is sold disassembled. Follow the instructions supplied for your exact kit and components; the available product information establishes the kit contents but does not provide a complete official, step-by-step assembly manual. In broad terms, a build involves mounting the plate and switches to the PCB, fitting the assembly into the case, and adding keycaps. Use the kit’s own instructions for the precise order and handling details.
Rank #4

- Package Included: 1x 40% Keyboard Acrylic Keyboard Dust Cover
- The acylic cover has films in the surface,when you use it please split the films
- This cover is only to cover the keycap part as the image show.If you want to cover all the keyboard,you need to choose bigger cover
- The size of the cover is around 235 x83 x18mm.The 40% keyboard which is close to this size all is able to use
- There are foot pads inside the dust cover, which you can attach according to your choice.
- Identify the PCB revision. Check the board or its documentation rather than assuming every Planck uses the same hardware.
- Find the matching QMK target. Use the build target documented for that revision in QMK’s Planck guide.
- Follow that revision’s bootloader and flashing directions. QMK’s examples vary by revision; do not apply one revision’s process to another without confirmation.
- Plan the keymap and layers. Decide which functions need to be available on the main layer and which can live on layers before settling on a layout you will use daily.
Why the keymap matters on a 40% board
A 12-by-4 grid has fewer physical keys than a conventional keyboard, so layer choices are central to making the layout workable. Before finishing your keymap, decide where you will access numbers, navigation, punctuation, and other frequently used functions. The right arrangement depends on your own habits; the available specifications do not establish that a Planck makes typing faster or prevents strain.
Compare the full build rather than the kit’s headline price alone: the kit, compatible plate, switches, and suitable keycaps are distinct parts of the V7 path, and availability and selected options may change. Verify each component and the PCB revision before ordering or flashing.
Quick Recap
Product prices and availability are accurate as of the date/time indicated and are subject to change. Any price and availability information displayed on Amazon at the time of purchase will apply.

