
The Tool Desk
Outbyte Driver Updater FREEScan for outdated or missing drivers - takes under a minuteDriver Scan →Outbyte PC Repair FREEClear out junk files and repair common Windows errorsFree Scan →The reliable way to show Twitch chat to viewers is to add it to the OBS scene as a Browser Source. A Twitch chat dock or a separate pop-out window is only visible to you; it is not included in the encoded stream.
This guide covers the quickest Twitch pop-out method and the more polished third-party chatbox method. The instructions use the current OBS 32.2 interface, where adding a source opens a dialog instead of the older source dropdown.
Before you start
Use a scene that is already used for your broadcast, such as your gameplay or starting-soon scene. Chat is attached to a scene, so adding it to one scene does not automatically add it to every other scene.
OBS Studio 32.2.1 supports Windows 10 and 11, macOS 13 or newer, and Linux through supported distribution packages such as Flathub. macOS 12 users need OBS Studio 32.1.2 because macOS 12 is not supported by the 32.2.x releases.
Do these 3 things before closing this tab:
1Fix the driver behind crashes, sound loss and screen glitches2Repair Windows errors before they cause bigger problems3Scan for outdated or missing drivers - takes under a minute#1 Best Overall

- Adjustable Height & Solid: The height of the microphone stand with boom arm is adjustable from 28.1 inches to 89.8 inches by adjusting the knobs, perfect for people in all age groups. It features upgraded supporting structures for better load-bearing capacity, holding your microphone in position.
- Steady Tripod Stand: The high-quality thickened steel poles enhance the exceptional stability and durability of this mic stand. Compared to other lighter stands that are easy to tip over, our mic tripod stand is as heavy as 4.0lbs, serving indoor and outdoor use.
- Flexible & Detachable Boom Arm: The boom arm of the stand is adjustable from 16 inches to 30 inches in length and it can rotate 360° horizontally as well as up to 180° vertically. You can choose the best angle and length of performance by easily adjusting the knobs on the boom arm. Remove the boom arm and attach the mic clip, then you can also use it as a straight mic stand.
- Portable Carrying Bag: The package comes with a premium carrying bag and the floor mic tripod stand is easy to disassemble into several pieces which allows it to easily pack into the small carrying bag (19.5”×8.3” ) and fit anywhere, easy to transport and store.
- Wide Compatibility: Two different styles of mic clips in package are compatible with most types of microphones such as Shure SM58, Shure SM48, Shure PGA48, Samson Q2U, ATR2100x-USB, etc. The included metal 3/8” to 5/8” screw adapter is suitable for Blue Yeti, Snowball, Hyper X QuadCast, SoloCast, Shure SM7B, AT2020, Fifine AM8 and more.
Method 1: Add Twitch’s pop-out chat
This is the fastest option and does not require an overlay provider. It uses Twitch’s own chat webpage inside OBS.
- Open Twitch and go to your channel page.
- Open the chat panel’s three-dot menu.
- Select Pop Out Chat. Twitch opens the chat in a separate browser window.
- Copy the complete address from that pop-out window. Copying Twitch’s generated URL is safer than typing the channel name manually. It normally resembles:
https://www.twitch.tv/popout/yourchannel/chatSome Twitch URLs include a trailing query string, such as ?popout=. Leave the address exactly as Twitch generated it.
- Open OBS and select the scene where viewers should see the chat.
- In the Sources dock, click +.
- In the Add Sources dialog, select Browser.
- Choose Create New, enter a name such as
Twitch Chat, and click OK. - Paste the Twitch pop-out address into the URL field.
- Set the Browser Source dimensions. For a vertical chat panel, a starting point might be Width: 400 and Height: 800. These values are the webpage’s source size, not your stream resolution.
- Click OK.
The chat should now appear in the OBS preview. Drag it to the desired location and resize it using the red bounding-box handles.
Position and size the chat precisely
For exact placement, select the chat source and choose Edit → Transform → Edit Transform…. The shortcut is Ctrl-E on Windows and Linux, or Cmd-E on macOS.
Rank #2

- Stable Tripod Base: CAHAYA tripod microphone stand has legs that extend wider than most, keeping your microphone securely in place. Hollow bottom supports prevent bending and help distribute weight, reducing vibration. Non-slip foot pads keep the stand in place.
- Carrying Bag & Universal Mic Clips: The mic stand floor comes with carrying bag and 2 mic clips: barrel style & clothespin style, compatible with most types of microphones like Shure SM58, Shure SM48, Shure PGA48, Samson Q2U, HyperX QuadCast, etc.
- Stand Height Adjustable: Microphone stand height can be adjusted from 25.2” to 62.2”, perfect floor use mic stand for outdoor use like stage performance, speeches, meeting rooms, party, wedding, karaoke sing or live broadcasts etc.
- Extendable & Removable Boom Arm: Boom arm extends freely within 16.9”-30.1” and 360° angle rotatable through adjustment knobs which allows for easy positioning. Simply remove the boom arm and attach microphone clip to convert the mic stand into a traditional straight mic stand.
- Portable and Quick to Assemble: All parts could be stored in a provided carrying bag for convenient transport. Assemble or disassemble in just 2 minutes for quick, effortless use.
Use the transform properties to set the chat’s position and size instead of estimating with the mouse. Keep the chat inside the canvas and make it large enough to read at the stream’s actual output resolution.
| Task | OBS control |
|---|---|
| Move the chat | Drag the source in the preview, or edit its position |
| Resize the chat | Drag a corner handle, or edit its transform dimensions |
| Crop unwanted edges | Hold Alt while dragging handles on Windows/Linux; hold Option on macOS |
| Show it above gameplay | Move the chat higher in the Sources list |
| Hide it temporarily | Click the eye icon beside the source |
Sources higher in the Sources list render above sources lower in the list. If gameplay covers the chat, move Twitch Chat above the gameplay source. When cropping, OBS shows the cropped edges in green.
Method 2: Use a designed chatbox overlay
The Twitch pop-out is a webpage, not a purpose-built transparent overlay. Depending on the page and its styling, it may include a dark background, Twitch interface elements, or formatting that does not match your scene.
For transparent backgrounds, custom fonts, themed layouts, animations, and better message filtering, create a chatbox with a provider such as StreamElements or Streamlabs:
Rank #3
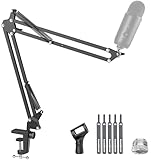
- Free Position Mic Arm: This professional microphone stand is fully adjustable in all parts with 360° base rotation for 135° back and forth extension, 180° arm shaft for up-and-down movement, and 270° metal adapter to freely position microphones. It can be easily folded and pushed away for space-saving storage when it stands idle and pull it back for usage.
- Prolonged Lifetime: Unlike other microphone stands that have a knob on the arm shaft getting in the way and causing spring deformation. InnoGear upgraded mic stand has this problem perfectly resolved with a unique design to prolong the life span of the springs and the stand itself.
- Solid & Heavy-duty: High-quality steel material with super-strong springs and extra positioning hole ensures an excellent load-bearing capacity of 3.3lb/1.5kg, compared to others of 2.2lb/1.0kg. InnoGear boom stand provides effortless and silent microphone positioning, which is vital in live recording situations.
- Desk Edge Compatibility: The desk clamp is specifically designed to securely grip squared edges up to 2 inches in thickness; please ensure your desk edge is flat and not slanted or curved for optimal functionality.
- Microphone Compatibility: This microphone arm stand allows diversity and compatibility, for it comes with a standard microphone clip to fit for dynamic microphones like Shure SM58, Samson Q2U, Shure PGA48 and more, and a 5/8" to 3/8" adapter for HyperX SoloCast 2, HyperX QuadCast 2 S, Razer Seiren V3 Mini, HyperX QuadCast 2, Blue Yeti, Blue Snowball, Blue Snowball iCE, Hyper X QuadCast, SoloCast, Shure SM7B, MV7, Fifine AmpliGame, Fifine K669B (Shock mount not included), Fifine AM8, etc.
- Sign in to the overlay provider with your Twitch account.
- Create or edit a chatbox widget.
- Choose the appearance, message behavior, font, colors, and background settings.
- Copy the provider’s generated overlay URL.
- In OBS, select the target scene and click Sources → + → Browser.
- Paste the provider URL into the Browser Source’s URL field.
- Set the Browser Source width and height to match the intended chat area, then position it in the preview.
Use the provider’s URL for this method, not the Twitch pop-out URL. The provider page supplies the custom styling and transparency.
Why a Twitch chat dock does not work as an overlay
OBS can display Twitch chat in a dock or in a separate window for the broadcaster. That chat is part of the OBS interface, not part of the scene. It is therefore absent from the stream recording and from what viewers receive.
To make chat viewer-visible, it must exist as a Browser Source inside the scene. A simple test is to record a short local clip with OBS. If chat is only in a dock, it will not appear in that recording.
Troubleshooting Twitch chat in OBS
Chat appears in Twitch but not in the stream
Check that you added the chat through Sources → + → Browser. A Twitch dock, a browser window, or a pop-out window by itself is not encoded into the scene. Also confirm that the Browser Source is in the scene currently selected for streaming.
What’s actually slowing this PC down?
Pick the symptom - the matching free tool is one click away.
Rank #4

- Adjustable microphone stand designed to hold a microphone securely in place (microphone clip sold separately) at the height you choose
- Long boom arm with molded plastic counterweight; adjust to standing height for singing or speaking or seated height for playing an instrument
- Versatile design folds flat for use as straight mic stand; max height 85.75 inches; base width 21 inches
- Sturdy steel construction; ultra-light for easy transport
- Compatible with 3/8-inch to 5/8-inch adapter; clip-on cable holder keeps cords out of the way
The Browser Source is blank or stuck
- Open the Browser Source properties and check the URL.
- Confirm that the channel login name is correct. A display name can differ from the channel’s login name.
- Make sure the computer has working network access.
- Use the Browser Source’s Refresh function after changing Twitch login or session state.
- If you typed the address manually, repeat the Twitch Pop Out Chat process and copy the generated URL.
Because a Browser Source loads a remote webpage, a network problem, invalid address, or changed login session can prevent it from rendering.
The chat source exists but cannot be seen
Look for the following:
- The eye icon is enabled in the Sources dock.
- The source is not outside the canvas.
- The source is not hidden behind gameplay or another full-screen source.
- The Browser Source has usable width and height values.
- The source is present in the scene that is actually live.
Select it in the preview and use Edit → Transform → Edit Transform… to inspect or reset its position and size.
Chat is visible but too small to read
Increase the Browser Source dimensions and enlarge its area in the OBS preview. A source that is technically present can still be unreadable after the stream is scaled down for viewers. If Twitch’s page does not provide the appearance you need, switch to a third-party chatbox where you can control font size, contrast, colors, and background transparency.
The chat overlaps the game or webcam
Move the chat to an unused part of the canvas, reduce its size, or crop it. If another source is covering it, move the chat higher in the Sources list. For a clean layout, reserve a fixed chat column when designing the scene rather than placing chat over important gameplay information.
Free tools Windows power users keep installed
One-click scans. No signup required.
Best Value

- [Sturdy Metal] The all metal microphone arm stand provides stability and sturdy protection for your podcast microphone whether you're gaming, podcasting, recording or streaming. The C-clamp can stay attached to a flat desktop and will not slip, making it less likely to scratch your desktop. Even if you vigorously collide with the arm stand or extend it fully to a certain height, the boom arm won't wobble and still remain stable and sturdy. (The microphone is not included)
- [Low Profile] The arm stand for gaming can extend from the bottom of your computer screen. The podcast mic stand gives more space in a unobstructing view while in an intense game. The low profile arm stand for mic can be set to extend under the bottom of the screen without interfering the screen or desktop space, which will not obstruct monitor view even fully extended.
- [Cable Management] The low profile microphone boom stand is equipped with cable managements in hiddenness to organize your microphone cables. Neat arrangement of cable will not cause excessive pulling or resulting in unexpected use, keeping your streaming setup cleaner.
- [Fully Adjustment] Suspension arm stand recording can be extended to 29 inches, suitable for your long large office desktop. The boom arm for microphone can be adjusted up to down by 220 degrees, and horizontally by 360 degrees. More angle adjustments provide more usage options. Tips:The section which near the C-clamp can not be adjusted up to down.
- [Screw Adapter] Coming with three kinds of threads size, 1/4'', 3/8'', 5/8'' that are compatible with most brands of microphones, the microphone boom arm solves the hassle of choosing additional adapters, which give a straightforward but not difficult assembly. You can easily figure out and quickly install and use microphones, shock mounts, etc with the mic stand in gaming, vocal recording, video creation.
Test before going live
- Send a test message in your Twitch chat from a separate account or an approved testing account.
- Confirm that the message appears in the OBS preview.
- Start a short recording and review the resulting video.
- Check readability at the final output resolution, not just in the large OBS preview.
- Repeat the test for each scene that should display chat.
FAQ
Does OBS have a built-in Twitch chat overlay?
No. OBS does not natively render Twitch chat directly into the stream. Add Twitch chat or a third-party chatbox as a Browser Source in the scene.
What is the Twitch pop-out chat URL?
It commonly uses https://www.twitch.tv/popout/CHANNEL/chat, but copying the address from Twitch’s Pop Out Chat command is safer because it uses the correct channel login name and current URL format.
Why can I see chat in OBS but my viewers cannot?
You are probably viewing a Twitch dock or separate pop-out window. Docks and separate windows are for the broadcaster and are not encoded into the scene. Add the chat through Sources → + → Browser.
Can I make Twitch chat transparent in OBS?
The Twitch pop-out is not a full-featured transparent chat widget. For transparent backgrounds, custom fonts, animations, and themed styling, use a StreamElements, Streamlabs, or similar chatbox overlay URL as the Browser Source.
Do I need to add the chat Browser Source to every OBS scene?
Yes, if chat should appear in multiple scenes. Sources belong to scenes unless you deliberately share or duplicate them between scenes.
The Bottom Line
For a quick overlay, open Twitch’s Pop Out Chat, copy its URL, and add it through Sources → + → Browser in the target OBS scene. Resize and position the source in the preview, then test a recording. Use a third-party chatbox URL when you need transparent backgrounds or a custom design.
Quick Recap
Product prices and availability are accurate as of the date/time indicated and are subject to change. Any price and availability information displayed on Amazon at the time of purchase will apply.

