
Free tools Windows power users keep installed
One-click scans. No signup required.
iTechGuides is reader-supported. When you buy through links on our site, we may earn an affiliate commission. As an Amazon Associate I earn from qualifying purchases. Learn more
Hall sensors offer a real drop-in replacement for drifting game console joysticks in several Joy-Con, Steam Deck, PlayStation, Xbox, and Switch Pro controllers, reducing the resistive-contact wear that causes conventional drift. The replacement is not universally solder-free or calibration-free: exact model matching, installation method, touch sensing, and post-repair calibration still determine whether the upgrade works.
Magnetic joystick modules are therefore best understood as wear-resistant replacements, not magic cures. Some use Hall-effect sensors; newer products increasingly use tunnel magnetoresistance, or TMR. Both measure magnetic movement without scraping a resistive track, but a replacement can still fail because of a damaged board, loose connector, broken spring, incorrect calibration, incompatible output, or poor installation.
Key takeaways
- Conventional potentiometer joysticks can drift when resistive tracks, wipers, connectors, or calibration data become unreliable.
- Hall-effect and TMR modules reduce the contact wear that causes a major class of joystick drift, but they do not make the complete joystick assembly immune to failure.
- “Drop-in” may mean the module shares the original footprint or needs no circuit modification; it does not necessarily mean tool-free, solder-free, or calibration-free installation.
- GuliKit lists an adjustable-tension TMR module for Switch Pro, PS4 DualShock, PS5 DualSense and DualSense Edge, Xbox Series, and Xbox Elite Series 2 controllers, but compatibility still depends on the exact hardware.
- Steam Deck owners must check the LCD Deck’s Type A or Type B stick hardware, and capacitive touch sensing may require manually soldering a wire.
- Repair is most attractive when the controller is otherwise healthy, the exact replacement is documented, and the owner is comfortable with disassembly or soldering.
What does “Hall Sensors Offer Drop-In Replacement for Drifting Game Console Joysticks” mean?
Hall sensors offer a credible replacement for the worn sensing mechanism in many game-controller joysticks, but “drop-in” describes compatibility only when the term is defined precisely. A physically matching module may still require soldering, calibration, a transferred touch-sensing wire, or controller-specific software.
The Tool Desk
Outbyte Driver Updater FREEScan for outdated or missing drivers - takes under a minuteDriver Scan →Outbyte PC Repair FREEClear out junk files and repair common Windows errorsFree Scan →Manufacturers and repair sellers use “drop-in” in several different ways:
Popular on Amazon

- 【Hall Effect Joystick】Upgrade TMR Hall Effect Stick without any drift and dead zone. High precision control helps gamers have a better gaming experience and achieve higher scores.
- 【Longer Lifespan】The Hall Effect Switch Joystick is designed to be more durable and reliable than traditional carbon film joysticks, reducing the frequent replacements and repairs, save your money and time.
- 【Low Power Technology】50% power consumption less than original carbon film stick, provides more energy saving and longer gaming session.
- 【Easy Installation】Hall Effect Switch Joycon Joystick designed with plug-and-play model, do not need to changing circuit and welding, which helps to reduce the risk of damaging controller.
- 【1:1 Compatibility】Joycon Joystick replacement is fit for Left / Right Joycon of Switch, Switch OLED, Switch Lite.
- Same physical footprint: The module has compatible mounting points, shaft dimensions, and cap interface.
- No circuit modification: The seller claims the controller board does not need resistors, firmware changes, or other electrical modifications.
- Solderless installation: The module connects without desoldering the original joystick or soldering the replacement.
- Functional replacement: Stick-clicking, touch sensing, motion-related features, travel, centering, and output range all work as expected.
Those meanings are not interchangeable. A GuliKit product page describes its multi-platform TMR module as a direct replacement without circuit modifications and lists compatibility with Switch Pro, PS4 DualShock, PS5 DualSense, PS5 DualSense Edge, Xbox Series, and Xbox Elite Series 2 controllers. The claim does not mean that opening every controller or removing every original module is easy. GuliKit’s compatibility and installation information should be checked against the exact controller revision before purchase.
Why do conventional joystick modules drift?
Conventional analog sticks commonly use potentiometers. Moving the stick moves a wiper across resistive tracks on two axes, changing the electrical signal that the controller interprets as X and Y position. When the stick is released, the controller expects a stable center value. Drift occurs when the reported value moves far enough from center for the console or game to register input.
Wear is one cause, because the wiper repeatedly contacts and rubs against the resistive material. Dust, contamination, corrosion, a damaged flex cable, a loose connector, a damaged circuit board, incorrect calibration, firmware behavior, or an electrically mismatched replacement can create similar symptoms. iFixit’s joystick-drift troubleshooting guidance treats calibration, debris, damaged wiring, worn hardware, and board faults as separate possibilities rather than assuming that every drifting stick has the same failure.
That distinction matters before buying a magnetic module. A new sensor cannot repair a cracked solder joint, corroded board trace, broken return spring, damaged connector, or mechanism that no longer centers physically. Calibration can correct a neutral-position mismatch, but calibration cannot repair damaged hardware.
How do Hall-effect joystick modules work?
A Hall-effect joystick moves a magnet with the stick. A magnetic sensor measures the changing magnetic field as the stick moves along each axis, and the controller converts the sensor output into a position signal. The sensor does not need a sliding electrical wiper to contact a resistive track.
The main durability advantage is therefore the removal of one major wear interface. A Hall-effect module largely eliminates the contact-wear mechanism associated with a conventional potentiometer, but the entire joystick still contains mechanical parts that can wear or break. Springs, plastic guides, the stick shaft, solder joints, connectors, and the sensor itself remain possible failure points.
“Hall effect” should not be used to mean “cannot drift.” A better description is resistant to potentiometer contact wear. A magnetic module can still need calibration, develop a sensor fault, lose its magnet alignment, suffer mechanical damage, or produce inaccurate input because the controller board is defective.
What is the difference between potentiometer, Hall-effect, and TMR joysticks?
Potentiometers use physical electrical contact; Hall-effect and TMR modules sense magnetic movement without that sliding contact. The three categories differ in their sensing method, common advantages, and compatibility risks.
| Technology | Contactless sensing? | Main advantage | Main qualification |
|---|---|---|---|
| Potentiometer | No | Established, inexpensive, familiar original feel | Resistive tracks and wipers can wear or become contaminated |
| Hall effect | Yes | Reduces contact wear and is widely understood | Module quality, calibration, output range, and mechanical fit vary |
| TMR | Yes | Magnetic sensing increasingly marketed for precision and lower power | Aftermarket ecosystem is newer and product-specific compatibility remains important |
TMR means tunnel magnetoresistance. TMR and Hall effect both belong to the broad family of contactless magnetic sensing, but they are not the same sensor technology. GuliKit markets its TMR modules as distinct from linear Hall sensors and claims lower sensor power consumption. According to GuliKit’s technical product information, one TMR sensor consumes approximately 0.1–0.3 mA, while one linear Hall sensor is listed at approximately 0.5–2 mA. Those are manufacturer-provided figures, not independent comparative measurements of every joystick module.
Claims such as “higher resolution,” “more accurate,” or “longer lasting” should therefore be treated as product claims unless supported by independent testing. A well-designed module can be a worthwhile upgrade, but sensor technology alone does not guarantee better stick feel, linearity, circularity, center return, or long-term reliability.
Which controllers can use magnetic joystick replacements?
Magnetic modules are available for several popular controllers, but the correct part is determined by the controller model, hardware revision, left/right position, and required features. The following summary separates the better-supported repair paths from assumptions that can cause failed installations.
Recommended Free Tools
| Platform | What is documented | Important limitation | Typical repair difficulty |
|---|---|---|---|
| Nintendo Switch Joy-Con | GuliKit markets a direct-fit TMR replacement for Joy-Con | Joy-Con must be opened and the new stick calibrated; a damaged board or connector may be the real fault | Small, delicate disassembly; soldering depends on the part and repair method |
| Steam Deck LCD | Replacement stick boards are independently mounted and can be replaced; GuliKit sells magnetic modules | Check Type A or Type B hardware; touch sensing may require a soldered wire | Moderate disassembly with battery and ESD precautions |
| Steam Deck OLED | Do not assume an LCD module fits | Verify the exact OLED-compatible part and current installation instructions | Model-specific |
| PS4 DualShock | GuliKit lists its adjustable-tension TMR module as compatible | Confirm controller revision and whether soldering is required | Often soldering-intensive |
| PS5 DualSense/DualSense Edge | GuliKit lists compatible modules; iFixit documents a TMR replacement option for DualSense | Desoldering and soldering are not beginner-level tasks | Intermediate soldering and significant disassembly |
| Xbox Series/Xbox Elite Series 2 | GuliKit lists compatible adjustable-tension TMR modules | Use the correct model and calibrate through Xbox tools where supported | Model- and revision-dependent; often requires soldering |
| Switch Pro Controller | GuliKit lists its multi-platform TMR module as compatible | Verify the exact part and calibration procedure before opening the controller | Disassembly and possible soldering |
How do you replace a drifting Switch Joy-Con stick?
A Joy-Con magnetic replacement normally requires opening the Joy-Con, removing the original joystick module, installing the compatible Hall-effect or TMR module, and calibrating the new stick. The replacement is not tool-free simply because the seller calls it a direct fit.
Also popular on Amazon
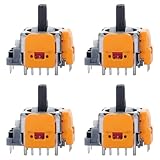
- 【Compatible model】-- Replacement Hall-Effect joystick compatible with PS5 Controller Only (NOT FIT for PS4 Xbox One Xbox One S/X Controller).
- 【4 × 3D Hall-Effect Analog joystick 】-- Made of high quality wear-resistant materials designed to ensure durability and long service life. Perfect replacement analog joysticks work for PS5 controller, repair your worn-out, damaged and drift analog joystick.
- 【Design for PS5 controller】-- Solve Most Joystick Problem: Stick drift, stuttering, dead zones, creeping, blind spots, non centered.
- 【What you Get】-- 4 x Hall-Effect joystick.
- 【Customer Service & Warranty】We provide 3 months warranty for replacement joystick. If you have any problem about the product, please feel free to contact us, we will reply you with 24 hours.Computer Repair Kits
- Confirm that the module is specifically intended for the Joy-Con model and position being repaired.
- Open the Joy-Con carefully and disconnect the battery and relevant internal connectors as required by the repair guide.
- Remove the original stick module without damaging its connector or nearby ribbon cables.
- Install the replacement and reassemble enough of the controller for safe testing.
- On the Switch, open System Settings → Controllers and Sensors → Calibrate Control Sticks.
- Follow the calibration prompts, then test center position, full travel, stick-click, and any game-specific input.
GuliKit specifically warns that a new Joy-Con stick may appear to drift until it is calibrated because the console was calibrated to the old module. The GuliKit Joy-Con TMR documentation recommends calibration after installation.
Nintendo’s official troubleshooting route includes checking attachment and updates, then calibrating the stick. If calibration fails or the problem persists, Nintendo’s U.S. and Canada support page directs the owner toward service and says the affected Joy-Con, rather than necessarily the entire console, may need service. Nintendo’s official Joy-Con troubleshooting information is region-specific, so service terms elsewhere may differ.
Switch Lite is a different repair scenario because its controls are integrated into the handheld rather than being removable Joy-Con units. Do not order a removable Joy-Con module for a Switch Lite without documentation explicitly confirming compatibility.
Do these 3 things before closing this tab:
1Clear out junk files and repair common Windows errors2Fix the driver behind crashes, sound loss and screen glitches3Repair Windows errors before they cause bigger problemsHow do you replace and calibrate a Steam Deck magnetic stick?
Steam Deck stick replacement is comparatively practical because each stick is mounted to its own board, but the LCD model has hardware variations and touch sensing needs special attention. Before ordering an LCD Deck module, open Settings → System and check the Controller ID.
- Controller IDs beginning with MEDA indicate Type A hardware according to iFixit’s guide.
- Controller IDs beginning with MHDA indicate Type B hardware according to iFixit’s guide.
Type matching is particularly important for capacitive touch functionality. iFixit’s left-stick replacement guide and its right-stick replacement guide explain the relevant hardware identification.
A typical Steam Deck repair has these stages:
- Shut down the Deck completely rather than leaving it suspended.
- Remove the microSD card before separating the case.
- Use appropriate ESD precautions and the correct screwdrivers and opening tools.
- Open the back cover and follow the recommended battery-safety procedure, normally disconnecting the battery before working on the stick board.
- Remove the relevant left or right stick board.
- Install the compatible replacement and reconnect its cable.
- Transfer or connect the capacitive touch-sensing wire if the module requires it.
- Reassemble the Deck and calibrate the stick before judging the repair.
GuliKit states that Steam Deck stick-touch sensing works only when the wire on the stick cap is manually soldered to the replacement module. A Deck can therefore have accurate X/Y movement while losing the original touch feature if the wire is omitted or poorly connected. GuliKit’s Steam Deck module documentation describes that requirement.
Battery safety is not optional. iFixit warns that a charged lithium-polymer battery creates additional risk during repair if punctured. Follow the current guide for battery precautions rather than relying on a generic disassembly video. The iFixit Steam Deck repair guide provides the relevant warnings and procedure.
Steam Deck Game Mode calibration
After reassembly, the normal Game Mode calibration route documented by iFixit is Steam button → Settings → Controller → Calibration & Advanced Settings → Joysticks. Test the neutral position and full travel, and adjust the dead zone only after confirming that the replacement is correctly installed. iFixit’s Steam Deck drift troubleshooting page documents this menu path.
Steam Deck Desktop Mode calibration
For deeper calibration, iFixit documents a SteamOS Desktop Mode procedure using Konsole:
- Switch to Desktop Mode and open Konsole.
- Leave both sticks centered and untouched when calibration begins.
- Rotate each stick through a complete 360-degree rotation twice.
- Return focus to Konsole and press Enter.
- Confirm that the terminal reports successful calibration.
The iFixit guide contains a warning that calibration did not work correctly in SteamOS 3.3. That is a historical, version-specific warning and should not be assumed to describe every current SteamOS release. Check the current SteamOS behavior before troubleshooting a newly installed module. See iFixit’s calibration procedure and version note.
Are PS5, PS4, Xbox, and Switch Pro replacements really solder-free?
Usually, “direct replacement” does not mean “beginner-friendly.” Many original controller joystick modules are soldered to the main board, so replacing them requires desoldering the old pins and soldering the new module even when the replacement has the same footprint.
For PS5 DualSense repairs, iFixit lists a soldering workstation, flux, solder, a desoldering pump, and desoldering braid among the required equipment. The guide presents a GuliKit TMR module as an option for replacing the original drifting joystick. The iFixit DualSense repair guide is a useful indication of the skill and equipment involved.
Also popular on Amazon

- Compatibility and Application: The 4PCS 3D Joysticks is for Sony Playstation 5 PS5 joystick replacement. Our for PS5 joystick replacement's type is Hall Effect joystick, it only suits for the controller of PS5. The replacement for PS5 Joystick are apply to the problem of the drifting, blind spots, dead spots, can't center, damaged or broken, long time to use, not sensitive, etc. Will better to solve the problem of drifting.
- Quality Guaranteed: For PS5 joystick replacement was test before shipment and for PS5 joystick replacement are made of good quality, metal+ABS plastic material make it use more accurately and has longer working life. The controller will use as a new one after replacing for PS5 joystick.
- Advantage for PS5 Hall Joystick: The ALPS joystick after using long time, it will has some problem:Electrical parts will wear out due to physical properties,resistance will increase and delay to operate. Our Hall Effect joystick for PS5 using the principle of the Hall effect and magnetic field induction, the accuracy is usually higher and can provide more accurate position detection. For PS5 Hall joystick has a longer life and is suitable for long-term use.
- Protection and Convenient Installation: Come with 4pcs for PS5 Thumbsticks replacement. Good replacement for your broken or cracked joystick.Comes with 4pcs Joystick Protector(help to extend the using time) and 26 screws(Help to replace the controller cover’s screw during the installation). And it comes with set tool:Screwdriver、Opening Tools、Pry Tool and Tweezer. Helps to disassemble and replace for Ps5 joystick more convenient.
- Installation Suggestion: After the joystick is installed, it may not be exactly centered with the your handle motherboard, and calibration is required to center it. Currently, the joystick can be calibrated to the center by adjusting the brush angle or adding an adjustable resistor.In mostly, the joystick offset within 5% is almost imperceptible. Generally, it will only cause a slight rotation of the perspective or automatic walking when it reaches more than 8%, so if the joystick is calibrated to 2% - 3%, it is normal to use.
Soldering creates real board-level risks. Excess heat can damage nearby components, and force or repeated heating can lift pads from the circuit board. A repairer without controlled soldering and desoldering experience should consider a professional service, an OEM replacement part, or a new controller instead of treating a TMR module as a simple accessory.
GuliKit says PS4, PS5, PS5 Edge, and Switch Pro replacements can use its third-party open-source calibration tool. GuliKit says Xbox Series and Xbox Elite Series 2 users can calibrate through the Xbox console or Xbox Accessories software on PC, including a Recalibrate option. These instructions are manufacturer guidance and should be checked against the current controller firmware and software. Review GuliKit’s current calibration instructions before installation.
What does drop-in compatibility need to include?
A replacement is genuinely compatible only when it passes more than a dimensional check.
PC Slower Than It Used to Be?
A free scan shows the junk files, broken settings and background clutter dragging Windows down - then fixes them in one click.Free scan · Windows 10 & 11Outdated Drivers Are Slowing You Down
One free scan finds every outdated or missing driver and matches the right update for your exact hardware.Free scan · exact hardware match| Compatibility test | What to verify | What failure looks like |
|---|---|---|
| Physical fit | Mounting points, dimensions, shaft height, cap interface, and left/right orientation | Module cannot be secured, cap rubs, or stick does not reach the full gate |
| Electrical compatibility | Expected voltage or signal range and connector arrangement | Wrong center, limited travel, erratic output, or failed calibration |
| Mechanical behavior | Travel, tension, center return, gate geometry, and stick-click alignment | Different feel, poor centering, blocked movement, or unreliable click |
| Functional features | Stick-click, capacitive touch, motion-related behavior, and controller identification | Movement works but touch, click, or another controller feature does not |
| Installation | Whether the repair requires opening, desoldering, soldering, or extra wires | A supposedly “drop-in” repair becomes a board-level job |
| Calibration | Whether the console, PC software, or a documented tool supports the replacement | Persistent apparent drift or inaccurate maximum range |
The physical footprint is only the first test. A replacement can fit the shell and still report an incompatible output range, lose capacitive touch, change the response curve, or fail to center after calibration.
Does magnetic sensing eliminate all joystick drift?
No. Magnetic sensing removes or greatly reduces wear of the resistive sensing track, which is a major source of conventional drift, but magnetic sensing does not make the whole joystick indestructible or guarantee perfect centering forever.
Remaining failure modes include:
- Broken or weakened return springs.
- Worn plastic guides, gates, or stick shafts.
- Magnet displacement or sensor-board failure.
- Debris affecting the mechanical movement.
- Corrosion, damaged flex cables, loose connectors, or motherboard faults.
- Poor factory calibration or an incorrect dead-zone setting.
- A replacement with the wrong electrical range or controller revision.
- Firmware or software interpreting a valid signal incorrectly.
If a newly installed magnetic module drifts, do not immediately assume that the technology failed. Confirm the exact part, run calibration, inspect the connector and cable, check that no wire is trapped under the shell, and test the stick after complete reassembly. If the fault remains, inspect the board and compare the behavior with the original module where practical.
Increasing the dead zone can hide a small amount of unwanted movement, but dead-zone adjustment is a diagnostic or temporary workaround, not proof that the hardware is healthy. A large dead zone can also reduce fine aiming control.
Why is calibration essential after a joystick replacement?
Calibration is essential because the new module’s neutral point and maximum X/Y output may not exactly match the old module’s stored values. A mechanically centered stick can therefore appear to drift until the controller learns the replacement’s usable range.
Use the platform’s supported calibration path:
- Switch and Joy-Con: Open System Settings → Controllers and Sensors → Calibrate Control Sticks.
- Steam Deck: Open Steam button → Settings → Controller → Calibration & Advanced Settings → Joysticks, or use the documented Desktop Mode procedure when deeper calibration is required.
- PS4, PS5, PS5 Edge, and Switch Pro: Follow the current replacement manufacturer’s calibration instructions and verify that the tool supports the controller and firmware.
- Xbox Series and Xbox Elite Series 2: Use the Xbox console or Xbox Accessories software on PC where the supported recalibration option is available.
Calibration cannot repair a broken sensor, damaged spring, bad connector, board corrosion, incompatible output range, or poor-quality replacement. Calibration is the final setup step, not a substitute for diagnosis.
Independent reader supportYour contribution helps us test, update, and keep practical guides available for everyone.Should you install a Hall/TMR module or an OEM potentiometer?
The better choice depends on whether the priority is wear resistance, original behavior, low cost, or compatibility certainty.
| Choice | Best for | Advantages | Trade-offs |
|---|---|---|---|
| Hall-effect or TMR module | Owners of premium controllers who want to reduce potentiometer wear | Contactless sensing, reuse of the original shell, potential adjustable tension, and a possible longer service life | Higher uncertainty, variable quality, possible soldering, calibration, changed feel, and possible loss of touch sensing |
| OEM or conventional potentiometer module | Owners prioritizing original feel, known electrical behavior, or low cost | Usually cheaper, familiar, widely documented, and more likely to match the original response | Retains the resistive-contact wear mechanism and may eventually drift again |
| Official service | Owners who do not want to open the controller or risk board damage | Lower DIY risk and potentially preserves warranty or service support | Availability, turnaround time, regional eligibility, and cost vary |
| New controller | Controllers with multiple faults or low replacement value | Fastest route to a known working device and no repair risk | Higher total cost, waste of an otherwise repairable controller, and possible loss of preferred ergonomics |
Genuine OEM parts are a sensible choice when exact compatibility and original feel matter more than eliminating potentiometer wear. For example, iFixit displayed a genuine Steam Deck LCD left or right thumbstick fix kit at $39.99 when observed on August 16–18, 2026. That price is a dated U.S. listing observation and should be rechecked before publication. iFixit’s Steam Deck left-stick part page and right-stick part page provide the current listing.
Quick wins for a faster PC:
Fix the driver behind crashes, sound loss and screen glitchesFind Drivers →Clear out junk files and repair common Windows errorsFree Scan →Scan for outdated or missing drivers - takes under a minuteDriver Scan →For comparison, iFixit’s game-console joystick category displayed a PS5 DualSense GuliKit TMR replacement covering two joysticks at $29.99 when observed on August 16–18, 2026. Marketplace and parts pricing changes, so the listed amount is not a permanent price or a universal cost for every controller. Check the current iFixit console joystick listings before making a cost comparison.
Also popular on Amazon

- Upgraded Anti-Drift TMR Joystick – Features advanced TMR electromagnetic sensing technology to significantly reduce friction. It offers superior durability, smoothness, and responsiveness.Designed for repairing and replacing drifting, non-functioning, or worn-out joysticks. Compatible with Switch 2 only, not for Switch 1.
- DIY-Friendly– Drop-In installation,no soldering required for easy DIY replacement. For a seamless replacement, you will need a Tri-point and Cross-head screwdriver, a pry bar, a triangular pick, and tweezers. Note: Repair tool kit not included.
- Extended Durability– Built to Last. The non-contact structure maximizes the elimination of physical wear, drastically extending the joystick’s lifespan, ensuring consistent performance and precise control even after long-term use.
- Anti-Interference Design – Specially designed to resist interference from the Switch 2’s built-in magnets, ensuring stable performance of the TMR stick for an uninterrupted gaming experience.
- Installation Note– Ideal for users with basic hands-on skills. We recommend following the repair video tutorial carefully for installation and the necessary calibration steps. Please feel free to contact us with any questions during use.
When does repairing a controller make more sense than buying one?
Repair makes sense when the controller is otherwise healthy, the exact module is confirmed, and the cost of parts and tools is comfortably below the value of the controller. Repair is particularly attractive for premium controllers, limited editions, devices with preferred ergonomics, and handhelds that are difficult or expensive to replace.
Buying a new controller is more rational when the board has multiple faults, the replacement’s compatibility is uncertain, soldering would be beyond the owner’s skill, the controller is inexpensive, or reliable same-day use matters more than preserving the existing hardware. Official service may be preferable when warranty coverage or a regional repair program is available at a reasonable cost.
| Situation | Most sensible path | Reason |
|---|---|---|
| Only the stick drifts and the exact magnetic module is documented | Magnetic module repair | Addresses the wear mechanism while preserving the controller |
| Only the stick drifts but original feel and compatibility are priorities | OEM potentiometer replacement | Lowest change to electrical and mechanical behavior |
| Controller is under warranty or owner lacks tools | Official service or professional repair | Avoids unnecessary disassembly and board damage |
| Multiple buttons, ports, or board functions also fail | Professional diagnosis or replacement controller | A new joystick may not solve the underlying problem |
| PS5 or Xbox repair requires unfamiliar desoldering | Professional repair or replacement | Lifted pads and heat damage can make the controller uneconomical to repair |
What should you check before buying a magnetic joystick module?
- Exact controller model: Identify DualShock versus DualSense, Xbox Series versus another Xbox generation, standard Switch controller versus Joy-Con, and LCD versus OLED Steam Deck.
- Hardware revision: Check revision-specific documentation. Steam Deck LCD Type A and Type B identification is a concrete example of why a general product title is not enough.
- Left or right position: Confirm whether the module is axis- or side-specific.
- Physical dimensions: Check mounting points, shaft height, cap fit, travel, and gate clearance.
- Electrical compatibility: Look for a documented signal range or controller-specific compatibility explanation, not only “anti-drift” wording.
- Stick-click: Confirm that the replacement preserves the click switch and aligns with the original button mechanism.
- Touch sensing: On Steam Deck, verify whether the module supports capacitive touch and whether a wire must be soldered.
- Installation method: Determine whether the repair is solderless, requires desoldering, or needs a new wire, cap, cable, or screw.
- Calibration support: Confirm whether the console, Xbox Accessories, SteamOS, or a documented third-party tool can calibrate the replacement.
- Parts included: Check whether caps, springs, screws, cables, and other small parts are included or must be reused.
- Seller support: Prefer a clearly identified manufacturer, compatibility table, calibration instructions, return policy, and replacement support.
- Warranty: Opening a controller may affect warranty or official service eligibility; check the applicable regional terms first.
A credible listing explains why the module is compatible with a particular controller. A listing that only promises “drift-free forever” without model, revision, calibration, and touch-sensing information deserves caution.
What’s actually slowing this PC down?
Pick the symptom - the matching free tool is one click away.
What should you do if the replacement still drifts?
If a magnetic replacement still reports movement at rest, troubleshoot installation and compatibility before condemning the sensor.
- Fully reassemble the controller and rerun its supported calibration routine.
- Confirm that the module is intended for the exact model, hardware revision, and stick position.
- Inspect the connector, flex cable, solder joints, and board for damage or corrosion.
- Check for a trapped cable, obstructed stick, damaged return spring, or magnet that has moved.
- Verify that stick-click and touch-sensing wires are correctly connected.
- Test whether the problem follows the replacement module or stays with the same controller side, when a safe comparison is possible.
- Use a larger dead zone only as a temporary diagnostic measure, not as a permanent claim that the repair succeeded.
If calibration fails repeatedly, the module may have an incompatible output range or a manufacturing fault, or the original controller board may be damaged. A replacement module cannot fix every cause of drift.
Final verdict: are Hall and TMR joystick replacements worth it?
Hall-effect and TMR joystick modules are credible anti-wear upgrades for supported controllers. They remove the sliding resistive-contact mechanism that commonly wears in conventional potentiometers, and they can be especially worthwhile in expensive controllers or handhelds that the owner wants to keep.
The phrase “drop-in replacement” needs qualification. A module may share the original footprint and require no circuit modification while still demanding delicate disassembly, desoldering, soldering, touch-wire installation, and calibration. Compatibility is controller- and revision-specific, and magnetic sensing does not repair damaged connectors, circuit boards, springs, or mechanical assemblies.
Windows Errors? Fix Them Before They Spread
Repair common Windows errors and clear accumulated junk for a smoother, more stable PC - no reinstall needed.Free scan · no reinstallCrashes, No Sound, or Screen Glitches?
Random freezes, missing sound and display glitches usually trace back to one bad driver. Find and replace yours safely.Free scan · under a minuteChoose a documented Hall/TMR module when the exact model is supported and the owner accepts the installation risk. Choose an OEM potentiometer when original feel and predictable compatibility matter more. Choose official service, professional repair, or a new controller when soldering skill, warranty status, multiple faults, or total cost makes a DIY upgrade a poor trade.
Frequently Asked Questions
Can Hall-effect joysticks still drift?
Yes. Hall-effect joysticks largely remove resistive-track wear, but they can still show inaccurate input because of calibration errors, mechanical damage, sensor faults, loose connectors, damaged circuit boards, debris, or incompatible replacement electronics. Magnetic sensing reduces one major cause of drift rather than guaranteeing permanent perfect centering.
Does a drop-in joystick replacement mean no soldering?
No. “Drop-in” can mean that a replacement shares the original footprint or needs no circuit modification, while the repair may still require opening the controller, desoldering the old module, soldering the new one, or attaching a touch-sensing wire. Check the installation instructions for the exact controller and part.
Do Steam Deck magnetic sticks preserve capacitive touch?
They preserve capacitive touch only when the correct compatible module is used and the touch-sensing connection is transferred correctly. GuliKit states that its Steam Deck module requires manually soldering the stick-cap wire to the replacement module for touch sensing to work.
Recommended Free Tools
Should I calibrate a new Hall-effect or TMR joystick?
Yes. A new module can have a different neutral point or travel range from the original module, so calibration should be performed after installation unless the manufacturer explicitly documents another procedure. Calibration cannot correct a damaged board, broken spring, faulty sensor, or incompatible part.
The Bottom Line
Bottom line: Hall-effect and TMR modules are real, useful replacements for many drifting controller sticks, but they are not universal, maintenance-free miracles. Verify the exact model and revision, determine whether soldering or touch-wire work is required, calibrate after installation, and compare the total repair risk with an OEM part, professional service, or a new controller.

