
The Tool Desk
Outbyte PC Repair FREERepair Windows errors before they cause bigger problemsFix Now →Outbyte Driver Updater FREEScan for outdated or missing drivers - takes under a minuteDriver Scan →A DIY pillbox laser projector is a simple, rotating-polygon laser display concept for projecting dot-matrix messages—not full-color video. Its pillbox is a heptagonal container repurposed as the rotating polygon in an assembly built around an Arduino, a laser pointer and a cooler fan. The historical project descriptions explain the idea, but do not provide enough specifications to reproduce a calibrated build safely.
What the pillbox does
The pillbox is not an electronics enclosure or a medication organizer in this project. It serves as a heptagonal polygon: as it rotates, its faces redirect the laser beam to form the displayed pattern. The 2012 EEWeb project overview says this improvised polygon was chosen to reduce cost and complexity. A 2010 Make project listing also describes the combination of a laser pointer, pillbox and Arduino.
The intended output is dot-matrix messaging. The description does not establish a full-color image system or video projector.
What the documented project includes—and leaves unspecified
The EEWeb overview names an Arduino, a laser pointer, a cooler fan and the heptagonal pillbox polygon. It is a concept overview, not a complete current bill of materials or a validated set of assembly instructions.
Do these 3 things before closing this tab:
1Repair Windows errors before they cause bigger problems2Fix the driver behind crashes, sound loss and screen glitches3Clear out junk files and repair common Windows errors#1 Best Overall
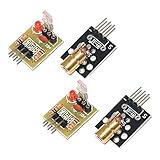
- Operating voltage: 5V
- Source wavelength: 650 nm
- Apply to: for Arduino AVR
- Model: 1*Laser Receiver Sensor Module+ 1* KY-008 Laser Transmitter Module
- Laser Receiver Sensor Module uses the non modulated laser receiver, please use in the room where without the light, the sunlight or other lamps and lanterns will interfere, suggested in the dark environment use.
- Controller: An Arduino is part of the concept, but no board model or detailed control specifications are given.
- Rotating assembly: A cooler fan and heptagonal pillbox are named, but dimensions, mounting details and a verified rotation speed are not stated.
- Optics: The overview describes the laser beam as diffracted as it emerges from the projector, but does not specify the optical surfaces or provide calibration instructions.
- Laser: The product’s output power and hazard class are not stated.
Those omissions matter: the project descriptions alone are not sufficient to select components, predict display quality or confirm that a particular build is safe.
Laser safety comes before construction
The U.S. Food and Drug Administration (FDA) warns, “As a rule, you should never look directly into any laser beam.” Its laser safety FAQ explains that hazards increase across laser classes. Consumer laser products are generally in Classes I, II and IIIa; the FDA says Class IIIb and IV products should be limited to appropriately trained use for legitimate applications. Do not infer a laser’s class or output from the word “pointer”—verify the actual product.
Rank #2

- 【Laser Sensor Module】Size: 1.52CM * 2.22CM; Power supply voltage: 5V;Output:When the laser output it's High level; when no laser light output it's low level;
- 【Laser Sensor Module】This sensor uses a non-modulated laser receiver, please use on the room which is dark.the sun or other lighting will interfere the using of the product.suggest use in a dark environment.
- 【Laser Head】Operating voltage: 5V; Power: 5MW; wavelength: 650 nm; OD: 6mm
- 【Laser Head】This 5V laser head is very easy to use, you can use for Arduino control, controllable laser pointer, theft detection, etc. interesting application devices.
A rotating beam can still create exposure risks. Do not operate a projector where the beam or reflections can reach eyes, and do not treat the pillbox or fan as a safety enclosure. The project overview does not supply an exposure assessment or a safety certification.
FDA rules for laser projectors and light shows
FDA guidance distinguishes laser illuminated projectors from laser light show products. Laser Notice No. 57, issued in May 2019, describes laser illuminated projectors as demonstration products designed to project an image without raster-scanned collimated beams and discusses their classification under FDA’s electronic product radiation-control framework and the relationship to IEC standards.
Rank #3

- Operating voltage: 5V, Output wavelength 650nm
- It output high level when receive laser signal, and low level when not.
- High sensitivity, can be received on the front, side, and back sides.
- Laser Receiver Sensor Module uses the non modulated laser receiver, please use in the room where without the light, the sunlight or other lamps and lanterns will interfere, suggested in the dark environment use.
- Can be use for Arduino control, doing controllable laser pointer, theft detection, etc. interesting application devices.
The FDA’s Laser Light Shows page states that demonstration laser products are generally limited to Class IIIa accessible emission limits. For visible wavelengths from 400–710 nanometers, it gives a 5 milliwatt limit for those products; higher-class laser light show equipment requires an FDA variance. These are regulatory statements, not approval of this DIY design. The available project descriptions do not establish whether a homemade device is compliant or exempt; legal requirements depend on the specific product and use.
Independent reader supportYour contribution helps us test, update, and keep practical guides available for everyone.What to establish before attempting a build
Treat the historical descriptions as an explanation of the concept, not as a construction-ready plan. Before choosing parts or powering a device, establish the laser’s verified output and class, how the rotating assembly will be contained, and whether the intended use meets applicable safety and regulatory requirements. The source descriptions do not establish suitable laser specifications, polygon material or optical flatness, motor speed and stability, timing control, or a tested assembly procedure. Without those details, a specific parts recommendation or performance claim would be unsupported.
Quick Recap
Best Value

- 30+ Guided Electronics Projects: Start with LEDs and build toward LCD1602 displays, RFID access, motion detection, distance sensing, motor control and environmental monitoring for STEM learning, coding clubs, classrooms and hobby projects
- 200+ Components Across 63 Types: Includes an ELEGOO UNO R3 controller, LCD1602, RC522 RFID, RTC, HC-SR501 PIR sensor, ultrasonic sensor, DHT11, GY-521, MAX7219, keypad, joystick, relay, SG90 servo, stepper motor, breadboard and more
- Begin Without Soldering: Pre-soldered modules, a solderless breadboard, organized storage case and small-parts box reduce setup time and help beginners move from lesson to lesson while keeping LEDs, ICs, wires and sensors easy to find
- Learn, Modify and Create: Program the ELEGOO UNO R3 board with Arduino IDE using the included PDF tutorial and example code, then adjust sensor thresholds, timing, display text and motor behavior to turn guided lessons into original projects
- Flexible Power and Project Setup: Includes a 9 V, 1 A power supply, breadboard power module, 9 V battery and USB cable to support controller, breadboard and module experiments without sourcing basic setup accessories separately
Rank #4

- TURN CODE INTO REAL-WORLD RESULTS — Follow 22+ guided lessons to make LEDs blink, read temperature and distance, move servo and stepper motors, control an LCD and respond to joystick or IR input; ideal for a family weekend build, homeschool unit, coding club or STEM classroom
- MORE PROJECT VARIETY IN ONE ORGANIZED KIT — Includes the UNO R3 controller, LCD1602 with pre-soldered header, breadboard power module, ultrasonic and DHT11 sensors, joystick, IR receiver and remote, SG90 servo, stepper motor, relay, DC motor, fan blade, displays, LEDs, buttons, resistors and jumper wires
- START WITHOUT SOLDERING — Plug-in modules, a solderless breadboard and the pre-soldered LCD help beginners focus on wiring, code and testing; the illustrated component list makes it easier to find each part and move from one lesson to the next
- LEARN THE LOGIC, THEN CREATE YOUR OWN — Use Arduino IDE and the included example code to understand digital input and output, analog sensing, timing, motor control and display functions, then change thresholds, speeds and sequences for alarms, environmental monitors, reaction games and motion projects
- CLEAR SETUP SUPPORT FOR FIRST-TIME BUILDERS — Download the latest tutorial and code, select the UNO board and correct computer port, check component polarity and breadboard rows, and keep power-module input at 9V or below; younger learners should work with an experienced adult
Product prices and availability are accurate as of the date/time indicated and are subject to change. Any price and availability information displayed on Amazon at the time of purchase will apply.

