
Windows Errors? Fix Them Before They Spread
Repair common Windows errors and clear accumulated junk for a smoother, more stable PC - no reinstall needed.Free scan · no reinstallCrashes, No Sound, or Screen Glitches?
Random freezes, missing sound and display glitches usually trace back to one bad driver. Find and replace yours safely.Free scan · under a minuteTo add animated marquee lighting, mount an addressable LED strip behind the sign, connect it to a compatible microcontroller, and upload a sketch that controls the LEDs. A simple example uses an Arduino Nano-compatible board, a NeoPixel strip, and the Adafruit NeoPixel library; the same basic approach works for other projects if the strip, controller, wiring, and power supply are compatible.
What you need
- An addressable NeoPixel strip and an Arduino Nano R3 or compatible board. Check the strip’s chipset, voltage, and controller support before connecting it. The reference build uses a Nano R3 and NeoPixel strip (Hackster tutorial, published October 21, 2018).
- Hookup wire for the strip’s 5 V, data, and ground connections. The tutorial uses pin 2 for data; use the pin specified by your own wiring and sketch.
- A computer with the Arduino IDE and the Adafruit NeoPixel library, which the reference sketch requires.
- Heat-shrink tubing to cover and secure soldered connections, as recommended in the tutorial.
- A 5 V power source suited to the strip and planned brightness. Do not assume the microcontroller’s onboard 5 V output can power every strip.
- Cardboard or another mounting surface, plus a flat piece to act as a light baffle if the LEDs shine directly into the viewing area.
Connect and program the strip
- Check compatibility first. Confirm the strip’s voltage, addressable LED chipset, data requirements, and current needs against the board and library you plan to use. Follow the strip manufacturer’s wiring guidance; the tutorial’s example connections are not a universal pinout.
- Wire the three connections. Connect the strip’s 5 V and ground to the appropriate supply connections, and connect its data input to the chosen board pin. The Hackster example uses pin 2 for data. Keep connections secure and insulate solder joints with heat shrink.
- Set the LED count in the sketch. The code needs to know how many LEDs are on the strip. Enter the actual count rather than relying on the example’s value.
- Install or select the library and upload the sketch. For the reference project, use Adafruit NeoPixel in the Arduino IDE. Upload the animation code to the board, then power the strip and check that it responds.
- Test before final mounting. Verify that the expected LEDs light and that the pattern runs correctly. If the strip stays dark or behaves unpredictably, recheck the strip’s data direction, ground connection, selected data pin, LED count, voltage, and library configuration.
Choose an animation and software library
The reference sketch demonstrates white walking, flashing, and pulsing effects. Its author notes that the code can be adapted for other colors and patterns. A moving chase can draw attention across a marquee, while a pulse or steady backlight may be less visually busy; select an effect that remains readable rather than letting direct glare obscure the sign.
Adafruit NeoPixel is the library used by the Hackster example. FastLED is another option: its official overview describes support for addressable NeoPixel and WS2812B LEDs and Arduino-compatible boards. FastLED’s basic usage guide outlines a typical frame workflow: identify the LED type, count, and data pin; register the strip in setup; assign colors in an LED array; then call FastLED.show() to send the frame. Its example animates a lit dot moving along the strip. That workflow illustrates the general idea, but it is not the library or code used in the reference build.
Plan power for the actual strip
Power needs vary by LED product, pixel count, brightness, and animation. Check the exact strip’s specifications and use a supply rated for the load; a controller board’s 5 V output may not be sufficient.
#1 Best Overall

- Manufacturer Warranty
A HandsOn Technology guide for a particular 3 W high-power NeoPixel module describes a 5 V, three-wire, individually addressable RGB device. For that module, it reports about 350 mA per RGB pixel element at full intensity, warns that an Arduino board’s 5 V output may not supply the current, and suggests an external 5 V supply rated at least 2 A. Those figures apply to that module and should not be used as a universal rating for NeoPixel strips.
Independent reader supportYour contribution helps us test, update, and keep practical guides available for everyone.Mount the lights to control the effect
For the tutorial’s cabinet, the strip is glued to cardboard behind the marquee. A second flat piece of cardboard is placed behind the sign to prevent light from shining directly downward. This simple baffle can help control glare, but the best position depends on the cabinet’s geometry and how the sign is viewed. Test the effect in place before permanently attaching the strip.
Rank #2

- New Style DIY Arcade Kit, LED arace game DIY MAME parts DIY Accessories.
- 100% Zero Delay Encoder and USB work perfectly all Windows systems.
- 2 Player Arcade MAME DIY Accessories, DIY Your Own Arcade Game Console.
- Use the highest quality materials! Made of high temperature resistant plastic.
- Perfect LED Kit Arcade PC Games DIY Choice! Easy to install!
The reference project powers the Nano over USB from a 5 V source. That setup is specific to its hardware; choose a power arrangement that meets the requirements of both the board and strip, and avoid assuming that USB or the board alone can supply a larger LED load.
Quick Recap
Best Value
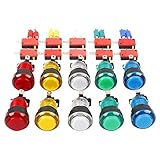
- Mounting hole required: 24mm - 28mm
- Overall diameter of button across plunger: 32mm
- Maximum depth of button from top of plunger to bottom of microswitch: 65mm
Rank #4

- Made with highest quality materials!Heat resistant plastic!
- Body & lens cap for optical clarity! Twist-Type design
- Professional 8 way Arcade Joystick with 35MM Ball top handle!
- Perfect LED Kit for Arcade PC Game DIY Project! Easy Install!
- Microswitch with gilded contact leg, excellent electronic performance, long life, reliability tested to 10,000,000 cycles!
Rank #3

- Dimensions (approx.): Interior Width: 20.75", Exterior Width: 21.75”, Exterior Height: 21”, Exterior Depth: 18”
- Available in HAPP (HAPP joysticks and 28mm buttons) or Sanwa (Sanwa Style joystick and 24mm start/coin and 30mm action buttons) Style
When to adapt the reference build
- Different strip or controller: Confirm the chipset and board support before choosing Adafruit NeoPixel or FastLED, and update the wiring and sketch for the actual data pin.
- More LEDs or brighter output: Recalculate power using the strip’s own specifications rather than scaling from the tutorial’s setup.
- Uneven or glaring light: Adjust the strip’s position and add or reposition a baffle so the marquee is illuminated without exposing the LEDs directly.
- A different visual style: Adapt the sketch’s colors and effects, testing each pattern at the intended viewing distance and brightness.
Product prices and availability are accurate as of the date/time indicated and are subject to change. Any price and availability information displayed on Amazon at the time of purchase will apply.
Free tools Windows power users keep installed
One-click scans. No signup required.

