
Free tools Windows power users keep installed
One-click scans. No signup required.
Klipper does not include a built-in sound-notification setting, but a host-side extension can let a G-code macro play a sound when a print starts, aborts, or finishes. In Al Williams’s October 8, 2024 Hackaday example, a Python Klippy extension registers an APLAY command that runs the Linux audio player on the Klipper host.
How the Klipper sound example works
Klipper separates printer control between Klippy, the host software, and the printer microcontroller. Klippy is primarily Python and supports extension modules in its klippy/extras directory, as described in the official Klipper code overview.
Williams’s example uses that host-side extension point. It registers a multiplexed APLAY command for named sound configurations. A configuration identifies a wave file and can optionally specify its path; a G-code macro then calls the registered command. The extension uses Python’s subprocess.run to invoke aplay on the host.
This is not a built-in Klipper sound feature, nor does it make arbitrary shell commands available to ordinary G-code macros. The extension adds a specific registered command for audio playback. Williams presents the implementation in “3D Printering: Listen To Klipper”.
#1 Best Overall

- [CONTINUOUS ALARM SOUND] Enjoy an uninterrupted alarm experience with this active doorbell.
- [WIDE POWER VOLTAGE RANGE] Versatile 3-24V supply voltage suitable for various electronic alarm applications.
- [HIGH PRESSURE LEVEL SOUND] Experience a loud alarm sound with a pressure level of up to 95dB.
- [EASY WIRING] Red wire for the positive post and black wire for the negative post, making installation simple and complicated.
- [USO VERSATILE] Widely used in computers, printers, copiers, alarm systems, electronic toys, automotive electronics, phones and timers. A must-have for DIY enthusiasts!
What you need on the Klipper host
- A Linux host running Klippy, such as a Raspberry Pi or an existing laptop. Williams describes both as host examples; the Raspberry Pi is not mandatory, and no particular model is specified.
- The
aplayutility installed on the host for the demonstrated implementation. - A wave file accessible at the path used in the sound configuration.
- Audio output that can play through a speaker. Check what your host already provides before assuming you need an external speaker; the example does not specify a speaker model or connection.
- A Klippy extension and G-code macro configured to use it. This is developer-oriented setup rather than a turnkey printer setting.
How to adapt the example safely
- Review the original example. Start with Williams’s Hackaday article for its Python module and configuration approach. Treat it as an example, not as guaranteed current syntax.
- Check current Klipper guidance. Consult the live code overview for extension architecture, and the official commands templates documentation and current configuration reference for G-code and configuration details.
- Make sure the host can play the file. Install
aplayon the Klipper host and verify that the chosen wave file is readable there. The sound is played by the host process, not by treating the printer microcontroller as an audio player. - Register and call the command deliberately. Add the extension and a macro that calls its registered sound command, following the code and configuration details you have verified against current Klipper documentation. Do not expect an ordinary macro to run a shell command by itself.
- Connect playback to the events you want. Once the command works, call it from the relevant start, abort, or completion macro. Test each event with the printer in a safe state and confirm the file path and host audio output if nothing plays.
Choosing an audio player or format
The demonstrated setup uses aplay and a wave file. Williams notes that a different player or file format could be substituted, but the replacement must be available on the host and invoked appropriately by the extension. Which player and format work depends on the host’s software and audio setup; the article does not compare alternatives.
Quick Recap
Best Value

- Voltage range: Operating voltage 3-24V, rated voltage 12V
- Size: Alarm diameter 29mm/ 1.14", height 15mm/ 0.59"
- Sound level: Produces continuous high-decibel alarm sound up to 95dB
- Applications: Suitable for car modification, DIY electronics projects, and other sound alarm needs
- Package contents: Includes 5pcs 95DB black active buzzers
Rank #4

- Package Included: You will get 10 pcs motherboard speaker, each with a length of 2.3 inches.
- Main Function: These motherboard speaker will make a sound to help you determine the operating status of the motherboard. They are easy to install, equipped with a 4-pin female connector, plug and play, and quickly integrated into the speaker connector on the front panel of the motherboard.
- Wiring: Equipped with a red wire for positive and a black wire for negative. However, any pole can be applied interchangeably as long as the interface is connected to the speaker.
- Usage: When you start the computer, you will hear a familiar "beep" sound, indicating that the system is running normally. This sound is emitted by the motherboard speaker. If there is a problem, the sound of the motherboard speaker can help you diagnose the problem.
- Quality material: These motherboard speaker are made of metal material, which is sturdy and will not break easily. It has reliable performance and can serve you for a long time.
Rank #3

- Product Name: Electronic Alarm Buzzer
- Feature: All multi-chip integrated circuits using gold wire ball bonding, complex production process, long life, stable performance, high rate of qualified products.
- Size: 11.7 x 8.8mm/0.46" x 0.35"(D*H);Pin Spacing: 7.6mm/0.35"
- Application: Widely used in the car modification, DIY electronics reminder projects or other area needs sound alarm.
- Package Include: 10pcs x Alarm Buzzer
Rank #2
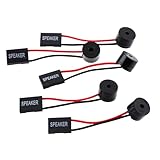
- Instructions for Use: When you start the computer, you will hear a familiar "beep" sound, indicating that the system is running normally. This sound is emitted by the pc motherboard speaker. If there is a problem, the sound of the motherboard speaker can help you diagnose the problem
- Wiring: Equipped with a red wire for positive and a black wire for negative. However, any pole can be applied interchangeably as long as the interface is connected to the speaker
- Main Function: These pc motherboard speaker will make a sound to help you determine the operating status of the motherboard. They are easy to install, equipped with a 4-pin female connector, plug and play, and quickly integrated into the speaker connector on the front panel of the motherboard
- Material: These motherboard speakers are made of metal material, durable and not easy to damage. Reliable performance, can be applied for a long time
- Package Content: You will get 5 pcs motherboard speaker, each with a length of 2.3 inches
Product prices and availability are accurate as of the date/time indicated and are subject to change. Any price and availability information displayed on Amazon at the time of purchase will apply.
Independent reader supportYour contribution helps us test, update, and keep practical guides available for everyone.
