
Recommended Free Tools
iTechGuides is reader-supported. When you buy through links on our site, we may earn an affiliate commission. As an Amazon Associate I earn from qualifying purchases. Learn more
Keep the YouTube Live stream connected and switch what OBS sends: play each recorded sermon from a Media Source, then cut or fade to a separate scene containing the Bible verse as an image or text. Test the complete handoff in YouTube Studio’s Live Control Room preview before the service.
Set up the YouTube Live stream and OBS scenes
- Create or schedule the live stream. In YouTube Studio, open the Live Control Room and create or schedule your stream. Connect OBS with the stream URL and stream key. Start the encoder and check that the incoming picture and sound appear in the Live Control Room preview before starting the public broadcast. See YouTube’s encoder setup instructions.
- Make a sermon scene. In OBS, create a scene for the recording. Add a Media Source and select the sermon video file. OBS’s source guide describes supported media types and playback options, including restart when the source becomes active and looping. For a sermon segment meant to play once, leave looping off; enable it only if you deliberately want playback to repeat. See the OBS Sources Guide.
- Make a verse scene. Create a second scene and add the verse as either an Image source for a prepared slide or a Text source for editable wording. Arrange it in the preview so the text is legible within the video frame, and check that the selected translation and reference are correct.
- Choose how to switch. OBS supports scene transitions such as Cut and Fade, as well as hotkeys for scene changes. Set the transition in OBS and assign a hotkey if a keyboard shortcut fits your operating setup. A cut changes scenes immediately; a fade makes the handoff gradual. Test sound during the switch, especially if the recording’s audio is part of the Media Source. See the OBS Scene Transitions guide.
Choose the verse source and handoff method
| Choice | Use it when | Trade-off |
|---|---|---|
| Prepared image | The verse slide has already been designed and checked. | It is a fixed graphic; changing wording means editing or replacing the image. |
| OBS Text source | You want to enter or edit the verse wording in OBS. | Check layout and legibility in the preview; the source guide documents the capability, not a particular church slide design. |
| Manual scene selection | An operator can watch sermon playback and switch at the intended handoff. | The operator must be ready at the right moment. |
| Hotkey | A keyboard shortcut is convenient at the production console. | Choose and test the shortcut in advance so it does not interfere with other controls. |
| Cut | You want an immediate change to the verse scene. | The change is abrupt by design. |
| Fade | You want a gradual visual handoff. | Check the transition timing and audio behavior in the actual sequence. |
Run and test the sequence before the service
- Start OBS and confirm that the sermon scene shows the correct recording and that its audio is present as expected.
- Start the encoder feed and wait for the picture and sound in YouTube Studio’s Live Control Room preview. YouTube recommends previewing and testing the setup before going live; its live streaming tips explain that encoders can send overlays as well as gameplay and other sources.
- Play the sermon, switch to the verse scene at the planned handoff, and confirm the slide is readable in the stream preview.
- Switch back to the next sermon scene and verify that its video and audio start as intended. If the media source should begin from the start on re-entry, check its restart-when-active setting.
- Only after the full sequence looks and sounds right in preview should you begin the live broadcast.
Custom verse scene or YouTube’s break slate?
YouTube documents a temporary away slate for breaks in the Live Control Room, along with an encoder browser-source overlay workflow. That is intended as a generic break treatment, not a purpose-built scripture scene. For a verse with chosen wording, layout, and timing between sermon recordings, use the custom OBS scene. See YouTube’s away slate instructions.
Common problems and fixes
- The preview is blank or does not show the sermon: Confirm the correct scene is selected, the Media Source points to the intended file, and OBS is sending a feed to the Live Control Room.
- The sermon repeats unexpectedly: Check the Media Source’s loop option. Turn it off when the recording should play once.
- The next sermon starts partway through: Enable the Media Source option to restart playback when the source becomes active, then test switching away and back.
- The verse is missing or hard to read: Check that the image or Text source is in the verse scene and inspect the result in the stream preview. Adjust the source layout or use a prepared image if you need a fixed design.
- Audio changes unexpectedly at the transition: Test both scenes and the transition before the service. Confirm the sermon audio source is active when needed and that changing scenes produces the intended sound.
- The hotkey does not switch scenes as expected: Verify the assigned OBS hotkey and test it during rehearsal; use manual scene selection if that is more reliable for your console.
Or let it run in the cloud
If the goal is a YouTube channel that keeps a pre-recorded program live continuously, StreamNeo is a cloud option: upload the recordings, add your YouTube stream key, and go live. It loops uploaded videos and playlists, so nothing has to stay running on a computer at home. A slot streams the upload as made, up to 4K 60fps, at one flat price per slot; StreamNeo automatically recovers if YouTube drops the stream. The first day is free with no card. Monthly: $9.99 per month. StreamNeo is for uploaded video on YouTube, not a live camera production, so use OBS when you need to operate the verse handoff during a service. Learn more at StreamNeo, or start the free first day.
Quick Recap
Best Value

- High Brightness DLP Lamp Projector: Deliver crisp text and vibrant images with WXGA (1280x800p) resolution and a 1.5-1.7 throw ratio; ideal for professional presentations and collaborative tasks in any workspace
- Clear Images with Ambient Lighting: Maintain visibility in classrooms and meeting rooms with 4,000 ANSI lumens; ensuring content remains sharp and readable even with moderate ambient light
- Vibrant and Cinematic Colors: Experience stunningly beautiful images powered by proprietary SuperColor technology; providing a wide color gamut for lifelike visuals in business or education settings
- Designed for Fast Paced Content: A low 16ms input latency and 120Hz refresh rate provides faster frame-by-frame action for smooth images with minimal delay
- Large Screen Immersive Viewing: Transform any professional environment with screen sizes ranging from 80 to 150 inches; conveniently projecting a detailed 100-inch image from 11 feet away
Rank #4

- High-Performance Full HD Projector: Deliver sharp, detailed visuals with native FHD (1920x1080p) resolution and a 1.4-1.6 throw ratio; providing professional-grade clarity for any space including offices and classrooms
- Clear Performance in Ambient Light: Maintain vibrant images with 4,000 ANSI lumens; ensuring presentations and instructional content stay visible in meeting rooms with moderate ambient lighting
- Designed for Fast-Paced Content: Experience smooth action with a 120Hz refresh rate and low 16ms input latency; perfect for fluid video playback and high-speed multimedia presentations with minimal delay
- Versatile Large Screen Viewing: Transform any professional environment with screen sizes ranging from 80 to 150 inches; conveniently projecting a detailed 100-inch image from just 10.8 feet away
- Easy Setup and Image Adjustment: Simplify your installation with 1.1x optical zoom and vertical auto-keystone correction; allowing for quick and precise image alignment on various projection surfaces
Rank #3
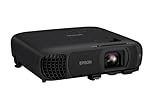
- EXTRA-LARGE SCREEN DISPLAY — Image size reaches up to 300 in, 4x the size of a 75 in flat panel; Color projector with speaker allows you to level up your Zoom video conferencing experience with stunning Full HD 1080p resolution
- ULTRA BRIGHTNESS — 4,100 Lumens of Color Brightness (IDMS rated) and 4,100 Lumens of White Brightness (ISO Rated)¹; Wall projector allows you to display group presentations, spreadsheets and videos, even in well-lit rooms
- CRISP IMAGE QUALITY — Advanced 3-Chip 3LCD technology displays 100% of RGB color signal for every frame, providing precision color accuracy while maintaining vivid color brightness, without distracting "rainbowing" or "color brightness" issues
- WORKS WITH APPLE AIRPLAY — Epson projector with wifi allows you to wirelessly stream videos, music, photos and presentations to your projector from your iPhone, iPad, or Mac², plus screen mirroring with Miracast to stream from your Windows PC³
- VERSATILE CONNECTIVITY — Features two HDMI ports and a USB port that functions as a power source for streaming devices⁴; Easily connect laptops and devices including Fire TV, Apple TV, Roku, and Chromecast; Seamless video conferencing and more
Rank #2
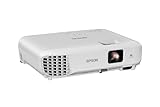
- EXTRA-LARGE SCREEN DISPLAY — Image size reaches up to 300 in, 4x the size of a 75 in flat panel; Color projector with speaker allows you to level up your Zoom video conferencing experience with stunning widescreen WXGA resolution
- ULTRA BRIGHTNESS — 4,000 Lumens of Color Brightness (IDMS rated) and 4,000 Lumens of White Brightness (ISO Rated)¹; Wall projector allows you to display group presentations, spreadsheets and videos, even in well-lit rooms
- CRISP IMAGE QUALITY — Advanced 3-Chip 3LCD technology displays 100% of RGB color signal for every frame, providing precision color accuracy while maintaining vivid color brightness, without distracting "rainbowing" or "color brightness" issues
- VERSATILE CONNECTIVITY — Epson video projector features two HDMI ports so you can easily connect laptops and streaming devices², including Amazon Fire, Apple TV, Roku and Chromecast; Connect laptops for seamless video conferencing and more
- QUICK AND SIMPLE SETUP — The built-in speaker means you can start using this business projector immediately; Easy setup for video and audio right out of the box; Portable projector can also be easily repositioned
#1 Best Overall

- HIGH-BRIGHTNESS FHD LASER PROJECTOR: This projector delivers Full HD 1920 x 1080 resolution and 5,500 ANSI lumens with a 1.13-1.47 throw ratio for bright, detailed images in boardrooms, classrooms, lecture halls, and golf simulators.
- GOLF MODE FOR REALISTIC SIMULATION: Designed for immersive play, this laser projector supports major golf simulators while its laser phosphor light source provides up to 30,000 hours of operation in Dynamic Eco mode.
- LARGE-SCREEN PROJECTION: Display images from 30 to 300 inches with this video projector, using a 1.3x optical zoom to adapt the image for meeting rooms, classrooms, training spaces, and public venues.
- FLEXIBLE INSTALLATION: H/V keystone, 4-corner adjustment, portrait mode, and 360-degree projection make this ceiling projector easier to position for permanent installations and rooms with challenging projector placement.
- VERSATILE CONNECTIVITY: Dual HDMI 1.4 inputs, USB Type A, RS232 control, audio out, and a built-in 15W speaker make this business projector ready for compatible presentation systems, media devices, and installed environments.
Product prices and availability are accurate as of the date/time indicated and are subject to change. Any price and availability information displayed on Amazon at the time of purchase will apply.
Independent reader supportYour contribution helps us test, update, and keep practical guides available for everyone.
