
Do these 3 things before closing this tab:
1Fix the driver behind crashes, sound loss and screen glitches2Clear out junk files and repair common Windows errors3Scan for outdated or missing drivers - takes under a minuteTo play GoldenEye 007 on a PC, install a Nintendo 64 emulator such as Mupen64Plus, connect a gamepad, then map its controls to the N64 controller layout and test them in the game. This walkthrough covers Mupen64Plus with its SDL input plugin; RetroArch, Project64, and other front ends use different configuration systems.
What you need before setup
- A Mupen64Plus build for your operating system. The project’s README describes the latest code and may include instructions for unreleased code, so follow the README packaged with your released build if its directions differ: Mupen64Plus Core README.
- A PC gamepad connected before you launch the emulator. SDL input can automatically configure recognized joysticks; without a supported joystick, Mupen64Plus documents keyboard controls instead: Mupen64Plus Input-SDL documentation.
- A game image you are authorized to use. The setup steps below only explain how to pass an image file to the emulator; they do not establish which ways of obtaining one are lawful in your location.
No particular Mupen64Plus release or gamepad model is established here as the recommended choice. If you need a controller, compare whether your operating system recognizes it, whether it has two sticks and suitable face and shoulder buttons, and whether you are willing to configure its inputs manually.
Install and launch Mupen64Plus
- Obtain and install a build through the project’s official distribution channel for your operating system. Use the instructions bundled with that build if they differ from the latest-code README; the project notes that its online README can cover unreleased code: Mupen64Plus Core README.
- Connect your gamepad before opening Mupen64Plus. The SDL input plugin may configure a recognized joystick automatically.
- Launch the emulator with the path to your game image as the ROM argument. The documented command form is
mupen64plus [parameter(s)] rom. Parameters can select fullscreen mode and input, graphics, audio, and RSP plugins. Check the documentation for your particular build for operating-system-specific launch details.
Map the gamepad to the N64 controls
Mupen64Plus SDL input handles the physical gamepad-to-emulated-controller mapping. Its configuration separates simulated controllers 1 through 4 and includes fields for the device, device name, whether the controller is plugged in, pak type, deadzone, and button or axis bindings. The plugin supports the N64 analog stick, four C-button directions, D-pad, A and B buttons, Start, Z, L and R triggers, and pak switching: Input-SDL plugin documentation.
Try a dual-stick starting layout
For a modern gamepad, a practical starting arrangement is the left stick for N64 analog movement, face buttons for A and B, a shoulder button or trigger for Z, and the right stick for the four C-button directions. The plugin README shows that a second analog stick can be assigned to C buttons, and notes that its axes can be swapped to put analog movement on the other stick instead: Input-SDL plugin documentation.
#1 Best Overall
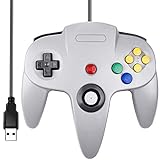
- Plug & Play: Standard USB controller; no drivers needed for compatible devices
- Compatible with Windows PC, macOS, Linux and Raspberry Pi
- Iconic original M-shaped configuration, featuring 10 action buttons, a precision analog Control Stick, and an 8-way D-pad.
- The 3D analog stick provides nuanced control for precise movements and enhanced gameplay comfort.
- Features a 6-foot (1.8 m) cable for comfortable gameplay.
This is a suggested layout to try, not a tested GoldenEye preset. Gamepads report controls differently, so adjust the mapping to suit your device and how you want to play.
Check GoldenEye’s in-game controls
After mapping the emulator controls, open the game’s control options and select a scheme that works with your layout. Test movement, aiming, firing, and menu navigation before changing sensitivity. The available documentation does not establish exact menu wording or a version-specific best layout, so follow the options shown in your copy of the game rather than relying on a particular menu label.
Use the keyboard fallback if needed
If Mupen64Plus has no supported joystick connected, its documented SDL keyboard defaults are:
Rank #2

- Use the generic standard USB port, if your program or application accepts USB controller input, it can be used natively without drivers or patches, JUST PLUG AND PLAY!
- Supported Operating system: Windows 98, ME, Vista, 2000, 2003, XP, 7, 8, 8.1, 10; Linux UBUNTU, Linux Mint, Android Linux (via an USB OTG cable); Mac OS X and beyond; Retrogaming operating systems: RetroPie, Recalbox, Happi Game Center, Lakka, ChameleonPi, Piplay.
- Supported Device (With USB storage device): PC, Notebook Computer, Laptop Computer; Android Smartphone: connect via an USB OTG cable; Raspberry Pi (RPI, Raspberry pie): Raspberry Pi 1 Model B, Model A, Raspberry Pi 1 Model B+, Raspberry Pi Zero, Raspberry Pi 2, Raspberry Pi 3 Model B, Raspberry Pi 3, Retro Pie. --- Note: NOT SUPPORT Android TV BOX.
- Supported Game Emulators: Current: Project64, 1964, MAME (MESS), Mupen64Plus, Sixtyforce, CEN64; Historical: Project Unreality, Corn, UltraHLE, Nemu64.
- Super sensitive buttons for precision control. Third party controller, not original Nintendo 64 controller. But it works phenomenal with the Raspberry Pi game emulation and so on. Cord is approx 5.9 ft. Long.
| N64 control | Default keyboard binding |
|---|---|
| Analog pad directions | Arrow keys |
| C-up, C-left, C-down, C-right | I, J, K, L |
| D-pad directions | W, A, S, D |
| Z trigger | Z |
| Left and right triggers | X and C |
| Start | Enter |
| A and B | Left Shift and Left Control |
Arrow keys normally simulate full analog-stick deflection. Right Control reduces it by 50%, Right Shift by 25%, and pressing both reduces it by 75%. These are fallback defaults, not an action-game-optimized layout. You can remap the keyboard in the configuration file, but its location varies by operating system and documentation version: Input-SDL keyboard documentation.
Free tools Windows power users keep installed
One-click scans. No signup required.
Fix common controller problems
These checks apply to Mupen64Plus SDL input. If you use RetroArch, Project64, or another front end, use that software’s own input settings instead; its mappings may not be stored in Mupen64Plus configuration files.
“No auto-configuration found for device”
Check the detected controller name, then add or rename a section in InputAutoCfg.ini so the section name matches the device. You can copy a nearby mapping as a template only when its binding syntax and control layout apply to your hardware. Adjust its button and axis entries as needed. The troubleshooting documentation recommends joystick-testing utilities to identify button, axis, and hat numbers: Input-SDL controller configuration documentation.
Rank #3

- Use the generic standard USB port, if your program or application accepts USB controller input, it can be used natively without drivers or patches, JUST PLUG AND PLAY!
- Supported Operating system: Windows 98, ME, Vista, 2000, 2003, XP, 7, 8, 8.1, 10; Linux UBUNTU, Linux Mint, Android Linux (via an USB OTG cable); Mac OS X and beyond; Retrogaming operating systems: RetroPie, Recalbox, Happi Game Center, Lakka, ChameleonPi, Piplay.
- Supported Device (With USB storage device): PC, Notebook Computer, Laptop Computer; Android Smartphone: connect via an USB OTG cable; Raspberry Pi (RPI, Raspberry pie): Raspberry Pi 1 Model B, Model A, Raspberry Pi 1 Model B+, Raspberry Pi Zero, Raspberry Pi 2, Raspberry Pi 3 Model B, Raspberry Pi 3, Retro Pie. --- Note: NOT SUPPORT Android TV BOX.
- Supported Game Emulators: Current: Project64, 1964, MAME (MESS), Mupen64Plus, Sixtyforce, CEN64; Historical: Project Unreality, Corn, UltraHLE, Nemu64.
- Super sensitive buttons for precision control. Third party controller, not original Nintendo 64 controller. But it works phenomenal with the Raspberry Pi game emulation and so on. Cord is approx 5.9 ft. Long.
A stick moves the wrong way or does not move
Verify that the right SDL device is selected, then check the X and Y axis numbers and whether each binding uses the correct positive or negative direction. Review the analog deadzone and peak settings for the device rather than assuming one value suits every controller: Input-SDL plugin documentation.
The D-pad does not respond as a hat
Some controllers expose D-pad directions as axes rather than a hat switch. If yours does, configure those directions using axis syntax instead of hat() bindings: Input-SDL controller configuration documentation.
PC Slower Than It Used to Be?
A free scan shows the junk files, broken settings and background clutter dragging Windows down - then fixes them in one click.Free scan · Windows 10 & 11Outdated Drivers Are Slowing You Down
One free scan finds every outdated or missing driver and matches the right update for your exact hardware.Free scan · exact hardware matchThe emulator does not detect the controller or the wrong port receives input
Confirm the gamepad is connected and recognized, assigned to simulated controller 1, and marked plugged in in the controller configuration. Then verify that the configured button and axis numbers match the actual device. Mupen64Plus’s troubleshooting guidance covers auto-configuration and manual device mappings: Input-SDL controller configuration documentation.
Use a mouse as an alternative
Mupen64Plus input configuration can map mouse movement to the N64 analog stick and mouse buttons to controller buttons. Enabling this grabs and hides the pointer; Left Control + Left Alt is the documented toggle: Input-SDL controller configuration documentation.
Quick Recap
Product prices and availability are accurate as of the date/time indicated and are subject to change. Any price and availability information displayed on Amazon at the time of purchase will apply.

