
Quick wins for a faster PC:
Fix the driver behind crashes, sound loss and screen glitchesFind Drivers →Clear out junk files and repair common Windows errorsFree Scan →Scan for outdated or missing drivers - takes under a minuteDriver Scan →For a quick image, use your operating system’s built-in capture tool. On Windows, Snipping Tool captures freeform, rectangular, window, and full-screen images and can record a rectangular video area. On macOS, Screenshot captures a selected area, window, or display and records video. Use OBS Studio when you need scenes, a webcam, microphone and desktop audio, gameplay, or an external capture card.
The right workflow depends on the result you need: a still image, a short clip, or a narrated production recording. The steps below cover each choice, including window-only captures, system audio, microphone checks, file formats, testing, and common failures.
Choose the capture method before you start
| Need | Best choice | Why |
|---|---|---|
| A quick screenshot | Windows Snipping Tool or macOS Screenshot | Built in, few settings, immediate save or clipboard copy |
| A short explanatory clip | Snipping Tool video snip on Windows; Screenshot recording on macOS | Fast recording of a selected area without configuring scenes |
| Narrated tutorial | OBS Studio | Selectable display or window, microphone, desktop audio, and reusable scenes |
| Gameplay | OBS Studio | Game Capture on Windows and separate audio controls |
| Camera or HDMI source | OBS Studio with Video Capture Source | Accepts webcams and capture cards |
Before opening an app, decide whether you need the whole display or one window, whether audio is required, and where the final file will be shared. A still screenshot normally belongs in a lossless image format; a recording needs a video container and an audio track.
Capture screenshots and video on Windows with Snipping Tool
Take a still screenshot
- Press Windows logo key + Shift + S. The capture overlay appears.
- Choose Freeform, Rectangle, Window, or Full screen.
- Select the content. A notification opens the result in Snipping Tool.
- Use the annotation controls if needed, then save or copy the image and share it.
For a full-screen image copied directly to the clipboard, press Print Screen. Paste it into an editor, document, chat, or image field and save it from there.
#1 Best Overall

- 【1080P HD High Quality】Capture resolution up to 1080p for video source and it is ideal for all HDMI devices such as PS4, PS3, Xbox One, Xbox 360, Wii U, DVDs, DSLR, Camera, Security Camera and set top box. Note: Video input supports 4K30/60Hz and 1080p120/144Hz. Does not support 4K120Hz/144Hz. Output supports up to 2K30Hz.
- 【Plug and Play】No driver or external power supply required, true PnP. Once plugged in, the device is identified automatically as a webcam. Detect input and adjust output automatically. Won't occupy CPU, optional audio capture. No freeze with correct setting.
- 【Compatible with Multiple Systems】suitable for Windows and Mac OS. High speed USB 3.0 technology and superior low latency technology makes it easier for you to transmit live streaming to Twitch, Youtube, Facebook, Twitter, OBS, Potplayer and VLC.
- 【HDMI LOOP-OUT】Based on the high-speed USB 3.0 technology, it can capture one single channel HD HDMI video signal. There is no delay when you are playing game live.
- 【Support Mic-in for Commentary】Rybozen capture card has microphone input and you can use it to add external commentary when playing a game. Please note: it only accepts 3.5mm TRS standard microphone headset.
Record a rectangular video snip
- Press Windows logo key + Shift + R.
- Drag over the rectangular area to record.
- Start and stop the recording from the Snipping Tool controls.
- Open the resulting clip, review it, and save or share it.
This is useful for demonstrating a small UI interaction without recording the entire desktop. It does not replace OBS when you need multiple sources, a webcam overlay, or a carefully mixed audio track.
Make the Windows capture clean and safe
- Close private tabs, password managers, notifications, and messaging previews before selecting the area.
- Resize the target window so text is legible at the final display size.
- Pause animated content when explaining a still image.
- Annotate after capture rather than moving the pointer repeatedly during a screenshot.
Capture screenshots and recordings on macOS
Open Screenshot and select a mode
- Open the Screenshot app from Applications > Utilities, or use the Mac’s Screenshot keyboard shortcut to open its control bar.
- Choose a still-image option or a screen-recording option.
- For a still, select the entire screen, a window, or a selected portion, then capture it.
- For a recording, select the entire screen or a selected portion and start recording. Stop from the menu-bar control.
Apple’s Screenshot workflow saves screenshots as .png files and screen recordings as .mov files. Confirm the save location before a long recording so the file does not end up somewhere unexpected.
Record only the window or region you are explaining
Use the selected-portion option and frame the application tightly. Leave enough space for menus and pointer movement, but exclude unrelated windows. A window-only capture is easier for viewers to follow and reduces the chance of exposing notifications or confidential information.
Check permissions and audio on macOS
If an app cannot capture the display, review its permissions in System Settings > Privacy & Security. A microphone also needs permission before narration can be recorded. For a reliable result, make a short test, play it back, and verify both the picture and the audio before recording the complete tutorial.
Free tools Windows power users keep installed
One-click scans. No signup required.
Use OBS Studio for tutorials, gameplay, and multi-source recordings
OBS Studio is the flexible option when a built-in recorder is too limited. Its workflow is based on scenes (saved layouts) and sources (the display, window, game, camera, image, or audio input inside a scene).
Rank #2

- 【4K HDMI Input, 2K@30Hz Recording】Powered by a true USB 3.0 high-speed interface, the capture card supports up to 4K@30Hz HDMI input and records at 2K@30Hz or 1080P@60Hz. Perfect for gamers, streamers, and professionals who need crisp, smooth video for live streaming, gameplay recording, or online meetings.
- 【Ultra Low Latency Screen Sharing】Built with a premium aluminum alloy shell and advanced chipset for stable heat dissipation, ensuring ultra-low latency transmission. Capture high-quality video and dual-channel audio in real time—no lag, no frame drop—ideal for Twitch, YouTube, or OBS streaming.
- 【Easy Plug and Play, Compact & Portable】No driver or external power required—just plug and play via USB 3.0 or Type-C connection to your Windows or macOS computer. Lightweight and compact design makes it easy to carry for outdoor streaming, live shows, or mobile recording setups.
- 【Wide Compatibility & Multi-Device Support】Compatible with Windows 7 8 10 11, macOS, Linux,Android and supports most popular software such as OBS, Zoom, VLC, Twitch Studio, and more. Works seamlessly with PS4, PS5, Xbox, Switch, DSLR cameras, TV boxes, and other HDMI-output devices for streaming to YouTube, Twitch, etc.
- 【What You Get】Includes: HDMI Capture Card, USB 3.0 to USB-C Adapter, User Manual. Tips: Make sure your tablet’s OTG function is enabled before connecting. Test your HDMI device with a monitor first to confirm video and audio output, then connect to the Video Capture Card for recording.
Build a basic scene
- Install and open OBS Studio.
- In Scenes, create a scene such as “Tutorial” or “Gameplay.”
- In Sources, add the capture you need:
- Display Capture records an entire display.
- Window Capture records one application window.
- Game Capture targets games on Windows.
- Video Capture Source adds a webcam or capture card.
- On macOS, macOS Screen Capture can capture a display, a single window, or visible windows for an application.
- Arrange and crop sources in the preview. Put a webcam layer above the screen or game layer if you want a picture-in-picture layout.
- Open the audio controls and confirm the microphone and desktop-audio meters move when you speak and play sound.
- Set the output folder and recording options, then press Start Recording.
- When finished, press Stop Recording and open the saved file.
OBS recommends running a short test before an important recording. Spend a few minutes checking framing, pointer visibility, frame rate, microphone level, desktop sound, and available disk space rather than discovering a failure after the full session.
Configure audio for a narrated tutorial
- Use a microphone source for narration and watch its meter while speaking at your normal volume.
- Use desktop audio only when viewers must hear application sounds, music, or gameplay.
- Keep the microphone and desktop meters separate so you can identify which source is clipping or silent.
- Record a sentence and a short application sound, then play the test back with headphones.
A USB microphone is a practical upgrade when the built-in microphone sounds distant or noisy. OBS documents microphone inputs and audio meters, so you can verify the upgrade inside the same scene. Treat a USB microphone as an input, not as a guarantee of better sound: placement and room noise still matter.
Add gameplay or external HDMI video
For a Windows game, add Game Capture and select the game-specific mode that matches your title. If the game does not appear, test Window Capture or Display Capture and run OBS with the same privilege level as the game. For a camera or console, connect a compatible USB video capture card, add Video Capture Source, choose the device, and check its preview and audio separately. A USB HDMI capture card is the relevant accessory when the source is an external HDMI device.
macOS version considerations
OBS’s macOS Screen Capture source provides audio on macOS 13 and later. Support is more limited on macOS 12.3–12.6, so verify the audio path on the exact Mac and operating-system version you will use. If desktop audio is absent, keep the video source and microphone test separate while you diagnose the system-audio permission or source configuration.
Screenshot and recording quality checklist
- Frame the subject: capture the relevant window or region instead of an unreadable full desktop.
- Make text readable: enlarge the application or browser before recording; do not rely on viewers to zoom a compressed clip.
- Keep the pointer intentional: move slowly when demonstrating a control and park it away from text when speaking.
- Protect private data: hide account numbers, tokens, email previews, and browser extensions.
- Check storage: longer recordings and higher-resolution sources create larger files.
- Test end to end: capture a short sample, stop it, open the saved file, and listen with headphones.
Troubleshoot common capture failures
The screenshot is blank or shows the wrong window
Re-select the target after bringing it to the foreground. In OBS, confirm that the source is visible in the Sources list and that another source is not covering it. For protected video or hardware-accelerated applications, try the application’s supported capture mode or a different source; some content intentionally blocks capture.
Rank #3

- High-Quality Video Capture, 4K HDMI Capture Card Ready: Capture smooth and vibrant video with this 4K HDMI capture card, engineered for gamers and content creators who demand crisp 1080P 60FPS video quality. Whether you're streaming to Twitch or recording gameplay for YouTube, your footage will look professional and detailed
- Plug-and-Play USB Capture Card, No Drivers Needed: Designed as a USB capture card for streaming, this device works instantly out of the box, just plug into your PC or laptop and start capturing. Fully compatible with popular software like OBS Studio, Streamlabs, and XSplit, making setup quick and stress-free for beginners and pros alike
- Universal Compatibility PS5, Xbox, Switch & More: Stream or record gameplay from virtually any HDMI-enabled device including Nintendo Switch, PS5, Xbox Series X, DSLR cameras, and PCs. The video capture card for gaming supports seamless passthrough so you can play without lag while your audience watches every frame in real time
- Low-Latency Performance for Smooth Streaming: This capture card for streaming minimizes delay between gameplay and broadcast, so you get reliable, low-latency capture that works well for competitive gaming, live broadcasts, and podcast sessions. Suitable for those building their channel with high-quality, engaging content
- Compact & Portable Design for Content Creators: Lightweight and portable, this USB 3.0 capture card works well for creators who travel or switch gaming setups often. Throw it in your bag and stream or record wherever you are, at home, events, LAN parties, streaming or studio sessions
The recording has no microphone audio
Check that the correct microphone is selected, its meter moves, and the operating system has granted microphone permission. Disconnect unused microphones, make a short test, and listen to the saved file rather than relying only on the live meter.
Desktop or game audio is missing
In OBS, verify the desktop-audio source and its meter. On macOS, check the operating-system version and permissions because Screen Capture audio support differs between macOS 13 and macOS 12.3–12.6. For games, test Window Capture or Display Capture if Game Capture does not hook correctly.
Windows Errors? Fix Them Before They Spread
Repair common Windows errors and clear accumulated junk for a smoother, more stable PC - no reinstall needed.Free scan · no reinstallCrashes, No Sound, or Screen Glitches?
Random freezes, missing sound and display glitches usually trace back to one bad driver. Find and replace yours safely.Free scan · under a minuteThe video is choppy or the file is huge
Lower the capture resolution or frame rate, close unnecessary applications, and record a short sample. If the sample is smooth, increase one setting at a time. Keep free disk space available; a failed write near the end cannot be repaired by changing the source afterward.
A webcam or capture card is not available
Reconnect the device, close other software that may be using it, and select it again under Video Capture Source. Check that the device appears at the operating-system level. If video works but sound does not, treat the capture card’s audio as a separate source and test it independently.
The saved file cannot be found
Check the application’s configured save folder and the operating system’s default screenshot location. In macOS Screenshot, confirm the destination in the Screenshot controls before recording. In OBS, review Output settings and then make a one-second test to establish the exact path.
Rank #4

- 【1080P 60FPS Video Capture Card】 This HDMI game capture card is based on USB3.0 high speed transmission port, input resolution up to 4K@30HZ, output resolution up to 2K@30Hz or 1920×1080@60Hz. Type c and USB interface can meet most of the devices in daily life. Easily meet the online capture, real-time recording, online meetings, live gaming and other functions, so you have a better visual enjoyment. Note: For capture use only; requires capture software to function and is not intended for direct screen casting to a monitor or TV
- 【Ultra Low Latency Screen Sharing】 HDMI capture card is made of good quality aluminum alloy with strong heat dissipation, allowing you to enjoy ultra low latency while live gaming or video recording or live streaming, avoiding blue screens and lag. This HDMI to USBC capture card supports easy recording of good quality audio or HD video and transferring it to your computer or streaming platform, allowing you to record 60 fps HD video directly on your hard drive and real-time preview
- 【Plug and Play, Easy to Carry】 This HDMI 1080P video capture card does not require any additional drivers or external power supply, just plug and play for fast capture. The capture card is small and lightweight, so you can put it in your bag for emergencies, making it very portable for outdoor live streaming. It's also a great way to share content in game recording, video conference, video recorder and online teaching
- 【Wide Compatibility USB Capture Card】 Easily streams to Facebook, Youtube or Twitch. With the connection, this HDMI to USB C/3.0 video capture devices can be working on several Operating Systems and various software: Windows 7/ 8/ 10, Mac OS or above, Linux, Android, Laptop, Xbox One, PS3/PS4/PS5, Camera, DVDs, Set Top Box, Webcame, DSLR, Switch/Switch 2, TV BOX, HDTV, Potplayer/VLC, ZOOM, OBS Studio etc.
- 【Package Content & Note】 1x HD Audio Capture Card , 1x USB 3.0 to USB C Adapter (A-side 3.0, B-side 2.0), 1x user manual. Please note that you need to restart the OBS Studio software after the audio setup is complete, otherwise it will result in no sound output. When using an adapter, if the device is recognized as USB 2.0, try using the other side with the USB-C port. Simply flip the capture card and reconnect it to be recognized as USB 3.0
Or skip the browser setup
If what you need is a screenshot of a public webpage rather than a recording of your own desktop, ScreenshotNeo returns a PNG, JPEG, WebP, or PDF from one GET request. It accepts the page like a visitor, removes more than 60 known consent platforms plus newsletter popups and chat widgets before capture, and bills only clean shots. Bot checks or CAPTCHAs, blank pages, timeouts, failed loads, and cache hits are not billed; the response identifies the page verdict and billing status in X-Page-Verdict and X-Billed headers.
Read the complete parameter list in the ScreenshotNeo documentation. This basic cURL request saves a WebP file:
curl -G "https://api.screenshotneo.com/v1/shot" -d access_key=YOUR_API_KEY --data-urlencode url=https://stripe.com -o shot.webpThe same request in Python:
import requests
r = requests.get("https://api.screenshotneo.com/v1/shot", params={"access_key": "YOUR_API_KEY", "url": "https://stripe.com"}, timeout=90)
open("shot.webp", "wb").write(r.content)
And in Node.js:
const q = new URLSearchParams({ access_key: 'YOUR_API_KEY', url: 'https://stripe.com' });
const res = await fetch(`https://api.screenshotneo.com/v1/shot?${q}`);
ScreenshotNeo also provides an MCP server for Claude, Cursor, and other MCP clients, with take_screenshot, get_page_info, and capture_pdf tools. Every plan includes features such as full-page capture with lazy images loaded, CSS-selector element capture, device presets, custom CSS and JavaScript, waits, request blocking, cookies and headers, geolocation, caching, signed links, asynchronous jobs, bulk capture of up to 100 URLs per call, and a usage API.
The Free plan includes 1,000 screenshots per month with no card. Paid plans start at $5 for 3,000 shots; yearly billing gives two months free. Create a free ScreenshotNeo account to try it.
FAQ
Can I capture just one application window?
Yes. Choose Window capture in Windows Snipping Tool or macOS Screenshot, or add Window Capture in OBS. Keep the window in the foreground when the tool requires it.
Best Value
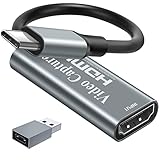
- [60fps4K perfect capture card] - Designed for game recording, video recording, online meeting, live broadcasting etc. Records high resolution video up to 1080p at 60fps The USB-C end is compatible with more devices
- Video Card Capture USB C – Capture card 60fps can be used for Windows, Android, Mac OS X and Linux. No more installing drivers, based on the high-speed USB 2.0 technology, let your live streaming on Twitch, YouTube, Facebook, Twitter, OBS, Potplayer and VLC
- No delay, no freezing: the HDMI video capture card 1080p offers a high-resolution input with a resolution of up to 3840 x 2160 @ 60 Hz. 1080p video recording card images are fluid, without freezing and no delay. Suitable for HD video recording, live broadcasting, live games, etc
- [Widely Compatible] - The 1080P HDMI recording card is compatible with most devices, such as: PS3, PS4, Xbox One, Xbox 360, Wili U Wii, Nintendo Switch, DVD, Security Camera, Webcam, Set-Top Box, DSLR etc
- [You should forge the iron as long as it is hot] - We are sure that you will be satisfied with this game capture card - Input end: USB C / Output end: HDMI, package comes with a USB C adapter to adapter your USB C and USB device
Which format does macOS use?
macOS Screenshot saves still images as PNG and screen recordings as MOV.
Should I use OBS for every screenshot?
No. Built-in tools are faster for still images and short clips. OBS is worthwhile when you need multiple sources, scenes, narration, gameplay, a webcam, or an external video input.
How do I know a recording is usable?
Play a short test from the saved file. Confirm the intended area is visible, text is readable, and microphone and desktop audio are present before recording the full session.
Frequently Asked Questions
Can I record a tutorial without showing my entire desktop?
Yes. Select a window or rectangular region in the built-in tools, or use Window Capture in OBS and add only the sources your tutorial needs.
Do these 3 things before closing this tab:
1Clear out junk files and repair common Windows errors2Scan for outdated or missing drivers - takes under a minute3Repair Windows errors before they cause bigger problemsWhat is the simplest way to capture a webpage image automatically?
Use a website screenshot API such as ScreenshotNeo when you need repeatable URL-based captures instead of manually arranging a browser window.
The Bottom Line
Use Snipping Tool or macOS Screenshot for fast captures; use OBS when audio, scenes, games, cameras, or capture cards make the job more demanding. Always test the saved file before the real recording.
Quick Recap
Product prices and availability are accurate as of the date/time indicated and are subject to change. Any price and availability information displayed on Amazon at the time of purchase will apply.

