
iTechGuides is reader-supported. When you buy through links on our site, we may earn an affiliate commission. As an Amazon Associate I earn from qualifying purchases. Learn more
For most ESP32-S3 projects, flash over the board’s serial connection with idf.py -p PORT flash, replacing PORT with the port your computer assigns to the board. If the board does not enter download mode automatically, hold BOOT, press RESET once, then release BOOT. USB-OTG DFU is a separate method with different firmware, host requirements, and hardware configuration; it is not a universal fallback.
Identify which USB interface your ESP32-S3 board uses
“Flash over USB” can refer to different paths, and the chip name alone does not tell you which connector or method your board exposes. Check the board documentation or schematic before choosing a port or following pin-level instructions.
| Interface | What it does | What to expect |
|---|---|---|
| USB Serial/JTAG | The ESP32-S3’s built-in USB interface can provide serial communication and support flashing without an external USB-to-UART bridge. Espressif identifies GPIO20 as D+ and GPIO19 as D− for this internal USB connection. Espressif USB Serial/JTAG documentation | Use this route when the board connects its USB socket to the chip’s native USB pins and exposes the interface to your computer. |
| USB-to-UART bridge | A separate chip on the board converts USB data to the ESP32-S3’s serial programming connection. | It commonly appears as a serial port, but the bridge and connector are board-specific. |
| USB-OTG DFU | A distinct firmware-download path using USB-OTG and dfu-util. |
Requires DFU-capable configuration, bootloader mode, and the appropriate host driver or permissions. It is not interchangeable with the default USB Serial/JTAG setup. |
Do not assume the board has USB-C, native USB wiring, or DFU support just because it contains an ESP32-S3. Use the board’s intended connector and a cable that carries data, not power only.
Quick wins for a faster PC:
Scan for outdated or missing drivers - takes under a minuteDriver Scan →Repair Windows errors before they cause bigger problemsFix Now →Fix the driver behind crashes, sound loss and screen glitchesFind Drivers →How do I flash firmware to an ESP32-S3 over USB?
For an ESP-IDF project, activate the ESP-IDF environment used by that project, open a terminal in the project directory, and run:
#1 Best Overall
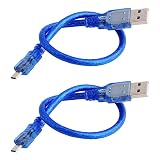
- Used for various Micro-USB port devices, data transfer and charge
- Interface: Micro-USB to USB 2.0
- Cable Length: 30cm/11.8"
- Color:Blue
- What you will get: 2 X Micro-USB Cable
idf.py -p PORT flashReplace PORT with the actual serial port for the board. The command builds and flashes the project as needed, so you do not have to run idf.py build first when using this workflow. See Espressif’s ESP32-S3 get-started guide for the project workflow.
- Connect the board using its documented programming connector and a data-capable cable.
- Identify the port assigned to that connection on your computer, then substitute it for
PORT. - Run
idf.py -p PORT flashfrom the ESP-IDF project directory. - Wait for the tool to finish writing the images. If automatic bootloader entry fails, use the manual download-mode procedure below and run the flash command again.
When a build completes, esptool’s generated flash command shows the binary paths and offsets for that particular build. Prefer that command over copying addresses from an unrelated example. An example may place the bootloader at 0x0, the partition table at 0x8000, and the application at 0x10000, but those addresses are not a universal image layout. Arduino and PlatformIO users should inspect verbose upload output for the actual esptool invocation and the files their framework built. Espressif’s esptool command documentation explains the generated command and flashing process.
Rank #2

- 2 pieces of USB Type-C Cable for Arduino Uno R4
- Uses to power and uploading code to Arduino Uno R4 WiFi and Minima
- Also works with ESP32 boards that has USB Type-C interface
- Can be used to exchange data between PC and any devices that supports USB Type C
- USB Type C Data Sync Cable
How do I put an ESP32-S3 into download mode?
If flashing for the first time or automatic reset does not work, enter the ROM serial bootloader manually. Espressif’s ESP-IDF Programming Guide v6.1 gives this sequence: “If you are flashing for the first time, you need to get the ESP32-S3 into the download mode manually. To do so, press and hold the BOOT button and then press the RESET button once. After that release the BOOT button.” Espressif: Establish Serial Connection with ESP32-S3
- Press and hold BOOT.
- Press and release RESET once while continuing to hold BOOT.
- Release BOOT, then retry the flash command.
At the chip level, GPIO0 must be low when the ESP32-S3 resets to enter ROM serial bootloader mode. Many development boards handle reset timing through their circuitry, but button labels and behavior vary; consult the board documentation for custom designs.
Rank #3

- High-performance Dual-core Processor: Integrated Xtensa 32-bit LX7 dual-core processor, offering powerful computing power and performance with low power consumption
- Upgraded Design with Complete Accessories: This board features enhanced connectivity with an external antenna base, pre-soldered headers for easy prototyping, and comes with 2 × antennas and 2 × IPEX conversion cables, providing a comprehensive solution out of the box
- Wi/Fi & Bluetooth 5.0 Dual Mode Support: Supports 2.4GHz Wi-Fi 802.11 b/g/n and Bluetooth 5.0 (BLE). The Bluetooth Low Energy subsystem supports Bluetooth 5 (LE) and Bluetooth Mesh. Equipped with a low-power coprocessor and a high-power mode of up to 20 dBm, it can meet the requirements of a variety of application scenarios
- Dual Type-C Interface & High-Speed Data Transfer: Features two Type-C ports — one dedicated COM port for direct plug-and-play use, and one OTG-capable port that can be accessed by holding the BOOT button during power-on to display the port and download programs. With data rates up to 150 Mbps, it ensures fast and stable connections for demanding projects
- Large Storage Capacity & Comprehensive Wi-Fi Features: Integrates 8 MB RAM and 16 MB Flash, providing ample storage for complex application development. Supports WMM, A-MPDU, A-MSDU, instant block confirmation and other features to improve multitasking efficiency and network performance
ESP32-S3 not detected over USB
If no port or device appears, work through the connection before changing firmware images:
- Check the connector and cable: Use the board’s intended programming connector and a data-capable cable. A power-only cable can power the board without providing a computer connection.
- Check the selected port: Confirm that the port belongs to the connected board. Unplugging and reconnecting can help identify which entry is new.
- Check the board’s USB path and host support: The socket may connect to native USB Serial/JTAG or to a USB-to-UART bridge. The interface, required driver, and connector depend on the board and host operating system.
- Enter download mode manually: Hold BOOT, press RESET once, then release BOOT and retry.
If the board still does not appear, consult its documentation to confirm which USB connector is used for programming and whether its USB interface is enabled and correctly wired.
Rank #4

- 🏃 [HI-SPEED SUPPORT] BoxWave Cable Compatible With M5Stack Dial ESP32-S3. Supports Hi-Speed USB 3.1 DATA TRANSFERS! 💬 Includes limited 3rd party tech support for your device (up to 3 inquiries via messaging) - not affiliated with or endorsed by M5Stack ⭐ *** PLEASE NOTE, DIAL ESP32-S3 DEVICE NOT INCLUDED ***
- 💰 [LOW COST] Why pay more? Get the DirectSync Cable for your device that functions just as well OR BETTER than your original cable for a fraction of the cost!
- ✌ [DUAL-FUNCTION] The DirectSync cable SYNCS and CHARGES your device. The DirectSync's dual-function design makes traveling convenient!
- 💪 [STABILITY AND STRENGTH] A SHIELDED cable provides PROTECTION to your cable to insure you get the most use and LONGEST LIFE out of your DirectSync. Features strong rubberized grommet strain reliefs to avoid kinks or splitting!
- 📒 [SPECIFICATIONS] Generous 6-FOOT LENGTH so you don't have to awkwardly prop up your device JUST SO in order to get a charge!
ESP32-S3 flash failed: match the symptom to the fix
The tool connects, but the image or offset is wrong
Rebuild for ESP32-S3 using the project’s intended framework and use the binaries and flash command produced by that build. Do not reuse an image or offset from another project as if it were universal. For ESP-IDF, the generated command identifies the image paths and offsets; for Arduino or PlatformIO, enable verbose upload output to see the esptool command.
Do these 3 things before closing this tab:
1Scan for outdated or missing drivers - takes under a minute2Repair Windows errors before they cause bigger problems3Fix the driver behind crashes, sound loss and screen glitchesThe board does not enter the bootloader automatically
Use the BOOT-and-RESET sequence to force download mode, then rerun the flashing command. Automatic entry depends on board reset circuitry and is not guaranteed on custom hardware.
Best Value

- ESP32-S3 development board: Dual-core 32-bit microprocessor up to 240 MHz, 8 MB flash, 8 MB PSRAM, onboard 2.4 GHz Wi-Fi and Bluetooth 5 (LE), USB-OTG, USB code uploader
- Detailed tutorial: Can be downloaded (in English) or viewed online (original in English, can be translated into other languages by browsers) (The tutorial link can be found on the product box, no paper tutorial)
- Example projects: Provides step-by-step guide and several typical projects, each project has complete code and detailed explanations
- 2 sets of code: MicroPython and C. Python is one of the most popular languages, and C is one of the most classic languages
- Easy to use: Just connect the board to your computer (installed IDE and driver) with the USB cable to program it
A security setting may block USB recovery
Check the device’s security configuration before relying on ROM USB recovery or DFU. Espressif documents that Secure Boot or flash encryption disables the ROM USB-OTG stack for serial emulation or DFU on that port, while Secure Download Mode disables DFU. A routine USB recovery path therefore cannot be assumed to remain available after these security options are enabled. See Espressif Secure Boot v2 documentation and Espressif flash-encryption documentation.
Can I recover an ESP32-S3 with DFU?
Possibly, if the board and device configuration support USB-OTG DFU and the ESP32-S3 can enter bootloader mode. DFU is not the same as the usual serial flash command: ESP-IDF uses idf.py dfu to build a dfu.bin image, then idf.py dfu-flash to send it with dfu-util. Follow Espressif’s ESP32-S3 DFU guide for the configuration and command details.
There is an important hardware distinction: by default, the ESP32-S3 internal USB PHY is assigned to USB Serial/JTAG, so that default configuration does not provide DFU through the same internal PHY. Espressif describes selecting USB-OTG with the USB_PHY_SEL eFuse, but this is a permanent hardware configuration choice; do not change it casually or assume it is appropriate for a board without checking its design and security configuration.
Recommended Free Tools
If no DFU device appears
- Confirm the ESP32-S3 is actually in bootloader mode.
- Check that
dfu-utilis installed and that the operating system has the correct driver or permissions. On Linux, follow the guide’s udev setup where applicable. - Confirm the board exposes the USB-OTG path required by its DFU configuration.
If DFU reports Lost device after RESET?
Espressif notes that Windows and macOS may encounter this on the first attempt. The idf.py dfu-flash command retries once; if the problem persists, run the command again manually.
Quick Recap
Product prices and availability are accurate as of the date/time indicated and are subject to change. Any price and availability information displayed on Amazon at the time of purchase will apply.

