Are you having trouble performing some tasks in the Notepad app on your Windows 11 PC? Not to worry, this guide offers all the help you need with Notepad in Windows 11.
Basically, to easily find a particular topic in this guide, expand “Browse Post Topics“ and click on the topic. However, you can read through the entire guide if you are new to Windows 11 notepad.
How To Open Notepad
Below are numerous methods to open the notepad application on your Windows 11 computer.
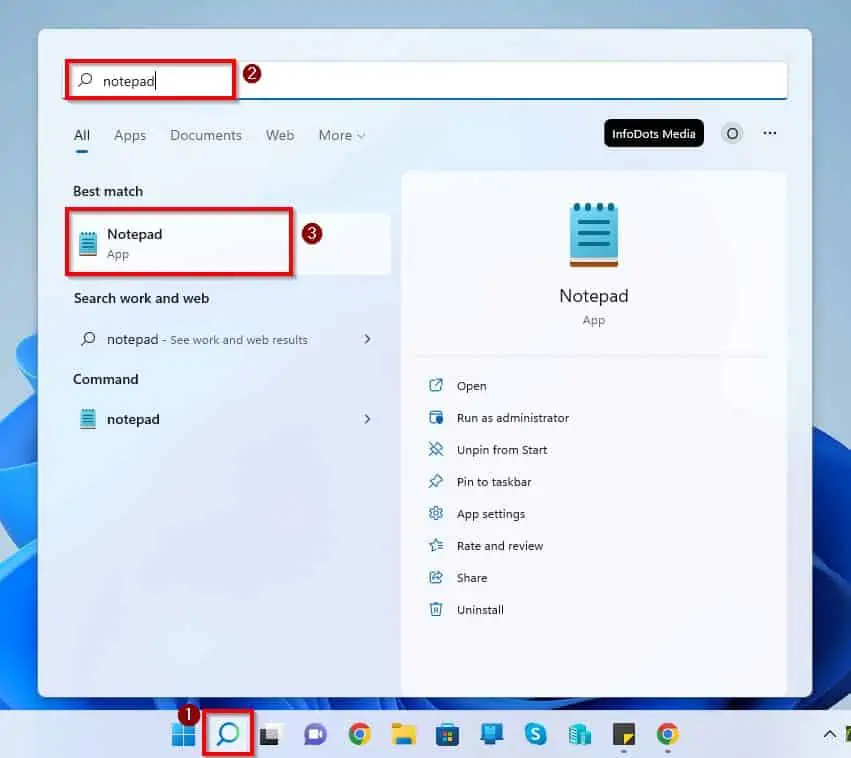
Option 1: Open Notepad via Search
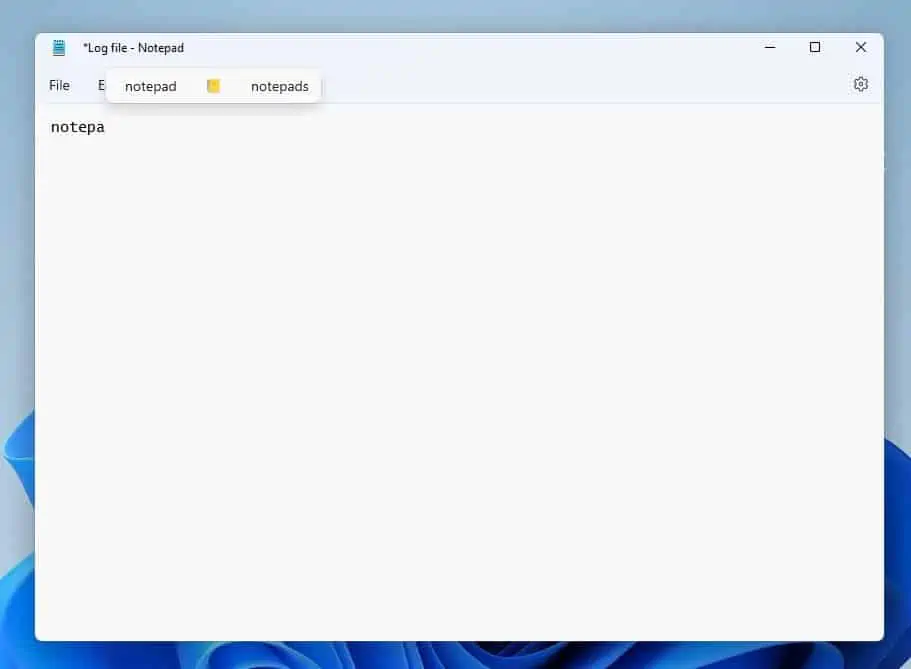
First, click the Search icon on the taskbar. Then, input “notepad” in the search field and select the Notepad application from the search result.
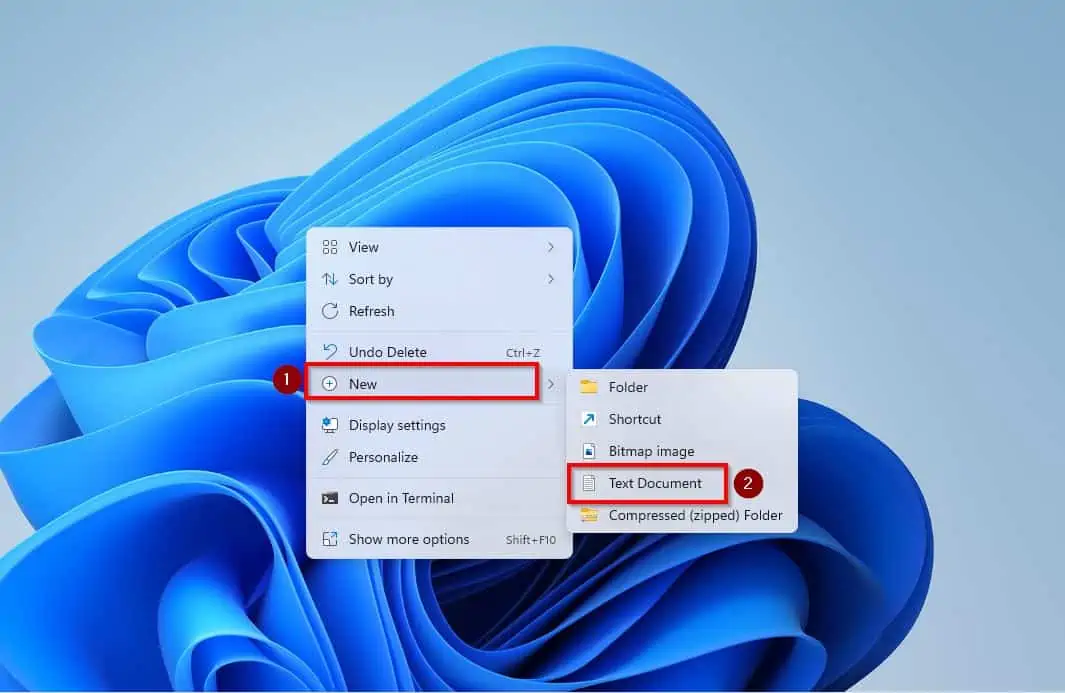
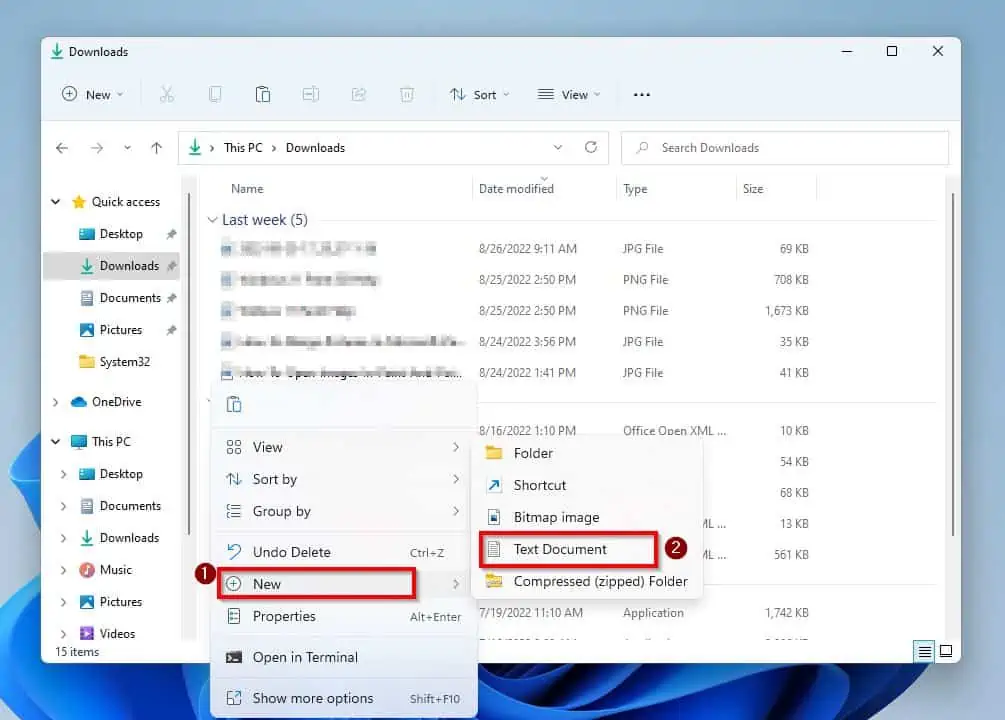
Option 2: Open Notepad via Context Menu or Within a Folder
You can also open the notepad app in Windows 11 by right-clicking any free space on the desktop or within a folder. Then, hover your mouse cursor on New from the option that appears and select Text Document.
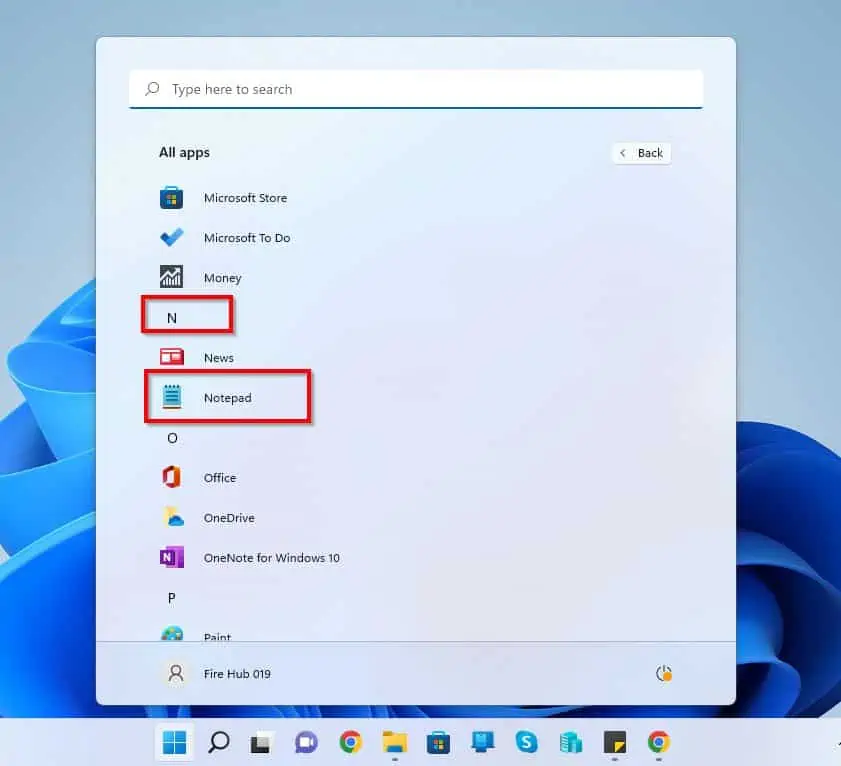
Option 3: Access Notepad From the Start Menu
Follow the steps below to open the notepad app on your Windows 11 computer from the Start menu.
- Click the Windows 11 Start menu on the taskbar and click All apps.
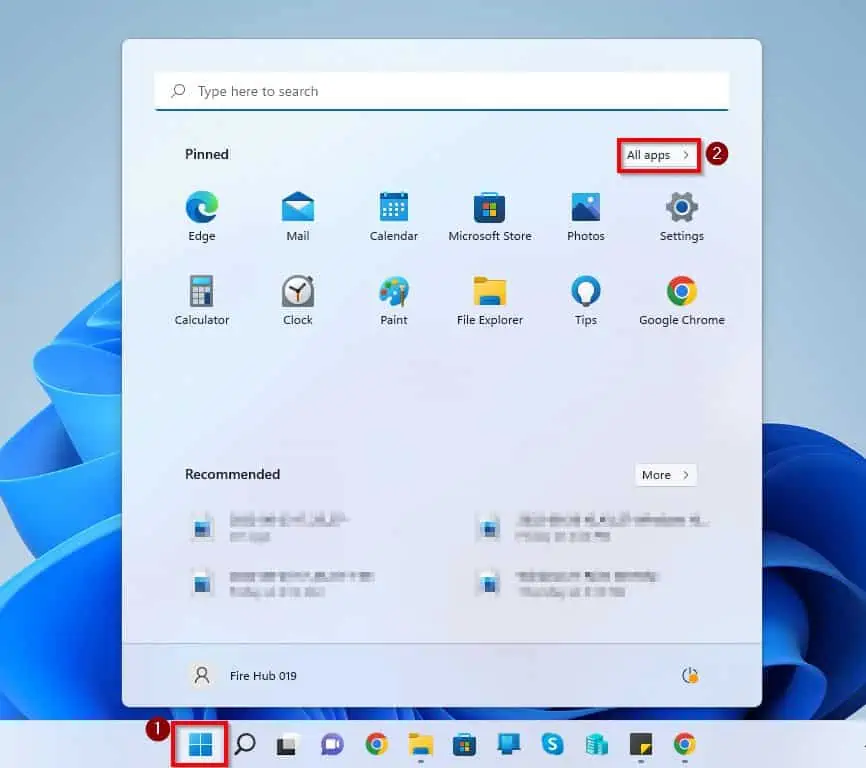
- Then, scroll down to the “N” category on the All apps page and select Notepad under the category.
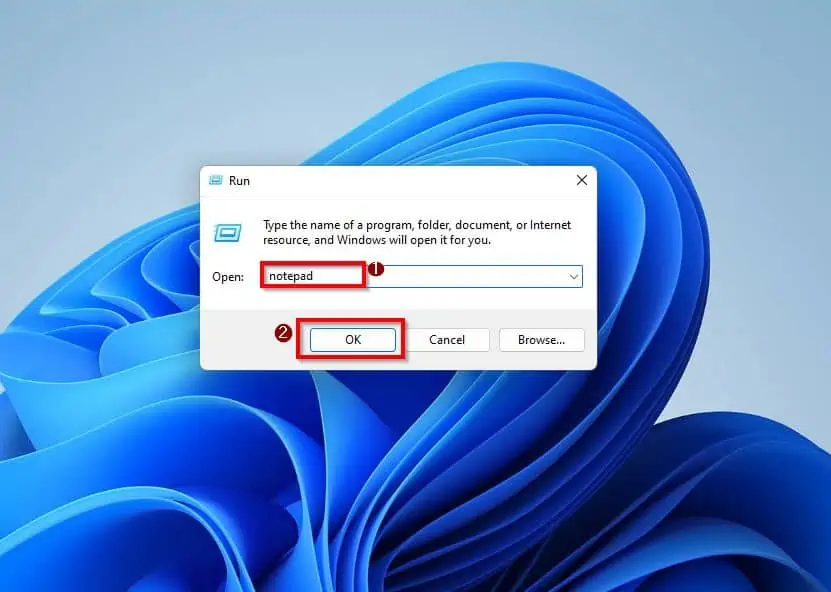
Option 4: Open Notepad via Run
Do you know you can also open the notepad app on your Windows 11 PC via the Run command? To do that, follow the steps below.
- Right-click the Windows 11 Start menu and click Run from the options that appear.
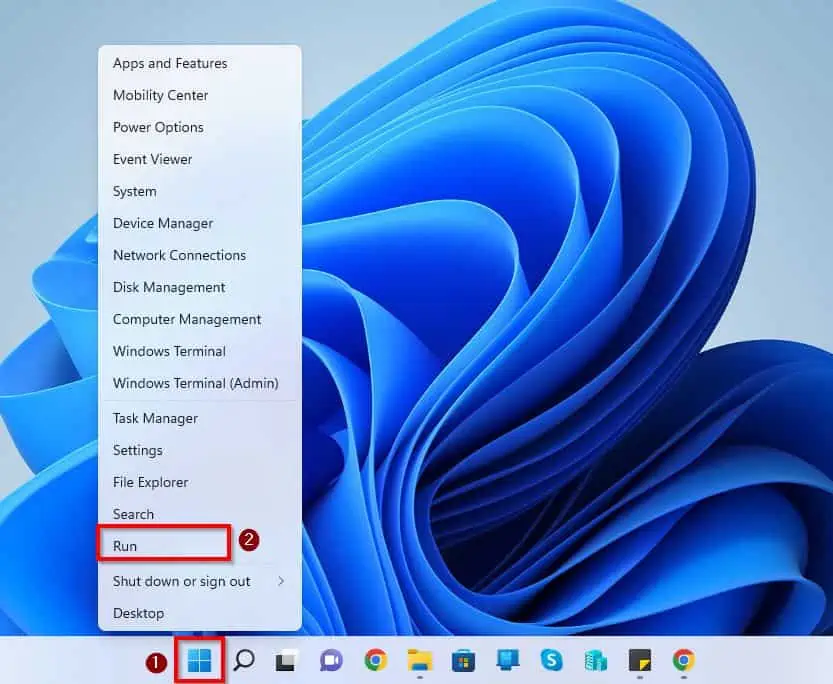
- Afterward, input “notepad” (without the quotes) in the Run command input field and click the OK button.
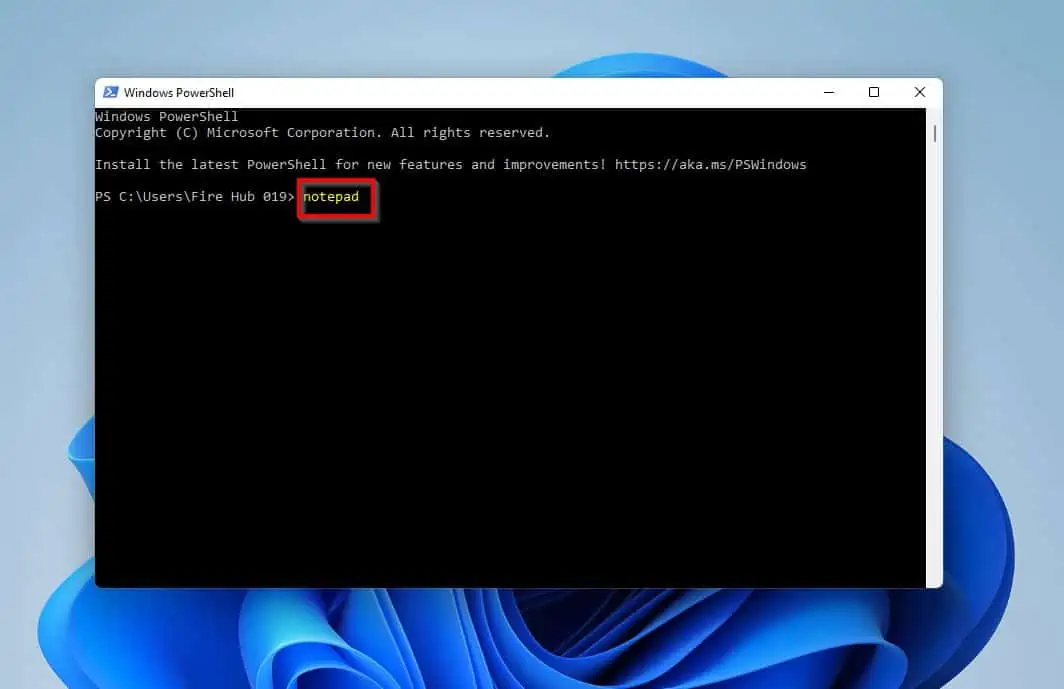
Option 5: Open Notepad Using PowerShell or Command Prompt
Another method to open the notepad application in Windows 11 is via Command Prompt or PowerShell. Basically, after opening the Command Prompt or PowerShell app on your PC, simply type “notepad” and press Enter.

How to Save, Save As, and Open Notepad
This section of this guide teaches you everything about saving a document in the Notepad app on your Windows 11 PC.
1. Save and “Save As”
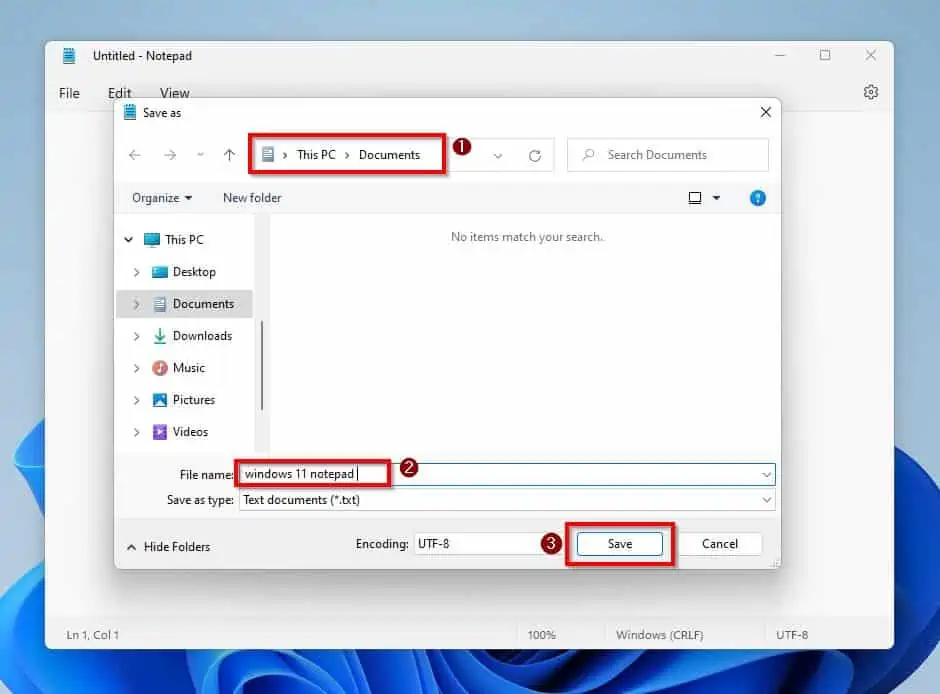
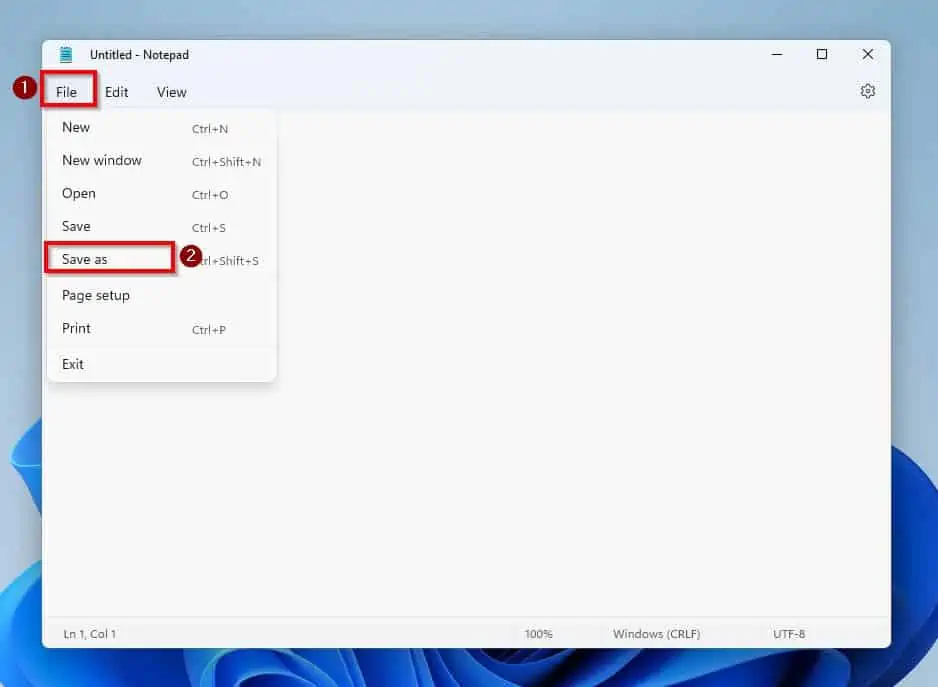
To save in Windows 11 Notepad, simply click File at the top left corner of the page. Then, select Save.

If you have previously saved the notepad document, any recent changes you made in the document will save when you click Save. However, if it is the first time you are saving the notepad document, the Save As window will open when you click Save.
Hence, on the Save As window, select a location and input a name for your document. Then, click the Save button at the bottom right of the window.
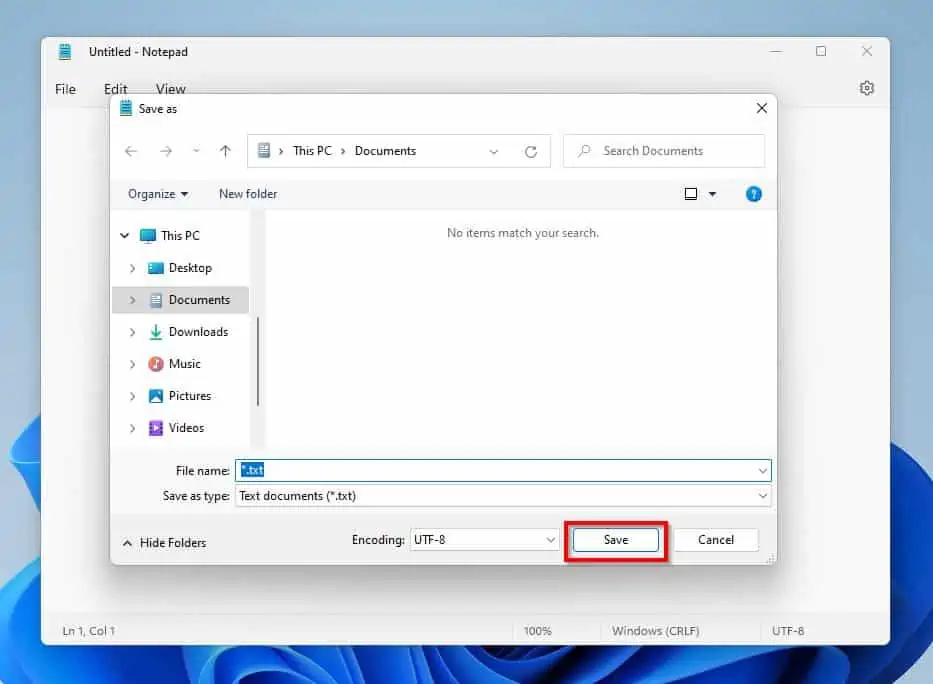
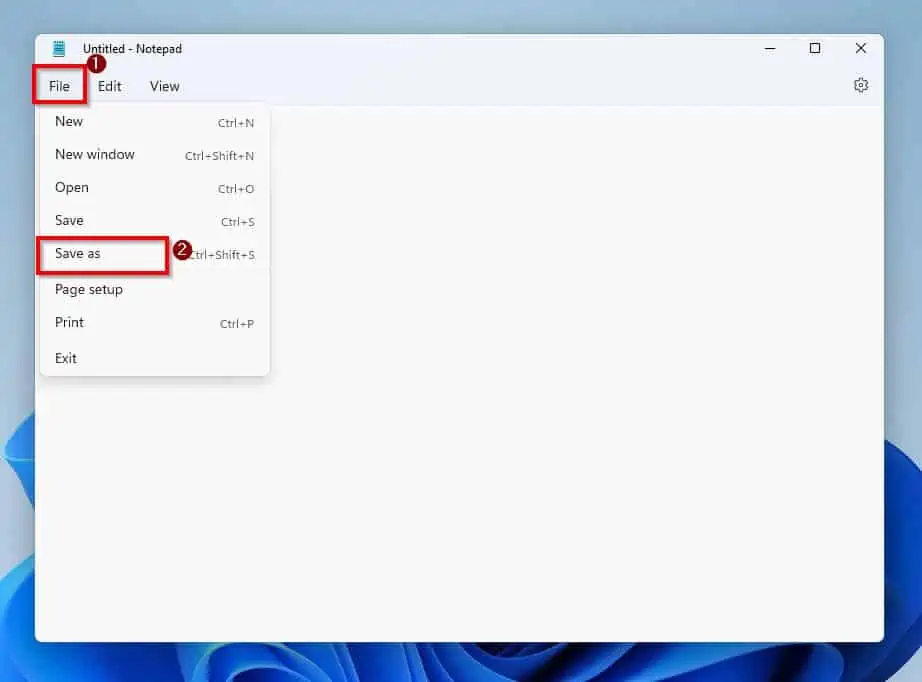
Interestingly, if you want to rename, change location, or save an already saved document as another file, you can do that via the Save As window. To manually access the Save As window, simply click File at the top left corner of the notepad window and select Save as.
Finally, when you are done on the Save As window, click the Save button at the bottom of the window.
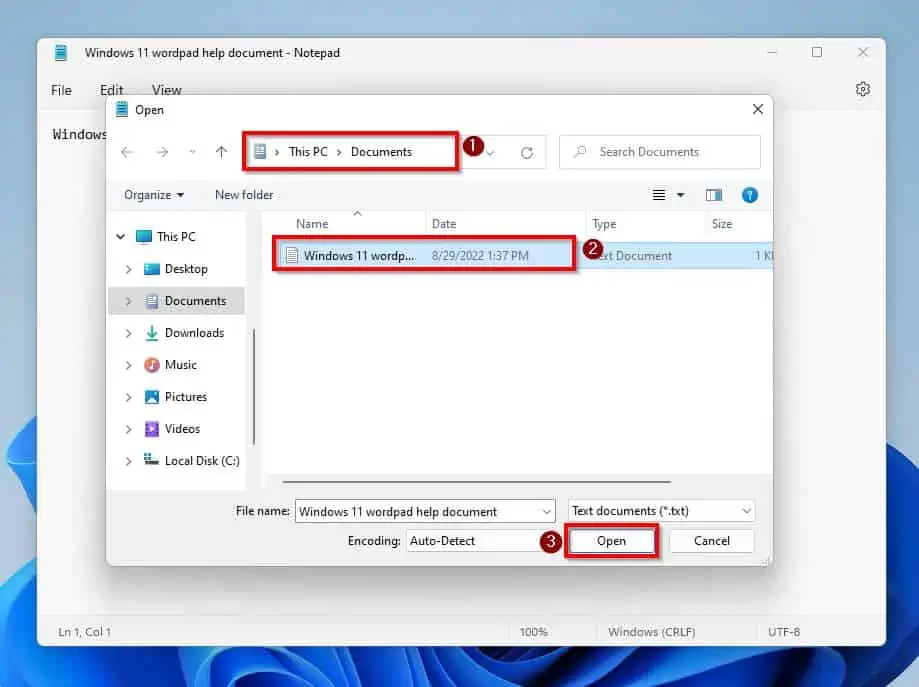
2. Open an Existing Notepad Document
As with advanced word processing apps, you can also open an existing notepad document within the notepad app on your Windows 11 PC. Simply click File at the top left corner of the notepad window and select Open from the options that pop down.
Alternatively, you can press the Ctrl + O keys on your keyboard for this command.
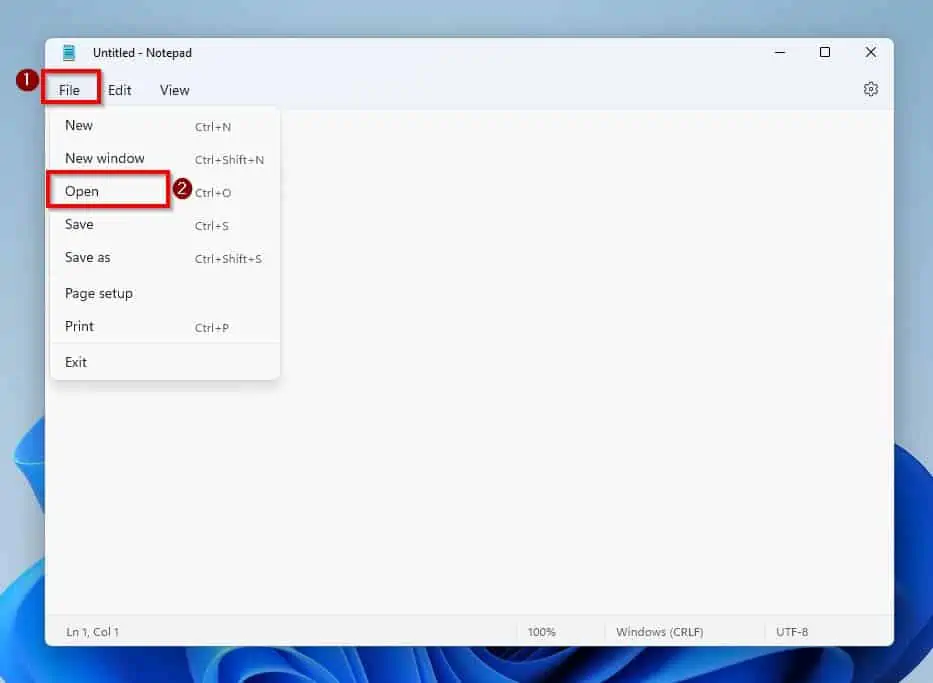
Then, on the Open window, navigate to the location of the document you wish to open, select it, and click Open.
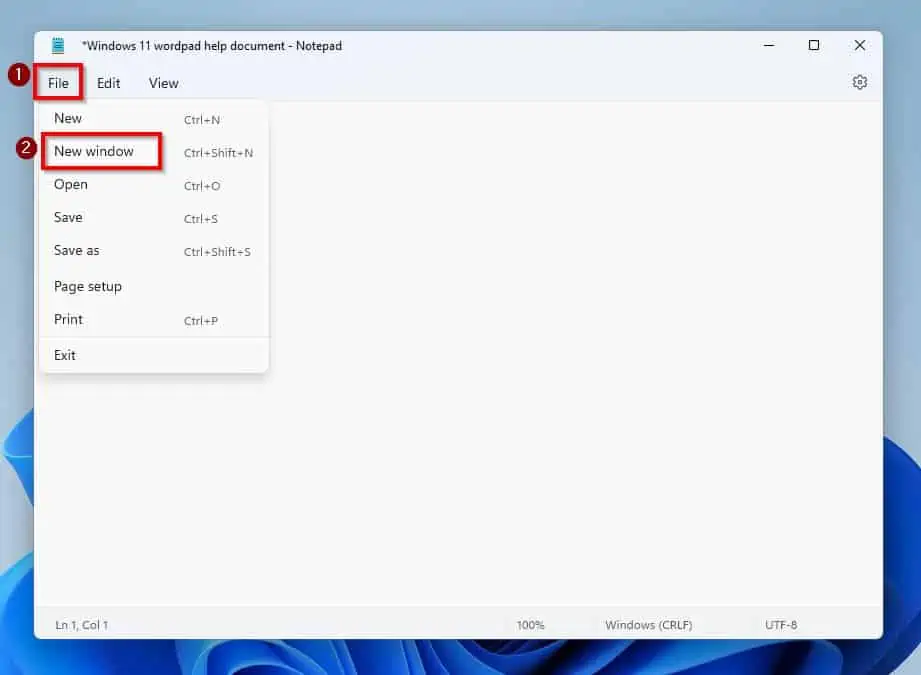
3. Open a New Document
To open a new document on the same notepad window, click the File menu and select New. You can also press Ctrl + N keys on your keyboard to open a new document on the same notepad window.

However, select New window from the File menu if you wish to open a new document on another notepad window.
How to Copy, Paste, Find/Find and Replace, Select All
In this section, you will learn how to copy, paste, find/find and replace, and select all in Windows 11 Notepad. Learning how to use these functions can enhance your productivity while working on a document in Notepad.
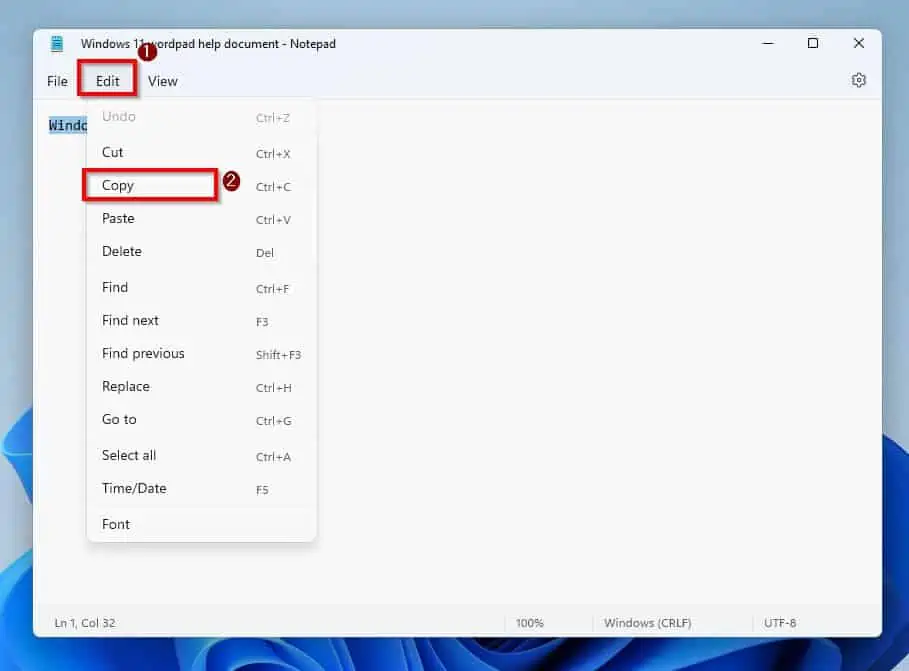
1. Copy, Paste, and “Select All”
To copy a text in Windows 11 notepad, firstly highlight the text. Then, select Copy from the options that pop down when you click the Edit menu.
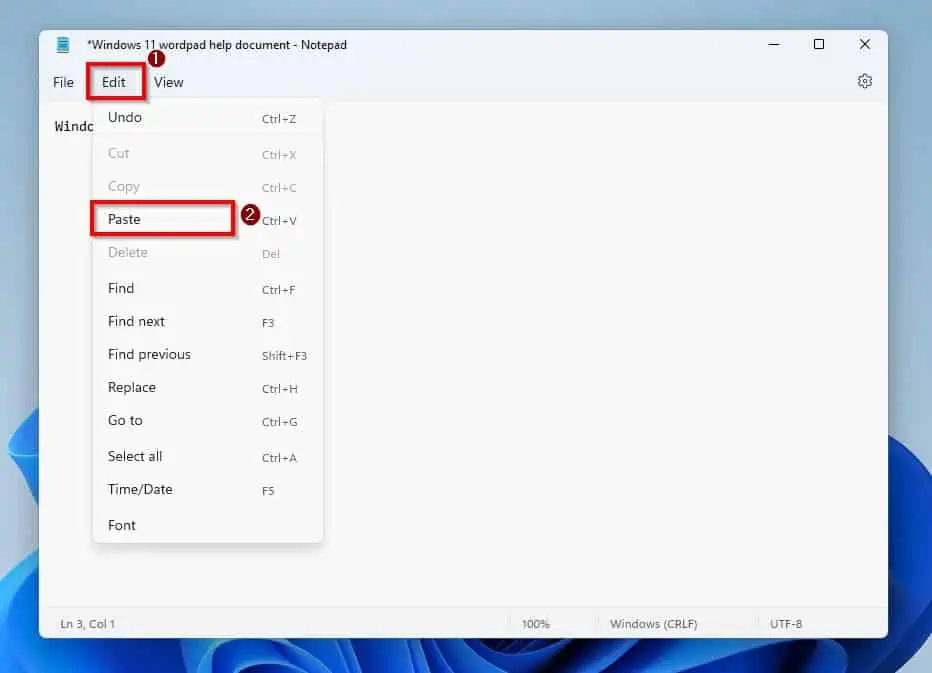
Meanwhile, to paste a text in Windows 11 notepad, first select the space you wish to paste the text. Then, click the Edit menu and select Paste or press Ctrl + V on your keyboard.
Lastly, to select all texts in Windows 11 Notepad, press the Ctrl + A keys on your keyboard.
2. Find/Find and Replace
To access the Find command in Windows 11 Notepad, click the Edit menu and select Find from the displayed options. Alternatively, you can press Ctrl + F keys on your keyboard.
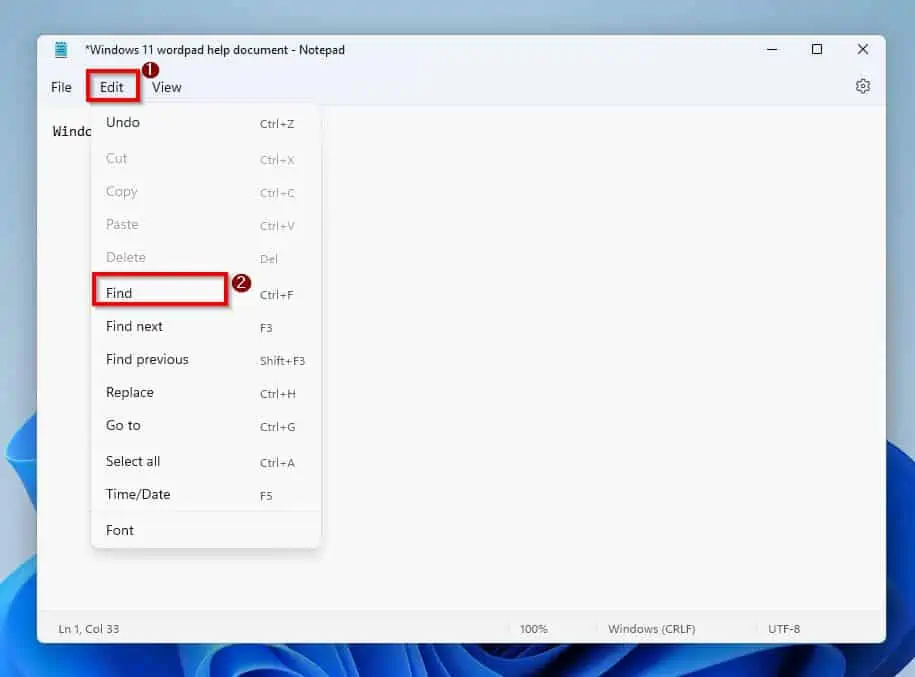
Hence, to find a word in your notepad document, simply input the word in the Find input field. Then, select the Search down or Search up icons.

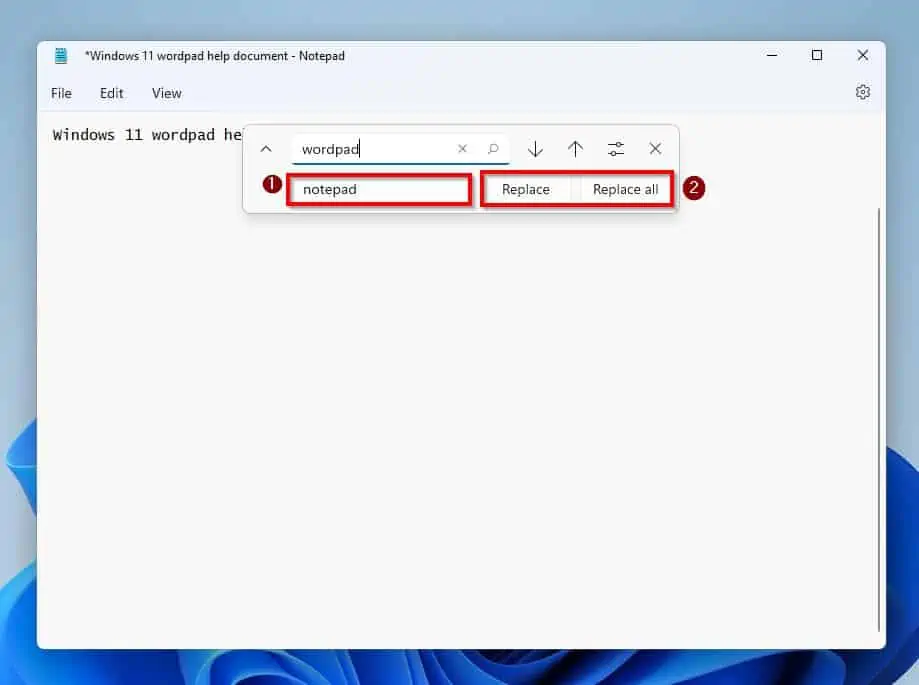
Meanwhile, select Replace from the displayed options when you click the Edit menu to access the Find and Replace command. You can also press Ctrl + H keys on your keyboard to access the Find and Replace command in Notepad.
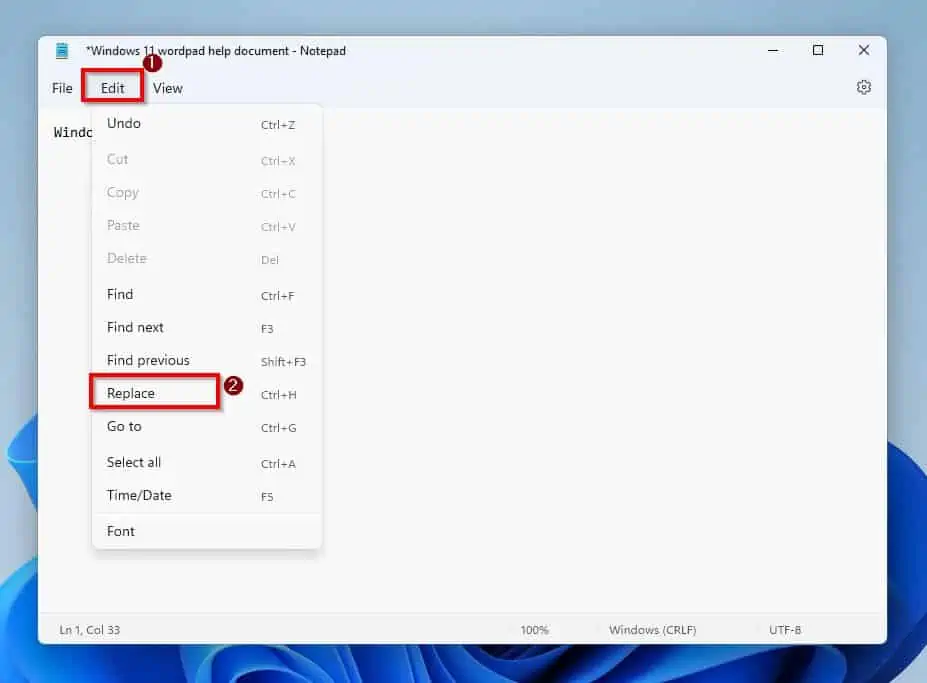
Thus, after finding the word you want to replace, input the replacement word in the Replace input field. Then, click Replace to replace the word in the exact place you found it.
However, click Replace All to replace the word everywhere it appears in the document.
How to Word Wrap, Change Fonts, Font Size
This section teaches how to enable word wrap in Windows 11 Notepad. In this section, you will also learn how to modify Notepad’s fonts and font size.
1. Enable “Word Wrap”
Look at the notepad texts in the screenshot below to better understand the word wrap feature. Did you notice that some of the texts are hidden in the document?
You must use the scroll tool located at the bottom of the Notepad app to view these texts.

However, by enabling the word wrap feature, the texts won’t be hidden anymore. Instead, they will be moved to the next line.
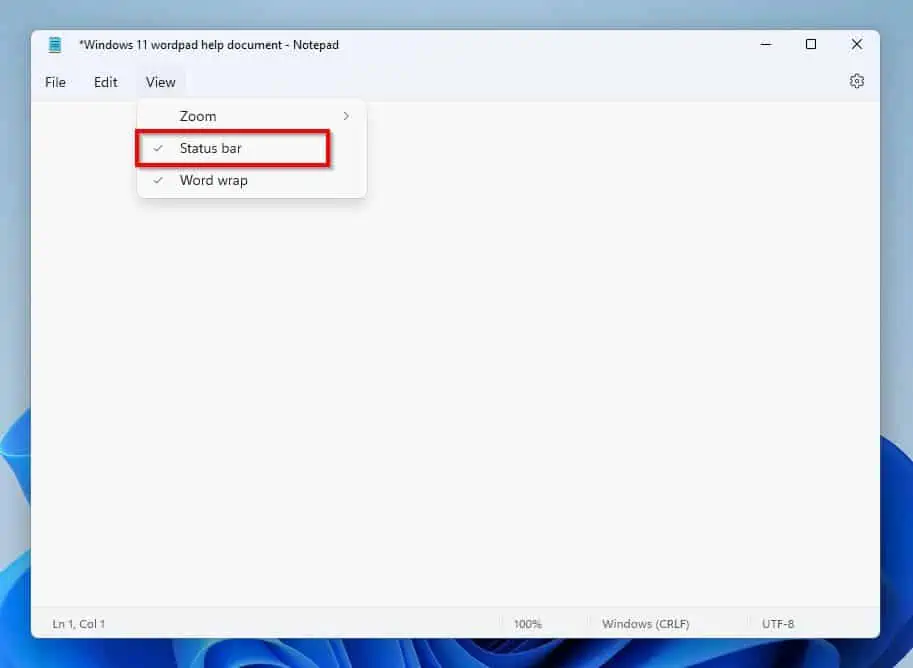
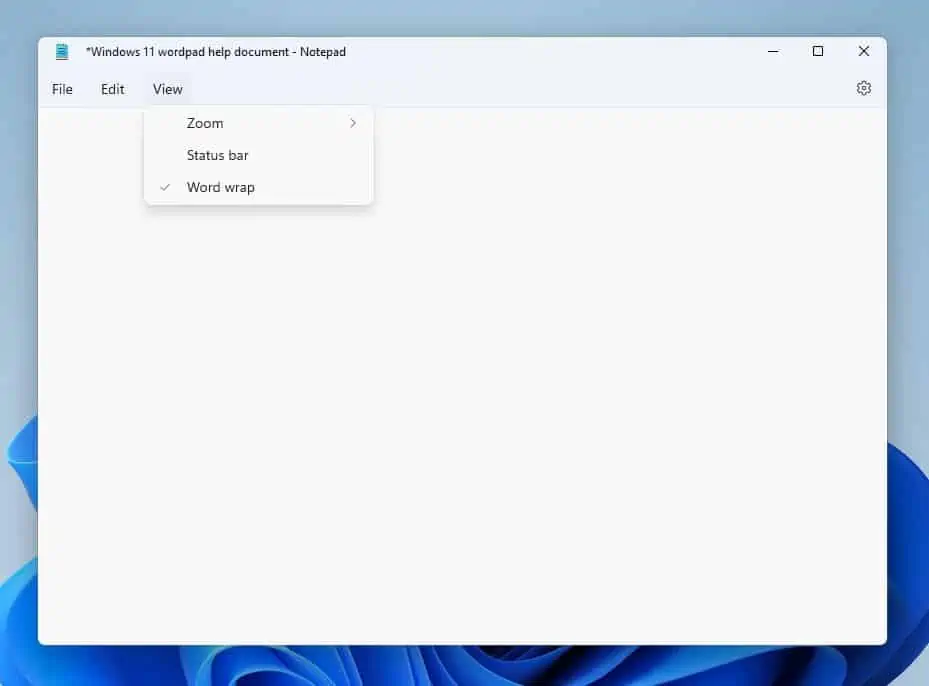
To enable the word wrap feature in Notepad, click the View menu and select Word wrap from the displayed options. You can do the same to disable the feature – but who would want to do that? Not me, though!


2. Change Fonts and Font Size
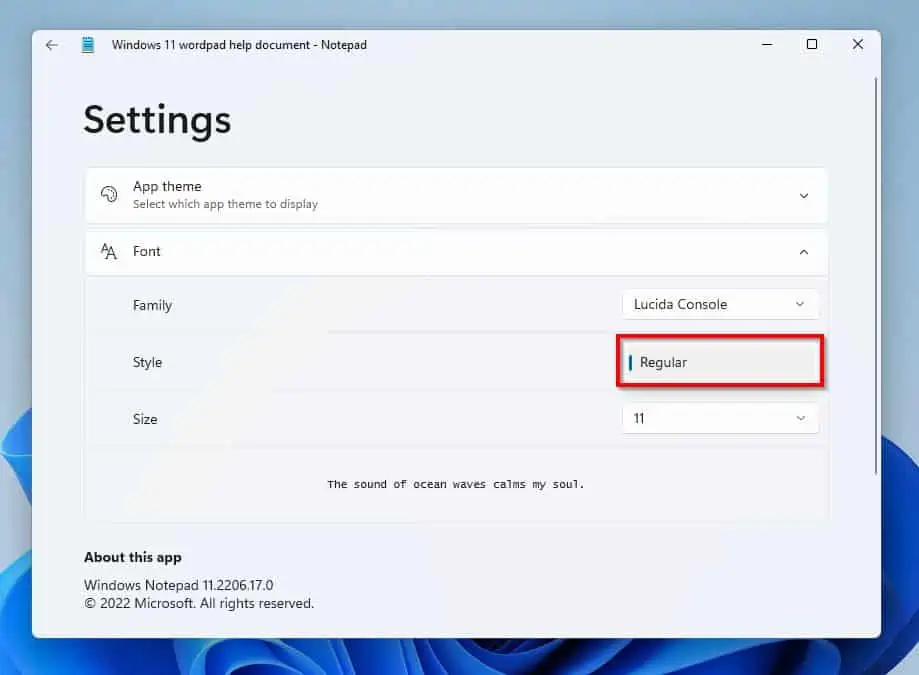
Sadly, unlike Windows 10 Notepad, you cannot change the font style of your texts in Windows 11 Notepad. The default font style in Windows 11 Notepad is Regular, which cannot be changed.
This means you cannot make your text bold or italic in Windows 11 Notepad, unlike in Windows 10 Notepad. Nevertheless, you can change your text’s font and font size in Windows 11 notepad.
To do that, click the Edit menu and select Fonts.
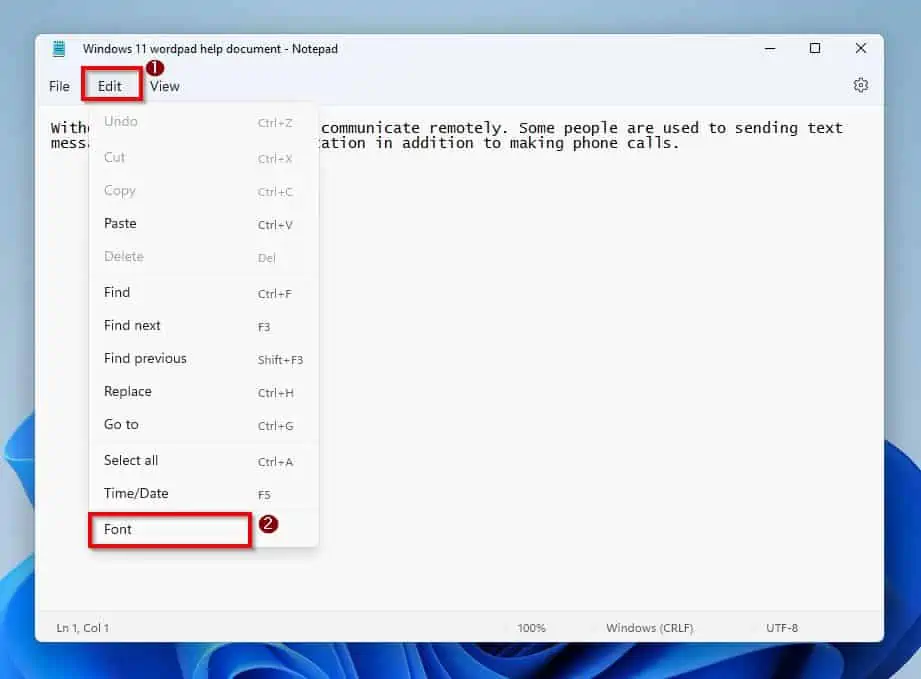
Then, to change the font of your texts, select the Family drop-down and select your preferred font.
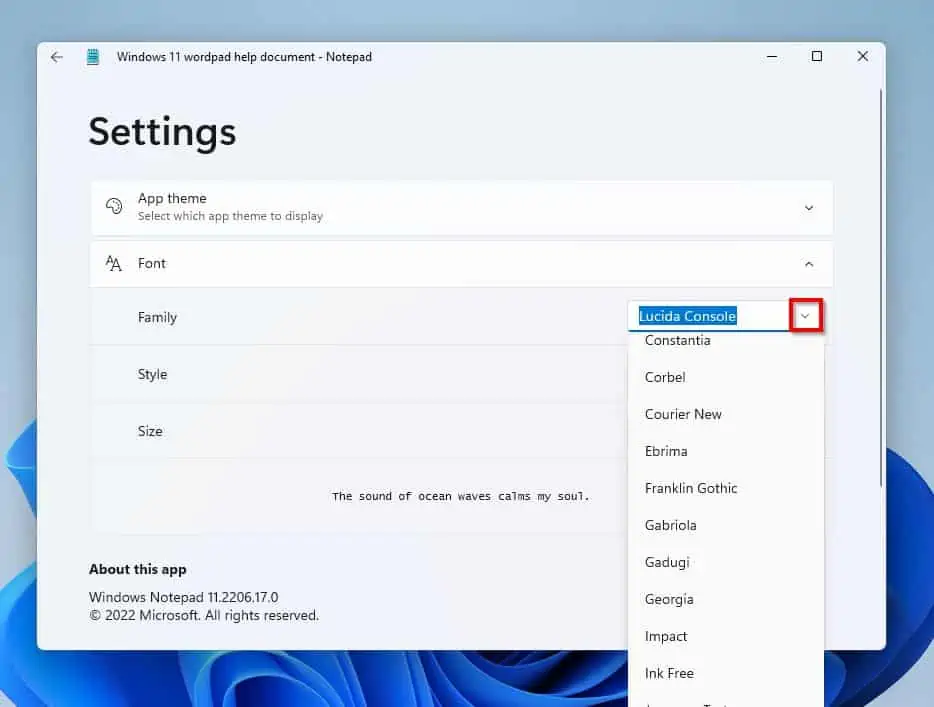
Meanwhile, to adjust the font size of your text in Windows 11 notepad, select the Size drop-down and choose your preferred size.

As stated earlier, the default font style in Windows 11 Notepad is Regular and cannot be changed. Thus, only the Regular option will appear if you click the Style drop-down in the Font category.
How to Add/Remove Status Bar, Zoom In, or Zoom Out
In this section, you will learn how to add/remove the status bar in Windows 11 Notepad. I will also teach you how to zoom in and zoom out in the Notepad app on your Windows 11 PC.
1. Add/Remove Status Bar
The status bar at the bottom of the notepad window displays basic information about your notepad document – see the screenshot below.
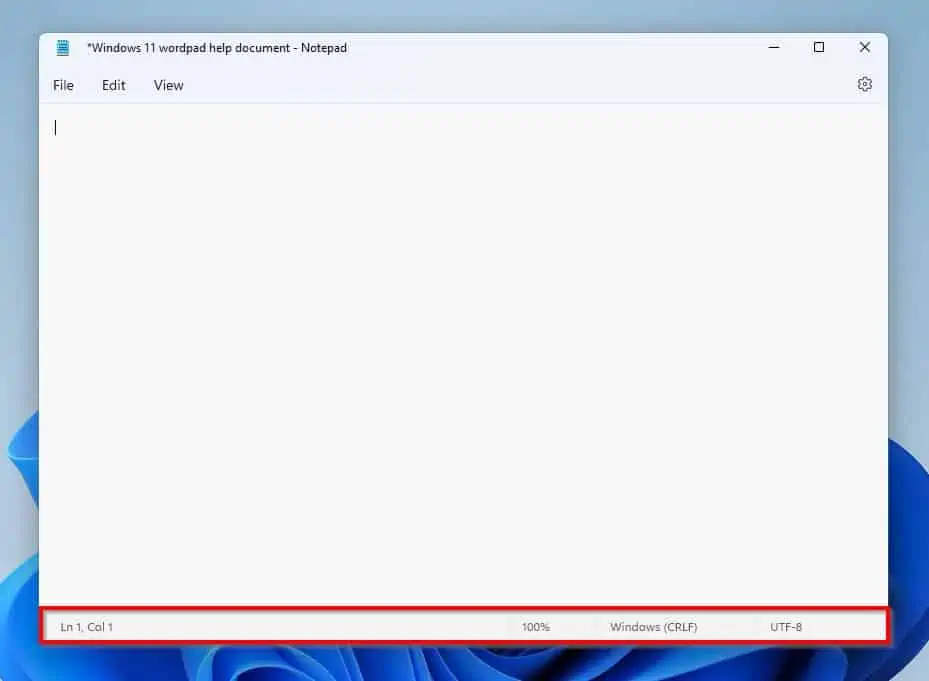
The status bar in Windows 11 Notepad is usually enabled by default. Hence, to disable it, click the View menu and select Status bar.
2. Zoom in, Zoom Out, or Reset Zoom
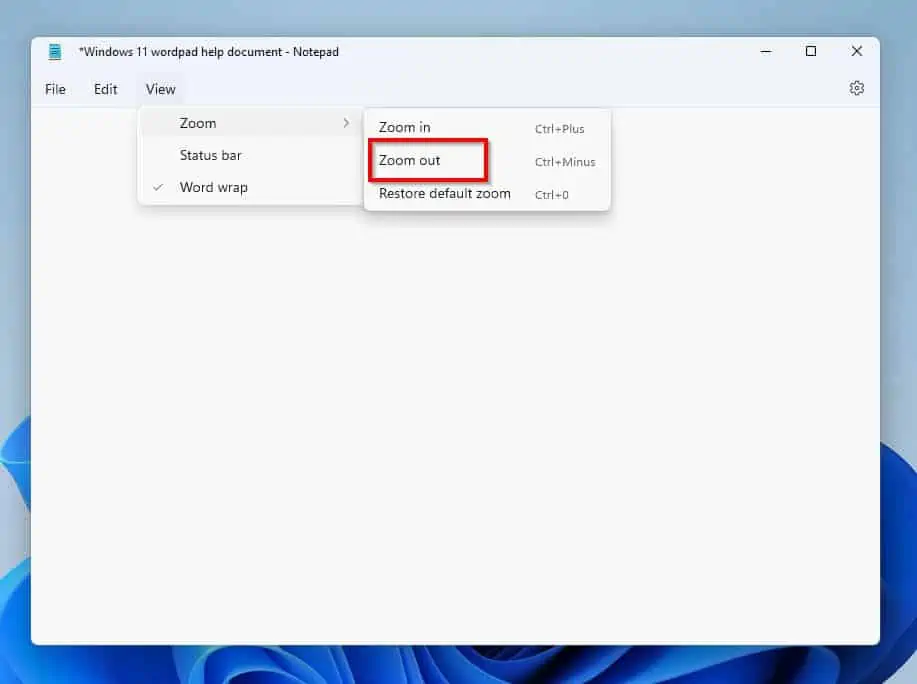
To zoom in on your notepad document in Windows 11, click the View menu and hover your mouse on Zoom. Then, select Zoom in from the displayed options.

However, select Zoom out from the displayed options if you want to zoom out on your notepad document.
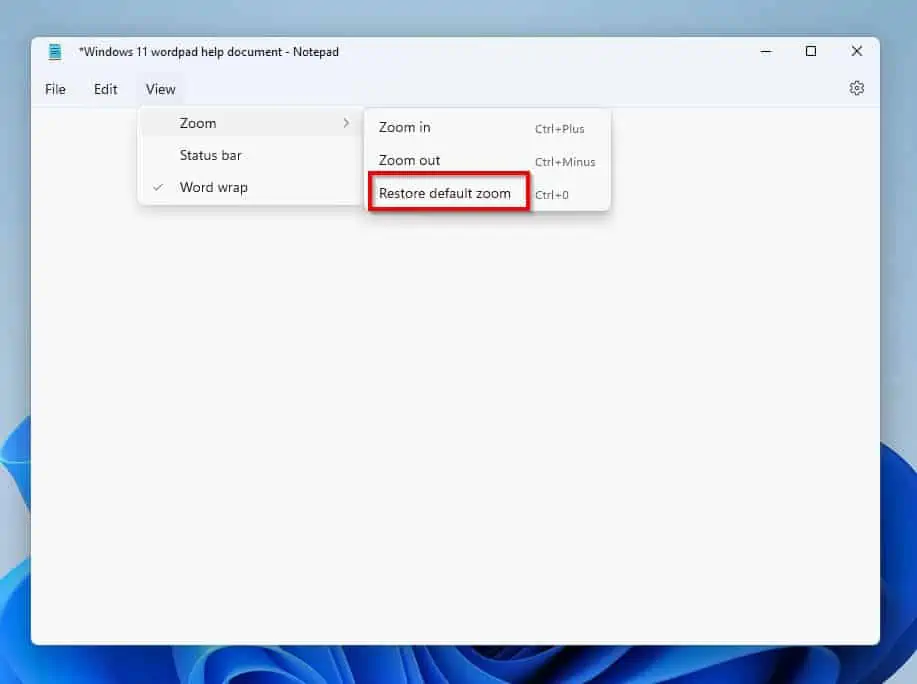
Lastly, select Restore default zoom from the displayed options to restore the zoom settings of your Notepad document.
How to Change Page Setup and Print
Even though Notepad is a basic word processing tool, you can adjust the print page setup of your document. You can also print your document directly from the Notepad app on your Windows 11 PC.
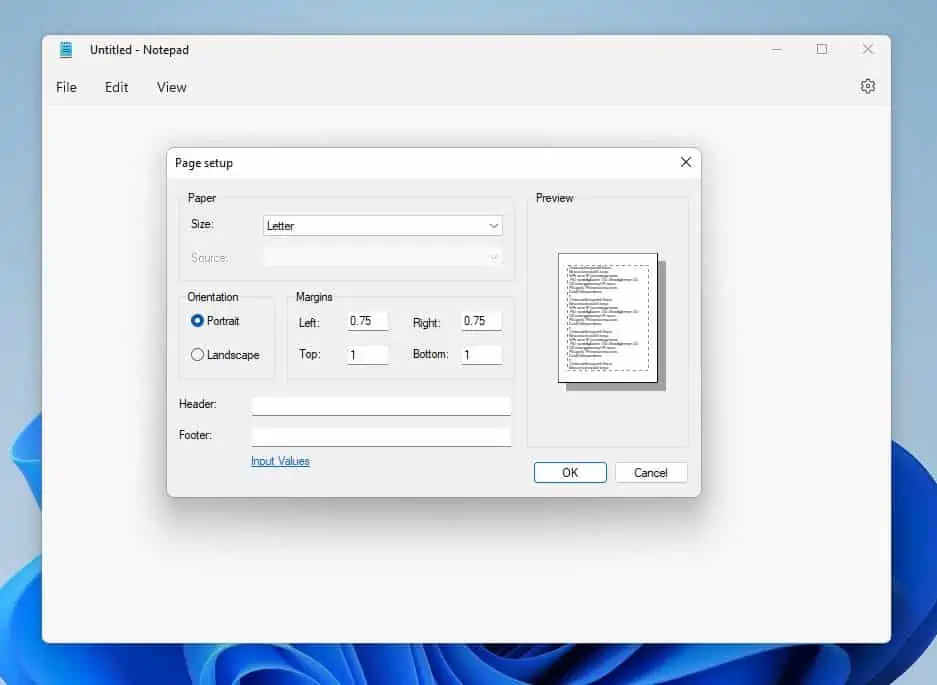
1. Change Page Setup
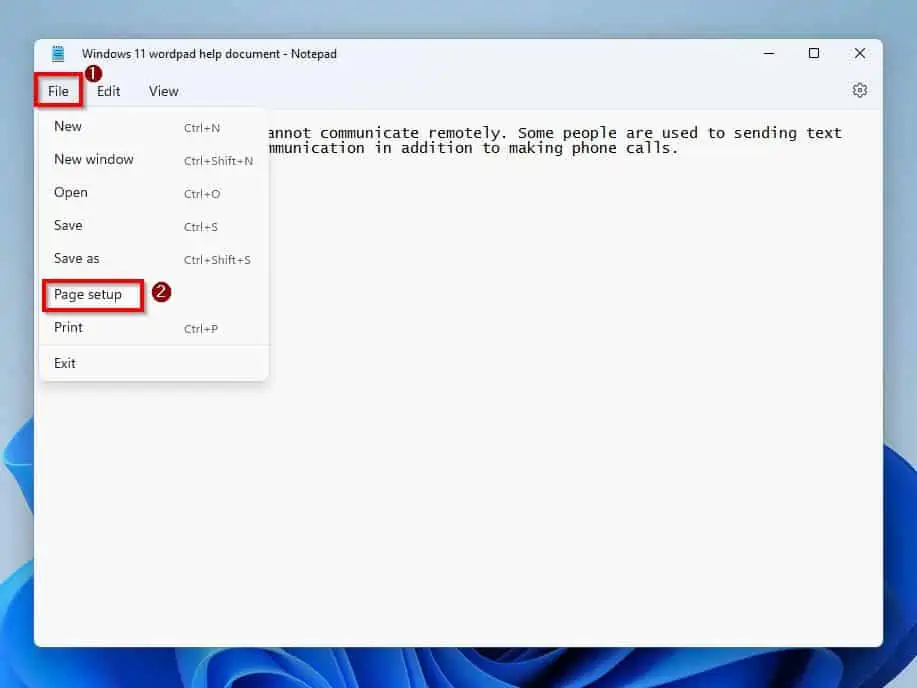
To open the Page Setup window in Windows 11 Notepad, click File and select Page Setup from the displayed options.
Then, you can adjust various printing settings on the Page Setup window. For example, you can change the paper source on the printer as well as the paper size.
In fact, you can also change the paper’s orientation – landscape or portrait – in the Page Setup window. That’s not all, you can adjust the margins of the paper.
Finally, you can include a header and/or a footer on the printed page. Visit Changing Header and Footer Commands in Notepad to learn more about headers and footers in Notepad.
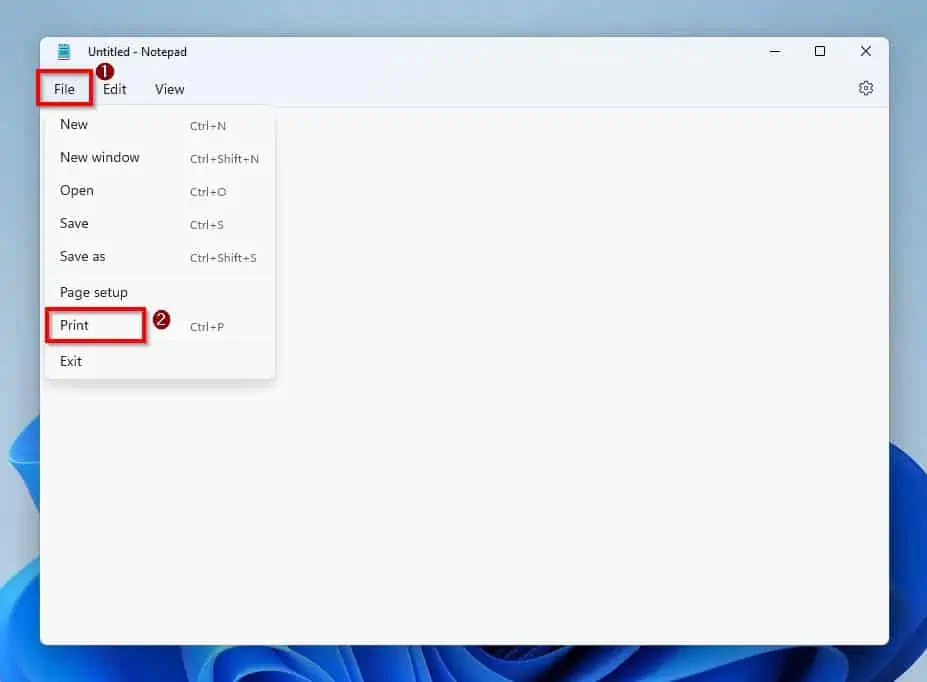
2. Print
To print on your Windows 11 notepad, click the File menu at the top left corner of the notepad window and select Print. Alternatively, you can press Ctrl + P on your keyboard to launch the Print window.
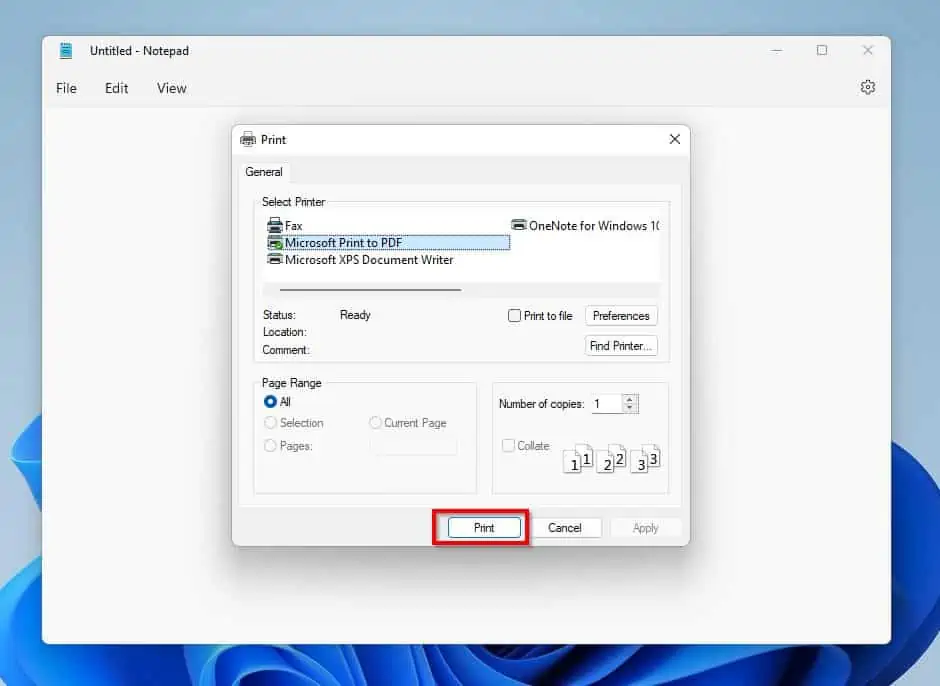
On the Print window, you can select the printer you want to send your document to. You can also choose the number of copies you wish to print and so much more.
After doing all that, click the Print button at the bottom of the window to print.
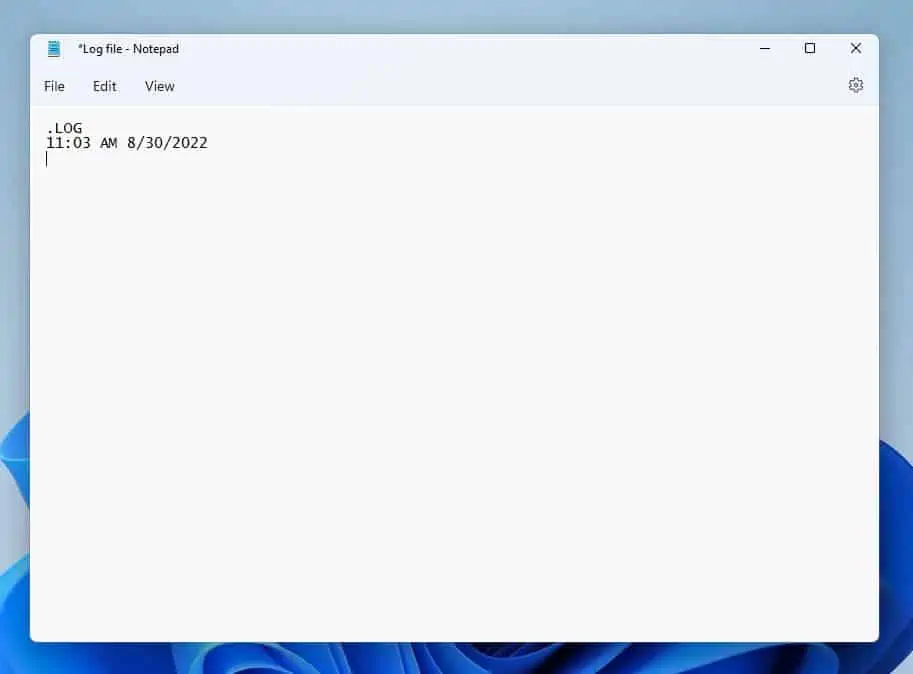
How to Create a Log File and Add Time/Date
This section is mainly targeted at tech readers that create log files with date/time stamps. Hence, follow the steps below to create a log file that automatically inserts the date/time each time you open your Notepad document.
- Open a new notepad window, and at the beginning of the document, type “.LOG” (without the quotes).
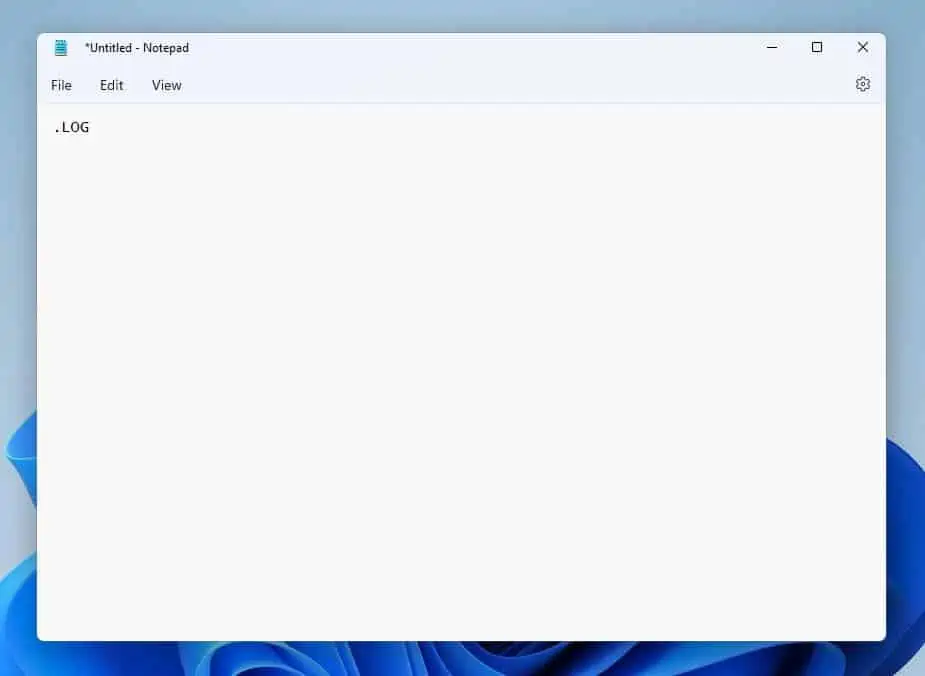
- Then, save the document and close it – read How To Save And “Save As” In Notepad to learn how to save a document in Notepad.
- Afterward, the current date and time will automatically appear in the next line whenever you open the notepad document again.
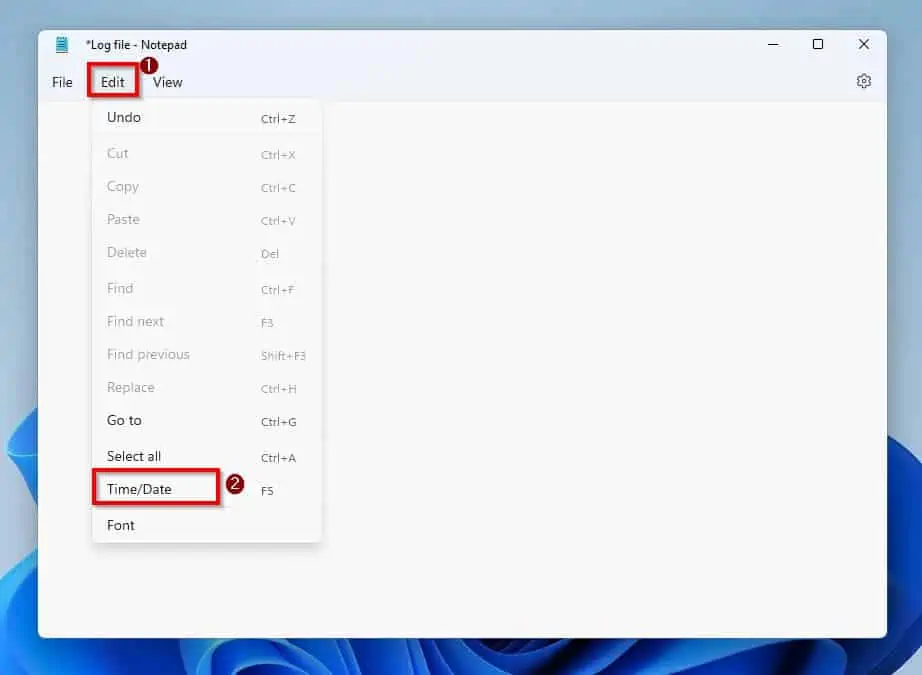
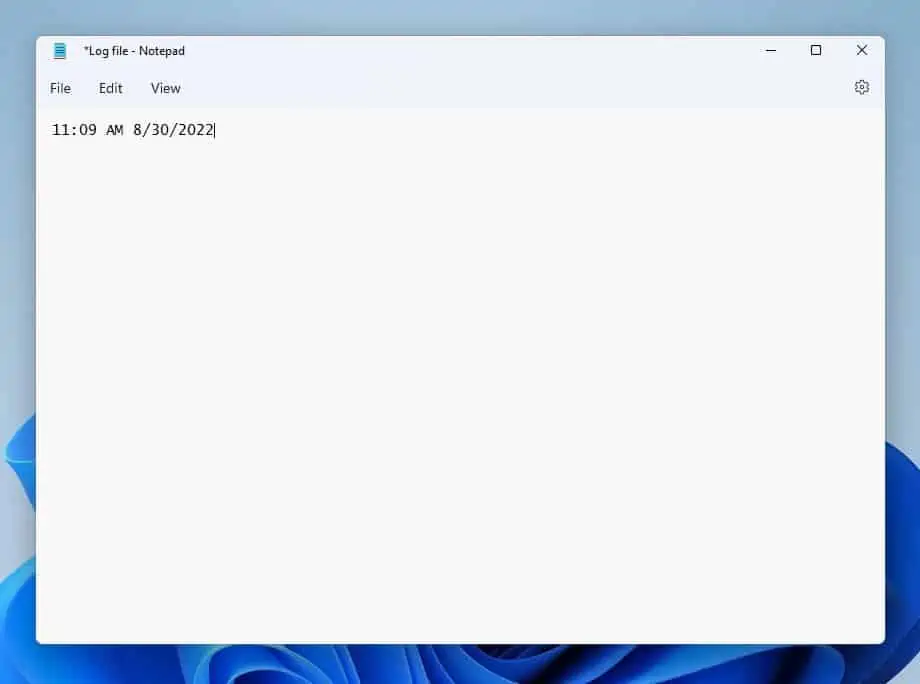
However, if you wish to add the date and time in your notepad document manually, firstly delete the “.LOG” entry. Then, click the Edit menu and select Time/Date from the displayed options.
Hence, the current time and date will be inserted into your notepad document.
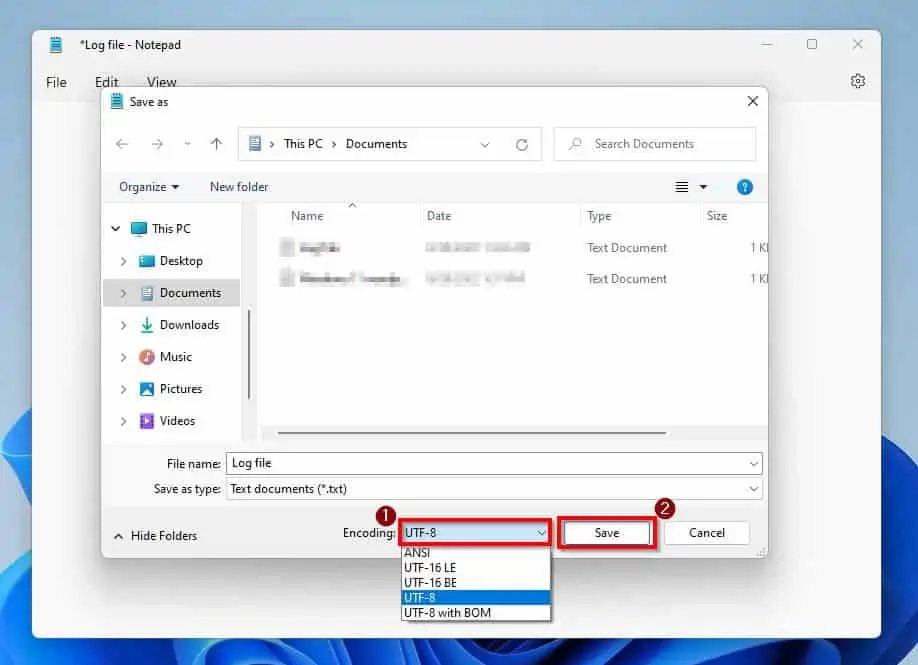
How to Change Encoding
Similar to the previous section, this section is for tech geeks. Essentially, you can modify the default encoding system in Notepad, which is UTF-8.
To do that, follow the steps below.
- Click the File menu and select Save As.
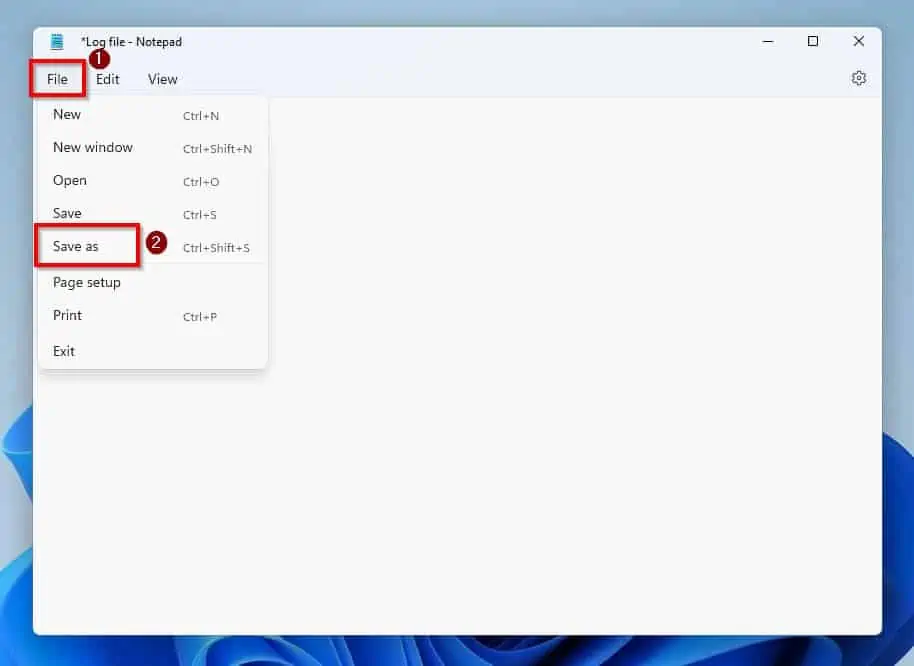
- On the Save As window, click the Encoding drop-down and choose a new encoding from the options. Finally, give the document a new name (optional) and click the Save button at the bottom of the window.
How to Spell Check
Because the Windows 11 Notepad app is a basic word processing app, it does not feature an in-built spell-check tool. The good news is that Windows 11 comes with an Autocorrect misspelled words feature that can serve as a spell-check tool.
Follow the steps below to activate this feature on your Windows 11 PC.
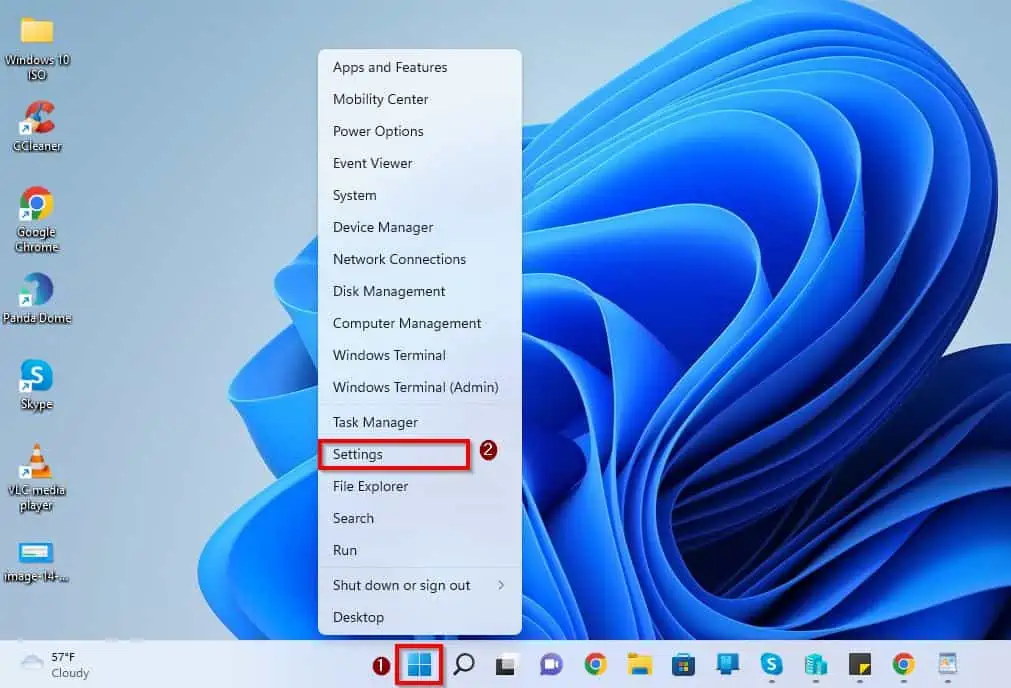
- Right-click the Start menu on your Windows 11 taskbar and select Settings from the displayed options.
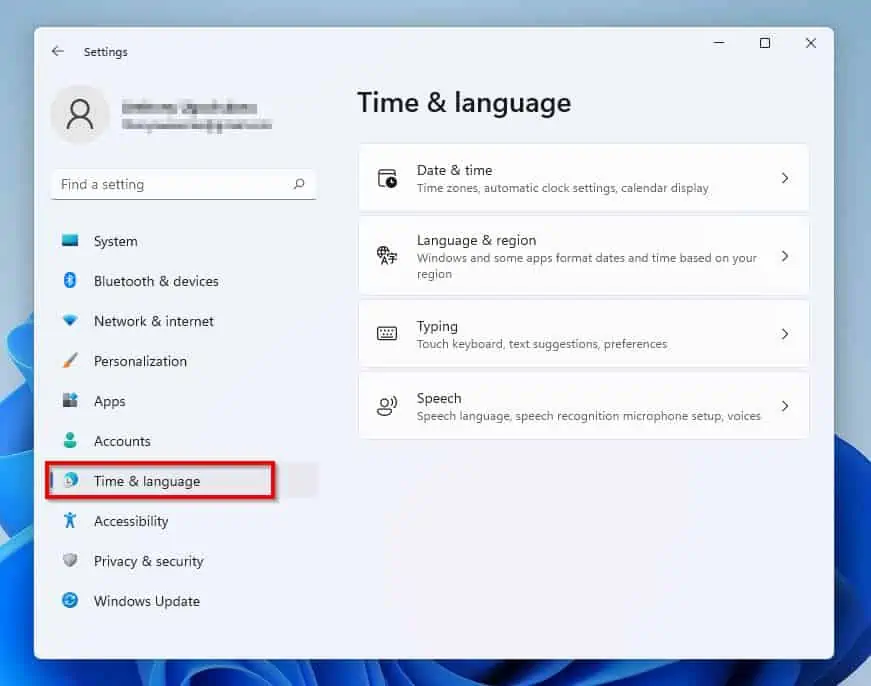
- After that, select Time & language on the left pane of the Settings window.
- Then, click Typing on the right pane.

- After doing that, turn on the Show Text Suggestions when typing on the physical keyboard feature. Additionally, ensure the Autocorrect misspelled words and Highlight misspelled words features are also turned on.
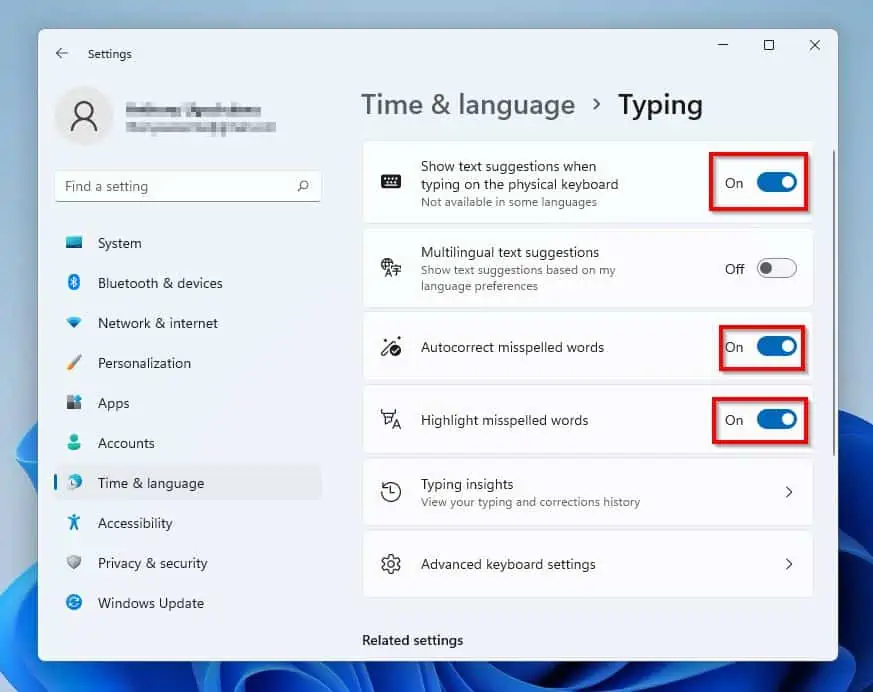
- Finally, anytime you type on the Notepad app, Windows 11 will suggest suitable words and auto-corrections for you.
How to Create XML File
Some people might wish to create an XML file with the Notepad app on their Windows 11 PC. If you are among these people, this section is for you.
Follow the steps below to create an XML file with the Notepad app on your Windows 11 computer.
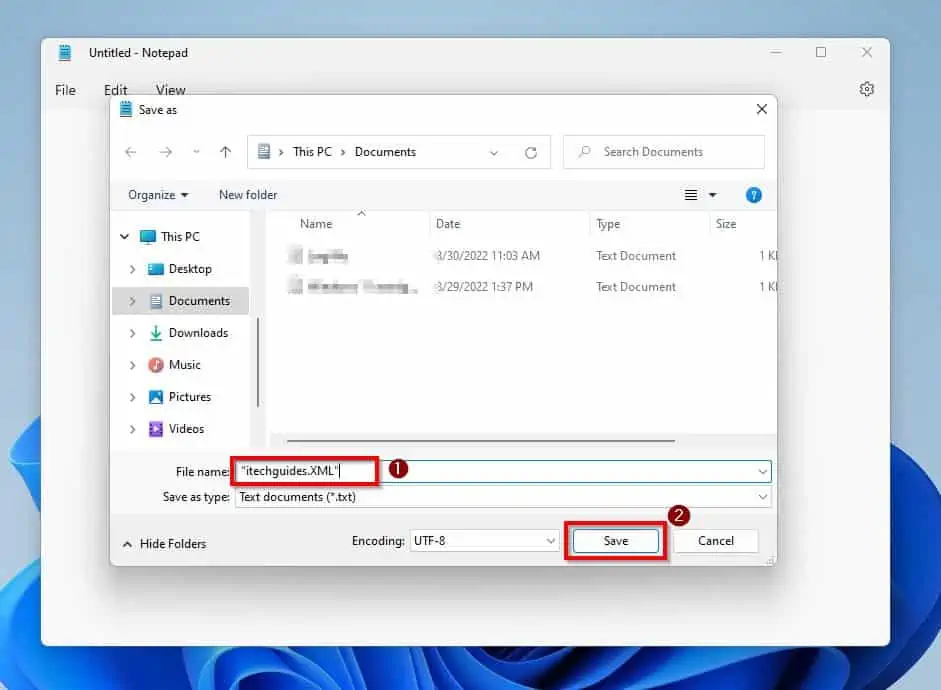
- After opening a new notepad document, click the File menu at the top left corner and select Save As.
- Then, on the Save As window, input the name of the document in quotes and include .XML at the end. Finally, click the Save button at the bottom of the page.
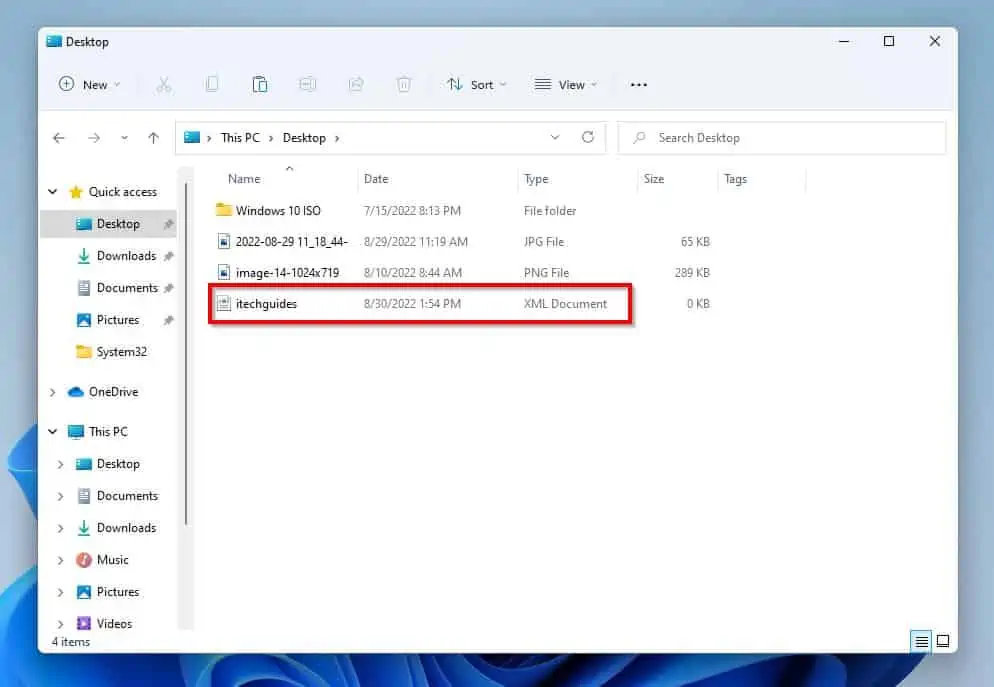
If you access the folder where you saved the file after saving it, the document will appear as an XML file.
How to Save as HTML
Follow the steps below to save a notepad document as HTML on your Windows 11 computer.
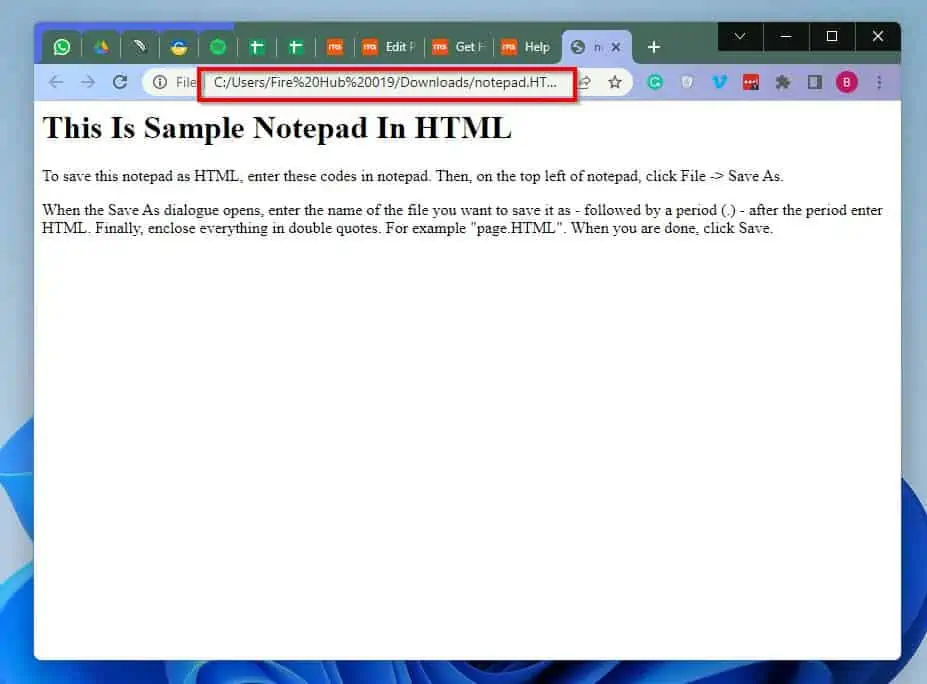
- Open a new notepad document and input your HTML code. For this demonstration, I will be inputting the codes below.
<h1> This Is Sample Notepad In HTML </h1>
<p>
To save this notepad as HTML, enter these codes in notepad. Then, on the top left of notepad, click File -> Save As.
</p>
<p>
When the Save As dialogue opens, enter the name of the file you want to save it as - followed by a period (.) - after the period enter HTML. Finally, enclose everything in double quotes. For example "page.HTML".
When you are done, click Save.
</p>
</body>
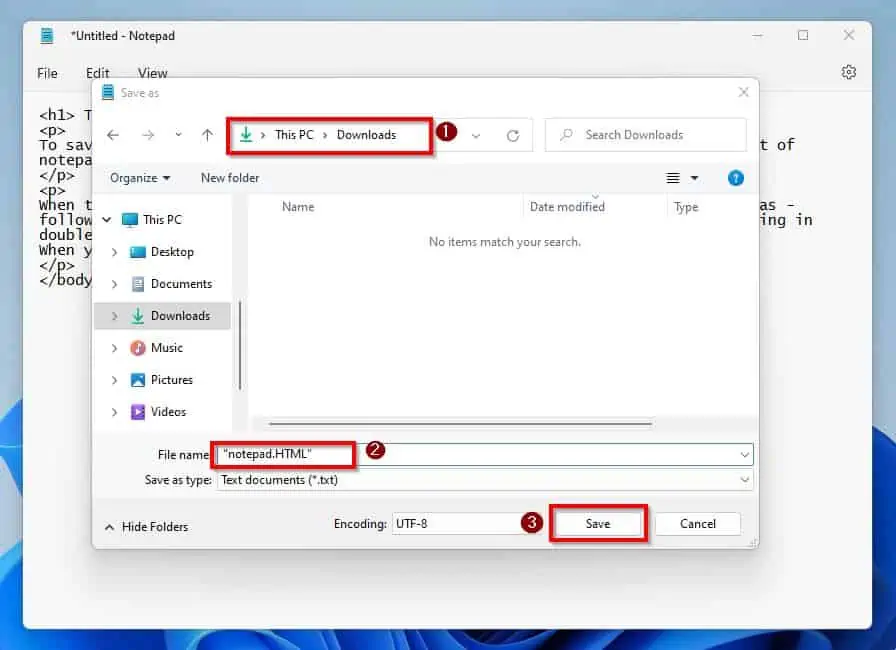
- Then, click File at the top left corner of the notepad window and select Save As.
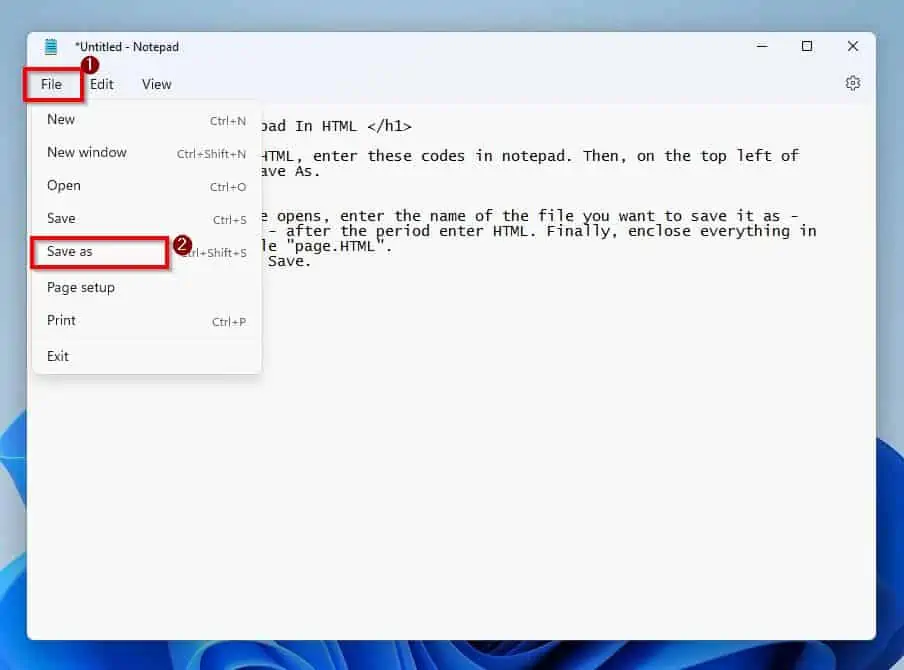
- Afterward, select the folder you want to save the HTML file in the Save As window. Then, input the name of the file in quotes and include .HTML at the end of the file’s name.
Finally, click the Save button at the bottom of the Save As window.
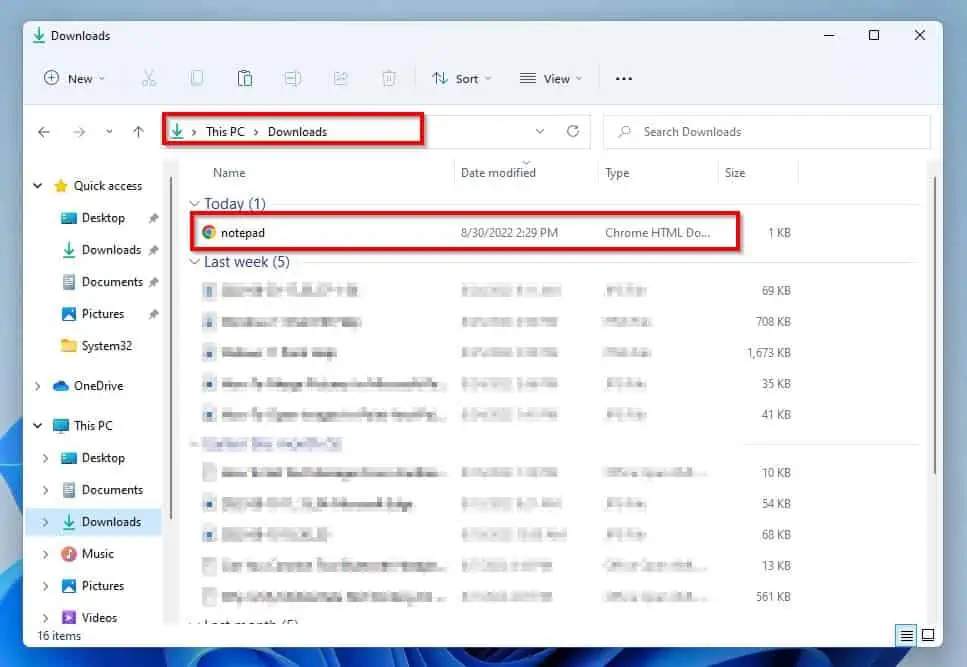
- If you open the folder you saved the file, the file should appear as an HTML file. Hence, you can double-click the file to open it on your default browser.
Common Shortcuts Keys
Below is a full list of Windows 11 Notepad keyboard shortcuts that can improve your productivity.
| Notepad Keyboard Shortcut | Actions Performed |
|---|---|
| Ctrl and N keys | Opens a new notepad on the current window. This action closes the current notepad text file without asking you to confirm |
| Ctrl and Shift + N keys | Opens a new notepad on a new window without closing the open text file |
| Ctrl and O keys | It opens the dialogue to open a saved notepad text file. |
| Ctrl and S keys | It opens the Find dialogue – allows you to search for texts within Notepad |
| Ctrl and Shift and S keys | Opens the Save As dialogue. This gives you the option to save the file (If you haven’t previously saved it), or save it as a new file (If you previously saved it with another name) |
| Ctrl and P keys | Opens the Print setup screen. |
| Ctrl and Z keys | Undo the most recent changes |
| Ctrl and X keys | Cut the selected text (s) |
| Ctrl and C keys | Copy the selected text (s) |
| Ctrl and V keys | Paste copied or cut items from the clipboard. |
| Ctrl and F keys | It opens the Find dialogue – allows you to search for texts within notepad |
| F3 key | Works when the Find dialogue is open. Pressing the F3 function key finds the next place the text you are looking for is located in the notepad text file. |
| Shift and F3 keys | It also works when the Find dialogue is open. Pressing Shift and F3 keys searches for the previous location of the text you are searching for. Unlike just F3, which moves the search forward, Shift and F3 move the search backward. |
| Ctrl and H keys | It opens the Find and Replace dialogue. Use this to replace a text that appears multiple times in the notepad text file – in one go. |
| Ctrl and A keys | Select all the texts in the notepad text file. |
| F5 | Insert Time/Date |
| Ctrl and + (or Plus) keys | Zoom In |
| Ctrl and – (or Minus) keys | Zoom Out |
| Ctrl and 0 keys | Restore Default Zoom |
Other Common Tasks
Some common notepad tasks may be challenging for some users. Due to this, this section teaches you how to perform some common tasks in Notepad.
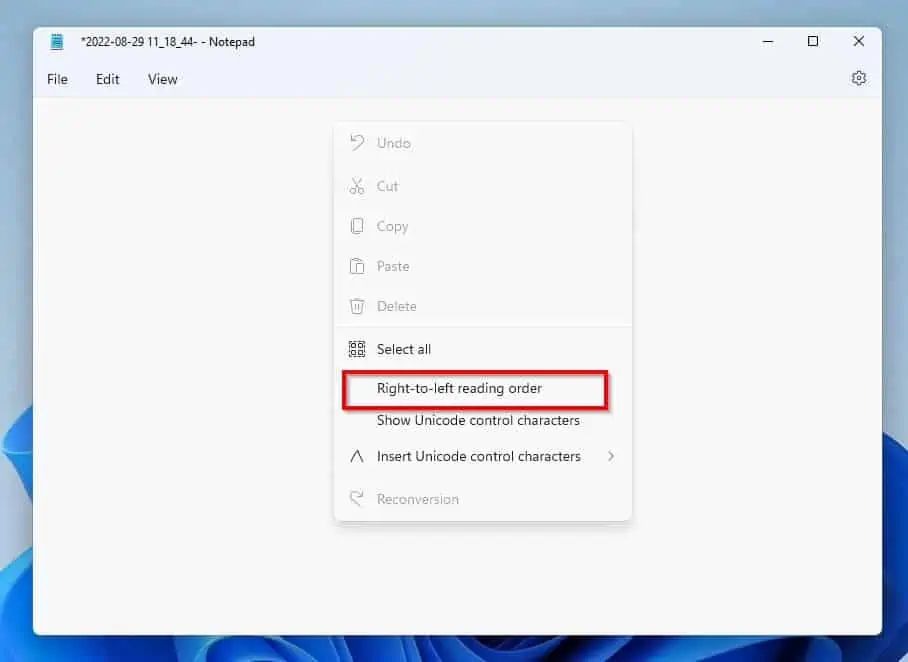
1. Adjust Text Alignment
By default, whenever you type in Windows 11 Notepad, the texts appear from the left side. However, you can adjust the text alignment of your notepad document, allowing texts to appear from the right side.
To do that, simply right-click any free space on your notepad document and select Right-to-left reading order. You can do the same to reverse the situation.
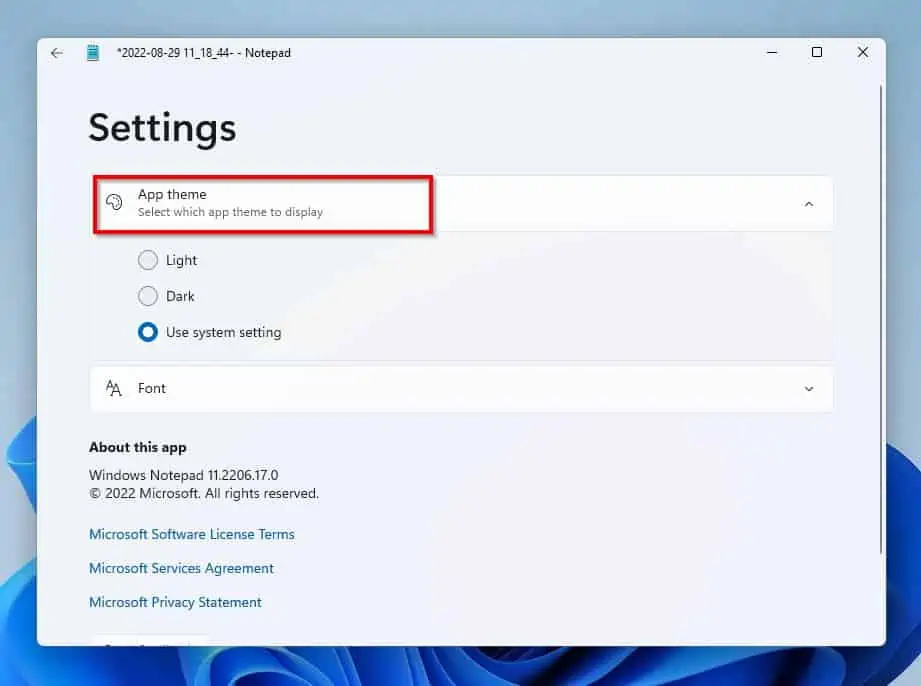
2. Change Theme
Follow the steps below to change the theme of your Windows 11 notepad app.
- Click the Settings icon at the top right corner.
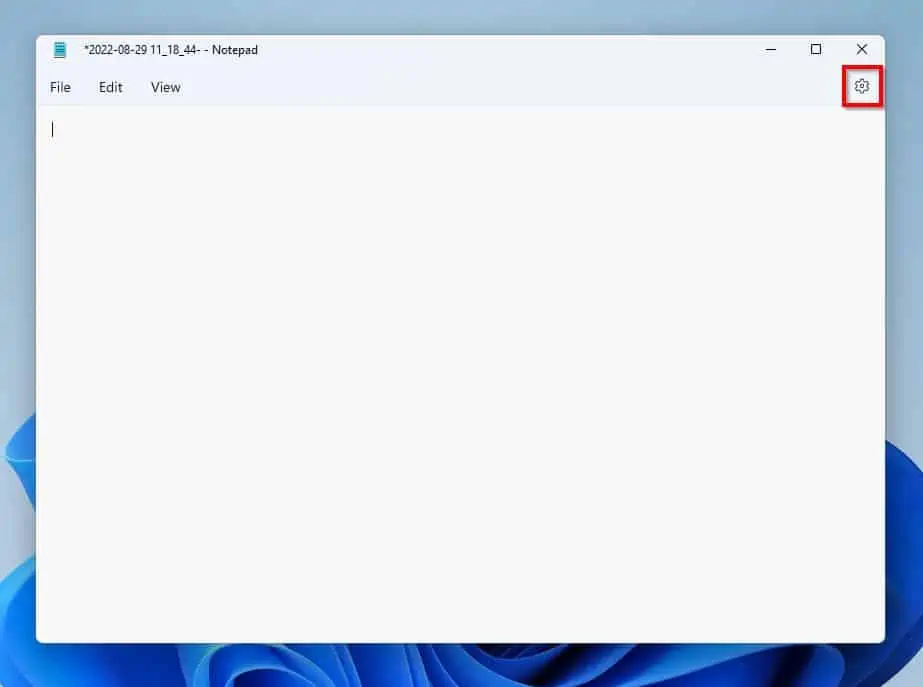
- Then, click App theme and select your preferred theme for the Windows 11 notepad app.
Frequently Asked Questions
Follow the steps below to open the Notepad app on your Windows 11 PC.
a) Click the Search icon on your Windows 11 taskbar.
b) Then, type “notepad” in the input field.
c) Finally, click the Notepad application from the search result.
Absolutely! Notepad is a basic word processing app that is pre-installed and works on Windows 11.
Although they are similar and both word processing apps, they are not the same. Basically, WordPad is more like an advanced version of the Notepad app.
In essence, WordPad has some features that the notepad app lacks.
The Notepad app was released in 1983.
The default notepad font in Windows 11 is Lucida Console.
Conclusion
As basic as the Notepad app can be, one might still need help accessing some of its features. Thankfully, this guide provided extensive details on how to use most of the features in Windows 11 Notepad.
In actual fact, this guide taught us several methods to open the Notepad app in Windows 11. Also, we learned various keyboard shortcuts to improve our productivity while working with notepad.
Hence, with this guide, performing various tasks in Windows 11 Notepad should be less bothersome.
Was this Windows 11 notepad help guide helpful? If you know it was helpful, click on “Yes” beside the “Was this page helpful” question below.
You may also express your thoughts and opinions by using the “Leave a Comment” form at the bottom of this page.
Lastly, for more Windows 11 how-to guides, visit our Windows 11 How-To page.
Sadly, the notepad application in Windows 11 cannot perform these tasks. This is due to the fact that it is a basic word processing app.
Thus, in order to perform these tasks, you will need a more advanced word processing app like Microsoft Word.


Finally!!!! Someone gave instructions to change the alignment back…. Thanks!!