
Free tools Windows power users keep installed
One-click scans. No signup required.
Yes—an Arduino can recognize images without Wi-Fi if you deploy a small model and all required firmware and libraries to the board first. A practical route is a Nano 33 BLE Sense Rev2, a compatible external camera, and TensorFlow Lite for Microcontrollers (TFLite Micro). The key constraint is memory: this is suited to compact tasks such as detecting whether a person is present in a small image, not general-purpose high-resolution vision.
Offline inference and offline training are separate questions. The device can run its deployed model without a network connection, but Arduino’s cited materials do not establish that the complete model-training workflow can also be done offline.
What “local image recognition” means on an Arduino
Image recognition on a microcontroller means capturing an image, preparing it in the format expected by a small machine-learning model, and running that model on the board. The model’s inference runs locally; the Arduino does not need to send each image to a cloud service.
Arduino documents TensorFlow Lite for Microcontrollers examples, including person detection with an external camera. Its camera guidance describes a 96×96 input for that person-detection example. That is evidence for a bounded task with a compact input, not a promise that an Arduino can run arbitrary modern object detectors or recognize unlimited categories.
Do these 3 things before closing this tab:
1Repair Windows errors before they cause bigger problems2Scan for outdated or missing drivers - takes under a minute3Clear out junk files and repair common Windows errors#1 Best Overall

- Powerful MCU Board: Incorporate the ESP32 S3 32-bit, dual-core, Xtensa processor chip operating up to 240 MHz, mounted multiple development ports, Arduino / MicroPython supported
- Advanced Functionality: Detachable OV2640 camera sensor for 1600*1200 resolution, compatible with OV3660 camera sensor, integrating additional digital microphone
- Great Memory for more Possibilities: Offer 8MB PSRAM and 8MB FLASH, supporting SD card slot for external 32GB FAT memory
- Outstanding RF performance: Support 2.4GHz Wi-Fi and BLE dual wireless communication, support 100m+ remote communication when connected with U.FL antenna
- Thumb-sized Compact Design: 21 x 17.5mm, adopting the classic form factor of XIAO, suitable for space-limited projects like wearable devices
To make deployment independent of the network, have the model, firmware, libraries, and the toolchain needed to build and upload them available locally before disconnecting. A board with a deployed model can then perform inference without Wi-Fi; model creation and conversion may involve a separate workflow.
Choose the board and camera as a matched setup
Nano 33 BLE Sense Rev2
The Nano 33 BLE Sense Rev2 is a plausible target for small TinyML workloads. Arduino’s current product specifications list an nRF52840 microcontroller, 256 KB SRAM, and 1 MB flash. Those figures are limits, not a guarantee that a particular model will fit: image buffers, model data, the TensorFlow Lite Micro tensor arena, the stack, and the rest of the application all compete for memory. The Rev2 does not have a documented built-in camera, so vision requires an external one. See Arduino’s Nano 33 BLE Sense Rev2 documentation and product specifications.
Rank #2

- HuskyLens is an easy-to-use AI machine vision sensor. It can learn to detect objects, faces, lines, colors and tags just by clicking. The Silicone Sleeve is included in the package.
- One-Click-Learn: HuskyLens is designed to be smart. Built-in algorithms allow HuskyLens to learn new things just by a single click.
- Machine-Learning-Enabled: Equipped with advanced machine learning technology, HuskyLens is capable of recognizing faces and objects, which is far more beyond ordinary sensors.
- Onboard Screen: HuskyLens carries a 2.0 inch IPS screen, therefore you don't need to use a PC in parameters tuning. Enjoy the convenience it brings, what you see is what you get!
- Extreme Performance: HuskyLens adopts a new generation AI specialized chip Kendryte K210, contributing to 1,000 times faster performance compared to STM32H743 when running neural network algorithm.
Two documented camera approaches
Arduino materials describe two distinct combinations. The Tiny Machine Learning Kit pairs a Nano 33 BLE Sense with an OV7675 camera, shield, and USB cable. Arduino’s separate camera tutorial demonstrates an OV7670 module connected with jumper wires. These are different sensor setups; do not assume that the camera, wiring, library, or example for one is a drop-in replacement for the other.
| Approach | What Arduino documents | Best fit | Availability or compatibility note |
|---|---|---|---|
| Tiny Machine Learning Kit | Nano 33 BLE Sense, OV7675 camera, shield, and USB A-to-Micro-USB cable | Makers who want a bundled board-and-camera setup | Arduino’s store page showed the kit sold out when consulted; stock can change. Confirm the camera and software support for the exact board revision. |
| Separate board and camera | The camera tutorial uses an OV7670 module and 16 female-to-female jumper wires | Those who already own a board or want to assemble separate components | Follow the OV7670 tutorial’s particular wiring and library setup; do not treat it as the kit’s OV7675 configuration. |
For kit details, see Arduino’s Tiny Machine Learning Kit page. For the separate OV7670 setup and capture example, see Arduino’s camera tutorial. Camera interfaces and software can change; check the current board core, library version, sensor variant, and example before wiring or compiling.
Recommended Free Tools
Rank #3

- 6 TOPS Edge AI & Deploying Custom Models Trained with YOLO: Powered by a 1.6GHz dual-core processor and a 6 TOPS AI accelerator, it handles complex neural networks locally. Built-in with 20+ algorithms (face, gesture, posture tracking), it also supports a complete toolchain for training and deploying custom YOLO models without relying on cloud computing.
- 116.6° WIDE-ANGLE VISION TO MINIMIZE BLIND SPOTS: The Plus Kit includes a specialized Wide-Angle Camera Module featuring an expansive FOV (D: 116.6°, H: 107.6°, V: 72.6°). Optimized for a near-field effective capture distance of 0.1~1.5m, it is perfectly designed for dynamic mobile robots, desktop robotic arms, and STEM competitions. It captures massive environmental data in a single frame, ensuring targets are detected earlier and is not lost during fast close-range movements.
- DUAL-MODE REAL-TIME VIDEO TRANSMISSION: Break traditional connection limits! Equipped with the WiFi module, it supports both USB wired and WiFi wireless real-time video transmission. Utilizing highly efficient image compression technology, it achieves millisecond-level latency, seamlessly syncing recognition results and live visuals to your remote terminals. It provides extremely reliable remote visual perception and data collection for enclosed robotic chassis.
- LLM INTEGRATION VIA MCP: HUSKYLENS 2 is the first AI vision sensor to support the Model Context Protocol (MCP). It acts as the "intelligent eyes" for Large Language Models (LLMs), sending structured contextual summaries (e.g., "A person is doing a specific gesture") directly to your AI Agents for smarter decision-making.
- PLUG-AND-PLAY: Featuring standard UART and I2C (Gravity) interfaces, it's fully compatible with Arduino, ESP32, Raspberry Pi, micro:bit, and UNIHIKER. Its intuitive "learn-and-use" touchscreen interface allows beginners and pros alike to build AI projects in minutes.
Why image size is the main constraint
A VGA image is far too large to keep as a single grayscale buffer on a board with 256 KB SRAM. Arduino’s camera article calculates that an uncompressed 8-bit grayscale VGA frame uses 300 KB—more than the board’s stated SRAM, even before the model and other runtime memory are considered.
The OV7670 tutorial lists these modes: VGA 640×480, CIF 352×240, QVGA 320×240, and QCIF 176×144. The article notes that its RGB formats use two bytes per pixel. Reducing camera resolution, converting to grayscale, or downsampling can lower buffer demands, but each change must remain consistent with the model’s input requirements.
Rank #4
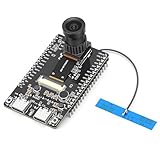
- 【Main Functions】BW21-CBV-Kit is a local AI vision recognition development board capable of independently running object recognition models
- 【Camera Specifications】Equipped with a 1920 x 1080 resolution, 2MP, 30fps wide-angle camera, a condenser microphone, and support for 2TB memory card storage
- 【Strong Communication Capabilities】Based on the RTL8735B chip, it supports dual-band 2.4GHz/5GHz WiFi and Bluetooth 5.1, providing high-performance wireless transmission capabilities for smoother image transmission
- 【Development Method】Utilizes the Arduino development approach, allowing you to easily implement your ideas, such as face recognition, gesture recognition, object recognition, component defect detection, people counting, pet recognition, etc
- 【Rich Interfaces】Two sets of 18-pin headers provide 30 programmable I/Os, facilitating project expansion. Combined with AI recognition, it unlocks limitless possibilities
For example, Arduino’s documented person-detection example uses a 96×96 input, while its camera article also points to 28×28 MNIST as a small-image example. These dimensions illustrate the scale of tasks to consider; they are not interchangeable model settings. Match the deployed model’s width, height, channel count, pixel conversion, preprocessing, and quantization exactly. A mismatch can produce invalid input or poor predictions even if the program compiles.
Implementation: from camera test to offline inference
- Select the exact hardware combination. Choose the Rev2 board and a camera with a verified library and wiring path. Decide whether you are using the kit’s OV7675 arrangement or the tutorial’s OV7670 arrangement; use the corresponding documentation rather than mixing their parts or examples.
- Install and verify camera capture first. For the OV7670 tutorial setup, Arduino names the Arduino_OV767x library and begins with its camera-capture example and a test pattern. The tutorial streams raw image bytes over serial for inspection in Processing. Processing is a development-time viewer, not a requirement for the finished offline inference device.
- Choose a model sized for the target. Use a compact recognition task and input dimensions the board can handle. Arduino documents a TFLite Micro person-detection example at 96×96. Confirm the model’s operators, input shape, channel format, and preprocessing before integrating the camera stream.
- Build the deployment with its runtime and model. Arduino documents TFLite Micro examples in its library ecosystem, and its board documentation points readers to TensorFlow Lite and Edge Impulse learning materials. Make sure the firmware includes the model and required runtime components; an inference device should not need to fetch them from a service after startup.
- Compile and upload while the development setup is available. Keep the selected board support package, libraries, model-conversion outputs, and other build dependencies on hand. The cited sources do not establish a single version-independent installation recipe, so check the current instructions for the chosen board and camera.
- Validate the complete data path. Check that the camera captures an image, that pixel conversion produces the expected tensor shape and values, that the tensor arena allocates, and that the model returns a sensible result. Test the uploaded device with the network disconnected to confirm that its inference path does not depend on connectivity.
Offline inference is not the same as offline training
Once the model and firmware are on the Arduino, inference can be network-independent. Training is different: Arduino’s Nano 33 BLE Sense materials point to Edge Impulse as a training route, but the cited documentation does not establish that data collection, training, model conversion, and deployment can all be completed offline.
Best Value

- 【Wide Compatibility】Works with Windows 11/10/7, Mac OS, Linux, Ubuntu, and Android. Fully compatible with Raspberry Pi, Jetson Nano, ARM boards, notebooks, desktops, and tablets. Plug & Play with native UVC driver, no additional software required.
- 【High-Definition Performance】Captures video up to 1080P@30fps with support for YUY2 and MJPEG formats, plus multiple optional resolutions to fit your needs. High-quality, low-noise MEMS microphone for clear and natural sound capture.
- 【Day & Night Vision with Auto IR-Cut】Automatically switches between vivid daytime colors and clear night vision. Night mode can be set to color or black & white via the on-board jumper.
- 【Wide Angle Lens】Fov(D) = 110 degrees and Fov(H) = 95 degree.
- 【Enhanced Protection】On-Board Common Mode Filter, Provide ESD/EMI protection on high-speed differential signal lines for improved electrostatic discharge protection and reduced signal noise, ensuring stable performance in various environments.
If your requirement is that no images or training data ever leave your premises, verify the full training and conversion workflow separately before choosing it. If your requirement is only that the installed device continue recognizing images without internet access, focus on placing all inference artifacts on the board and validating operation while disconnected.
What performance to expect—and what is not established
The documented examples support the feasibility of small, constrained vision tasks on Arduino-class hardware. They do not establish a general-purpose high-resolution detector, a particular frame rate, recognition accuracy, or power consumption for the Nano 33 BLE Sense Rev2. Those results depend on the model, camera settings, preprocessing, implementation, and memory allocation; measure them on the exact hardware and software combination you deploy.
Arduino’s camera tutorial dates from 2020, so treat its named APIs, library instructions, and hardware examples as version-sensitive. The board’s current store specifications establish its memory figures, but compatibility should be checked against the current camera library and board core before relying on an older example.
Quick Recap
Product prices and availability are accurate as of the date/time indicated and are subject to change. Any price and availability information displayed on Amazon at the time of purchase will apply.

