
Do these 3 things before closing this tab:
1Scan for outdated or missing drivers - takes under a minute2Clear out junk files and repair common Windows errors3Fix the driver behind crashes, sound loss and screen glitchesiTechGuides is reader-supported. When you buy through links on our site, we may earn an affiliate commission. As an Amazon Associate I earn from qualifying purchases. Learn more
Read this guide to learn how to renew expired certificates in Active Directory Federation Service (AD FS) and their WAP servers.
Step 0: Review the Problem Background and Overview
Earlier today (8th April 2025), my manager told me that the certificate in our AD FS servers had expired. He had already purchased a new publicly signed certificate.

So, my task was to renew the certificates in the AD FS servers.
Free tools Windows power users keep installed
One-click scans. No signup required.
When an AD FS certificate expires, the service stops, and users cannot access it. Needless to say, resolving this problem was a high priority.
#1 Best Overall

- 3 different colors per sheet
- Laser and inkjet compatible with instructions for customizing in Microsoft Word
- 30 certificates with envelopes per pack
- Includes ledger to record certificates and "Gift Certificates Available" sign
- Security features such as: consecutive numbers, simulated watermark and microprinting
I have never performed this task before, so I did a few web searches and found this article: ADFS: Changing the Certificate. The referenced article is great, but it covered just the steps to renew the AD FS certificate, not the WAP server certificates.
A further search led me to another article, – Replace ADFS/WAP SSL certificates – which showed me how to renew the WAP servers’ certificates.
While these referenced articles are great, none provided a comprehensive step-by-step guide to performing this all-important SysAdmin task. After successfully renewing the certificates in my servers, I decided to document the full steps for my readers.
Windows Errors? Fix Them Before They Spread
Repair common Windows errors and clear accumulated junk for a smoother, more stable PC - no reinstall needed.Free scan · no reinstallCrashes, No Sound, or Screen Glitches?
Random freezes, missing sound and display glitches usually trace back to one bad driver. Find and replace yours safely.Free scan · under a minuteHere are they are:
Step 1: Get a New Publicly Signed Certificate
This step is obvious, but I included it for completeness. You can order a certificate from any certificate provider.
Rank #2
Meanwhile, it is important to ensure that the certificate meets the requirements outlined in requirements for ADFS tlsssl certificates.
Step 2: Add a Temp Self-Signed Wildcard Cert to ADFS
Since ADFS requires some certificate to function, use the steps below to create and add a temporary self-signed wildcard certificate to the primary AD FS Server.
- If the AD FS service is stopped, start it. To do this, search for and open the Services MMC, right-click the Active Directory Federation Services service, and select Start.

- To confirm that the AD FS server you’re signed in to is the primary server, open the AD FS Management console via Server Manager.

If the server is the primary server, it will display the AD FS services. The secondary Federation server – see my second screenshot below – will not display the AD FS service.
What’s actually slowing this PC down?
Pick the symptom - the matching free tool is one click away.

The secondary server also displays the primary federation server (blurred in my screenshot below).
Rank #3

- Sign in to the primary AD FS server and open Windows PowerShell as administrator. Then, run the command below to get the status of the existing certificate.
Get-ADFSCertificate –CertificateType token-signing
As seen in the certificate’s Not After property, it expired in March 14th 2025.

- After that, enable certificate rollover and generate a new certificate by running these commands.
Set-ADFSProperties -AutoCertificateRollover $true
Update-ADFSCertificate –CertificateType token-signing

- Finally, verify that the self-signed cert has been assigned to the AD FS server by running the Get-ADFSCertificate command again:
Get-ADFSCertificate –CertificateType token-signing
The command’s results should list two certificates. One should have a Not After date in the future, while the other should have the IsPrimary value False.


Step 3: Import the New Public Signed Cert to the AD FS Server’s Local Store
Perform the steps in this section on the primary and secondary AD FS servers.
- Double-click the PFX file of the certificate you purchased from a certificate provider in Step 1. Then, on the first page of the import wizard, select Local Machine.

- The certificate’s file path will be displayed on the following page. Click Next to proceed to the next page.

- Finally, enter the certificate’s PFX password and import it to the local computer’s certificate store. See my screenshots below for guidance.


Repeat the above steps in the secondary AD FS server. Then, run the command below on the primary server to disable the AD FS certificate rollover.
Rank #4

- Fireproof Document Bag: The surface is made of fire-resistant silicone fiberglass fabric that can withstand temperatures up to 2200 F. Provides your important documents, cash, passports and other valuables with extra protection in the event of a fire, giving you peace of mind
- Waterproof Document Organizer: This folder adopts a unique zipper binder and waterproof pockets design, which can effectively protect your important documents in emergencies such as flood and wet weather
- Large Capacity Storage: Multiple different sizes of file bags for document filing and storage, meeting all your storage needs. It can orderly store Important Papers, Emergency Binder, Birth Certificates, Social Security Cards, Passports, Photos, Letters, Bills and receipts, and more
- Easy to Carry: Zipper Binder Size: 14" x 10.6" x 2", not too big or bulky, easy to carry. With double zipper design and portable handle, you can put it at home, office, car, safe, locker, or take it for travel
- Binder Pockets Included: The document holder includes 8 pieces A4 4-holes binder pockets, 4 pcs B5 binder pockets, and 1 pcs card slot page that holds 6 bank cards and USB drives
Set-ADFSProperties -AutoCertificateRollover $false
Step 4: Grant the AD FS AD Service Account Access to the Cert Private Key
- Get the name of the Active Directory Service account for AD FS from the Log On tab of the properties of the Active Directory Federation Services service. You require this account later in this section.

- Search for and open MMC as administrator (right-click MMC from the search result and choose Run as administrator).

- Then, on the MMC, click File and select Add/Remove snap-in…Then, select Certificates > Add.


- Next, choose Computer account on the Certificate snap-in wizard, then click Next. Finally, choose Local computer (the computer this console is running on), then select Finish, OK. See my screenshots below for guidance.


- Expand Certificates (Local computer), Personal and left-click Certificates on the MMC console. Then, right-click the certificate you imported in Step 3 and point to All Tasks > Manage Private Keys.

- The above action opens the Permissions properties for the certificate’s private keys. Click the Add button.

- Then, click Object Types > Select Service Accounts, OK. After that, enter the name of your AD FS service account in the Enter the object names to select field and grant it full control.


Step 5: Renew the Certificate in the AD FS Servers
- Launch the AD FS management console (via Server Manager). Then, expand Service > Certificates and choose Set Service Communication Certificate.

- On the Windows Security pop-up, select More choices. Then, choose the new certificate and click OK.


- Repeat steps 1 and 2 above to replace the Token-decryption and Token-signing certs. Finally, delete all the old certificates.
- When you finish the above steps, the new certificate should be listed for the Service communications, Token-decryption, and Token-signing sections of the Certificates blade.

- After that, get the certificate’s thumbprint by right-clicking it, selecting View Certificate, and choosing the Details tab > Thumbprint. Then, select and copy the certificate’s thumbprint with Ctrl + C.


- Paste the thumbprint in a notepad and remove all spaces.

- Run the command below – from the PowerShell console you opened as administrator – to re-enable AD FS rollover. Then, confirm that the new certificate is available in AD FS by running the second command.
Set-ADFSProperties -AutoCertificateRollover $true
Get-adfsCertificate
- After that, set the AD FS server to use the new cert by running the command below. Replace everything in bold with your cert Thumbprint.
Set-AdfsSslCertificate -Thumbprint <enter your certificate thumprint here>
- Then, set the cert rollover to true and restart the ADFS service. Finally, run the Get-AdfsSslCertificate command to confirm that the AD FS server uses the new certificate.
Set-ADFSProperties -AutoCertificateRollover $true
Restart-Service ADFSSRV
Get-AdfsSslCertificate


Step 6: Renew the Certificate on the AD FS WAP Servers
- Copy the PFX file of the public signed certificate to your first AD FS WAP server and repeat Step 3 (link opens in a new browser tab) section of this guide.
- After that, open PowerShell as administrator and run these commands.
#1. Configure the WAP service to use the new certificate

Set-WebApplicationProxySslCertificate -Thumbprint <enter your certificate thumprint here>

#2. Re-establish the proxy trust of the WAP server with the AD FS server. This command will prompt you to enter an AD account with permissions to the AD FS service

Install-WebApplicationProxy -CertificateThumbprint <enter your certificate thumprint here> -FederationServiceName <enter your AD FS federation service FQDN here>

#3. Finally, update the SSL cert for every published app

Get-WebApplicationProxyApplication | Set-WebApplicationProxyApplication -ExternalCertificateThumbprint <enter your certificate thumprint here>


- Repeat steps 1 and 2 above in your second WAP server.
Conclusion
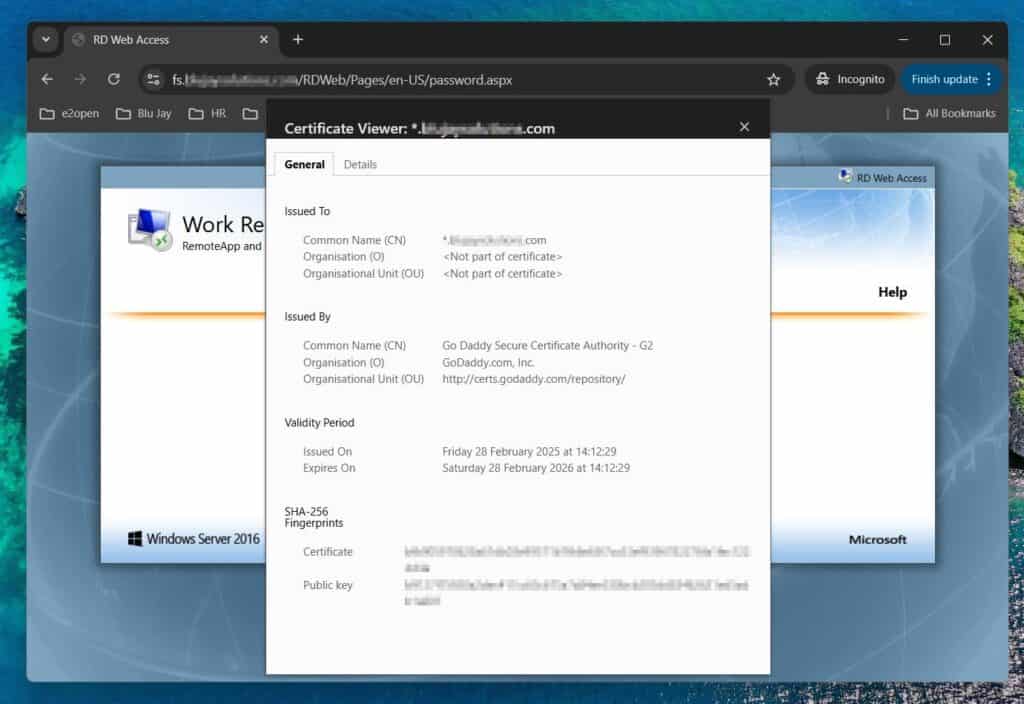
After completing the steps outlined in this detailed guide, when you open the front-end site of your AD FS service on a browser, it will no longer display a certificate error. Furthermore, if you open the site’s certificate, it should display the new certificate.

I admit that renewing a certificate in an AD FS server is relatively complex. Following this detailed guide, I’m confident you have completed the task successfully, but I would still like to hear your thoughts.
Let me know what you think about this guide and if you met your goal by following it. You can provide feedback by responding to our “Was this page helpful?” feedback request below.


