Do you want to use Select-Object in your PowerShell script but don’t know how? This PowerShell Select-Object article will be your guide.
Overview
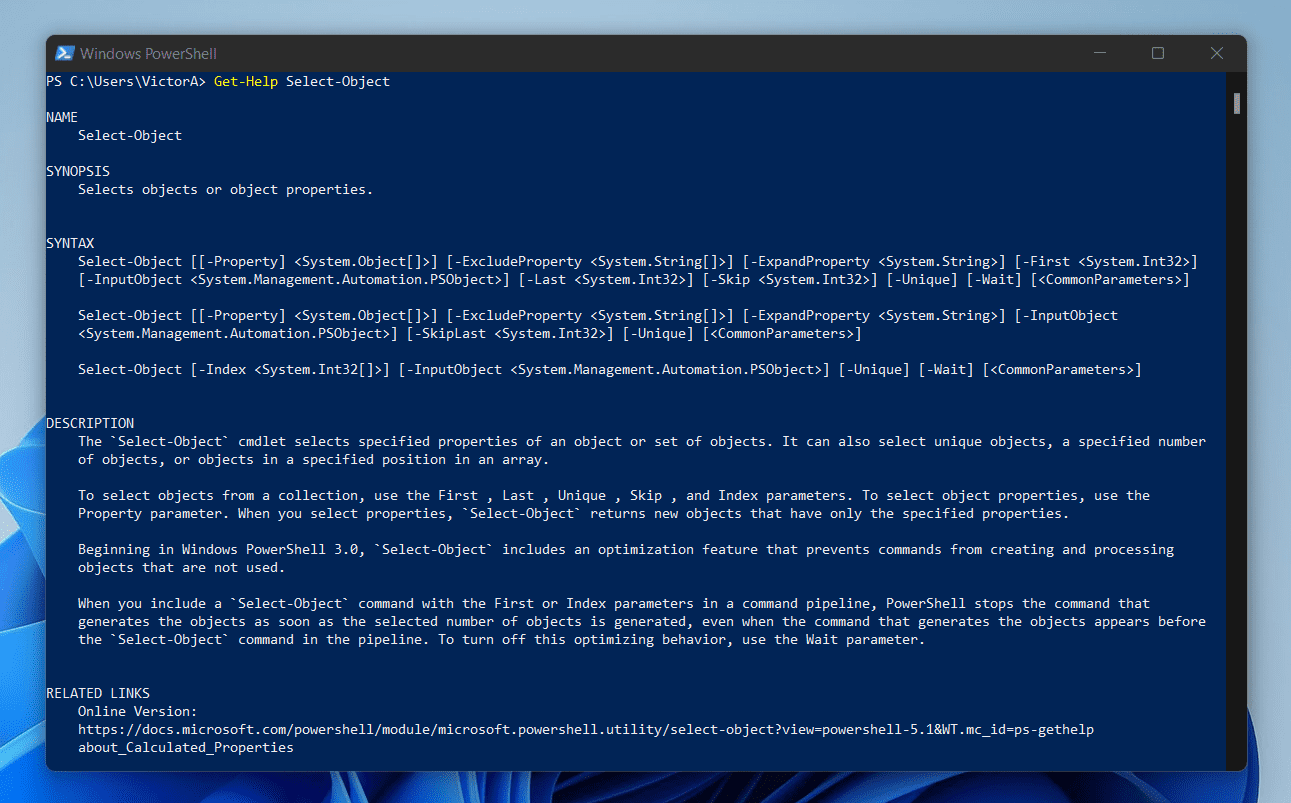
Scripters use the Select-Object Cmdlet to select the properties of an object. If you ever want to create a report with headers, your likely go-to Cmdlet is Select-Object.
This Cmdlet selects specified properties of an object or set of objects. In other words, you can use Select-Object to combine a set of properties.
You can also use PowerShell Select-Object to select unique objects, a specified number of objects, or objects in a defined position in an array.
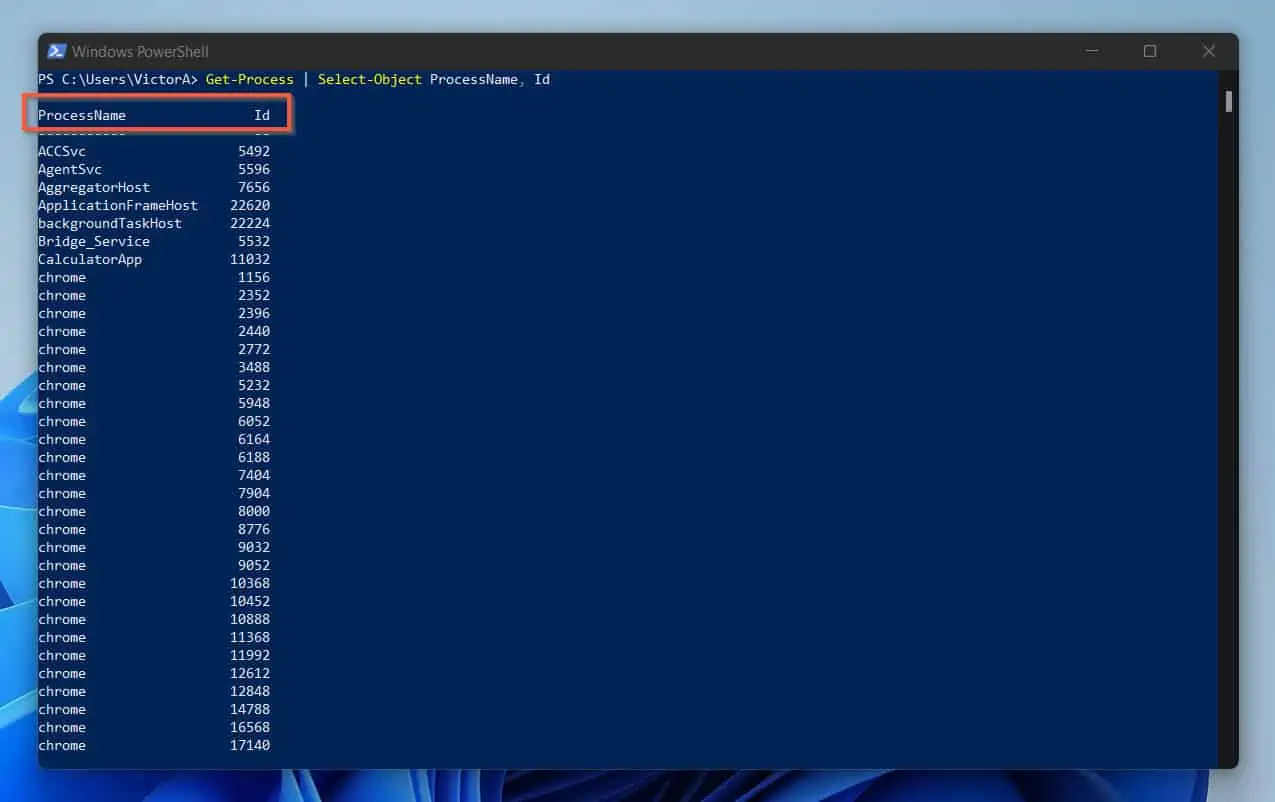
For quick use of this cmdlet, I will run the Get-Process command. Then, pipe the output to Select-Object.
Get-Process | Select-Object ProcessName, IdEven though Get-Process returns a number of properties for processes running on my computer, I used Select-Object to select just two – ProcessName and Id (Process ID).
Syntax
The Select-Object cmdlet has four syntaxes. Here they are…
Select-Object
      [-InputObject <PSObject>]
      [[-Property] <Object[]>]
      [-ExcludeProperty <String[]>]
      [-ExpandProperty <String>]
      [-Unique]
      [-Last <Int32>]
      [-First <Int32>]
      [-Skip <Int32>]
      [-Wait]
      [<CommonParameters>]
Select-Object
      [-InputObject <PSObject>]
      [[-Property] <Object[]>]
      [-ExcludeProperty <String[]>]
      [-ExpandProperty <String>]
      [-Unique]
      [-SkipLast <Int32>]
      [<CommonParameters>]
Select-Object
      [-InputObject <PSObject>]
      [-Unique]
      [-Wait]
      [-Index <Int32[]>]
      [<CommonParameters>]
Select-Object
      [-InputObject <PSObject>]
      [-Unique]
      [-SkipIndex <Int32[]>]
      [<CommonParameters>]
You may be wondering the differences in the syntaxes. Let’s start by comparing the first and the second syntaxes.
If you take a closer look, you’ll notice that the first syntax has the following parameters: Last, First, and Skip. However, the second syntax does not have these three parameters.
Instead, the second syntax has one parameter that differentiates from the first syntax: SkipLast.
Moving on to syntaxes two and three, 2 parameters differentiate the two syntaxes.
Specifically, in syntax three, PowerShell Select-Object has the Index parameter. However, in the fourth syntax, it has SkipIndex.
In the next section, I’ll explain all the syntaxes.
Parameters
In the table below, I have explained all the parameters of the Select-Object cmdlet.
| S/N | Parameter Name | Select-Object Parameter Meaning/Notes |
|---|---|---|
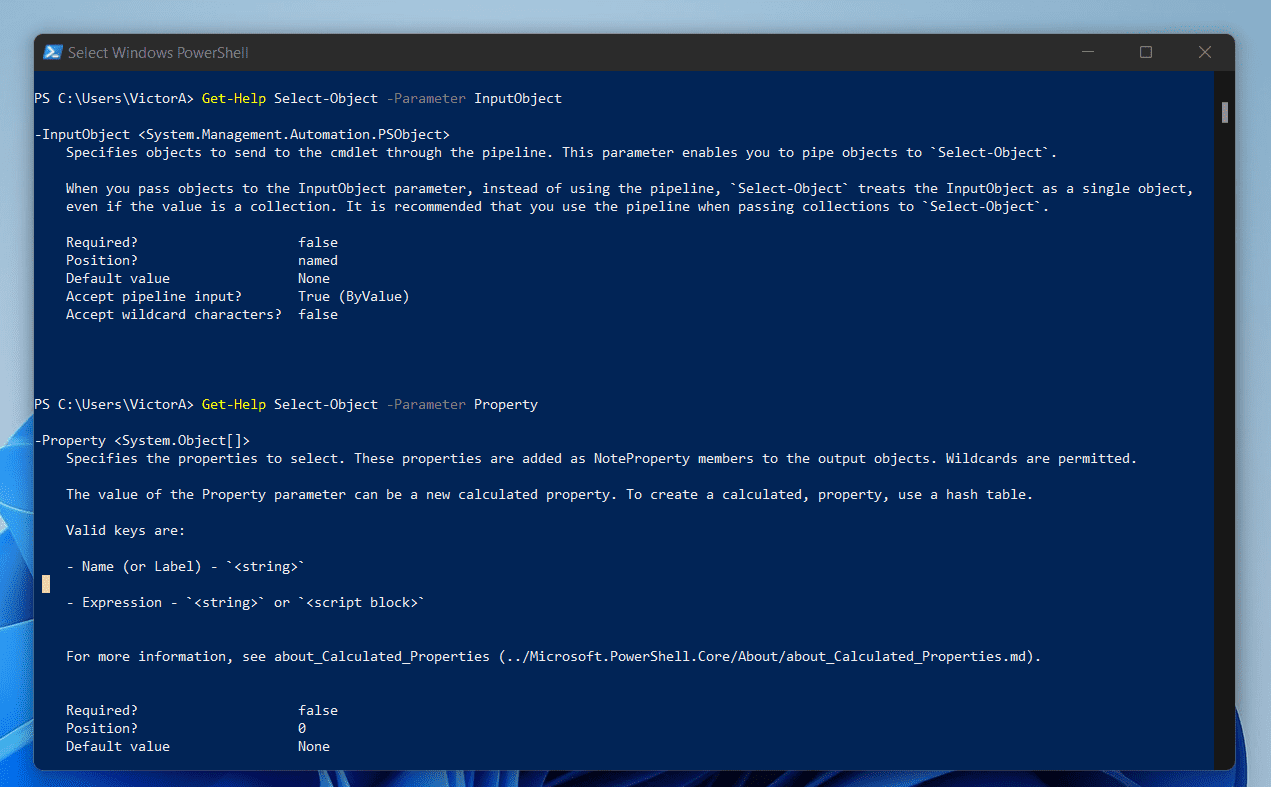
| 1 | InputObject | The InputObject parameter specifies objects to send to the cmdlet through the pipeline. This parameter allows you to pipe objects to Select-Object. However, instead of using the InputObject parameter, Microsoft recommends that you send objects through the pipeline. |
| 2 | Property | Use the Property parameter to specify the properties to select. These properties are added as NoteProperty members to the output objects. This parameter allows wildcards. |
| 3 | ExcludeProperty | The name of this parameter is self-explanatory. Use the ExcludeProperty parameter to specify the properties that Select-Object excludes from the operation. |
| 4 | ExpandProperty | Use the ExpandProperty parameter to get Select-Object to attempt to expand a specified property. If the object property you specified is an array, PowerShell Select-Object will include each value of the array in the output. |
| 5 | Unique | You use this parameter to specify that if a subset of the input objects has identical properties and values, only a single member of the subset will be selected. The Unique parameter selects values after other filtering parameters are applied. |
| 6 | First | Use the First parameter to specify the number of objects to select from the beginning of an array of input objects. |
| 7 | Last | When you run Select-Object, you can use the Last parameter to specify the number of objects to select from the end of an array of input objects. |
| 8 | Skip | When you specify the Skip parameter, you enter a number next to the parameter. Then, PowerShell Select-Object skips (will ignore) the specified number of items. By default, the Skip parameter counts from the beginning of the array or list of objects. However, if the command uses the Last parameter, it counts from the end of the list or array. |
| 9 | Wait | The Wait parameter optimizes the performance of the Select-Object command. By default, if you include a Select-Object command with the First or Index parameters in a command pipeline, PowerShell stops the command that generates the objects as soon as the selected number of objects is generated. However, when you specify the Wait parameter, PowerShell Select-Object runs commands in the order that they appear in the command pipeline and lets them generate all objects. |
| 10 | SkipLast | Skips (ignores) the specified number of items from the end of the list or array. It works in the same way as using the Skip parameter together with the Last parameter. Unlike the Index parameter, which starts counting at 0, the SkipLast parameter begins at 1. |
| 11 | Index* | When you specify the Index parameter, you enter a number next to it. Then, Select-Object selects objects from an array based on their index values. To specify index values, enter them in a comma-separated list. Indexes in an array begin with 0, where 0 represents the first value and (n-1) represents the last value. |
| 12 | SkipIndex | No information is available for this parameter. |
Examples
This section has 10 examples of different ways you can use PowerShell Select-Object. Each example shows commands, scripts, and screenshots.
1. Get Only the Value of an Object’s Property
When you run the Select-Object command, PowerShell displays the names of the properties as headers. Then, it displays the values of each property beneath the header.
For example, if I run the Get-Process command and use Select-Object to select ProcessName and Id, PowerShell displays the ProcessName and Id as the headers.
Get-Process | Select-Object ProcessName, Id
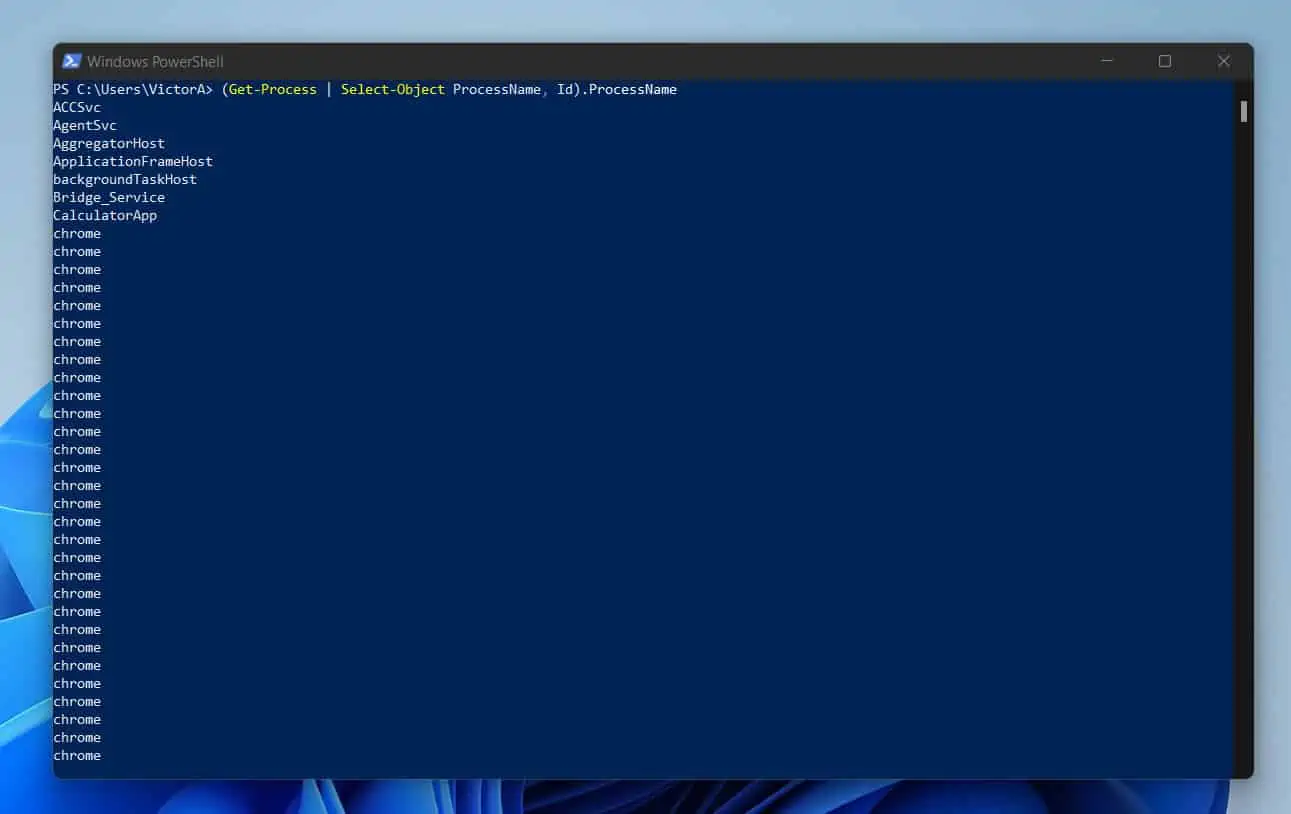
However, there are instances where you may not want to display the headers. To achieve this, you have to call the property you wish to display from the result of the last command.
For example, I’ll run the command below to display the process names without displaying the ProcessName property as a header.
(Get-Process | Select-Object ProcessName, Id).ProcessName
PowerShell now displays the result without the header.
As you can see from the previous command, this is not an efficient way to do this. In the first instance, if I want to display the ID property values, I will have to run another command…
(Get-Process | Select-Object ProcessName, Id).id
However, if I saved the original command in a variable…
$processes = Get-Process | Select-Object ProcessName, Id
I can use the following commands to display the ProcessNames and IDs.
$processes.ProcessName
$processes.id
This last method is more efficient, especially if you’re scripting.
2. Use ExpandProperty to Display Object Properties with No Header
This example is similar to the last one. It is just another way to display object property values without displaying the property as the header.
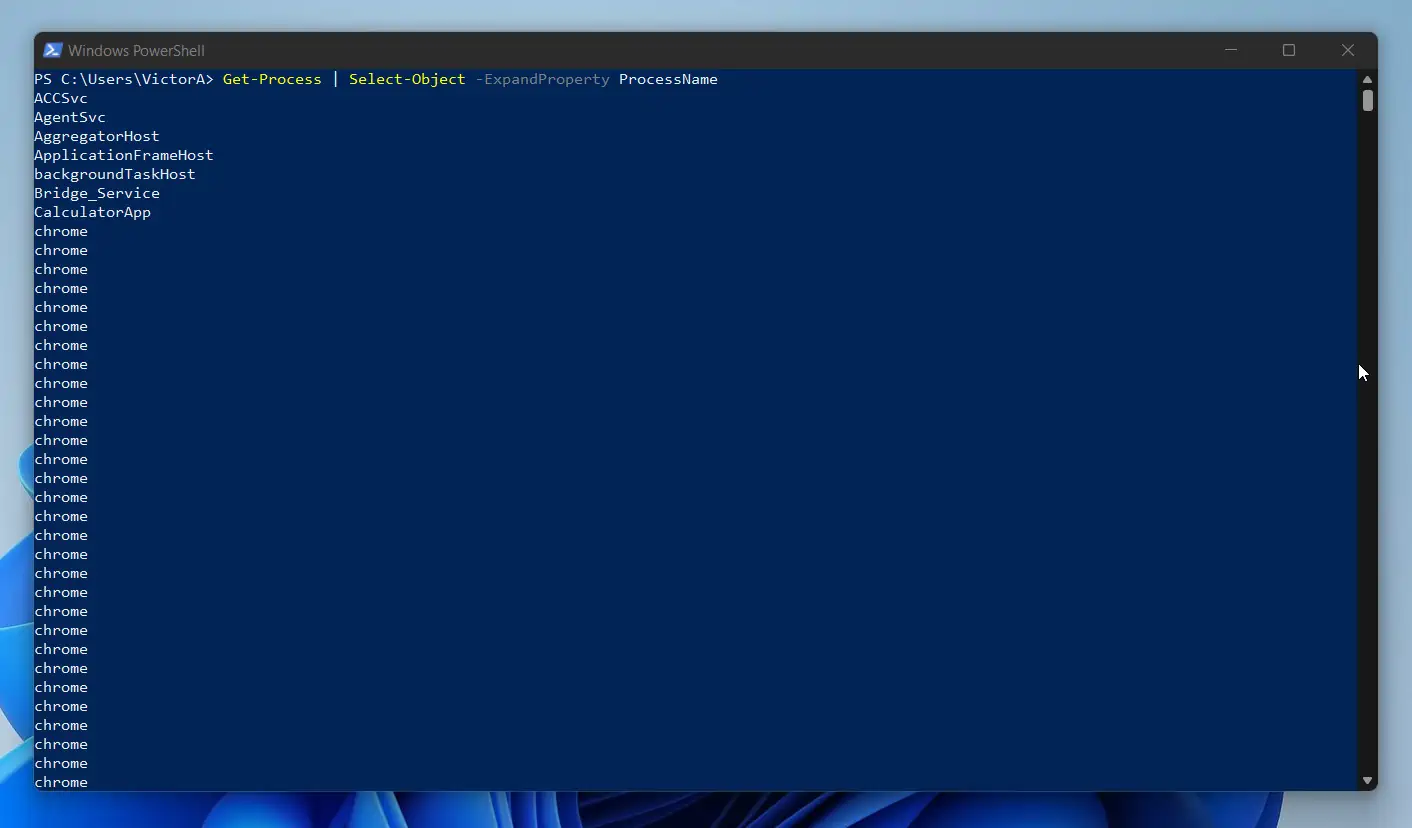
In other words, you display the result of Select-Object with no header using the ExpandProperty parameter. Here is a sample command using Get-Process.
Get-Process | Select-Object -ExpandProperty ProcessNameLike the result in the previous example, the above command displays the Process Names without displaying the ProcessName property as the header.
3. Use “Expression” to Calculate Values
By default, Select-Object uses the properties of an object as the headers. But you can change the name of an object’s property.
Here is the general syntax:
@{Name = New_HeaderName;Expression = {Property_Name}}
In the syntax above, “New_HeaderName” is the new name you want to give the object’s property. On the other hand, “Property_Name” is the name of the original property.
The way you access an object’s property name depends on the situation. If you saved the output of the Select-Object in a variable, say $obj, you will access the property as shown below:
$obj.Property_Name
However, if you are accessing the output of Select-Object from the pipeline, you’ll access the property using the pipeline variable $_
$_.Property_Name
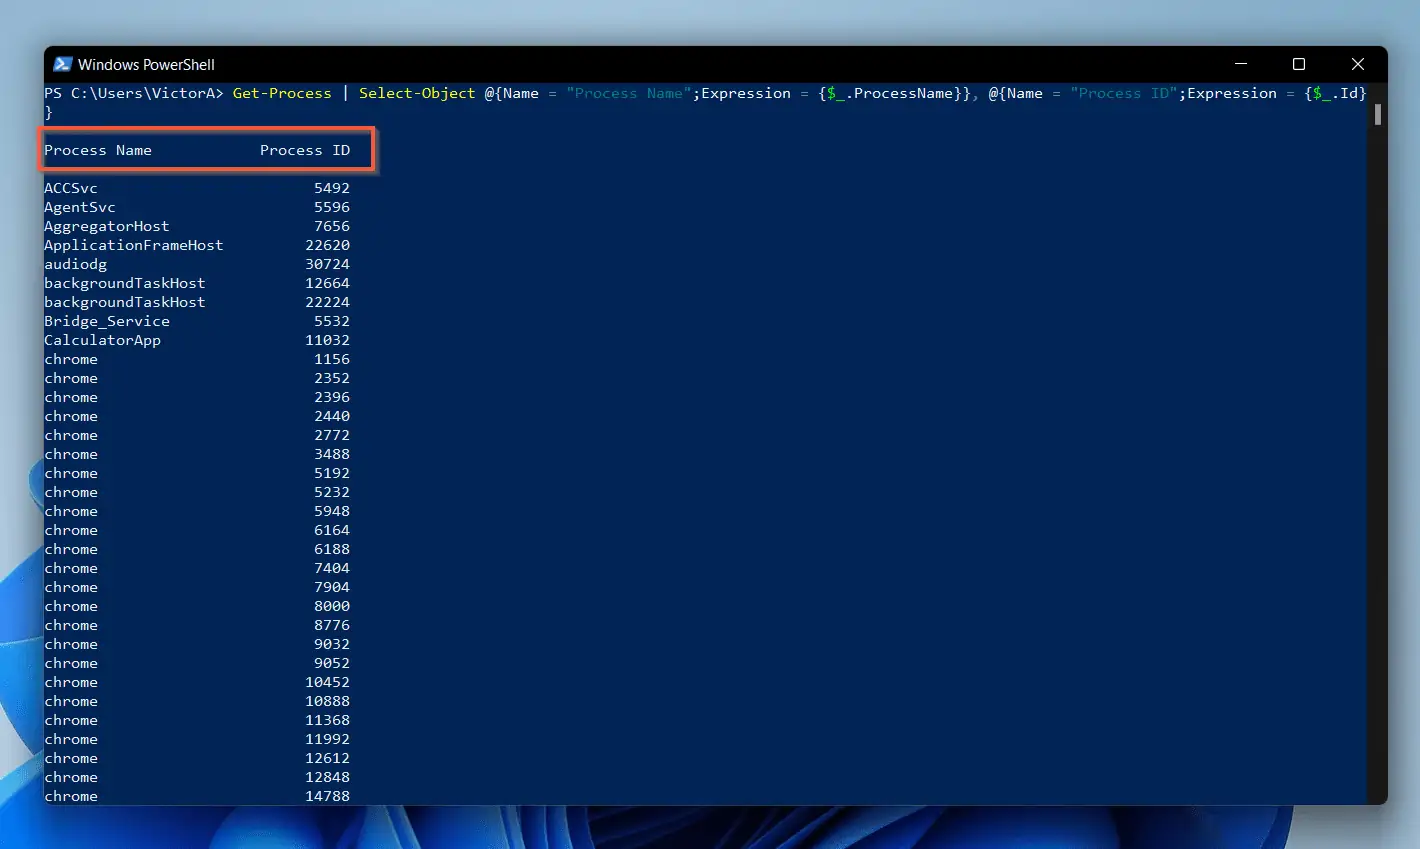
To give some real examples, I’ll return to the Get-Process command example I used earlier.
Get-Process | Select-Object ProcessName, IdThe command displays the ProcessName and Id as the headers.
But, I might want to use more friendly names as the headers. In that instance, I will modify the command as shown below:
Get-Process | Select-Object @{Name = "Process Name";Expression = {$_.ProcessName}}, @{Name = "Process ID";Expression = {$_.Id}}
Now, the default headers (object property names) have been replaced with the headers specified in the “Name” parameter.
4. Create Calculate Values Without Using “Name-Expression” Syntax
Continuing from the last example, if you do not want to use the traditional Name, Expression syntax, there is another way to achieve the same result.
First step: save the result of the Get-Process command in a variable, say $proceses
$process = Get-Process
Second step: open a ForEach block and add the previous command in the block.
$process = Get-Process
ForEach ($proc in $process) {


}
Third step: create an object with a PowerShell Select-Object command. Then, save the object in another variable, $obj
$process = Get-Process
ForEach ($proc in $process) {
$obj = " " | Select-Object -Property "Process Namee", "Process ID"

}
Fourth step: link the object properties in the $proceses variable with object properties in the $obj variable
$process = Get-Process
ForEach ($proc in $process) {
$obj = " " | Select-Object -Property "Process Namee", "Process ID"
$obj.'Process Name' = $proc.ProcessName
$obj.'Process ID' = $proc.id
}
Fifth step: finally, call the $obj variable to return all the information.
$process = Get-Process
ForEach ($proc in $process) {
$obj = " " | Select-Object -Property "Process Namee", "Process ID"
$obj.'Process Name' = $proc.ProcessName
$obj.'Process ID' = $proc.id
$obj
}
The result is similar to the result delivered by the Name-Expression code…
However, you can easily build a report using properties from different objects with the second method.
5. Use Where-Object and Select-Object to Filter Object Properties
If you combine Select-Object and Where-Object, you empower your PowerShell scripts and take them to a different level. So far, I have shown you how to return all object properties with Select-Object.
In this example, I will pipe the output of the Get-Process command to the Where-Object. Then, within the Where-Object command, I’ll filter out all other processes and return only the process with ID 7884.
Get-Process | Where-Object {$_.id -eq "7884"}
At this point, when I run the command, it returns…
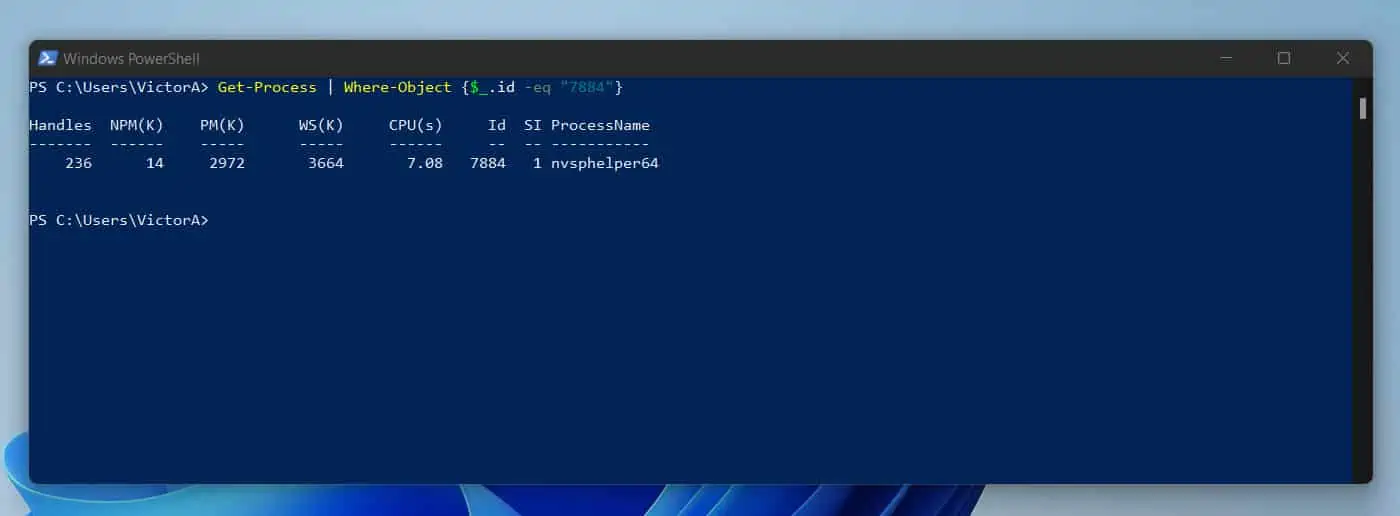
The command returns the default properties of a process. But what if I want to return some properties and ignore the rest?
This is where PowerShell Select-Object comes in. In the last stage of the command, I will pipe the output of the Where-Object command to Select-Object.
Get-Process | Where-Object {$_.id -eq "7884"} | Select-Object ProcessName, Id, Handles
This last command now returns only three properties…
6. Format the Output
When you create a report with Select-Object, you may want to format the output. There are several options available to you.
Let me start this illustration with the command below:
Get-Process | Select-Object -Property Name,Id,Description,FileVersion,Threads
This command returns a long list of processes, but the result is not properly formatted.
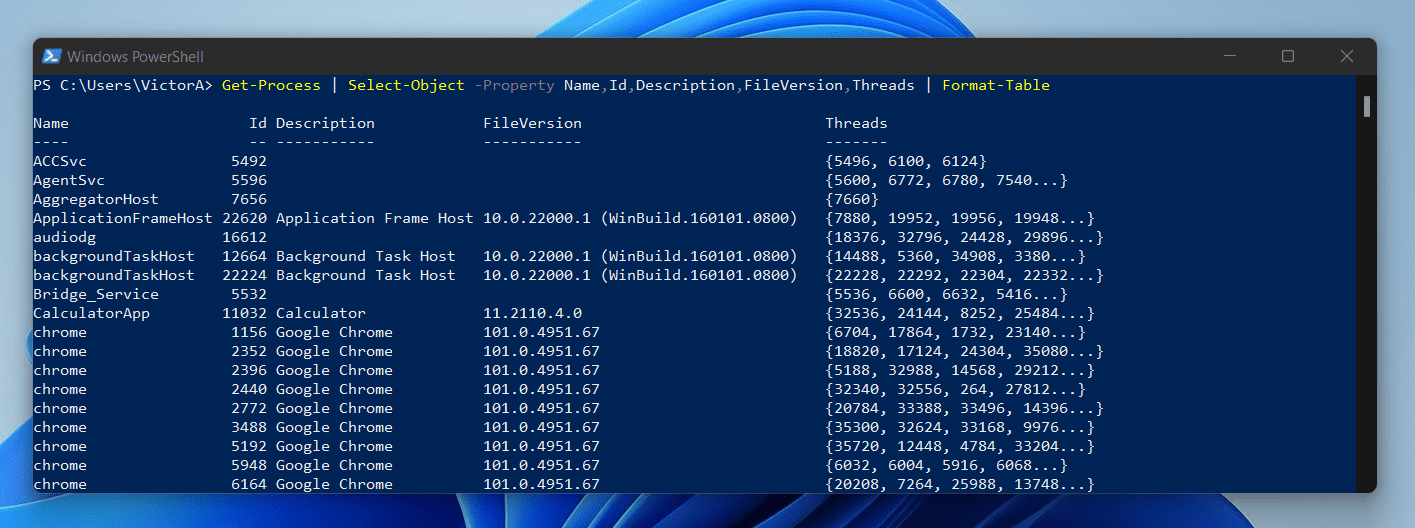
I’ll introduce the Format-Table Cmdlet to format the table and fit it into the PowerShell window.
Get-Process | Select-Object -Property Name,Id,Description,FileVersion,Threads | Format-TableThe result is much better!
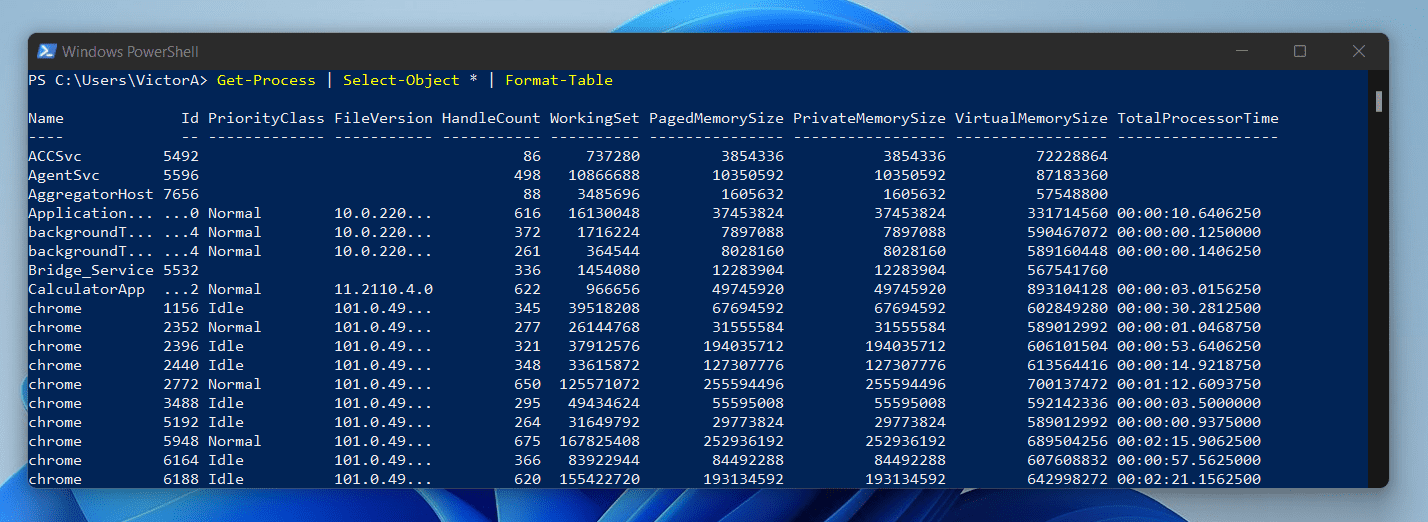
7. Select All Properties of an Object
If you want to display all the properties of an object, use the asterisk wildcard (*) as the property in Select-Object.
For example, to display all properties of processes, use the command below
Get-Process | Select-Object *
The command displays a bunch of results. However, the formatting is not very useful.
To format the result of the command and display it in a tabular form, pipe the output of the last command to Format-Table.
Get-Process | Select-Object * | Format-Table
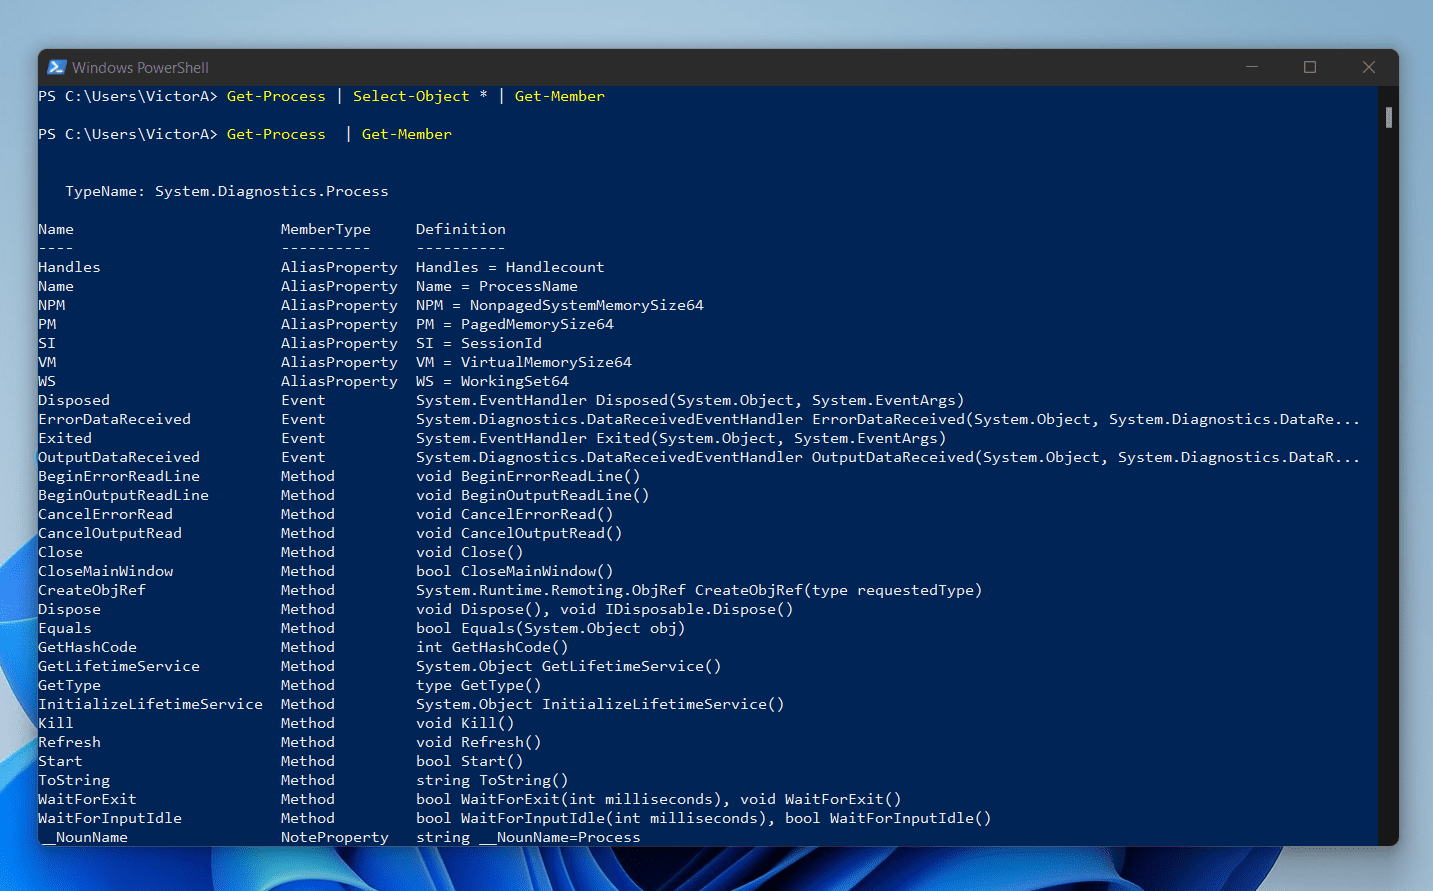
Before I move on from this example, I’ll mention that there is a way to find all the available properties of an object. To find all available properties in a PowerShell object, pipe the output of the command to Get-Member.
For example, run the command below to find all the properties in the objects generated by the Get-Process command.
Get-Process | Get-Member
The output of the command returns some interesting properties. It also returns the Methods.
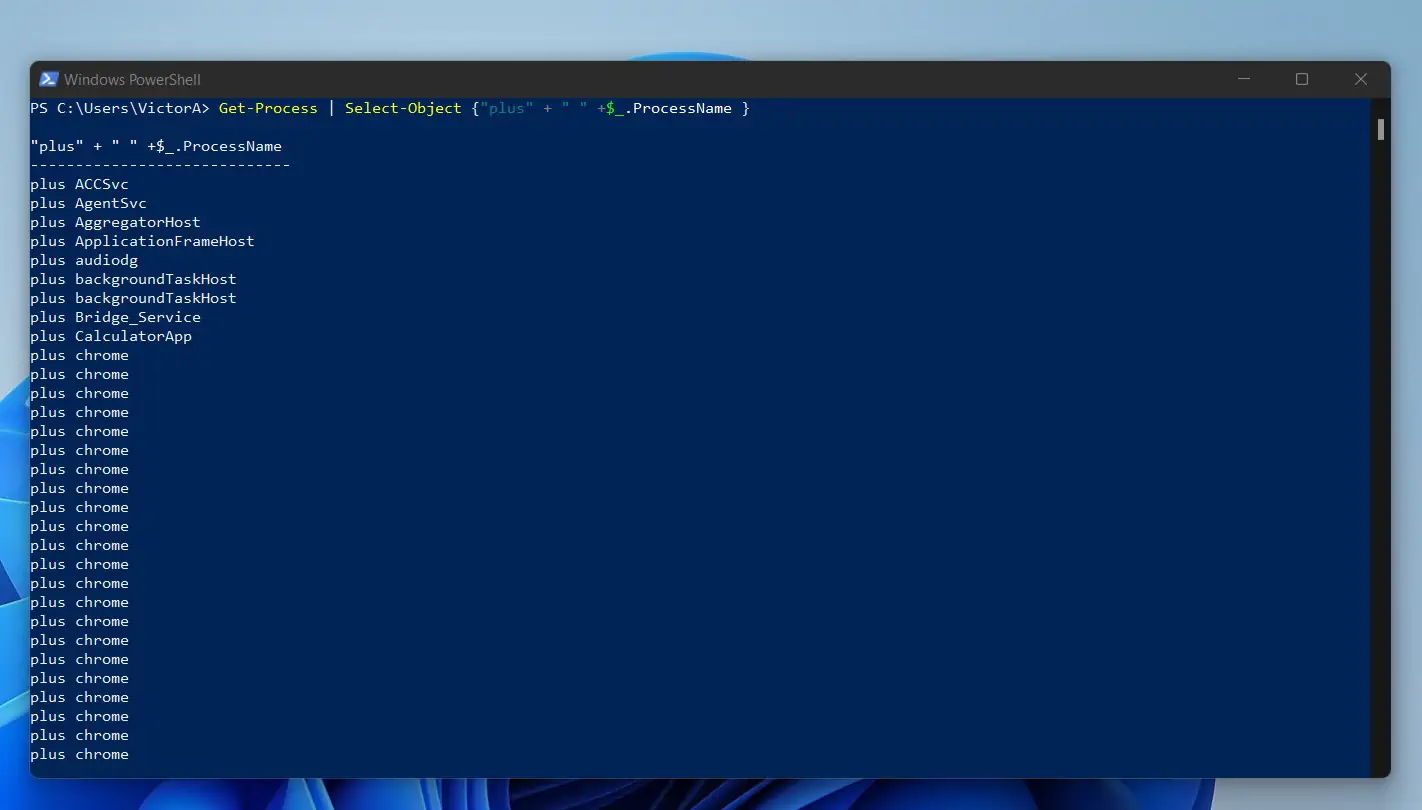
8. Append Returned Strings to Properties
Windows task automation comes in different shapes and sizes. You may receive some weird request, but you have to make it happen no matter how weird!
One such weird request may be for you to add a specific string to the properties of an object. In this example, I will add the string “plus” to the names of all processes returned by the Get-Process command.
Here is the command that performs the magic…
Get-Process | Select-Object {"plus"+$_.ProcessName }
The command works, but the header is not user-friendly.

But before I deal with the report header, let me deal with another issue first. As you can see from the screenshot above, there is no space between the string “plus” and the names of the processes.
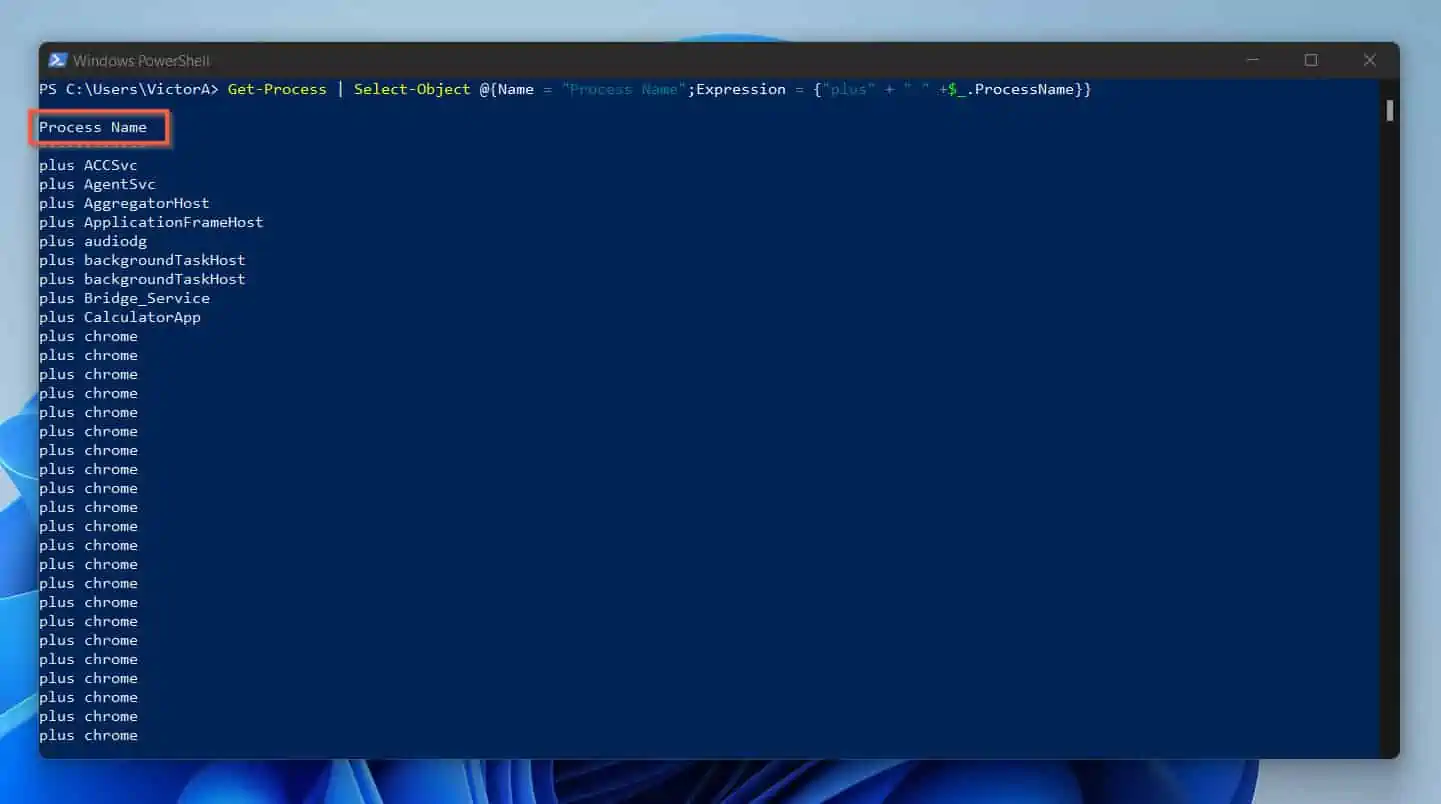
If you do not want a space between them, it is okay. However, if you need a space between the string and the name of the property, modify the command as shown below.
Get-Process | Select-Object {"plus" + " " +$_.ProcessName }
The output now has a space between the string, “plus” and the name of the process. To achieve this, I added double quotes with space (” “) between “plus” and $_.ProcessName.
Now, let me format the header properly. To do this, I will use the “Name-Expression” Syntax I used in a previous example.
Get-Process | Select-Object @{Name = "Process Name";Expression = {"plus" + " " +$_.ProcessName}}
Now the header is properly formatted…
9. Add More Columns to the Default Output
When you run some PowerShell commands, the command may not return all available properties by default. So, if you’re not experienced, you may believe that the returned properties are the only available properties of the objects.
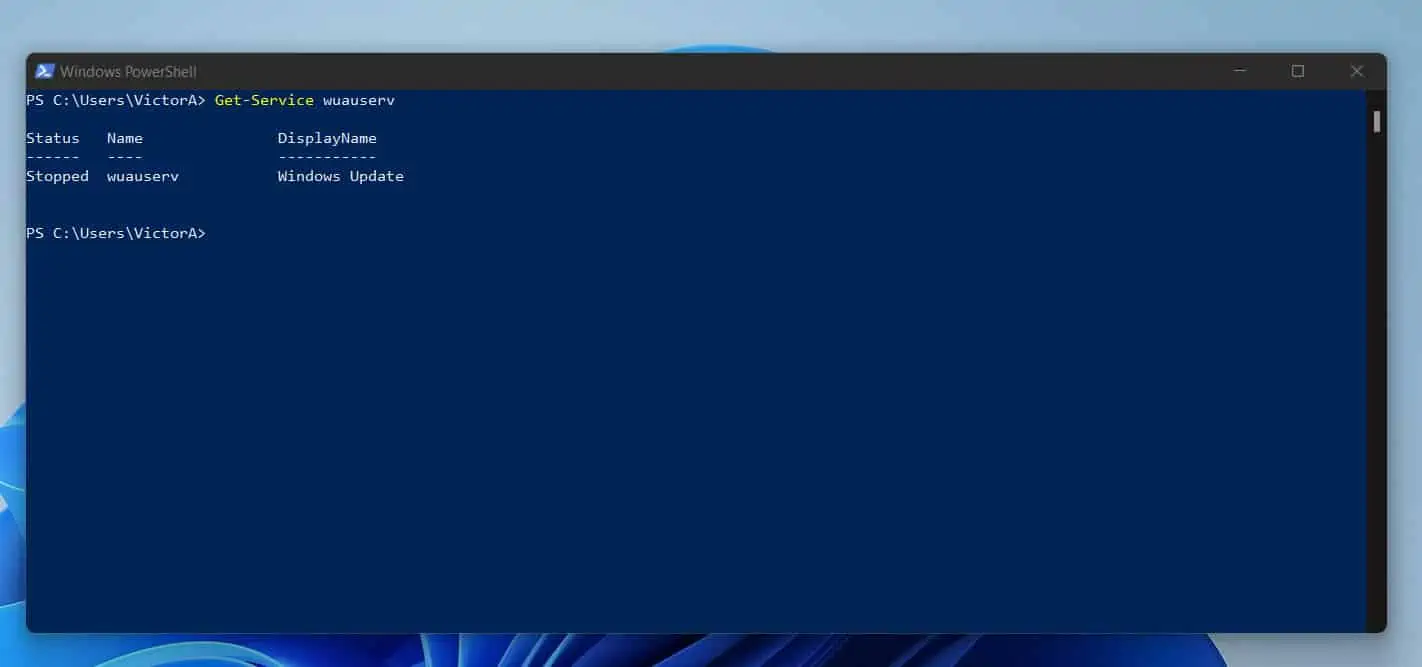
For example, if I run the command…
Get-Service wuauserv
it returns just 3 properties…Status, Name, and DisplayName…
But what if I want to include the name of the computer? The first step is to find out of the “Get-Service wuauserv” command has a property that returns the name of the computer.
To achieve this, I’ll pipe the output of Get-Service to Get-Member.
Get-Service wuauserv | Get-Member
When I took a close look, I could see a property called MachineName. This is likely the name of the computer.
I’ll run the Get-Service command and pipe it to Select-Object to find out. Then, I’ll select the MachineName property to see what it displays.
Get-Service wuauserv | Select-Object MachineName
Unfortunately, it does not display the name of the computer. So, I have to find another way to add the property.
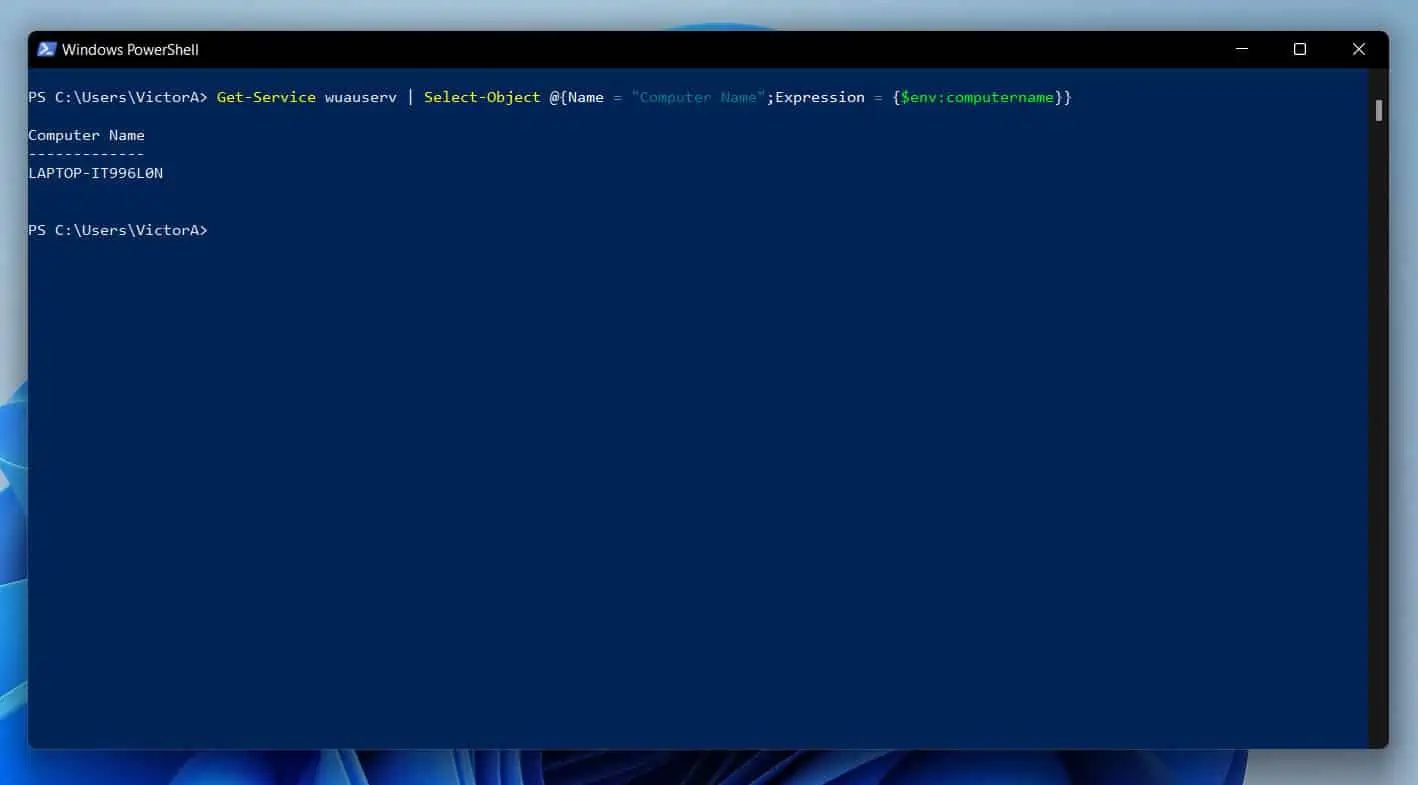
One way is to use the $env:computername environmental variable.
To achieve this, I will use the command below…
Get-Service wuauserv | Select-Object @{Name = "Computer Name";Expression = {$env:computername}}
This will return the expected result…
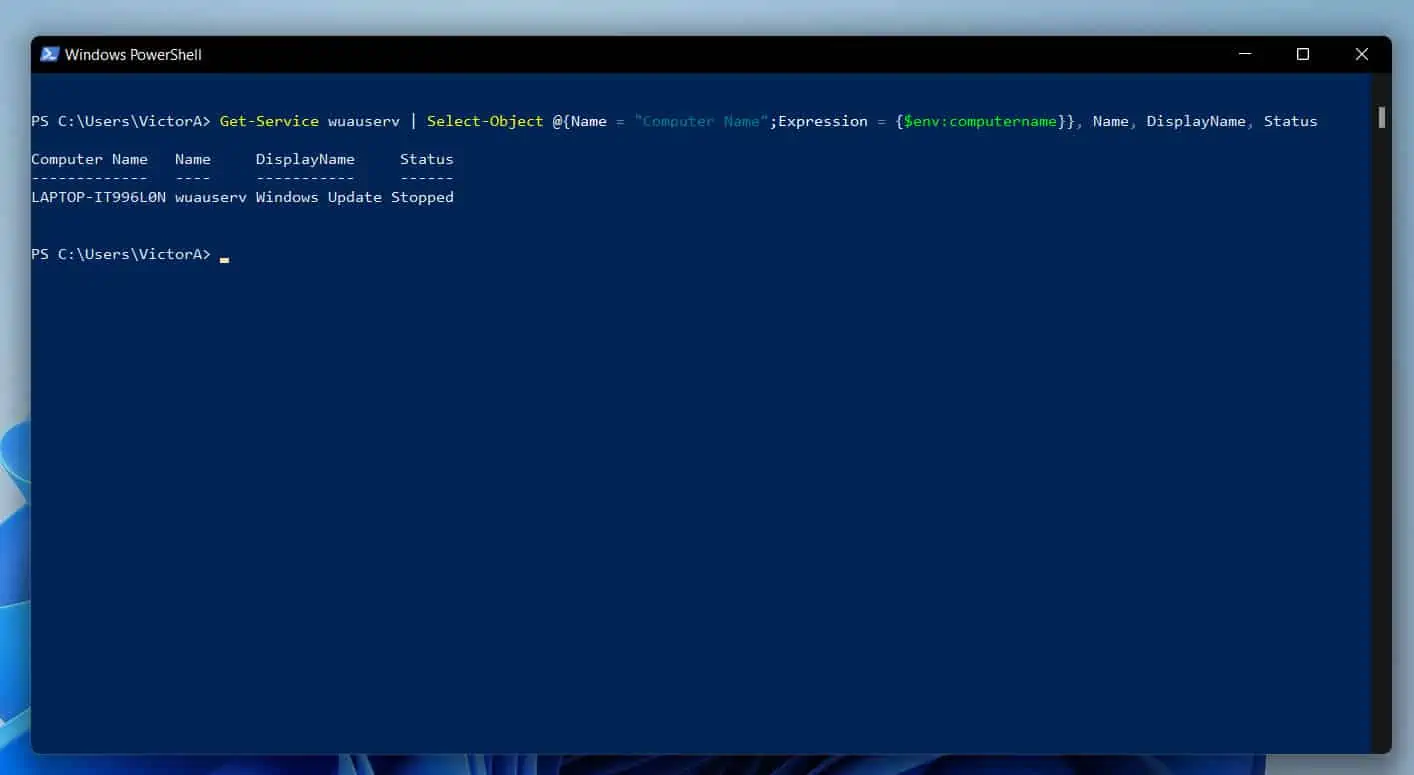
But there is one more problem. How do I include other properties into this result?
Easy!
All I need to do is to include any other property I wish to include where I want it. Each property must be separated by commas (,).
Get-Service wuauserv | Select-Object @{Name = "Computer Name";Expression = {$env:computername}}, Name, DisplayName, Status
And here is your beautiful result…
10. Order or Group the Properties of an Object with Select-Object, Sort-Object And Group-Object
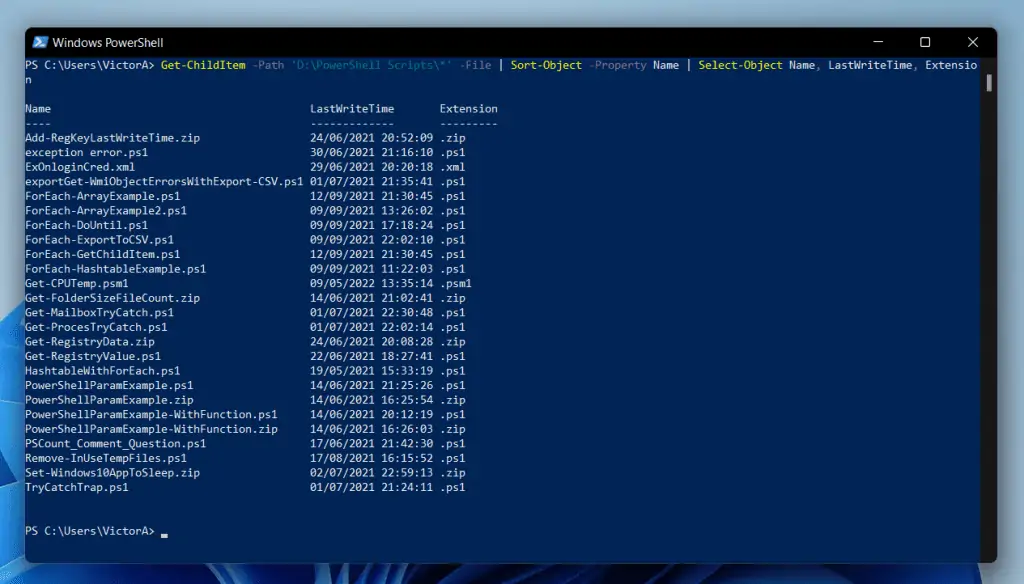
To demonstrate how to order the properties of an object with Select-Object and Sort-Object, I’ll use the Get-ChildItem command below…
Get-ChildItem -Path 'D:\PowerShell Scripts\*' -File | Sort-Object -Property Name | Select-Object Name, LastWriteTime, Extension
The command returns all files in “D:\PowerShell Scripts\”. Then, Sort-Object sorts the result by the object property, Name.
Finally, I used Select-Object to select Name, LastWriteTime, and Extension.
Moving on, if you rather group the object properties, you need the Group-Object command. Here is a quick example…
Get-Process | Group-Object -Property Name
The command groups the objects by Name…
Frequently Asked Questions
In PowerShell, $_ is known as the current item in the pipeline. This is an automatic variable generated for each item when you send a command to a pipeline.
For example, when I send Get-Process to Select-Object via a pipeline, the properties of Get-Process are represented by $_.
To show object properties in PowerShell, pipe the output of the command to Get-Member. The Get-Member Cmdlet returns all objects sent to it in the pipeline.
@() is used to create an array in PowerShell. To find out more, read our article PowerShell Array Explained With Examples.
To loop through an array in PowerShell, use the ForEach loop.
For example, to loop through this array…
$LogNames = @(“System”, “Application”, “Security”)
I’ll use the command below:
ForEach ($Log in $LogNames) {
}
To get the first element of an array in PowerShell, add [0] next to the array.
For example, to get the first item in the array below…
$LogNames = @(“System”, “Application”, “Security”),
I’ll use the command below…
$LogNames[0]
To return the second and third items, use $LogNames[1] and $LogNames[2] respectively.
Conclusion
PowerShell Select-Object is a versatile cmdlet that you’ll likely need to use in most scripts. In this guide, I have discussed the syntax and parameters of Select-Object.
Then, I shared ten examples of this useful cmdlet.
I hope I was able to help you understand PowerShell Select-Object, its syntax, and parameters. I also hope that you found the examples I shared in this guide helpful!
I hope you found this article helpful. If you did, click on “Yes” beside the “Was this page helpful” question below.
You may also express your thoughts and opinions by using the “Leave a Comment” form at the bottom of this page.
Finally, for more PowerShell guides, visit our Windows PowerShell Explained page. You may also find our Windows PowerShell How-To Guides page useful.