
iTechGuides is reader-supported. When you buy through links on our site, we may earn an affiliate commission. As an Amazon Associate I earn from qualifying purchases. Learn more
You can recreate a compact, Chrome-style dinosaur runner with an Arduino Uno Rev3 and a Kuman LCD Shield. The game uses custom characters on the shield’s 16×2 LCD, and its SELECT button starts a round and makes the dinosaur jump. The exact pin and button mapping matters: a different LCD keypad shield may need code changes before it works.
What you need for the basic game
- An Arduino Uno Rev3
- A Kuman LCD Shield
- A computer with the Arduino IDE
These are the core parts named by the Arduino Project Hub project. It uses the LiquidCrystal library and configures a 16-column, two-row LCD. The LCD is driven through pins 8, 9, 4, 5, 6, and 7, while the shield buttons are read at analog input A0.
Check shield compatibility before loading the game
The original project is built around its stated Uno Rev3 and Kuman LCD Shield combination. Hackster says an Arduino that follows the Arduino 1.0 pinout should work, but cautions that another shield may require changes to the LCD pin assignments and button definitions. Do not assume that a shield with a similar layout will work unchanged.
Free tools Windows power users keep installed
One-click scans. No signup required.
| What to check | Why it matters |
|---|---|
| Arduino pinout | Hackster identifies Arduino 1.0 pinout compatibility as the relevant board consideration. |
| LCD connections | The original code assigns the LCD to pins 8, 9, 4, 5, 6, and 7; another shield may wire the display differently. |
| Button mapping and A0 behavior | The original build reads the keypad through A0. A different shield’s button definitions or analog readings may need corresponding code changes. |
| Project scope | The basic game needs the Uno and LCD keypad shield; a servo and photoresistor belong only to the optional automation extension. |
For the pin assignments and button definitions, use the documentation for the exact shield you have rather than copying the Kuman configuration blindly. The Hackster project page describes the compatibility warning.
#1 Best Overall
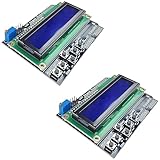
- ALL-IN-ONE DISPLAY & KEYPAD MODULE: This 1602 LCD Keypad Shield combines a 16x2 character LCD display with built-in navigation buttons (select, up, down, left, right), offering an easy-to-use interface for Arduino Uno R3/R4 and Mega boards—perfect for interactive projects, sensor monitoring, and menu navigation.
- 2-PACK FOR DOUBLE THE CREATIVITY: Includes two LCD keypad shields for Arduino, ideal for prototyping multiple Arduino projects at once. Great value for electronics hobbyists, students, and professional developers.
- SEAMLESS ARDUINO COMPATIBILITY: Fully compatible with Arduino Uno R3/R4 and Mega. The shield plugs directly onto your board with no extra wiring, making setup fast and hassle-free for both beginners and advanced users.
- CLEAR & BRIGHT 1602 LCD DISPLAY: Features a high-contrast LCD screen with two rows and sixteen characters, providing crisp and easy-to-read output for real-time data, menus, and system feedback in any lighting condition.
- FREE ONLINE TUTORIAL AVAILABLE: Get started quickly with our helpful online guide. Just search “DIYables LCD Keypad Shield” to access step-by-step instructions, example codes, and project ideas designed to support both new learners and experienced makers.
How the LCD version of the game works
This is a character-cell adaptation, not a full reproduction of the browser game. The code defines custom LCD glyphs for a dinosaur, cactus, bird, and block, then arranges them on the 16×2 display to depict the runner and approaching obstacles. The limited display area and custom-character approach make the action readable in a small format, but cannot show the browser game’s full graphics or mechanics.
At startup, the game shows a splash screen and waits for SELECT. SELECT both begins play and serves as the jump input. As obstacles scroll toward the dinosaur, the game advances the score; the project describes blocking score increases while the jump button is held. After a collision, a game-over screen appears. The best score is saved in the Arduino’s internal EEPROM, and the project includes a code-protected option to erase that saved record.
Rank #2

- LCD 16x2 Keypad Shield: Stackable shield with 16x2 blue display and six buttons (Right, Up, Down, Left, Select, Reset), fits Arduino Uno R3, R4, Mega, Mega 2560, Due, and Giga for DIY projects.
- Interactive 6-Button Design: Navigate menus or control projects with Right, Up, Down, Left, Select, and Reset buttons, ideal for Arduino Uno R4 and Mega 2560 builds.
- Blue Backlight Display: Bright 16x2 LCD with white text for clear readouts, perfect for Arduino Due dashboards, timers, or sensor displays.
- Versatile Maker Solution: Enables prototyping of interactive interfaces or control panels with Arduino Uno R3 and Mega form factor boards.
- Online Tutorials Provided: Search for "DIYables LCD 16x2 Keypad Shield" for online tutorials to simplify coding and setup for Arduino projects.
How to play
- Power the Arduino and wait for the splash screen.
- Press SELECT to start the game.
- Press SELECT again to jump over an approaching obstacle.
- After a crash, reset the board to start another round.
The start, jump, and reset behavior is described on the Hackster project page. Because SELECT is used for both starting and jumping, verify that the button mapping works on your shield if you have changed the hardware.
Optional: automate the jump with a second Arduino
A separate 2020 build from The DIY Life extends an LCD keypad shield game with a second Arduino, a light-dependent resistor (LDR or photoresistor), and a servo. The sensor detects an obstacle and the servo presses the jump button. That experiment also lists an LED, resistors, ribbon cable, male pin headers, and a power supply; none of these additions is required to play the basic game.
Rank #3

- A specially designed dot matrix LCD module which is used for displaying letters, numbers and symbols etc.
- Consists of several 5X7 or 5X11 other dot matrix character bits.The interval exists between each line or each bit to creat a good character spacing and row spacing effect.
- Based on HD44780 LCD chip and adopts standard 16-pin interface.
- It has a contrast adjustment knob, backlight selection switch, but also with four directional buttons, a selection button And a reset button.
- This 1602 LCD expansion board in the true sense of the circuit will be simplified, directly to the board inserted Arduino Duemilanove controller can be.
The author of that particular build reports that its shield buttons were not ideal for quick presses, and that the LCD showed ghosting and brightness issues as obstacles moved faster. Those are observations about that implementation, not a general finding about every LCD keypad shield.
Quick Recap
Best Value

- 1602 LCD Shield Module Display V3 for Arduino UNO R3 MEGA2560 Nano DUE
- This is a 16x2 LCD Keypad module for Arduino Diecimila Duemilanove, UNO, MEGA1280, MEGA2560 board.
- Blue Backlight with white words, adjustable backlighting
- 4 Bit LCD Library,V3 design, pins out for easy connecting
- 1602 LCD Keypad Shield 1602 LCD Expansion Shield Board Blue Backlight 4.5-5.5V for Arduino Duemilanove Robot
Rank #4

- Operating Voltage: 5V
- 5 Push buttons to supply a custom menu control panel
- RST button for resetting Arduino program
- Integrate a potentiometer for adjusting the backlight
- 16 character x 2 line HD44780 compatible LCD
Product prices and availability are accurate as of the date/time indicated and are subject to change. Any price and availability information displayed on Amazon at the time of purchase will apply.

