
iTechGuides is reader-supported. When you buy through links on our site, we may earn an affiliate commission. As an Amazon Associate I earn from qualifying purchases. Learn more
The simplest general-purpose way to add Arduino digital I/O is an MCP23017 I2C GPIO expander. It adds 16 configurable lines—each can be an input or an output—while using the Arduino’s I2C bus. For output-only expansion, a 74HC595 is a better fit; for input-only expansion, consider a 74HC165.
What an MCP23017 adds to an Arduino
The MCP23017 is a 16-bit general-purpose I/O expander for I2C. Microchip describes the MCP23017/MCP23S17 family as providing “16-bit, general purpose parallel I/O expansion for I2C bus or SPI applications.” The MCP23017 uses I2C; its related MCP23S17 uses SPI. See Microchip’s MCP23017 product documentation.
Each MCP23017 line can be configured individually as an input or output. The chip also supports interrupts, which can signal the Arduino when an input changes instead of requiring the sketch to check every input continuously. Microchip documents up to eight devices on one I2C bus when each has a unique address.
Free tools Windows power users keep installed
One-click scans. No signup required.
Choose the right expansion method
| Option | Best for | Added I/O | Arduino connections and trade-offs |
|---|---|---|---|
| MCP23017 | Mixed digital inputs and outputs, per-line direction control, or interrupt-driven inputs | 16 configurable digital lines per device; Microchip documents up to eight devices on a bus with unique addresses | Uses SDA and SCL. I2C speed and response latency depend on the bus, device configuration, and software; consult the chip and board documentation. |
| 74HC595 | Output-only expansion, such as controlling LEDs or relays | 8 serial-in/parallel-out outputs per device; devices can be chained | Requires serial shifting and a latch operation in the sketch. It does not provide the MCP23017’s configurable input/output lines. |
| 74HC165 | Input-only expansion | 8 parallel-in/serial-out inputs per device | Requires serial sampling and timing in the sketch; it is not a general-purpose output expander. |
| Packaged IO expander shield | A ready-made board when both digital expansion and analog multiplexing are needed | Numato’s 2015 IO Expander Shield manual specifies 28 digital I/O and 16 analog inputs | The manual says the shield uses three Arduino pins. Its design combines two MCP23017 devices with a 74HC4067 analog multiplexer. See Numato Lab’s IO Expander Shield manual. |
For a mixed-input/output project, the MCP23017 is the straightforward default. Pick a shift register when you only need one direction of I/O and are comfortable handling its serial protocol in the sketch. A shield is useful when analog multiplexing is also part of the requirement.
#1 Best Overall

- 16-Channel I/O Expansion: MCP23017 chip extends 16 GPIOs (PA0-PA7/PB0-PB7) solving interface shortages with dual interrupt pins (INTA/INTB) for instant response to input changes, reducing CPU load by 70%
- 3-Platform Support: Works with Raspberry Pi (Zero/2B/4B), Arduino and STM32 with included C/Python/Arduino demo codes for quick integration
- Auto-Sensing Logic Levels: Compatible with 3.3V/5V systems without level shifters and features 8 configurable I2C addresses with 3-bit DIP switch settings (0x20-0x27) for multi-device chaining
- Plug-and-Play Design: PH2.0 connector plus 2.54mm headers for no-soldering integration with your development boards
- Versatile Applications: Suitable for sensor arrays, industrial control systems, smart home hubs, and IoT node development projects
Wire an MCP23017 to an Arduino
- Check the voltage requirements. Connect MCP23017 VDD to a logic supply supported by both the expander and the Arduino setup. Check the device datasheet and the board’s voltage specifications before connecting signals.
- Connect the grounds. Join the expander’s ground to the Arduino’s ground so they share a reference.
- Connect the I2C bus. Wire SDA to the Arduino’s documented SDA pin and SCL to its documented SCL pin. Pin locations vary across Arduino board families, so use the documentation for your specific board rather than assuming a location.
- Set the address pins. For multiple expanders, configure the address pins so every device on the bus has a unique address. Microchip documents up to eight MCP23017 devices on the bus.
- Provide bus pull-ups and decoupling. Add the pull-ups required by the I2C bus and follow the datasheet’s decoupling and voltage guidance. Check whether your board or module already includes pull-ups before adding another set.
Use the MCP23017 datasheet and your Arduino board documentation for the exact electrical limits, including logic-level compatibility and output-current limits. Do not treat an expander pin as a power source for a load unless the device specifications explicitly allow it.
Independent reader supportYour contribution helps us test, update, and keep practical guides available for everyone.Configure and use the expander in a sketch
The general software sequence is to initialize the Arduino’s I2C interface, configure the expander’s GPIO directions, then read input states or write output states through an MCP23017 library. The exact calls vary by library and board core; there is no single API implied by the hardware method.
Rank #2

- I2C controlled, expands 2 signal pins as 16 I/O pins
- I2C address configurable by shorting the A0/A1/A2 jumpers
- Provides two connector options: PH2.0 terminal and/or solder pads, allows multi I2C modules to be stacked
- Onboard voltage translator, compatible with 3.3V/5V level
- Include the documentation and setup instructions for the MCP23017 library you choose.
- Start the Arduino I2C interface using the board core’s supported Wire/I2C setup.
- Initialize the expander at the address selected by its address pins.
- Set each required line to input or output before using it.
- Read the configured inputs or update the output registers using the library’s documented functions.
If the Arduino cannot communicate with the expander, check the power and common ground first, then verify SDA/SCL pin selection, pull-ups, address-pin settings, and voltage compatibility. For incorrect or unstable I/O, confirm that each line’s direction is configured and that the circuit respects the datasheet’s electrical limits.
Quick wins for a faster PC:
Scan for outdated or missing drivers - takes under a minuteDriver Scan →Clear out junk files and repair common Windows errorsFree Scan →Fix the driver behind crashes, sound loss and screen glitchesFind Drivers →Quick Recap
Best Value

- 16-Bit Remote Bidirectional I/O Port.
- High-Speed I2C Interface.
- Configurable Interrupt Output Pins.
- INTA and INTB Can Be Configured to Operate Independently or Together.
- Polarity Inversion Register to Configure the Polarity of the Input Port Data.
Rank #4

- MCP23017 IO Expansion Board Compatible with Arduino Motherboard, Raspberry Pi Motherboard, Micro:bit Motherboard and STM32 Motherboard.
- I2C controlled, expands 2 signal pins as 16 I/O pins.
- I2C address configurable by shorting the A0/A1/A2 jumpers.
- UP to 8 MCP23017 IO Expansion Board can be used at the same time, providing up to 128 I/O pins.
- Interface Wire: 22AWG environmentally friendly high temperature resistant silicone wire, JST-PA SMT 6-Pin to DuPont female single head, wire length 210mm.
Rank #3
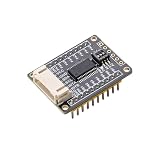
- I2C Interface Design: Features I2C interface with minimal pin usage for efficient communication and connectivity
- Dual Voltage Compatibility: Compatible with both 3.3V and 5V operating levels for versatile applications
- Flexible Connection Options: Equipped with PH2.0 connector and reserved 2.54mm pitch pads for easy connection to other development boards
- User-Friendly Address Configuration: Onboard 3-bits DIP switch for convenient I2C address setting without additional programming
- Comprehensive Software Support: Provides open-source example programs compatible with Raspberry Pi, Arduino, and STM32 development boards
When to choose a different approach
- Only need more outputs? A 74HC595 can provide chained output expansion, with the sketch responsible for shifting and latching the desired bit pattern.
- Only need more inputs? A 74HC165 shifts parallel input states into the Arduino for serial sampling.
- Need analog inputs as well as digital I/O? Consider a packaged shield that combines GPIO expansion with analog multiplexing; check its manual for the exact pin count and wiring.
- Need fast, time-critical pin changes? Compare the communication overhead and response behavior of an external I2C device with using the Arduino’s own pins. The actual bus speed and latency depend on the board, bus configuration, code, and connected devices.
Product prices and availability are accurate as of the date/time indicated and are subject to change. Any price and availability information displayed on Amazon at the time of purchase will apply.

