
What’s actually slowing this PC down?
Pick the symptom - the matching free tool is one click away.
iTechGuides is reader-supported. When you buy through links on our site, we may earn an affiliate commission. As an Amazon Associate I earn from qualifying purchases. Learn more
Lightroom has two different HDR workflows. To combine exposure-bracketed shots, merge them with Photo Merge > HDR; in Lightroom Classic, the result is a DNG. To edit or export a supported photo for HDR-capable displays, enable HDR in the editing controls and turn on HDR Output when exporting. You can use both workflows on the same image, but they solve different problems.
Choose the HDR workflow you need
| Your goal | Use this workflow | What it does |
|---|---|---|
| Combine bracketed exposures into one image | Photo Merge > HDR | Combines multiple exposures into a merged image. Lightroom Classic adds the result to the catalog as a DNG. |
| Edit a supported photo for HDR-capable viewing or delivery | HDR editing and HDR Output | Enables HDR rendering controls and an HDR-capable export. It does not, by itself, combine separate bracketed frames. |
Adobe documents both workflows separately: HDR photo merge in Lightroom Classic (updated July 29, 2024) and Edit and Export in HDR – Lightroom Classic (updated October 27, 2025).
Merge bracketed photos into an HDR image
Use this workflow when you captured multiple frames at different exposures and want Lightroom to combine them. The desktop Lightroom merge is also documented in Adobe’s Merge photos to create HDRs, panoramas, and HDR panoramas in Lightroom desktop (updated May 24, 2023).
The Tool Desk
Outbyte PC Repair FREERepair Windows errors before they cause bigger problemsFix Now →Outbyte Driver Updater FREEFix the driver behind crashes, sound loss and screen glitchesFind Drivers →Lightroom Classic
- In the catalog, select two or more exposure-bracketed photos.
- Choose Photo > Photo Merge > HDR, or press Ctrl+H.
- Review the HDR Merge Preview. Leave Auto Tone enabled if its suggested tonal starting point is useful; turn it off if you want to set the tone yourself.
- Choose whether to use Auto Align. It can help correct slight movement between frames, especially with handheld captures; with a steady tripod capture, it may not be needed.
- Check for semi-transparent artifacts caused by movement. If you see them, start with Deghost Amount: Low, then increase to Medium or High only if needed. You can inspect the deghost overlay. If the preview shows no ghosting, leave deghosting off.
- Optionally select Create Stack, then click Merge.
Lightroom Classic creates a merged DNG and adds it to the catalog. Adobe’s merge instructions also cover selecting frames and reviewing the preview.
#1 Best Overall

- 27” 240Hz 1500R Curved FHD 1080P Gaming Monitor for Game Play.
- Prioritizes Gaming Performance: Up to 240Hz high refresh rate, more immersive 1500R Curvature, FreeSync, MPRT 1ms Response Time, Black Level adjustment(shadow booster), Game Modes Preset, Crosshair.
- Cinematic Color Accuracy: 130% sRGB & DCI-P3 95% color gamut, 4000:1 contrast ratio, 300nits brightness, HDR, Anti-flicker; Anti-Glare.
- Plug & Play Design: HDMI & DP1.4 & Audio Jack(No built-in speakers), durable metal stand, tilt -5°~15, VESA 100*100mm compatible.
- Warranty: Money-back and free replacement within 30 days, 1-year quality warranty and lifetime technical support. Pls contact SANSUI service support first if any product problem.
Lightroom desktop
- In Grid or Detail view, select multiple exposure-bracketed images.
- Choose Photo > Photo Merge > HDR, use the keyboard shortcut shown in the app, or open the contextual menu and choose the HDR merge command.
- In the preview, use Auto Align for slight movement between frames and Auto Settings as a tonal starting point.
- If movement created unnatural semi-transparent areas, adjust Deghost Amount until those artifacts are addressed.
- Review the result and complete the merge.
Reduce movement when you capture
For future brackets, use automatic exposure bracketing if your camera provides it, and consider a tripod to minimize movement. A tripod is a capture aid, not a requirement: Auto Align can help with slight movement, while deghosting is intended to address artifacts from motion between frames.
Edit a photo in HDR in Lightroom Classic
HDR editing is a separate mode from merging. It can be used with supported inputs, including DNG files created by Merge to HDR, certain iPhone HEIC or JPEG images, and certain exported or camera HDR files. HDR processing requires Process Version 3 or later.
Rank #2

- Samsung’s 32” Odyssey G5 QHD Gaming Monitor delivers brilliant visuals for exhilarating gameplay that’s more immersive than ever before.
- QHD resolution (2560 x 1440) boasts incredibly detailed, pin-sharp images.
- With a wide 178° viewing angle, the IPS panel consistently delivers crisp, clear hues from various viewpoints.
- 180Hz Refresh Rate and 1ms response time (GtG) allow fast reactions for ultra-smooth gaming, plus G-Sync compatibility syncs the GPU and panel to reduce choppiness, screen lag, and image tearing.
- HDR10 provides brighter highlights and nuanced shadows for added depth.
- Open the photo in the Develop module.
- In Basics, select HDR.
- Adjust the photo using the HDR editing controls and evaluate it on an HDR-capable display when possible.
For supported HDR photos, Lightroom Classic can enable HDR editing by default. The setting is in Edit > Preferences > Presets.
Free tools Windows power users keep installed
One-click scans. No signup required.
Display and preview limitations
Correct HDR display depends on a supported HDR display and graphics processor. Adobe recommends newer MacBook Pro XDR displays and, for Windows, VESA Certified Display HDR 1000 or higher; those recommendations are not a guarantee that every computer-and-display combination will work. HDR display is available in selected Develop and Library views, but not in Library Grid, Slideshow, Filmstrip thumbnails, or image-content dialogs such as Merge to HDR. If GPU use is off, you can still edit HDR photos, but they may not display correctly in the main image view.
Rank #3

- CRISP CLARITY: This 23.8″ Philips V line monitor delivers crisp Full HD 1920x1080 visuals. Enjoy movies, shows and videos with remarkable detail
- INCREDIBLE CONTRAST: The VA panel produces brighter whites and deeper blacks. You get true-to-life images and more gradients with 16.7 million colors
- THE PERFECT VIEW: The 178/178 degree extra wide viewing angle prevents the shifting of colors when viewed from an offset angle, so you always get consistent colors
- WORK SEAMLESSLY: This sleek monitor is virtually bezel-free on three sides, so the screen looks even bigger for the viewer. This minimalistic design also allows for seamless multi-monitor setups that enhance your workflow and boost productivity
- A BETTER READING EXPERIENCE: For busy office workers, EasyRead mode provides a more paper-like experience for when viewing lengthy documents
If you need to judge how an HDR edit will look on a standard dynamic range screen, use SDR Rendition Settings to preview and adjust its SDR appearance.
Independent reader supportYour contribution helps us test, update, and keep practical guides available for everyone.Export an HDR file from Lightroom Classic
- Make sure HDR editing is enabled for the photo.
- Choose File > Export.
- In File Settings, select a supported format and enable HDR Output.
- Export the file, then confirm that the recipient’s app, device, or platform supports the chosen format and HDR playback.
Adobe recommends AVIF or JPEG XL for sharing and web galleries, and TIFF or PSD when you plan further HDR work such as compositing. AVIF and JPEG XL support remains limited across apps and platforms, so check compatibility with the intended recipient. JPEG HDR export can write a gain map that adapts the file to the display. For other export settings, see Adobe’s How to export Lightroom Classic files to disk or CD help page.
Quick Recap
Best Value
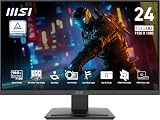
- MSI's 23.8-inch Full HD IPS gaming monitor (1920×1080) delivers a 1500:1 contrast ratio with wide 178°/178° viewing angles — producing deeper blacks, brighter highlights, and accurate colors from virtually any position for gaming and productivity.
- TÜV Rheinland certified Flicker Free and Low Blue Light — eliminating the ~200Hz screen flicker common on standard monitors and reducing harmful blue light exposure to minimize eye strain during extended gaming or work sessions.
- 144Hz high refresh rate delivers ultra-smooth motion and sharper tracking versus standard 60Hz or 75Hz monitors — keeping every frame fluid and responsive for fast-paced FPS, racing, and action games without screen tearing or stuttering.
- MSI's built-in Eye-Q Check provides a vision assessment tool to help optimize display settings for healthier long-term viewing — designed for professionals and students spending extended hours in front of a Full HD IPS screen.
- Tilt-adjustable stand (-5°~20°) for comfortable viewing at any desk setup, with VESA 100×100mm wall mount compatibility for monitor arms, brackets, and multi-monitor arrangements — reducing neck strain during long gaming or work sessions.
Rank #4

- - 24’’ 200Hz gaming monitor fast 1ms FreeSync for gaming, business, entertainment
- - Response time: MPRT 1ms, FreeSync tech, 110%sRGB color gamut, Contrast Ratio 4000:1, Brightness 300Nits, HDR, Over Drive, Anti-flicker, Low blue light,Anti-glare
- - Multiple Ports: HDMI & DP 1.4 Ports(up to 200Hz), 1 HDMI cable included, Audio Jack (no built-in speakers)
- - VESA mount (75x75mm), -5°to 15°Tilt , 178°wide Viewing Angle, Cable Managed, CrossHair /Timer/ Blacklevel Adjust/RTS /FPS /RACING
- - Warranty: Money-back and free replacement within 30 days, 1-year quality warranty and lifetime technical support.
Fix common HDR problems
- The merge looks misaligned: Reopen the merge preview and use Auto Align if there was slight movement between exposures. For future captures, a tripod can minimize movement.
- You see ghost-like or semi-transparent areas: Use Deghost Amount, starting at Low and increasing only as needed. Do not apply deghosting when there is no visible ghosting.
- The photo looks ordinary in a thumbnail or dialog: HDR display is not supported in every Lightroom Classic view. Check the image in a supported Develop or Library view instead.
- The HDR image looks wrong in the main view: Check that the display and graphics processor support HDR and that GPU use is enabled; Adobe notes that HDR photos may not display correctly in the main image view when GPU use is off.
- The exported file appears SDR or will not open as expected: Confirm that HDR editing was enabled for the image and HDR Output was selected in File Settings. Also verify that the receiving app or platform supports the exported format and HDR content.
Product prices and availability are accurate as of the date/time indicated and are subject to change. Any price and availability information displayed on Amazon at the time of purchase will apply.

