
Recommended Free Tools
iTechGuides is reader-supported. When you buy through links on our site, we may earn an affiliate commission. As an Amazon Associate I earn from qualifying purchases. Learn more
An Arduino greenhouse can water plants, run a ventilation fan and control supplemental lighting automatically by reading sensors and switching suitable outputs when readings cross calibrated thresholds. The basic system is a controller, sensors, electrically appropriate switching hardware and a control loop; Arduino’s Greenhouse Kit packages many of these parts, while a custom build lets you choose and replace components individually.
How Arduino greenhouse automation works
The controller repeatedly reads conditions inside the greenhouse, compares them with rules you set, and turns equipment on or off. Soil moisture is the principal input for irrigation. Temperature and humidity can inform ventilation, and a light sensor can inform supplemental lighting. Thresholds are starting points to calibrate—not universal settings for every crop or growing medium.
- Measure: Read soil moisture, temperature and humidity, and light on a schedule.
- Decide: Compare readings with configured thresholds. Use hysteresis or minimum run times where appropriate to reduce rapid switching.
- Act: Switch a pump, fan or LED strip using a relay or motor driver rated for the load.
- Observe: Log readings and check that the sensor response and equipment behavior match expectations.
Arduino describes its Greenhouse Project as one that “takes care of your plants for you!” That is a project description, not a guarantee of unattended performance.
Choose a kit or assemble a custom system
The official Arduino Greenhouse Kit is a packaged starting point. A custom system can use individual components instead, which makes it easier to select particular sensors or replace a failed part. Check voltage, current ratings, connector compatibility, sensor calibration and regional availability before buying components.
#1 Best Overall

- Build a Real, Working Smart Farm from Scratch - It’s your gateway to building a fully functional IoT farm. With the ESP32 at its core, you’ll assemble a charming wooden farmhouse, connect 8 sensors and 6 actuators, and bring it to life with code. Monitor real-time data, control devices remotely via WiFi, and see your creation respond to the environment.
- Learn Two Ways to Code - Start with Scratch 3.0 — drag and drop colorful blocks to build logic visually. Then, when you’re ready, dive into Arduino IDE and write real C++ code. Every step comes with clear tutorials and sample code. Whether you’re a complete beginner or ready for a challenge, we’ve got you covered.
- Rich Sensor & Actuator Set for Real Projects - This kit includes 8 sensors (soil moisture, water level, DHT11, PIR motion, light, rain, ultrasonic, button) and 6 actuators (water pump, servo, fan, LED, buzzer, LCD display). You’ll learn how sensors gather data, how actuators take action, and how to connect them all into a smart system.
- Assembly & Coding Made Easy - Worried it might be too hard? Don’t be. We provide step-by-step online tutorials with video guidance and sample code for every single project. The kit comes unassembled (so you get the full building experience), and the code isn’t pre-burned (so you learn to upload it yourself). All you need is 6 AA batteries. No soldering.
- Exquisite Models - You can paint them and customize them to create your very own masterpiece. This is both a craft project and a programming challenge—a truly immersive STEM experience that combines craftsmanship with coding.
| Design | What the cited source establishes | Trade-off |
|---|---|---|
| Arduino Greenhouse Kit | Arduino lists an MKR WiFi 1010 board, MKR IoT Carrier Rev2, moisture and temperature sensors, a fan, a water pump, an LED strip, cables and power hardware. The kit page also lists VOC/CO2 sensing. | Packaged components reduce integration work; verify current contents and availability on Arduino’s page. |
| Custom build | Arduino Project Hub examples demonstrate soil-moisture sensing, temperature/humidity sensing, relay modules, fans and pumps. | Individual parts give you more choice and replacement flexibility, but you must check compatibility and integrate the system. |
What you need
Controller and sensors
- Arduino board: The official kit uses an MKR WiFi 1010 with an MKR IoT Carrier Rev2. Other designs should choose a board compatible with the selected sensors, switching hardware and connectivity needs.
- Soil-moisture sensor: Use its readings to decide when irrigation is needed. Calibrate the threshold for the sensor installation and growing medium rather than copying a demonstration value.
- Temperature and humidity sensor: Use readings to inform ventilation rules. Place it where it measures representative greenhouse air rather than direct sun, a fan’s exhaust or a wet surface.
- Light sensor: A light reading can control supplemental lighting when ambient light is low. Set the rule to suit the plants and lighting arrangement.
Equipment and switching
- Water pump: Select a pump appropriate to the water path and its electrical supply. Do not power a motor directly from an Arduino I/O pin.
- Ventilation fan: Match the switching device and power supply to the fan’s voltage and current requirements.
- LED strip: Switch supplemental lighting through appropriately rated hardware; confirm voltage and current requirements before connecting it.
- Relay or motor driver: These let a low-voltage control signal switch an actuator without placing its load directly on an Arduino pin. Check the module’s ratings and isolation arrangement for the specific load.
- Power and protection: Provide suitable supplies and fusing for pumps and lighting, plus a manual cutoff.
Set up automatic irrigation
Make irrigation conditional on a calibrated low-moisture reading, and stop the pump after a controlled run rather than allowing a sensor reading alone to leave it running indefinitely. The Project Hub examples illustrate moisture-triggered irrigation, but their thresholds are demonstrations rather than crop recommendations.
- Install the moisture sensor in the root zone where it can represent the growing medium. Keep its wiring and electronics protected from water.
- Observe its readings under the conditions relevant to your setup, including after watering and as the medium dries. Determine a threshold from those observations.
- Configure the controller to start the pump only when moisture is below that threshold. Add a maximum run time or minimum interval and check the result before leaving it unattended.
- Use a relay or suitable motor driver to switch the pump, with a supply and protection appropriate to the pump. Keep water paths separate from mains wiring.
- Test the pump’s delivery and confirm it stops as expected. Provide a manual way to disconnect it.
Automate ventilation and lighting
Temperature and humidity for a fan
Read temperature and humidity and define a fan rule for the conditions you want to manage. One Arduino Project Hub example uses a DHT11 temperature/humidity sensor and a four-relay module; another describes relay-controlled fan output. These establish example implementations, not recommended temperature or humidity setpoints. Calibrate rules to the crop, greenhouse layout and sensor location.
Rank #2
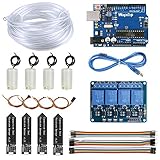
- 【Upgraded Automatic Watering System】Combine development board with USB download cable, water pump, tubing, soil moisture sensor, 4 channel 5V relay module and jumper wires in one plant watering system, including all component for a whole for Arduino DIY drip irrigating system.
- 【Take Care of Your 4 Plants Anytime】You can have the system to water your 4 plant automatically. Whenever your soil becomes too dry, the pump is set into motion and water flows up the tube and into the pot. You don’t have to worry about your plants while going for vacations.
- 【Development Board】The board comes preprogrammed with a bootloader that allows you to upload new code to it without the use of an external hardware programmer.
- 【Capacitive Sensor】Insert it in to the soil around your plants and With a screen and a motherboard, you can talk to your plants. To see if your plants is thirsty, do they need more water to moisten it?
- 【Reliable Support】We have prepared detailed automatic self watering tutorial, includes: guidance manual, demo code, burning tools, necessary class libraries.(All of these are in E-format. You can contact us on Amazon, we will send PDF Document to you at any time.)
Light readings for supplemental lighting
A light sensor can trigger an LED strip when ambient light falls below a chosen level. The DjoMaro Project Hub example describes lighting when outside light fades. In your installation, check the sensor’s placement and the plants’ actual light conditions; a single reading may not represent every growing area.
Do these 3 things before closing this tab:
1Clear out junk files and repair common Windows errors2Scan for outdated or missing drivers - takes under a minute3Repair Windows errors before they cause bigger problemsFor either output, use a relay or driver with ratings suitable for the fan or lighting load. Do not connect motors or other high-current equipment directly to Arduino I/O pins.
Rank #3

- Complete Project-Based Learning Path – Build 13 progressive projects (LED blink → button control → PIR motion sensor → music playback → motorized doors/windows → SK6812 RGB lighting → fan control → LCD display → gas alarm → temperature/humidity monitor → RFID door unlock → Morse code access → WiFi control → mobile APP remote control). Each project builds on the previous one, ensuring you understand both the electronics and the programming logic behind every smart home feature.
- Master Two Industry-Standard Languages – Learn to code in both Arduino C++ and MicroPython with 13 detailed tutorials for each language. Compare how the same hardware behaves under different programming approaches – a valuable skill for any aspiring engineer. Perfect for classrooms teaching multiple coding languages or self-learners who want flexibility.
- Build a Real WiFi-Controlled Smart Home – Assemble the wooden house structure and integrate sensors to create a functioning smart home system. Control lights, fans, door servos, and RGB lighting directly from your mobile APP (iOS/Android) . Experience how IoT works in real life – from manual control to automated responses based on temperature, humidity, motion, and gas detection.
- Comprehensive Online Wiki with No Guesswork – Our detailed online tutorials (also accessible via the packaging) include wiring diagrams, full code explanations, and step-by-step assembly guides for every project. Whether you're a complete beginner or a teacher preparing lessons, the structured content eliminates confusion and helps you succeed from project 1.
- Everything You Need to Get Started – (TIPS: Batteries are NOT Included)This kit includes the ESP32 development board, expansion board, wooden house parts, all sensors and modules (DHT11, PIR motion, gas sensor, RFID, SK6812 RGB, servo motors, fan, LCD1602, etc.), and connection cables. NOTE: 6x AA batteries are required (NOT Included). The kit is unassembled – you'll build it yourself following our online tutorials, making the learning experience truly hands-on.
Plan the control loop and test safely
Use a repeatable loop: read sensors, validate the readings, apply the control rules, switch outputs and record what happened. Hysteresis—using different on and off conditions—or minimum run times can reduce rapid cycling when a reading hovers near a threshold. Start by observing the system and testing each actuator individually.
- Keep water paths separate from mains wiring, and protect electronics from splashes and condensation.
- Fuse pumps and lighting appropriately, and include a manual cutoff.
- Check relay or driver voltage and current ratings against the actual equipment; a control module is not automatically suitable for every load.
- Test sensor placement and calibration in the installed environment. A threshold from another build may not suit your sensor, crop or medium.
- Check what happens if a sensor reading is implausible or a connection fails. Avoid a failure mode that leaves a pump or light on indefinitely.
Monitor and expand the greenhouse
Remote monitoring is possible through Arduino IoT Cloud with supported Arduino hardware. The official kit uses an MKR WiFi 1010, but confirm hardware and service compatibility for the particular setup before relying on cloud access. Remote visibility can help you notice readings or equipment states; it does not replace electrical protection, local safeguards or checking the physical system.
Rank #4

- Solar Tracking Kit for Arduino:This kit is based on Arduino. It consists of 4 ambient light sensors, 2 DOF servos, a solar panel and so on, aiming at converting light energy into electronic energy and charging power devices.It boasts a smart phone charging module, a temperature and humidity sensor, a BH1750 light sensor, a buzzer, an LCD1602 display, a push button module, an LED module and others, enriching the tutorial and making the projects more interesting.
- 11 Detailed Online Tutorials : From simple to complex, guide you step by step. You can either start from those basic ones like learning how to control a signal module or sensor, or aim at a more sophisticated one, the one integrating most of these components.
- High extension:This kit preserve IIC, UART, SPI ports, and extend other sensors and modules;if you are experienced,you can also alter the code or connect it with other sensors or modules through the bulding parts reserved to conduct your own experiments.
- Programmble Starter Kit for Teens, Adults and Professionals|:KEYESTUDIO starter kit is a cost-effective open-source programming device. Only a few simple steps are needed to install it and wire it up, very easy and convenient.it can not only help beginner have a better learning about programming but obtain knowledge about electronics, machinery, controlling logic and computer science.
- About this starter kit: The product is not assembled and the code is not burned before it leaves the factory. We have online tutorials to teach you how to assemble and upload the code. This kit does not include batteries, you need to prepare the batteries yourself.
Project Hub builds are useful for understanding implementation patterns. The Automated greenhouse with Arduino example uses soil moisture to decide whether a plant needs water and describes relay-controlled irrigation and fan outputs. Greenhouse Automation describes the DHT11, four-relay module, moisture-triggered irrigation and lighting when outside light fades. Treat these as examples to adapt, not as validated agronomic settings.
What the available examples do—and do not—show
The Arduino kit page and Project Hub examples establish component choices and automation patterns. They do not establish a universal sensor threshold, crop yield increase, percentage of water saved, energy reduction or reliability rate. Setpoints and performance depend on the crop, equipment, calibration and installation.
Quick Recap
Best Value
![Arduino Official Plug and Make Kit [AKX00069] - Ultimate Starter Kit for Beginners | Build Connected Projects Easily | Fun & Educational Technology Package for Learning Electronics & Coding](https://m.media-amazon.com/images/I/41A6dlalB9L._SL160_.jpg)
- The Easiest Arduino Kit to Build Connected Projects: The Official Arduino Plug and Make Kit [AKX00069] is designed to be the most beginner-friendly Arduino kit, making it the perfect entry point for those new to electronics, programming, and connected projects. With intuitive plug-and-play components, step-by-step instructions, and no soldering required, this kit lets you build your first electronic projects quickly and easily, while introducing you to the world of Arduino.
- Build & Connect Interactive Projects: This kit includes all the essential components to create a variety of interactive projects, from simple blinking LEDs to more complex sensors, buttons, and motors. It empowers you to quickly build real-world, connected devices that interact with their environment, such as automated lights, security systems, or simple robots. Explore basic electronics and learn how to program and control these devices using the Arduino IDE.
- Comprehensive Beginner’s Guide & Easy Setup: The Arduino Plug and Make Kit includes a detailed, easy-to-follow guide with clear instructions for building several projects. Whether you're completely new to electronics or just getting started with programming, this kit walks you through each project with helpful visuals, ensuring you grasp key concepts like input/output (I/O), circuits, and basic programming logic in a fun and approachable way.
- Fun Learning Experience with Hands-On Components: The kit includes a range of beginner-friendly components, such as LEDs, sensors, motors, buttons, and a mini breadboard, allowing you to create and control interactive circuits. Each component is color-coded for easy identification, and the plug-and-play connectors make assembly quick and hassle-free. It’s designed to provide a tactile, hands-on learning experience that builds confidence and sparks curiosity about technology.
- Perfect for School Projects, Hobbyists, & DIY Makers: The Arduino Plug and Make Kit is ideal for anyone looking to start their journey in electronics, coding, or maker projects. Whether you’re a student, hobbyist, or educator, the kit makes it simple to build connected, functional devices and bring your ideas to life. The simplicity and flexibility of the kit mean that you can easily expand to more complex projects, all while having fun with the process.
Product prices and availability are accurate as of the date/time indicated and are subject to change. Any price and availability information displayed on Amazon at the time of purchase will apply.

