
Recommended Free Tools
PowerPoint’s Windows desktop app can record a selected area of your screen and insert the capture as a video on a slide. The feature is available in PowerPoint for Microsoft 365, 2024, 2021, 2019, and 2016; it is different from the presentation-recording feature that captures narration and timings.
To record, select Insert > Screen Recording, choose an area, and select Record. When you stop, PowerPoint places the video on the selected slide.
PowerPoint screen recording availability
The documented Insert > Screen Recording workflow is for the Windows desktop application. It is not available in PowerPoint for Mac or PowerPoint for the web. Mac users can record with macOS tools and then insert the resulting video into PowerPoint. If you use PowerPoint in a browser, open the presentation in the Windows desktop app if your plan and installation provide it.
How to record your screen in PowerPoint
- Open the presentation and select the slide where the recording should appear.
- Select the Insert tab.
- Select Screen Recording.
- On the Control Dock, select Select Area.
- Drag across the portion of the screen you want to capture.
- Select Record.
- Select Pause if you need to stop temporarily.
- Select Stop when you have finished.
PowerPoint inserts the completed recording as a video on the selected slide. The minimum selectable recording area is 64 × 64 pixels.
Quick wins for a faster PC:
Fix the driver behind crashes, sound loss and screen glitchesFind Drivers →Repair Windows errors before they cause bigger problemsFix Now →#1 Best Overall

- 【Studio-Grade Sound Quality】This podcast bundle features Smart Noise Reduction System and 360° omnidirectional capture technology for vocal precision. ual-layer defense: Outer metal mesh filters plosive sounds, while inner windproof foam eliminates ambient noise. Integrated with professional DSP audio processing chip, it delivers studio-quality sound with real-time optimization.
- 【Plug & Play】Professional DJ mixer console seamlessly integrates podcasting functions with hybrid controls for real-time audio optimization. Includes 2 broadcast-grade condenser mics with anti-vibration suspension arms. USB-C interfaces enable instant connectivity across PC/smartphones/iPad, enable immersive creation anytime.
- 【Rich sound effects】The audio interface mixer has 4 sound variations(Female、Male、Child and Monster)and can produce 10 sound effects.It contains almost all of the commonly used functions.Four sound modes and 13 functions are not only made for live streaming,which is designed for recording,podcasting,tiktok live streaming,ect.
- 【Powerful Compatibility】Pro-grade compatibility ecosystem,supporting Smartphones/PC/PS5/Xbox and more.It can be compatible with Windows|Mac OS|Android|iOS|Chrome OS.Plug and play zero configuration direct connection technology, one click integration of cross platform creation ecology, suitable for 12+professional scene needs such as live streaming/recording/esports/remote work
- 【Multi instrument access】This product can directly connect electric guitars/bass/electronic drums without damage, retaining the original dynamic response.Whether live-streaming, recording, or hosting a radio show, you can directly input instrument audio to deliver pristine sound quality that authentically captures your performance
Record the entire screen with a shortcut
To record the entire screen without dragging a selection rectangle, use this Control Dock shortcut:
Windows logo key + Shift + B
To select a recording area using the keyboard, press Windows logo key + Shift + E.
Choose whether to record audio and the pointer
PowerPoint selects both Audio and Record Pointer by default on the Control Dock.
- Audio: Leave this selected to include related audio, or clear it for a silent capture.
- Record Pointer: Leave this selected to show mouse movements, or clear it to omit the pointer.
The audio option does not guarantee that every sound from every application will be captured. In particular, the documentation does not promise capture of protected or restricted application audio.
Crashes, No Sound, or Screen Glitches?
Random freezes, missing sound and display glitches usually trace back to one bad driver. Find and replace yours safely.Free scan · under a minuteWindows Errors? Fix Them Before They Spread
Repair common Windows errors and clear accumulated junk for a smoother, more stable PC - no reinstall needed.Free scan · no reinstallKeep the Control Dock visible
Unless pinned, the Control Dock moves into the top margin while recording. Move the pointer to the top edge of the screen to make it reappear. Pin the dock before recording if you need it to remain visible.
Rank #2
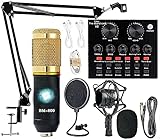
- Professional Podcast Equipment Bundle - The Podcast Equipment Bundle is equipped with BM-800 microphone, Mic adjustable suspension scissor arm stand, Shock mount, Pop filter, Anti-wind foam Cap, Power cable, Live sound card. This professional recording studio package was designed for podcasting, streaming and recording music and short video. What you get is a complete set of professional podcast equipment bundle.
- Excellent Sound Quality - The condenser microphone bundle has been designed with 2021 professional sound chipset, ensuring your voice is captured in high detail. The cardioid pickup pattern is more suitable for recording podcasts, vocals and other voice works. The condenser microphone records the sound source in front of the microphone directly and provides a rich, mellow sound.
- High Compatibility Podcast Kit - The podcast equipment bundle can be used in most mainstream operating systems such as Windows and Mac OS, in addition, the voice changer is compatible with smartphones (Android and IOS). This audio interface can be used on any mobile phone, computer, tablet iPad, PS4, Xbox, Switch and any game platform.
- Functional Recording Studio Package - This voice changer has multiple sound effects. You can connect to different devices (computer/ mobile phone/ laptop) by using different connection methods. Change your voice anytime, anywhere, call with friends, chat on for WeChat, live and sing, take video on TikTok, Youtube, etc. The podcast equipment bundle will bring more fun to you and make your recording more creative.
- PAY ATTENTION - After you get the condenser microphone bundle, please charge it first. We are a company dedicated to the research and development of podcast kit, if you have any questions in the process of use, please contact us in time, we will solve any problems for you within 12 hours.
Set when the recording plays
After PowerPoint inserts the video, you can choose when it starts during a slide show:
- Right-click the video frame.
- Select the Start icon.
- Choose In Click Sequence, Automatically, or When Clicked On.
In Click Sequence starts the video as part of the normal click order. Automatically starts it when the slide appears. When Clicked On waits for you to click the video.
Change the video’s appearance
You can change how the video looks on the slide without changing the screen content that was captured:
What’s actually slowing this PC down?
Pick the symptom - the matching free tool is one click away.
- Right-click the video.
- Select the Style icon.
- Choose a style or shape.
Trim the beginning or end of the recording
PowerPoint can remove unwanted material from the start or end of the clip. Its documented trimming controls do not provide a timeline editor for cutting arbitrary sections from the middle.
- Right-click the video frame.
- Select Trim.
- In the Trim Video dialog box, select Play.
- Select Pause near the point where trimming should occur.
- Use Next Frame or Previous Frame for precise positioning.
- Drag the green marker to set the beginning.
- Drag the red marker to set the ending.
- Select OK.
Save the recording as a separate video file
The recording is initially embedded in the presentation. To save it separately, normally as an MP4:
Rank #3

- 【Introducing NEEWER BASICS】 Simple and practical, NEEWER BASICS is an economical product line that focuses on essential functions and designs, without unnecessary extras and materials. Note: Not for phone shooting
- 【Upgraded No Assembly Design】 NEEWER X12B teleprompter is upgraded with an installation free design for ultimate user friendliness. Made of premium aluminum alloy, it's lightweight yet durable enough to hold your iPad, tablet and camera in place while making videos. The liftable platform and glass make it suitable for various photography equipment by keeping the lens always centered. It is an all in one teleprompter for presentations, online courses, and tutorial recording, Please note that this product does not function as a monitor or allow direct on screen self viewing during recording.
- 【Intelligent Remote Control 】 This X12B enables intelligent control via the included RT113 remote (AAA battery not included) and the NEEWER Teleprompter App. Pair the remote with your smartphone/tablet in the app via Bluetooth connection, or a direct Bluetooth link from your smartphone/tablet. Simply click to play/pause, adjust scroll speed, turn script pages, and change font size. The RT113 features a black appearance and quiet buttons. The app is compatible with iOS 11.0/Android 6.0 and later
- 【Easy to Read with 12" HD Display】 Thanks to an innovative coating technique, the high quality beam splitter glass ensures 75% light transmittance. With its adjustable hood and leading technology glass, the text on your tablet is clearly reflected onto the 12" high definition display of the teleprompter. The reflected text can be read up to 10ft (3m) away. If you prefer a teleprompter with a bigger screen, check out NEEWER X14, X14 Pro, X14 II, X16, and X17 II teleprompters
- 【Foldable & Portable】 The flip open structure makes it collapsible for easy storage and transport. When not in use, fold it flat and fit it inside the durable carry case for storage and protection
- Right-click the embedded video.
- Select Save Media as.
- Choose a folder in the dialog box.
- Enter a name in the File name box.
- Select Save.
Use this option when you need the clip outside PowerPoint. Ensure the destination drive has enough free space. Save Media as may not be available in older PowerPoint versions that do not support embedded-media extraction.
Export the entire presentation as a video
Save Media as extracts only the screen-recording clip. To render the entire presentation as a video:
The Tool Desk
Outbyte Driver Updater FREEFix the driver behind crashes, sound loss and screen glitchesFind Drivers →Outbyte PC Repair FREEClear out junk files and repair common Windows errorsFree Scan →- Save the presentation in .pptx format.
- Select File > Export > Create a Video.
- Choose a video quality.
- Choose Use Recorded Timings and Narrations or Don’t Use Recorded Timings and Narrations.
- If you are not using recorded timings, set Seconds to spend on each slide.
- Select Create Video.
- Choose a filename and location.
- Choose MPEG-4 Video or Windows Media Video as the file type.
- Select Save.
Available export resolutions:
| Quality | Resolution |
|---|---|
| Ultra HD (4K) | 3840 × 2160 |
| Full HD (1080p) | 1920 × 1080 |
| HD (720p) | 1280 × 720 |
| Standard (480p) | 852 × 480 |
Microsoft recommends MPEG-4 for broad compatibility. Exporting can take substantial time for a long or complex presentation; PowerPoint shows progress in its status bar.
Common PowerPoint screen-recording problems
Screen Recording is missing
Check that you are using the Windows desktop app and looking under Insert. The Record button and Record Slide Show commands are presentation-recording features, not the screen-capture command. The installed edition or version may also affect whether the command is available.
The Control Dock disappeared
If the dock is not pinned, it moves to the top margin during recording. Move the pointer to the top edge of the screen to reveal it, or pin it before recording.
Rank #4

- IDEAL FOR PROFESSIONAL VIDEOS: The Leeventi Teleprompter delivers clear text display from up to 10 Foot away, making it perfect for professional recordings. Its high-quality reflection screen ensures optimal lighting and readability in your videos.
- LARGE REFLECTION SCREEN: With a TV studio-sized screen of 11x7,5in, it offers ideal contrast and is gentle on the eyes. The text remains clear from a distance of 6,5-10 ft, making it perfect for extended video productions.
- MULTI-COMPATIBILITY: The Leeventi Teleprompter is compatible with smartphones, tablets, cameras, and video cameras. It easily mounts on all tripods and is suitable for both private and professional video recordings.
- LIGHTWEIGHT & DURABLE: Made of robust aluminum and weighing only 1,3lb, it is easy to transport. Its compact design makes it ideal for on-the-go or studio recordings, with quick and simple assembly.
- REMOTE CONTROL OPERATION: Intuitively and professionally control text scrolling with the remote and the Leeventi "Voice Teleprompter" software. A 1-year license for the software is included in the package.
The recording area is too small
PowerPoint will not accept an area smaller than 64 × 64 pixels. Select a larger rectangle or use Windows logo key + Shift + B to record the entire screen.
The audio is missing
Check that Audio was selected on the Control Dock before recording. PowerPoint does not promise to capture every type of application audio, including protected or restricted audio.
The mouse pointer is not visible
Make sure Record Pointer is selected before recording. It is selected by default but can be cleared.
Save Media as is unavailable
Older PowerPoint versions that do not support embedded-media extraction may not offer Save Media as. On macOS, extraction of embedded media is available to Microsoft 365 subscribers beginning with PowerPoint version 16.24; this does not add the Windows-only screen-recording feature.
The PowerPoint file is unusually large
Screen recordings are embedded in the presentation by default, and video can increase its size. Use Save Media as to create a separate file if needed. You can remove the embedded video from the presentation if you no longer need it there.
Best Value

- Lightweight Portable Design with Clear Load Limit:Crafted with premium lightweight metal material, this projector tripod features a strict 4.41 lbs maximum load capacity. It is specially designed for various small and lightweight electronic devices including mini projectors, audio sound cards, recorders and more. Not compatible with heavy laptops, large-sized projectors or overweight devices, effectively avoiding unstable placement caused by overloading.
- Flexible Height Adjustment for Multi-Scenario Use:Coming with a telescopic lifting structure, this floor tripod supports stepless height adjustment from 21.46 inches to 43.5 inches. It meets the viewing and placement needs of sitting and standing postures for home entertainment and office work. To achieve optimal stability, please fully expand the tripod legs and tightly lock all adjusting knobs; slight shaking is normal at maximum height or full load status.
- Practical Sized Tray with Reserved Thread Interface:Equipped with a widened flat tray measuring 9.84×7.09 inches, the stand provides a stable placement platform for small devices. A reserved 1/4-inch thread interface at the bottom allows for flexible installation and matching. Please note that safety fixing straps are not included in the package, bringing you flexible DIY use space.
- Tool-Free Quick Assembly & Foldable Storage:Adopts user-friendly quick-lock buckle structure, no extra tools or complicated installation steps are required. You can finish assembly and disassembly in seconds. After folding, it is compact (16.26 inches) and lightweight, easy to put into bags or store in cabinets, perfect for outdoor movie nights, business presentations and mobile outdoor use.
- Versatile Application:This multifunctional tripod holder fits a wide range of usage scenarios, including home theater viewing, backyard outdoor movies, office conference presentations, studio recording and other daily and professional scenes.
Some content is missing from an exported presentation video
Microsoft notes that exported video may omit some older or unsupported content, including media inserted in previous PowerPoint versions unless converted or upgraded, QuickTime media under certain codec conditions, macros, and OLE or ActiveX controls. Convert or embed legacy media before exporting when possible.
Independent reader supportYour contribution helps us test, update, and keep practical guides available for everyone.FAQ
Can PowerPoint record my computer screen?
Yes. In the Windows desktop app, select Insert > Screen Recording, select an area, and choose Record. PowerPoint inserts the capture as a video on the selected slide.
Does PowerPoint screen recording work on Mac?
No. The documented Insert > Screen Recording feature is Windows-only. Mac users can record with macOS tools and then insert the video into PowerPoint.
Does PowerPoint automatically save the recording as an MP4?
No. PowerPoint first embeds the recording in the presentation. To save a separate file, right-click the video, select Save Media as, and save it to a folder.
What is the minimum screen area PowerPoint can record?
The minimum selectable area is 64 × 64 pixels.
What is the difference between Screen Recording and Record Slide Show?
Screen Recording captures a selected area or the entire Windows screen and inserts it as a video. Presentation recording captures narration, timings, ink, pointer gestures, and optionally the presenter’s camera feed.
The Bottom Line
Use Insert > Screen Recording in PowerPoint for Windows to capture an application or desktop area inside a presentation. Set the audio and pointer options on the Control Dock, trim the clip if needed, and use Save Media as to create a separate video file. To render the entire deck, use File > Export > Create a Video.
Quick Recap
Product prices and availability are accurate as of the date/time indicated and are subject to change. Any price and availability information displayed on Amazon at the time of purchase will apply.

