
Quick wins for a faster PC:
Repair Windows errors before they cause bigger problemsFix Now →Fix the driver behind crashes, sound loss and screen glitchesFind Drivers →Clear out junk files and repair common Windows errorsFree Scan →iTechGuides is reader-supported. When you buy through links on our site, we may earn an affiliate commission. As an Amazon Associate I earn from qualifying purchases. Learn more
Setting the clock on a Samsung range takes about a minute, but the button names, the press length, and the menu path depend on your control panel. The sequence is the same across most models: enter Clock mode, enter the time, then save. The details that change are which button starts the process, whether you can hold it, and whether the clock offers AM/PM. This guide walks through each control style and flags the mistakes that send owners into the wrong menu.
Identify your control type first
Samsung’s clock instructions are written for three broad control styles. Before you press anything, look at the front panel and match it to one row below.
| Control style | Where the clock setting lives | How you enter the time | How you save |
|---|---|---|---|
| Keypad or button panel | A Clock button (sometimes marked with a clock icon or paired with Setting) | Number pad or directional buttons | Clock or START/SET, depending on the model |
| Smart Dial | The Menu button (three horizontal lines), then Set time | Turn the dial to change values | Push the dial to confirm |
| Touchscreen built-in wall oven | Settings > Date & Time | Time zone, date, and time fields on screen | On-screen selection |
Keypad and button ranges
This is the most common layout. Use these steps for models with a dedicated Clock button and a number pad.
What’s actually slowing this PC down?
Pick the symptom - the matching free tool is one click away.
- Press Clock. On some panels the button is labeled with a clock icon or shares a label with Setting.
- If the display offers AM/PM, press Clock again to choose AM or PM. If your display uses 24-hour time, skip this step.
- Enter the hours and minutes with the number pad or directional buttons. For example, to set 1:30, press 1, 3, then 0.
- Press Clock or START/SET to save. On models that have a Clear button, press it to cancel a wrong entry and start again.
The number-pad example is representative. Your model may require a different digit order or a different save button, so check the panel labels before you key in the time.
#1 Best Overall

- 6.0 cu ft Convection+ Oven – Fast, even cooking with Air Fry & Air Sous Vide.
- 5-Burner Gas Cooktop – 18K BTU brass burner with continuous grates and griddle.
- Smart Wi‑Fi Control – Works with SmartThings for remote monitoring and voice control.
- Sleek Bespoke Design – Slide-in style with recessed handle, self-clean oven, and storage drawer.
- Easy & Compliant – Sabbath mode, ADA compliant, and simple daily use.
Smart Dial ranges
Smart Dial panels replace most buttons with a single rotary control. The clock is part of the main menu rather than a dedicated button.
- Tap Menu (the three horizontal lines).
- Turn the dial to select Set time, then push the dial to open it.
- Turn the dial to set the hour and minute, then push the dial to confirm.
- To change the display format, go to Menu > Time format and choose 12-hour or 24-hour, where your model offers that option.
If the panel has gone dark, push or turn the dial to wake it. Samsung states that Smart Dial Sleep mode starts after two minutes of inactivity, so you may need to wake the panel before the menu appears.
Touchscreen built-in wall ovens
Touchscreen wall ovens handle the clock through the Date & Time settings, and you can choose between automatic and manual setting.
Do these 3 things before closing this tab:
1Fix the driver behind crashes, sound loss and screen glitches2Repair Windows errors before they cause bigger problems3Scan for outdated or missing drivers - takes under a minuteRank #2

- COMPATIBLE MODEL:Dg64-00473a gas stove knobs compatible with nx58h5600ss, nx58h5650ws, nx58j7750ss, nx58m6850ss, nx58k7850ss gas range oven -If your stove is black, you will need dg64-00473b instead .
- UPGRADED :DG64-00473A knob has strong rings to reinforce(The size of the "D" shape in the middle is 0.45in ) around the middle part of the knobs - kinda like a tight sleeve around them to ensure they can take heavy duty and won't be cracked easily. No tool required - Easily install the part YOURSELF and quickly get your range oven burner back to work within few minutes.
- Replaces Part Number: DG64-00473A, AP5917439,3447565, AP5917439, PS9606608, B01GV9ZRM4, EAP9606608
- IDEAL REPLACEMENT: DG64-00473A stove knobs that matches the original, our gas stove knobs for far less than going back to the dealership. DG64-00473A replacement range knob was specifically designed to look and function the same as the original burner knob dial on samsung range oven.
- HIGH-END DESIGN:Range knobs compatible with dg64-00473a stove knobs exceed oem quality at half the price.Range knob for samsung stove made of highly-end materials, compact & sturdy, longevous.
Automatic setting
- Turn on Wi-Fi on the oven.
- Open Settings > Date & Time.
- Switch automatic time on.
Manual setting
- Open Settings > Date & Time.
- Switch automatic time off.
- Set the time zone, date, and time.
The time display on the screen can turn off after one hour of inactivity. That is a display setting, not a clock failure. Touch the screen to bring the time back into view.
The long-press trap
A short press is the safe default on every control style. On some models, the Clock or Setting button also serves a second function, and a long press opens that function instead.
- Holding Clock for about three seconds can open the Settings menu on some models, according to Samsung’s general guidance.
- On certain NX60 series models, a three-second hold is the route to Demo mode, which is a display-only mode you do not want while cooking.
- On certain NE63 series models, Samsung says not to hold Clock/Setting for three seconds or more while adjusting the clock.
If you entered a menu or mode by accident, check your model’s manual for how to leave it. Do not assume a second long press will reverse the first.
Rank #3
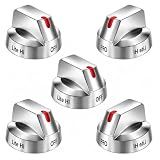
- Compatible with Select Samsung Gas Range Models: This set of replacement knobs is designed to fit popular Samsung range models including NX58H5600SS NX58F5700WS NX58H5650WS NX58J7750SS NX58M6850SS
- Reliable Replacement for Original Knobs: These stove knob replacements are manufactured to mimic the look and functionality of the original parts. An affordable alternative to dealer-priced components, these knobs provide a comparable fit and operation for your Samsung range.
- Strengthened Design for Daily Use: The knobs feature reinforced inner support rings that help resist wear. Made from resilient materials, they are built to withstand regular use. Installation is straightforward and requires no tools.
- Replaces Multiple OEM Part Numbers: This set is compatible with part numbers including DG64-00473A, AP5917439,3447565, AP5917439, PS9606608, B01GV9ZRM4, EAP9606608, making it a versatile choice for many Samsung range owners.
- Durable and Functional Construction: Crafted from quality materials, these replacement knobs for Samsung stoves offer a sturdy feel and are engineered to match OEM specifications. They provide a cost-effective solution without compromising on appearance or durability.
Model-specific differences
Samsung’s general instructions cover many, but not all, ranges. Its Canadian guide says its steps apply to ranges sold in Canada and that available settings may differ in other markets. The US model-specific troubleshooting pages show how much the procedure can vary even within one brand. Use the table as a cross-check, not a replacement for your manual.
| Model family (as listed by Samsung) | Clock control | Time entry | AM/PM selection |
|---|---|---|---|
NE63*631*S* |
Clock/Setting button | Number pad | Not stated |
NE63*611*S* |
Press-and-hold action | Up and Down buttons | Not stated |
NE63**8315**** |
Not stated | Not stated | Included, unless the display is set to 24-hour time |
NX60*83**S* |
Clock button | Number pad | Not stated |
If the visible controls or steps do not match what you see here or in the general steps above, confirm your exact model number and use its manual.
Independent reader supportYour contribution helps us test, update, and keep practical guides available for everyone.Resetting the clock after a power outage
A power outage is one of the most common reasons to reset the clock. After power returns, the display may show an incorrect time or a blinking clock. Start from the procedure for your control type above. The steps are the same as an initial setup; Samsung frames the task as setting or resetting the clock after an outage.
Rank #4

- SMART OVEN CAMERA: Internal camera allows you to check on meals as they cook anytime, anywhere and make and share time-lapse videos to your social media to show off your culinary skills.
- ILLUMINATED PRECISION KNOBS: Precisely control and ensure proper activation of your cooktop with the Illuminated Precision Knobs that must be pinched in before the knobs can be pushed and turned. These knobs will light up when in use to let you know that your cooktop is on.
- BESPOKE DESIGN: Give your kitchen a premium look with a contemporary Bespoke design and a recessed handle that suits your style and elevates your home.
- AIR SOUS VIDE: Lock in flavor and moisture and avoid overcooking with Air Sous Vide. Precise, controlled heat and airflow within the oven give you gourmet cooking results at home.* Perfect for fish, poultry, and vegetables.* Requires a sous vide cooking bag, which is not included with the oven.
- AIR FRY: Enjoy healthier* fried foods with Air Fry built right into your oven. Air Fry tray included.* As compared to deep frying.
Why an accurate clock matters
The clock controls more than the display. Samsung’s US range clock-setting support guide states: “An accurate clock will also ensure the oven’s automatic features work properly, such as delayed cooking or Sabbath mode.” If the time is wrong, a delayed start can run at the wrong moment, and Sabbath mode may not behave as expected.
If the clock still does not match
- The button does not respond: confirm you are pressing the Clock or Setting control, not a timer or cook function. On Smart Dial models, wake the panel first.
- The wrong time saved: on models with a Clear button, clear the entry and enter it again. On other models, reenter the time from the start of the procedure.
- A menu or mode opened unexpectedly: stop, and use your model manual to exit it.
- The time keeps resetting on a wall oven: check whether automatic time is on and whether Wi-Fi is connected, then compare the time zone setting.
Scope of these instructions
The steps above come from Samsung’s general US and Canada clock-setting guidance and from its US model-specific troubleshooting pages. Samsung’s Canadian guide was last updated July 2, 2026, and the instructions reflect Samsung’s published material as of early October 2026. Control layouts change between model years and regions, so treat this guide as a starting point and confirm against the manual for your exact model.
Quick Recap
placeholder
Product prices and availability are accurate as of the date/time indicated and are subject to change. Any price and availability information displayed on Amazon at the time of purchase will apply.

