
What’s actually slowing this PC down?
Pick the symptom - the matching free tool is one click away.
iTechGuides is reader-supported. When you buy through links on our site, we may earn an affiliate commission. As an Amazon Associate I earn from qualifying purchases. Learn more
You can reuse old hard drives in a RAID array if they are healthy, compatible with your chosen system, and you have copied off any files you want to keep. A NAS storage manager, Windows Storage Spaces, or Linux mdadm can combine drives, but setup may overwrite data. RAID can protect against certain drive failures; it is not a substitute for an independent backup.
Before you start: check the drives and protect their data
Do not initialize, pool, or create an array until you have verified that the selected disks are the ones you intend to repurpose. Copy wanted files to a separate storage device first. Creating a pool or writing RAID metadata can affect existing data, and removing or reconfiguring a pool also carries data risk. Synology advises backing up before removing a storage pool; its pool creation guide also recommends healthy, compatible drives.
- Check drive health: Do not assume a disk is suitable because it still appears in File Explorer or a file manager. Use your NAS or operating system’s drive-health tools and consult the drive or device documentation.
- Check compatibility: Confirm the drive interface, size, and model are supported by the NAS or host. Synology recommends checking its compatibility list and using drives of the same type in a pool; requirements vary by model and RAID type.
- Confirm the connection: Internal SATA connections are different from USB enclosures. In particular, an enclosure may hide individual disk identities or report drives as removable.
- Have a separate backup plan: RAID redundancy helps with particular drive failures, but it does not protect against every cause of data loss, such as accidental deletion or damage to the whole system.
There is no universal promise that an old drive will be accepted or that a particular mix of drive sizes will yield a specific capacity. Check the documentation for your exact NAS or operating system before initialization.
Quick wins for a faster PC:
Scan for outdated or missing drivers - takes under a minuteDriver Scan →Repair Windows errors before they cause bigger problemsFix Now →Choose the RAID route that fits your equipment
| Route | What it uses | Best fit | Important constraint |
|---|---|---|---|
| NAS storage manager | A NAS and its installed drives | A dedicated appliance with a graphical storage manager | Bay count, drive compatibility, and supported pool and RAID types depend on the NAS model. |
| Windows Storage Spaces | Eligible physical disks connected to a Windows PC | Readers with a suitable Windows host and drives Windows recognizes as eligible | At least two extra drives are required; some USB enclosures or hubs prevent eligibility. |
Linux mdadm |
Linux software RAID devices | Technically comfortable readers who can identify disks and use the command line | Commands must target the correct devices; creating an array writes metadata and starts a resync. |
Microsoft describes Storage Spaces as a way to combine multiple drives into one storage pool to protect data from drive failures and expand storage. The practical result depends on the resiliency option you select and the drives Windows can use. Microsoft’s Storage Spaces guide explains its options and eligibility requirements.
#1 Best Overall

- High Speed Data Transmission: The D2-320 hard drive enclosure (a DAS, NOT a NAS) adopts USB 3.2 Gen2 protocol for high-speed data transmission up to 10Gbps. With 2 hard drives in RAID 0, the read/write speed can reach up to 521MB/s (SATA III HDD 8TB x 2). With 2 SSD's in RAID 0, the read speed can reach 1075MB/s (SATA III 1TB SSD x 2)
- Multiple RAID Configurations: The D2-320 is a hardware RAID enclosure and it supports RAID 0, RAID 1, JBOD and SINGLE which can better satisfy various demands of users. In RAID 1, data will be in a mirror backup. When there is a damaged hard drive, you can directly replace the hard drive, and the data will be recovered automatically. This provides an absolute security for the data
- Super-Large Storage Capacity: The D2-320 USB storage enclosure can support up to two 3.5" and 2.5" SATA HDD, as well as 2.5" SATA SSD, with a maximum capacity of 22TB per drive, providing users with up to 44TB (22TB x 2) of storage space
- Intelligent Temperature Control: The D2-320 HDD enclosure has an intelligent temperature-controlled and low-noise fan that automatically adjusts its speed based on the temperature of the hard disk. This feature ensures that the hard disk operates at its best temperature and provides better heat dissipation
- Tool-Free Hard Drive Installation: The D2-320 external hard drive enclosure features a tool-free hard drive tray design that allows for easy installation and removal of hard drives without the need for any tools. Furthermore, the D2-320 incorporates a brand new Push-lock unique design from TerraMaster, which automatically locks the hard drive tray when you insert the hard drive, preventing the hard drive from falling out or disconnecting
Pick a RAID level by capacity and failure tolerance
RAID levels trade usable capacity against redundancy and other characteristics. The Linux MD documentation describes the behavior of supported levels; the mdadm manual lists linear, RAID0, RAID1, RAID4, RAID5, RAID6, and RAID10. The summary below covers commonly considered choices, not every level or platform-specific variation.
| Level | How it stores data | Failure tolerance | Capacity implication |
|---|---|---|---|
| RAID0 | Striping across drives | No redundancy; a drive failure can make the array’s data unavailable. | Uses drive capacity for the striped set, subject to the implementation and drive sizes. |
| RAID1 | Mirroring | Mirrors data; exact tolerance depends on the number of drives and configuration. | Mirroring uses capacity for duplicate copies, reducing usable space compared with raw capacity. |
| RAID5 | Striping with parity | Single-parity protection, as described by Linux MD. | Parity consumes some raw capacity; usable space depends on the drive set and layout. |
| RAID6 | Striping with dual parity | Dual redundancy, as described by Linux MD. | Dual parity uses more raw capacity than single parity; exact usable space depends on the drive set and layout. |
| RAID10 | Striping across mirrored sets | Depends on which drives fail and the array layout. | Mirrored copies reduce usable capacity compared with raw drive capacity. |
Mixed drive sizes can leave capacity unused depending on the system and layout. For a specific set of disks, use the NAS maker’s calculator or the applicable platform documentation rather than estimating from raw capacity alone. Synology’s RAID calculator is specific to its products and notes that each drive reserves approximately 10 GB of system space. That platform-specific figure should not be generalized to other RAID systems.
Rank #2

- 【Reliable External Storage System for Individuals and business】The 3.5 hard drive enclosure supports 2.5/3.5 inches HDD and SSD, max capacity up to 20TB for each hard drive, it's a ideal external hard drive enclosure for personal or enterprise using.Save space on your desktop or laptop.
- 【No heat】The sata enclosure built in Aluminum-Alloy materials and 2.7 inch Fan.Maximize the security of your data. NOTE:Fan noise is around 40-50 decibels, not recommended if you are very sensitive to noise.
- 【Up to 5Gbps】This 3.5 hard drive enclosure equips with advanced chips and USB 3.0 output interface.Transfer 1G files in 3-5 seconds with USB 3.0 Ports, which is 10 times faster than USB 2.0.
- 【Hot Swappable Convenience】The HDD enclosure supports hot swapping, allowing users to replace hard drives without powering off the device. This feature enhances convenience and efficiency in data transfer processes.
- 【Tool-Free Installation】Featuring a tool-free hard drive tray design, the external hard drive enclosure enables easy installation and removal of hard drives without requiring additional tools. Plug and play! No fuss, no muss!
Performance also depends on the configuration and hardware. The cited documentation does not establish a defensible speed benchmark for old drives, so do not assume that a RAID setup will make them faster.
Route 1: create a pool on a NAS
A NAS is the appliance route: its storage manager builds and manages a pool from one or more drives, with RAID protection available where the model and chosen configuration support it. Synology’s storage pool guide explains the concept. Exact labels and requirements vary by device model and DSM release.
Rank #3
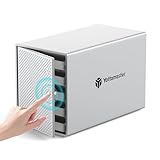
- 【Reliable External Storage System for Individuals】This 5 bay hdd enclosure support up to 110TB (5 x 22TB) external expanded storage. The front door adopt user-friendly PUSH Design for easy install and replacement of hard drives. It is an ideal choice for personal storage at home and office. It can support 2,5"/3,5" SATA HDD/SSDs, so you can take advantage of your hard drives' potential fully.
- 【Flexible RAID for Customized Work Need】It supports RAID 0/1/3/5/10/JBOD(SPAN)/CLONE RAID modes. You can optimize/simplify your workflow by chosing suitable RAID configuration. You can choose hardware RAID for easy set without downloading application, or you can use Software RAID to set/manage RAID modes. It is the ultimate storage solution for demanding video workflows on location and in the studio.
- 【Aluminum-Alloy Enclosure & 80mm Silent Fan】The 5 bay RAID sata enclosure built with rugged heat-dissipating aluminum shell, front and rear with cooling holes, a 80mm intelligent temperature control fan inside can effectively accelerate air convection and rapid cooling. The fan adjusts its speed automatically based on the hard drive's temperature, providing optimal cooling with low noise.
- 【For 2.5"/3.5" SATA HDD & SSD】Yottamaster 5 bay USB 3.0 RAID HDD enclosure designed for both 2.5 inch SATA and 3.5 inch SATA HDD/SSDs. It comes with 5 removeable trays, allowing for easy installation and replacement of either the large desktop hard disk drives or the portable laptop drives and SSD's.The included screws securely fix the hard drives to the trays, effectively protecting them from shock and interface damage.
- 【5Gbps Transfer Rate】This 5 bay hdd enclosure adopt USB3.1 protocol, transfer rate up to 5Gbps (MAX). Equipped with a versatile USB3.1 Type-C interface to connect other peripheral devices. Compatible with most Windows, Mac and Linux systems.
- Check the NAS first: Confirm it has enough bays, supports the drives’ interface, and lists the drives as compatible. Review the requirements for the particular RAID type you intend to use.
- Check drive condition: Verify that the drives report healthy status. Do not proceed with a questionable disk simply because it is detected.
- Back up files you want to keep: Pool creation is not a way to preserve standalone drive contents.
- Install the drives and open the storage manager: Follow the model’s instructions; the exact navigation differs by NAS and software version.
- Create the storage pool and volume: Choose a RAID type based on the capacity and failure tolerance you need. Synology’s DSM 7 creation guide describes its wizard and drive requirements.
- Wait for synchronization, then check status: Confirm the pool reports healthy before migrating data onto it.
If you plan to expand a Synology pool later, drive-type, size, health, and pool-type requirements apply. Consult its drive expansion guide before relying on a future upgrade path.
Route 2: combine drives with Windows Storage Spaces
Microsoft’s Windows option requires at least two drives in addition to the Windows system drive. It supports internal and external hard drives, but Windows must enumerate each physical disk as eligible. The drive count alone does not guarantee that a USB-connected disk will work.
Rank #4

- 【Reliable External Storage System for Individuals and business】The 3.5 hard drive enclosure supports 2.5/3.5 inches HDD and SSD, max capacity up to 20TB for each hard drive, it's a ideal external hard drive enclosure for personal or enterprise using.Save space on your desktop or laptop.
- 【4 Raid Modes】!!!NOTE:Press and hold the "Reset" button for 5 seconds after reset the RAID array!!!This raid enclosure supports 4 RAID Modes(RAID 0, RAID 1, Normal, JBOD).Designing RAID may result in data loss.MAC OS no Raid software.
- 【No heat】The 2 bay hard drive reader built in Aluminum-Alloy materials and 2 inch Fan.Maximize the security of your data.NOTE:Fan noise is around 40-50 decibels, not recommended if you are very sensitive to noise.
- 【Up to 5Gbps】This dual bay raid enclosure equips with JMS561 chip and USB 3.0 output interface.
- 【Wide Compatibility, Plug and Play】Equipped with USB A/C 3.0 Cable.Compatible with Windows 7 and above, Mac 9.1 and above, Linux.Plug and play, no fuss, no muss.
- Connect the drives and inspect them individually: Use Device Manager or Disk Management to confirm Windows sees each physical disk and whether it reports as fixed or removable.
- Confirm eligibility before creating a pool: Some USB enclosures and hubs report disks as removable or conceal the identities of individual drives. Either behavior can prevent Storage Spaces from using them.
- Create a storage pool: Use the Storage Spaces controls available in your Windows version. Microsoft changes Windows navigation over time, so consult its current Storage Spaces instructions for the exact route.
- Create a virtual drive and choose resiliency: Select the option appropriate for your capacity and failure-tolerance needs.
- Format and test the new drive: Verify that it appears and that you can read and write files before moving important data.
Why might an external USB drive not work?
Check whether Windows sees the disk as fixed or removable and whether it exposes each disk separately. If the enclosure or hub hides individual physical disks or marks them removable, Storage Spaces may not consider them eligible. Test the connection and enclosure before troubleshooting the pool itself.
Free tools Windows power users keep installed
One-click scans. No signup required.
Route 3: create Linux software RAID with mdadm
mdadm manages Linux software RAID. Its manual distinguishes creating a new array from assembling an existing one: --create writes RAID metadata to component devices and starts a resync, while --assemble brings together components of an array that already exists. They are not interchangeable. See the mdadm manual and the Linux MD documentation for supported levels and behavior.
Best Value

- High-Speed Data Transmission: The D4-320 hard drive enclosure (a DAS, NOT a NAS) utilizes the USB 3.2 Gen2 protocol, achieving high-speed data transmission of up to 10Gbps. When equipped with four hard drives, the actual read/write speed can reach up to 1,016 MB/s (combined read/write with four SATA III HDDs of 8TB each). With just one SSD installed, the read speed effortlessly reaches 510 MB/s (SATA III 1TB SSD). The D4-320 supports a single HDD up to 30TB, with a total capacity of 120TB, and is compatible with various hard drives, including 3.5-inch SATA hard drives, 2.5-inch SATA hard drives, and 2.5-inch SATA SSDs
- Plug-and-Play Compatibility: The D4-320 USB storage supports 4 individual disks (NO RAID function), and is plug-and-play, eliminating the need for drivers. It is highly compatible with MAC, Windows, and Linux operating systems. The USB Type-C interface supports various computer interfaces, including USB 3.0, USB 3.1, USB 3.2, Thunderbolt 3, and Thunderbolt 4
- Hot Swappable Convenience: The D4-320 HDD enclosure supports hot swapping, allowing users to replace hard disks without powering off the device. This feature enhances convenience and efficiency in data transfer processes
- Tool-Free Hard Drive Management: Featuring a tool-free hard drive tray design, the D4-320 external HDD enclosure enables easy installation and removal of hard drives without requiring additional tools. Furthermore, the D4-320 incorporates TerraMaster's unique Push-lock design, automatically securing the hard drive tray upon insertion, preventing the hard drive from falling out or disconnecting
- Efficient Heat Dissipation and Quieter Operation: The D4-320 direct attached storage incorporates an intelligent temperature-controlled fan for optimal heat dissipation. Additionally, specialized sound-absorbing panels and vibration damping measures contribute to a quieter operation, with noise levels reduced by up to 50% compared to the previous generation. In standby mode, the noise level drops below 21 dB(A), creating a remarkably quiet user environment
Because device names are easy to mis-target and no drive details are specified here, there is no safe one-size-fits-all destructive command. If you use mdadm, identify each intended disk positively using stable identifiers and confirm them immediately before creating the array. Do not copy a command using guessed device names or run --create on a disk that contains files you still need.
- Back up wanted data and identify the component devices: Verify model, size, and stable device identifiers rather than relying on a name copied from an example.
- Select the array level and confirm the target list: Check that the chosen level supports your drive count and delivers the failure tolerance you expect.
- Create the new array only after confirming every target: The create operation writes metadata and begins resynchronization.
- Wait for the array to synchronize and check its status: Do not treat the array as ready simply because the command returned.
- Create a filesystem on the resulting array: The array device needs a filesystem before it can be used for ordinary file storage.
For an array that already exists, use the documentation’s assembly procedure instead of creating a replacement array. If you are not confident identifying disks or interpreting the command’s targets, use a graphical NAS or Windows route if your hardware supports it.
Keep RAID separate from backup
RAID’s protection is tied to its layout and the failures that layout can tolerate. It does not make an independent copy of your files. Keep a backup on separate storage, and make one before changing or reusing the old drives. Before moving important files into the new pool or array, confirm that setup and synchronization are complete and that the system reports healthy status.
Quick Recap
Product prices and availability are accurate as of the date/time indicated and are subject to change. Any price and availability information displayed on Amazon at the time of purchase will apply.

