
Do these 3 things before closing this tab:
1Scan for outdated or missing drivers - takes under a minute2Repair Windows errors before they cause bigger problems3Fix the driver behind crashes, sound loss and screen glitchesiTechGuides is reader-supported. When you buy through links on our site, we may earn an affiliate commission. As an Amazon Associate I earn from qualifying purchases. Learn more
If Ubuntu Desktop will not appear on a RISC-V machine, do not start by reinstalling graphics drivers. First identify the exact board or QEMU configuration and image, then determine whether firmware handed off to the kernel and whether Linux reached userspace. Serial output or SSH can prove that the computer booted even when the display is blank. Only after that should you diagnose GPU support, display-manager failures, or an emulated graphics device.
Use this diagnostic order
A RISC-V Ubuntu Desktop failure can occur in several independent places: an image that does not support the board, boot media or firmware, the board-specific device tree, the Linux kernel, userspace services, or the display hardware. Treating every black screen as a GNOME or driver fault hides the real failure. Work through these stages in order:
- Record the platform. Write down the board make, revision, Ubuntu release, exact image filename, image origin, boot media, firmware type and version, GPU model, and whether the system is physical or emulated.
- Verify image support. Canonical’s RISC-V catalog is board-specific. It separates preinstalled server images from live installers, and some entries explicitly support headless operation only, with no GPU or Wi-Fi.
- Get an independent console. Use the documented UART or serial console on a physical board. If networking starts, try SSH. These paths let you distinguish a running system from one that failed before Linux.
- Locate the last successful boot stage. Identify whether output stops in firmware, GRUB, the kernel, systemd, or the graphical session.
- Check graphics last. Confirm that the exact board and GPU have supported graphics before changing packages, kernel parameters, firmware, or hardware.
This sequence applies to an “Ubuntu RISC-V desktop won’t boot” report and to a “RISC-V Ubuntu black screen” report without assuming that either describes the same fault.
First establish what you are running
Physical board versus QEMU
| Environment | Check first | Best diagnostic access | Graphics expectation |
|---|---|---|---|
| Physical RISC-V board | Board-specific image, boot source, firmware, boot media, and documented limitations | Board UART or serial console where documented; SSH if networking is available | Depends on the exact board. Some catalog entries are headless, and documented boards can have unsupported GPUs or no usable external-GPU path. |
| QEMU RISC-V | QEMU version, emulated CPU profile, EDK II firmware, and image/release match | -serial mon:stdio output plus QEMU’s own messages |
Experimental desktop path using an emulated virtio-gpu-pci device; regular GNOME can be extremely slow. |
Do not transfer a fix from one environment to the other. A physical board’s GPU and PCIe wiring are platform limitations; QEMU’s display is a virtual device configured by the emulator.
#1 Best Overall

- Stable & Reliable CP2102 Chipset - Built with the trusted CP2102 chipset, ensuring stable data transmission and consistent performance. Supports 3.3V TTL logic level communication, making it suitable for most modern microcontroller systems.
- Extra Long 3ft/95cm Cable – More Flexible Than Standard Short Cables - Upgraded with a 3ft/95cm extended cable, providing greater flexibility than standard short cables. Perfect for hard-to-reach ports, complex setups and bench testing environments.
- Simplified 4-Wire Interface for Easy Wiring - Designed with a 4-pin configuration (TXD, RXD, VCC, GND), making connections faster, cleaner and less error-prone compared to traditional multi-pin modules.
- Plug and Play USB to TTL Adapter Cable - Easily connect TTL serial devices to your computer via USB without external power supply. Ideal for Arduino, ESP8266, ESP32, STM32 and other microcontroller platforms.
- Wide Compatibility for Development & Debugging - Provides stable 5V power output with 3.3V TTL signal level communication, ensuring reliable performance with Arduino, Raspberry Pi, ESP8266, ESP32 and other development boards.
Capture a reproducible setup record
- Board manufacturer, model, hardware revision, and any carrier-board revision.
- Ubuntu release, architecture, and the complete image filename.
- Whether the image is a preinstalled server image, a live installer, or a desktop image.
- Where the image was obtained and whether its catalog entry names your exact board.
- SD card, eMMC, NVMe, USB, or virtual disk used as the boot medium.
- Firmware type and version, such as U-Boot or EDK II, and the selected boot source.
- GPU model, display connector, cable, monitor input, and any adapter in the path.
- For QEMU: QEMU version, CPU option, firmware file, command-line display device, and host operating system.
- The last visible serial line, whether a login prompt appears, and whether the machine answers on the network.
Keep this record before changing anything. “Desktop does not start” is not enough information to separate an unsupported image from a failed firmware handoff or a display-only problem.
Prove whether Linux booted
Use the board’s documented serial console
On first boot, serial output is often more useful than a monitor. Canonical strongly recommends a serial console for first boot on the HiFive boards covered by its tutorial because display output may not begin until the kernel initializes the GPU. The connector, pinout, voltage level, baud rate, and flow-control settings are board-specific; never assume that a UART header on one board matches another.
Canonical’s VisionFive 2 instructions use a USB UART adapter connected to the GPIO UART. Follow that board’s pinout and electrical requirements exactly. A USB-to-TTL adapter is a diagnostic accessory, not a generic graphics fix: connect only the signals and voltage specified by the board documentation.
Quick wins for a faster PC:
Clear out junk files and repair common Windows errorsFree Scan →Scan for outdated or missing drivers - takes under a minuteDriver Scan →Capture the complete first-boot transcript, including the final line before a pause or reset. Look for firmware messages, an SBI handoff, UEFI or U-Boot activity, GRUB, Linux kernel messages, and eventually a login prompt. A monitor that remains dark while the serial console reaches login is evidence of a display-path limitation, not proof that Ubuntu failed to boot.
Use SSH as a second independent test
If the board obtains an address and the SSH service is enabled, connect from another computer. A successful SSH login proves that the system progressed far enough to bring up networking and userspace, even if no graphical output is available. From that session, collect facts without making broad changes:
uname -a
cat /etc/os-release
systemctl status display-manager
journalctl -b --no-pager
journalctl -b -p err..alert --no-pager
To investigate graphics messages, inspect the boot log for DRM, framebuffer, or GPU errors:
Rank #2

- Support 4 kinds of TTL levels:This is a versatile USB to TTL converter. It is powerful enough to handle almost all TTL level communications. It is compatible with 5V, 3.3V, 2.5V, 1.8V TTL levels.
- FTDI FT232RNL Chip:Built-in original FTDI FT232RNL Chip.Industrial grade, Compatible with Windows 7, 8, 10, 11, Linux, MacOS
- Protective case:Comes with a protective case, this transparent protective case can effectively prevent static interference from the hand and prevent accidental short circuit
- It provides access not only to UART TX,RX, RTS, CTS, VCC and GND pins,but also provides access to DSR,RI,DCD,DTR,RESET pins
- What You Get: SH-U09C5 USB to UART Adatper, 6PIN Cable
dmesg | grep -iE 'drm|gpu|framebuffer|fbcon|display'These commands identify symptoms; they do not establish that a particular driver is available for your board. Save the output before attempting a package or firmware change.
Windows Errors? Fix Them Before They Spread
Repair common Windows errors and clear accumulated junk for a smoother, more stable PC - no reinstall needed.Free scan · no reinstallCrashes, No Sound, or Screen Glitches?
Random freezes, missing sound and display glitches usually trace back to one bad driver. Find and replace yours safely.Free scan · under a minuteInterpret the last successful stage
- No serial characters at all: suspect power, cabling, UART selection, boot media, firmware, or an incorrect board image before suspecting GNOME.
- Firmware appears but no GRUB: inspect the selected boot source, EFI entry, storage visibility, and firmware configuration.
- GRUB appears but the kernel does not: check the kernel, initrd, device-tree handoff, and boot arguments.
- Kernel messages end and SSH works: Linux is running; investigate userspace or the display path.
- Login prompt or SSH works but the monitor is blank: check board GPU support, connector selection, framebuffer/DRM messages, and the display manager.
- The graphical login appears and then fails: collect the display-manager and user-session journal before changing drivers.
Check the RISC-V boot chain before graphics
Canonical describes a typical Ubuntu RISC-V chain as boot ROM, an SBI implementation such as OpenSBI, UEFI-capable firmware such as U-Boot or EDK II, GRUB, and Linux. Each layer must use the board’s matching configuration. A failure before the kernel cannot be repaired by installing a desktop package.
Firmware and boot source
Confirm which firmware the board actually executes and which storage device it selects. A board may contain more than one boot source, and an update can leave the firmware pointing at a different card, partition, or EFI entry. Use the board guide’s recovery or boot-selection procedure rather than applying a generic RISC-V command.
Device-tree selection
The device tree tells Linux which CPU, memory, UART, storage controller, display controller, and other devices exist. Canonical’s boot-flow documentation says Ubuntu tries to use the device tree matching the board. Its flash-kernel process uses the device-tree model property when arranging the tree for a kernel update.
If boot stopped after a kernel or firmware update, verify that the selected board image, firmware, EFI entry, kernel, initrd, and device tree all describe the same hardware. A wrong tree can disable the console or storage and make a graphics failure appear earlier than it really is. Do not substitute a device tree from a similar-looking board.
What an early stop means
If the last message is before Linux identifies the root device, investigate storage and device-tree handoff. If Linux starts and then pauses while systemd launches services, graphics is still not the first suspect. If a serial login is available, the kernel and basic userspace have already succeeded.
Rank #3
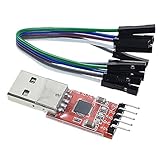
- Stable and reliable chipset CP2102
- Baud rates: 300 bps to 1.5 Mbps
- Connect MCU easily to your computer!
- Standard USB type A male and TTL 5pin connector. 5pins for 3.3V, RST, TXD, RXD, GND & 5V
- Supports Windows 98SE, 2000, XP, Vista, Window7, Mac OS 9, Mac OS X & Linux 2.40
Physical-board troubleshooting
Match the image to the exact board
Canonical’s image catalog lists multiple RISC-V boards and variants. The presence of a RISC-V download does not mean that a supported desktop image exists for every board. Read the entry for the exact model and revision, including notes that say “headless,” “server,” or “without GPU and Wi-Fi.” A server image can boot correctly while offering no local desktop to display.
Check whether the image is preinstalled or intended for a live installer. These are different boot workflows. Rewriting a live image onto media expected to contain a preinstalled layout, or vice versa, can create a boot failure unrelated to graphics.
Follow the board’s first-boot procedure
- Use the storage medium, partition layout, and image-writing method specified by the board guide.
- Set the documented boot switch, jumper, or firmware boot source.
- Connect the UART before powering on if the guide recommends it.
- Record firmware and kernel output from power-on through login.
- Only after serial or SSH confirms a successful boot, connect the display and investigate graphics.
Do not assume that an image for one StarFive, HiFive, or other RISC-V board will work on another. Even boards using related SoCs can require different firmware binaries, device trees, storage paths, and display support.
VisionFive 2: treat graphics as a documented limitation
Canonical’s VisionFive 2 guide states that the onboard GPU is unsupported. It also documents incomplete PCIe support, meaning an external GPU does not provide a working workaround on that board. If serial output or SSH reaches userspace but the monitor stays blank, the evidence points toward the platform’s documented graphics limits rather than a missing desktop driver.
Do not buy a GPU or install a random desktop driver as the first response. Confirm the board revision, read the current board guide, and decide whether headless operation, remote access, or a different supported platform meets your goal.
HiFive guidance: useful diagnostics, not a universal support promise
Canonical’s HiFive tutorial gives a practical serial-console and GPU-capable example, but it is legacy guidance and explicitly says the Ubuntu Desktop installation described there was not officially supported on riscv64. Use its serial recommendation and board-specific wiring information in the context of the HiFive models it covers. Do not generalize its desktop result to every RISC-V board or current Ubuntu release.
Rank #4

- Stable & Trusted CP2102 Chipset – Built with the reliable CP2102 chipset for stable data transmission and consistent performance in embedded and serial communication projects.
- Flexible Baud Rate Range – Supports a wide range of baud rates from 300 bps to 1.5 Mbps, meeting various data transmission needs for microcontrollers and development boards.
- Plug-and-Play USB Connectivity – Easily connects your TTL serial devices to a computer via USB. No external power supply needed. Ideal for Arduino, ESP8266, STM32, STC, and more.
- Standard Pin Configuration – Features USB Type-A male and TTL 5-pin female header (3.3V, RST, TXD, RXD, GND). Compatible with both 3.3V and 5V logic levels, ensuring broader hardware support.
- Broad OS Compatibility – Works with Windows 98SE/2000/XP/Vista/7/10/11, Mac OS 9/X, and Linux 2.4+, making it a versatile solution for developers and DIY electronics enthusiasts.
QEMU: a separate experimental desktop path
Check release and emulator compatibility first
Canonical labels its RISC-V Desktop images experimental and unsupported. The current QEMU guide says Ubuntu releases from 25.10 onward require the rva23s64 CPU profile, available with QEMU 10.1 or later. The image catalog notes that hardware which is not RVA23-ready continues to be supported by Ubuntu 24.04.5 LTS. Verify the release, QEMU version, and CPU profile before changing the image.
Recommended Free Tools
These requirements are independent of the graphical device. A VM can fail before display initialization because the emulated CPU lacks required ISA extensions, even when virtio-gpu-pci is configured correctly.
Use the documented virtual devices
Canonical’s example uses EDK II firmware, an emulated virtio-gpu-pci device, USB keyboard and mouse devices, an attached ISO, and -serial mon:stdio for serial monitoring. A representative command layout is:
qemu-system-riscv64 -machine virt -cpu rva23s64 -bios edk2.fd -device virtio-gpu-pci -device usb-kbd -device usb-mouse -serial mon:stdio -cdrom xubuntu-minimal.isoUse the firmware filename, ISO path, and other storage options required by the exact Canonical procedure. The command starts the graphical output full-screen in the documented example; remove -full-screen when using that option if you want a window instead. Keep the serial monitor enabled while testing so a blank graphical window does not hide an earlier boot failure.
Choose a realistic desktop for emulation
Canonical reports that regular GNOME Desktop can take more than 30 minutes to load under QEMU and suggests Xubuntu Minimal as more suitable for emulation. That delay is not a useful test of whether a physical board’s GPU works. For a quick diagnostic, use the lighter documented image, wait for serial progress, and treat the VM as an experimental environment rather than a supported desktop deployment.
What’s actually slowing this PC down?
Pick the symptom - the matching free tool is one click away.
QEMU symptom branches
- QEMU exits immediately: check the emulator version, firmware file, CPU profile, and command-line syntax before investigating graphics.
- Serial output stops before firmware or GRUB: verify EDK II and the virtual machine definition.
- Serial reaches login but no graphical window appears: confirm that
virtio-gpu-pci, USB input devices, and the graphical output option are present. - The GNOME session appears frozen: allow for the documented 30-plus-minute load time, or switch to Xubuntu Minimal for emulation testing.
- A 25.10-or-newer image fails on an older QEMU: upgrade to QEMU 10.1 or later for
rva23s64, or use a release whose documented requirements match your environment.
When Linux boots but the display is blank
Confirm the monitor path
After serial or SSH proves that Linux is running, check the monitor input, cable, adapter, connector, and board output described by the board guide. A serial login with no DRM or framebuffer device can be expected on a headless image. Do not interpret the absence of a desktop as evidence that the image-writing step failed.
Best Value

- 6 ft USB to TTL serial adapter (with 4 pin 0.1” pitch female header socket) connects devices with 3.3 V logic level UART signals interface to a laptop via USB port
- A genuine PL2303TA chip module is housed in USB 2.0 type A male terminal for wider compatibility and supports reliable data transfer rates
- 6 feet USB to TTL serial cable 3V3 (4 way output flying leads ) provides access to UART (transmit) Tx, (receive) Rx, VCC (5V) and GND
- PL2303 Prolific chipset on the PCB board has configurable internal EEPROM and UART signals can be individually inverted by configuring the EEPROM
- 4 pin 3.3V USB to TTL converter cord Compatible with Windows 10, 8, 8.1, 7 (32, 64-bit), 2008/XP/Vista/CE; ideal USB 2.0 debug cord for Vendor ID re-write, router, GPS, set top box, transmitter, flash firmware on hard drive, etc.
Inspect display services without replacing drivers blindly
From SSH or a text console, inspect the display manager and recent boot errors:
systemctl status display-manager
journalctl -u display-manager -b --no-pager
journalctl -b | grep -iE 'drm|gpu|display|wayland|xorg'
If the logs show that the display service starts but no supported graphics device exists, the solution is platform selection or headless access, not a generic driver installation. If the board guide explicitly documents a supported GPU and the logs show a device initialization error, use that guide’s package and firmware instructions for the exact revision.
Do not confuse slow startup with failure
QEMU GNOME startup taking more than 30 minutes is specifically documented by Canonical. Physical boards can also be slow during first boot, but a long wait without serial progress is not proof of a graphics delay. Use the console transcript to determine whether the system is still making progress.
Recovery without making the diagnosis harder
- Preserve the serial transcript, SSH logs, image filename, and firmware version.
- Undo only the last known change if the failure began immediately after it, such as reverting to the previous image or firmware through the board’s documented recovery method.
- Test one variable at a time: image, boot source, firmware, device tree, then display configuration.
- Recheck the current Canonical image catalog and board guide before downloading a replacement; image availability and release requirements change.
- For QEMU, record the complete command line and test the documented CPU profile and firmware before changing desktop packages.
- If the board is documented as headless or its GPU is unsupported, stop searching for a universal graphics-driver fix and use serial, SSH, or a supported platform instead.
Escalation reports are most useful when they include the exact board revision, release and image, firmware path, complete serial output, whether SSH works, and the display hardware. A screenshot of a blank monitor alone cannot identify which boot stage failed.
What a successful diagnosis looks like
You should be able to answer four separate questions: Did the board or VM execute the intended firmware? Did the matching device tree and kernel start? Did Ubuntu reach userspace and accept SSH or a console login? Does the exact platform provide a supported graphical device? The first three answers establish boot health; only the fourth determines whether a local Ubuntu Desktop session is realistic.
For a physical RISC-V system, a working serial or SSH session combined with a catalog entry that says headless, unsupported GPU, or incomplete PCIe support is a platform limitation, not a generic Ubuntu boot failure. For QEMU, a successful serial boot with the documented virtual GPU and input devices confirms that the experimental graphical path is configured, while the chosen release, QEMU version, and desktop environment determine how practical it will be.
Quick Recap
Product prices and availability are accurate as of the date/time indicated and are subject to change. Any price and availability information displayed on Amazon at the time of purchase will apply.
Free tools Windows power users keep installed
One-click scans. No signup required.

