
The Tool Desk
Outbyte PC Repair FREEClear out junk files and repair common Windows errorsFree Scan →Outbyte Driver Updater FREEFix the driver behind crashes, sound loss and screen glitchesFind Drivers →iTechGuides is reader-supported. When you buy through links on our site, we may earn an affiliate commission. As an Amazon Associate I earn from qualifying purchases. Learn more
You can track a satellite from a backyard without a professional observatory. The practical sequence is: choose a target, generate a pass forecast for your exact location, translate the forecast into a section of sky, and start a wide-enough video before the object appears. For the International Space Station (ISS), NASA’s location-based Spot the Station service and its smartphone astrophotography guide provide a documented starting point: record high-speed video at about 60 frames per second, begin around a 1/2000-second shutter speed, point a telescope-and-phone setup at a recognizable part of the predicted path, and start recording roughly one minute early.
Those settings and that workflow are an ISS example, not a universal recipe. Satellites differ greatly in brightness, angular speed, orbit, and pass geometry. A fresh prediction for your observing site matters more than any single camera setting.
What satellite tracking from a backyard actually involves
In this context, “tracking” has two parts. First, you predict when a satellite will be above your horizon and where it will travel. Second, you acquire the moving object quickly enough to observe or record it. A pass is not a stationary target that remains centered in an eyepiece; it is a time-limited path across the sky.
Do these 3 things before closing this tab:
1Repair Windows errors before they cause bigger problems2Scan for outdated or missing drivers - takes under a minute3Clear out junk files and repair common Windows errorsThe ISS is the clearest practical example because it is large and bright enough to produce conspicuous naked-eye passes. NASA’s Spot the Station service lists the station’s orbital inclination as 51.6 degrees and 16 orbits per day. Those figures describe the ISS only; they are not a rule for every satellite. Smaller or less reflective spacecraft may be difficult or impossible to see from a backyard, even when a prediction exists.
#1 Best Overall

- CAPTURE IMAGES AND VIDEO THROUGH YOUR SCOPE: The Celestron Smartphone Adapter connects your phone to your telescope, spotting scope, binocular, monocular & microscope! You can capture amazing images & video through the eyepiece to share with friends.
- UNIVERSAL SMARTPHONE ADAPTER: Fits a wide range of smartphones, including the latest iPhone, Samsung Galaxy, and Google Pixel models — even with most cases on.
- EASY TO USE: Simply place your phone in the adapter, center your phone’s camera over the eyepiece, and use the knobs to secure the adapter in place.
- STURDY CONSTRUCTION: Durable metal frame and polymer body for worry-free use in the field — perfect for star parties or birding events.
- COMPATIBLE EYEPIECES: Smartphone adapter fits almost any eyepiece from 29 millimeters to 45 millimeters in diameter, including telescopes equipped with 1.25” eyepieces.
You also do not need a telescope merely to see an ISS pass. A telescope or camera becomes useful when you want close-up views, individual video frames, or a record you can inspect later. The narrower the optical field of view, the harder it is to acquire a fast-moving object, so magnification and target-finding must be balanced.
Choose a target and set the observing location
Start with the ISS if you are learning
The ISS gives a beginner the best chance of a satisfying first attempt because its reflected sunlight can make it prominent against a darker sky. Once you can predict and acquire it, you can apply the same planning method to other satellites, while expecting more variation in brightness and visibility.
Use a location-specific forecast
Pass predictions depend on the observer’s latitude, longitude, date, and local horizon. Select the actual backyard, rooftop, or field where you will stand before reading a schedule. A forecast for a nearby city can differ in start time, maximum elevation, and the directions in which the object appears and disappears.
- Open NASA’s Spot the Station service when the ISS is your target, or use Heavens-Above when you want broader satellite listings, pass predictions, and sky views.
- Set the observing location using the service’s map, search, or saved-location controls.
- Choose the date and observing session, then note the next visible pass rather than relying on an old screenshot or calendar entry.
- Refresh the prediction shortly before going outside. Satellite timing and geometry are tied to the selected place and date.
NASA Spot the Station versus Heavens-Above
| Planning need | NASA Spot the Station | Heavens-Above |
|---|---|---|
| Primary target | International Space Station sighting opportunities | Broader satellite listings and pass planning |
| Location setup | Location-specific ISS opportunities and live tracking | Location-specific predictions and sky views |
| Forecast information | Start time, visibility duration, maximum height, and appearance/disappearance directions | Pass predictions, sky charts, and satellite listings |
| Best fit | ISS alerts and a straightforward sighting plan | Exploring targets beyond the ISS or using a chart-based view |
These services serve different planning purposes. The available information does not establish that one is more accurate than the other, so use the service that covers your target and gives you a usable view of the pass.
Read the pass forecast like an observing plan
Start time and visibility duration
The start time is when the satellite should become visible from your selected location under the forecast’s conditions. Visibility duration tells you how long the listed opportunity lasts. Treat the start as a window, not a cue to begin setting up: be ready several minutes beforehand and record early.
Rank #2

- Capture What You See Through Your Scope — TRIDAPTOR helps connect your smartphone to most spotting scope, telescope, monocular or microscope eyepieces, so you can capture and share birds, wildlife, targets, celestial objects and distant scenes.
- Precise 3-Axis Alignment for Cleaner Shots (Patent Pending) — This 3-axis digiscoping adapter lets you adjust your phone left/right, up/down and forward/back to line up the camera with the eyepiece. The Z-axis adjustment helps reach the right eye relief, reducing dark edges or vignetting for clearer photos and videos.
- All-Metal Build, No Phone Sagging — Rigid aluminum construction helps keep your phone steady and aligned, unlike flimsy plastic telescope phone adapters that can flex, tilt or lose position. Rubber pads help protect your phone and eyepiece from scratches.
- Shoot Without Touching the Scope — Use the included Bluetooth remote with this phone scope adapter to take photos or videos without tapping your phone and shaking the image, making it easier to capture sharper shots and share your view.
- Fits Most Phones & Many Standard Eyepieces — This smart phone adapter for telescope fits most iPhone and Android smartphones from 2.36"–3.44" wide / 60–87.5 mm. It also fits eyepieces with an outer diameter of 0.86"–2.4" / 22–61 mm.
Maximum elevation
Maximum height is elevation. The horizon is 0 degrees; directly overhead is 90 degrees. A higher maximum elevation generally gives you a larger, more comfortable arc of sky to work with, while a low pass can be hidden by trees, buildings, or haze. Compare the forecast’s elevation with the unobstructed part of your own horizon.
Appearance and disappearance directions
The forecast states where the ISS appears and where it disappears. Use those directions to identify a starting sector before the pass. A compass, a phone’s direction indicator, or recognizable landmarks can help you orient the telescope or camera, but do not wait until the object is already moving.
Sunlit object, dark background
NASA says ISS sightings commonly occur within a few hours before sunrise or after sunset. At those times, sunlight can still illuminate the station while the sky where you are standing is dark enough to provide contrast. This is why a pass that occurs in full daylight may be far less useful visually than a similarly high pass near dawn or dusk.
Pick an observing and capture setup
Naked-eye observation
For an ISS pass, begin with your eyes. This lets you confirm the timing and direction before adding a narrow telescope field of view. A bright, steadily moving point that follows the predicted arc is a useful visual confirmation, although the forecast remains the authority on where and when to look.
Telescope with a smartphone at the eyepiece
NASA’s documented example uses a telescope and phone. The phone records video through the eyepiece while you aim the telescope manually along the predicted path. A smartphone telescope eyepiece adapter is optional: it can hold the phone more consistently, but you must verify that its clamp fits your phone and that its optical opening aligns with the eyepiece. The source material does not name or require a particular adapter.
Rank #3

- Capture the World :This spotting scope phone adapter allows you to easily capture the beauty of the world through your screen. Connecting your phone to telescopes, spotting scopes, binoculars, monoculars and microscopes, you can capture wonderful images and videos through the eyepiece and share them with your friends.
- Easy Setup:Put your phone into the spotting scope phone mount, precisely align the camera with the eyepiece, and then turn the knob, the adapter will hold your phone firmly in place with just these three steps. The whole process is easy and convenient, no need for complicated adjustments, even a novice can get started quickly.
- Regular Size:This spotting scope phone adapter is extremely compatible with almost any eyepiece on the market with a diameter between 28mm and 47mm. Whether it's a normal eyepiece you use every day or a specialized eyepiece with special features, as long as the diameter is within this range, the adapter can be accurately mated and easily assembled.
- Durable Material :The main body is made of zinc alloy (more durable than aluminum alloy) with grooved metal case. The phone clip is made of high-strength PA plastic, and the metal body of the adapter is durable enough to be used in the field and in harsh weather conditions.
- Fits most smartphones:Ranging from 2.13 inches to 3.54 inches (54-90 mm). Fits almost all smartphones on the market iPhone 16Pro Max, 16 Pro, 15, 15 mini, 14 Pro Max, 14 Pro,14, SE, Xs, Xr, X, S20, S20+, S20FE, S10, S10+, S10E, S8, S7, S6, S5, S4, Note20, Note20 Ultra, Note10+, Note 10, Note 9, Note 6, Note 5, Note 4, A51, A71, A70 and more.
Dedicated camera and lens
A dedicated camera can record high-speed video or a burst sequence without being attached to an eyepiece. Its usefulness depends on whether its field of view includes the predicted path and whether it can expose the bright ISS without excessive blur. A wider lens is easier for acquisition; a telescope gives more scale but makes aiming more demanding.
Computerized or motorized mount
No specific tracking mount is required by NASA’s ISS example. A mount that can follow a fast object may be convenient, but it also introduces setup, alignment, and compatibility questions. For a first attempt, a stable manual setup with a sufficiently wide field can be simpler than adding a system that you have not practiced before.
| Approach | Acquisition challenge | Useful strength | What to verify |
|---|---|---|---|
| Eyes only | Low; broad field of view | Confirms the pass and path | Visibility, darkness, and unobstructed sky |
| Phone at telescope eyepiece | Moderate to high; narrow field and moving target | Documented way to capture ISS video | Phone focus, eyepiece alignment, storage, and adapter fit if used |
| Dedicated camera with lens | Depends on lens field of view | High-speed recording without eyepiece alignment | Video frame rate, shutter control, focus, and exposure range |
| Camera on a tracking mount | Requires mount setup and alignment | Potentially steadier framing during a pass | Mount compatibility and whether it can acquire the predicted path |
Prepare the camera and telescope before the pass
Practice the recording mode
NASA’s 2023 A Guide to Smartphone Astrophotography recommends becoming familiar with the camera’s video mode and trying a high-speed burst or video at about 60 frames per second. Practice in daylight or on a distant terrestrial object so you know how to start recording, stop recording, change exposure, and review clips without searching through menus during the pass.
Use NASA’s ISS settings as a starting point
NASA says, “You will need to take a high-speed burst at about 60 frames per second (fps) and see what kinds of individual frame settings you need.” For the bright ISS, the guide says that starting at a 1/2000-second shutter speed is a good way to minimize motion blur. These are starting points for the guide’s ISS example. They are not guaranteed settings for every camera, telescope, phone, satellite, or sky condition.
If the first clip is too dark, too bright, or still blurred, change one control at a time on a later pass. Keep the frame rate and shutter choice tied to what your camera can actually record; a menu value that the device silently changes is not the setting you intended.
Rank #4
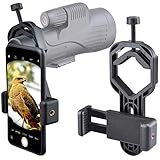
- For phone width range: 55~85 mm(2.16"~3.35"). Fit iPhone X/8/8 Plus/7/7 Plus/6/6s/6 Plus/5/5s - Fit Samsung Galaxy S9/S8/S7/S6/S6/S5 Note 9/8/7/6/5 - Fit Sony, LG, HTC, and other brands.
- With this universal smartphone telescope adapter, you can connect your phone to a telescope or microscope to take images of the moon and cells, or to a spotting scope to take images of birds and other objects.
- Smartphone mount compliable with microscope, telescope, binoculars, monocular, night vision spotting scope. Fit eyepiece diameter 22mm~ 44mm(0.86"-1.73").
- Optimized weight, lighter and reduce the pressure on the telescope eyepiece, weight: 75 g / 2.65 oz.The body is made of high-strength PA plastic. The surface of the mobile phone and eyepiece has a soft EVA pad to avoid scratching and damage.
- Warranty service:If you have questions about installation and not using, please contact us in time, we will reply and deal with your problems as soon as possible.
Set focus and framing in advance
Focus the camera before the pass and avoid relying on autofocus to lock onto a small moving point. Through an eyepiece, center a distant object and check that the phone sees the full usable image. Leave enough surrounding sky that a small aiming error does not put the ISS outside the frame.
Make the setup physically ready
- Charge the phone or camera and clear enough storage for a continuous clip.
- Secure the telescope, tripod, or camera so touching the controls does not shift the view.
- Install the eyepiece and phone adapter, if used, before the forecast start time.
- Identify the appearance direction and an unobstructed landmark or patch of sky.
- Keep a dim red light or screen brightness low enough that you can still see the sky.
Step-by-step: capture an ISS pass
- Choose the site. Stand where the forecast’s appearance and disappearance directions are visible. Move away from a wall, tree, or roofline that blocks the predicted arc.
- Generate a fresh forecast. Select your exact location and confirm the date, start time, visibility duration, maximum elevation, and directions.
- Translate the chart into a starting aim. Pick a recognizable area along the path, not necessarily the horizon point. A higher, open section can be easier to work with if your equipment has a narrow field.
- Set the recording mode. Use a high-speed burst or video near 60 fps if your camera supports it. For the bright ISS, begin around 1/2000 second as NASA’s guide suggests, then check what your camera actually records.
- Mount and focus. Attach the phone to the eyepiece if that is your method, confirm alignment, and focus before the predicted appearance.
- Start early. Begin recording about one minute before the predicted appearance. NASA’s example uses this lead time so the observer can search the starting area without losing the first seconds of the pass.
- Acquire broadly, then follow. Look for the moving point in the wider surrounding sky or eyepiece view. Once it enters the frame, move the telescope or camera smoothly along the predicted arc rather than making abrupt corrections.
- Keep recording through the useful arc. Continue until the object reaches the forecast disappearance direction or leaves the practical field of view. Do not stop after the first glimpse.
- Save the original clip. Review individual frames later, when you can distinguish a real satellite trail or resolved shape from camera shake, aircraft lights, or a nearby bright star.
How to follow a fast-moving object manually
Manual acquisition works best when you treat the forecast as a route, not a single point. First identify the starting direction and elevation. Then use the maximum-elevation value to anticipate whether the path will climb toward overhead or remain low. Keep both eyes available when possible: one can watch the wider sky while the other checks the eyepiece.
At high magnification, the ISS may cross the field faster than you expect. If you lose it, do not swing randomly. Return to the next recognizable section of the predicted path and reacquire there. A wider eyepiece or camera field can produce fewer close-up pixels but may give you a much better chance of recording the pass.
Recording early is especially important with a phone at an eyepiece. The one-minute lead in NASA’s example is a practical buffer for finding the target; it is not a measured guarantee that every observer will acquire the station.
Recommended Free Tools
Troubleshoot the most common failures
| Symptom | Likely cause | Next attempt |
|---|---|---|
| No satellite appears at the forecast time | Wrong observing location, stale prediction, blocked horizon, or a pass too faint for the conditions | Recheck the selected location and date, refresh the forecast, and compare the appearance direction with your actual horizon. |
| You see the ISS but the camera records empty sky | Field of view is too narrow or the starting aim is off | Use a wider view, aim at a recognizable point along the path, and start recording earlier. |
| The object is a bright blur | Shutter is too slow, focus is poor, or the telescope is being moved abruptly | For an ISS attempt, start near NASA’s 1/2000-second example, refocus, and make smoother corrections. |
| The clip is dark | The ISS is not equally bright in every pass, or the chosen shutter and exposure combination admits too little light | Review the clip and adjust exposure controls for the next pass while retaining a frame rate your camera can sustain. |
| The target leaves the frame immediately | Magnification is high or the camera is pointed too close to the path edge | Leave more sky around the predicted route or use a lower-magnification optical view. |
| The phone image shows a black crescent or heavy vignetting | The phone lens is not centered over the eyepiece | Realign the phone, secure the adapter if used, and check the full image before recording. |
What changes when you track satellites other than the ISS?
The planning framework remains useful: select the satellite, set the observing location, read the pass geometry, and prepare before the start time. The capture assumptions do not automatically transfer. A smaller satellite may be dimmer, a different orbit may produce a lower pass, and reflected light can change as the spacecraft’s orientation changes.
Best Value

- Capture What You See Through Your Scope — TRIDAPTOR turns your spotting scope, telescope, monocular or microscope into a smartphone viewing and camera setup. View through your phone screen instead of staying pressed against the eyepiece, then capture and share birds, wildlife, targets, celestial objects and distant views.
- Precise 3-Axis Alignment for Cleaner Shots (Patent Pending) — This 3-axis digiscoping adapter lets you adjust your phone left/right, up/down and forward/back to line up the camera with the eyepiece. The Z-axis adjustment helps reach the right eye relief, reducing dark edges or vignetting for clearer photos and videos.
- All-Metal Build, No Phone Sagging — Rigid aluminum construction helps keep your phone steady and aligned, unlike flimsy plastic telescope phone adapters that can flex, tilt or lose position. Rubber pads help protect your phone and eyepiece from scratches.
- One Adapter for Most Phones — The telescope phone mount fits most iPhone and Android smartphones from 2.36"–3.44" wide / 60–87.5 mm. No need to buy a new adapter every time you upgrade your phone or scope.
- Check Eyepiece Size Before Ordering — This smart phone adapter fits many spotting scope eyepieces within 0.86"–2.4" / 22-61 mm outer diameter. Please measure your eyepiece before purchase. Compatible with most Vortex, Swarovski, Celestron, Nikon, Zeiss, Kowa and Leupold eyepieces.
Do not infer that every listed satellite will be naked-eye visible, that every pass will occur near dawn or dusk, or that 60 fps and 1/2000 second will suit it. The documented high-speed settings are tied to NASA’s bright-ISS example. For another target, use the forecast to decide whether a camera with a wide field is more realistic than a telescope at high magnification.
Safety and observing etiquette
Never point a telescope or an unfiltered camera at the Sun. ISS opportunities near sunrise and sunset refer to reflected sunlight on the station while your local sky is dark; they do not make direct solar viewing safe. Keep the optical tube capped until you are oriented away from the Sun, and avoid standing where cables or a tripod can become a trip hazard in the dark.
Limits of the documented method
The NASA material establishes a practical ISS capture example, not a universal equipment test. It does not establish a required telescope aperture, a guaranteed success rate, a particular camera model, or a requirement for a computerized mount. A phone at a telescope eyepiece is one workable approach; dedicated cameras and mounts must be judged by their field of view, video capability, compatibility, and ability to acquire the predicted path.
Crashes, No Sound, or Screen Glitches?
Random freezes, missing sound and display glitches usually trace back to one bad driver. Find and replace yours safely.Free scan · under a minutePC Slower Than It Used to Be?
A free scan shows the junk files, broken settings and background clutter dragging Windows down - then fixes them in one click.Free scan · Windows 10 & 11The most reliable habit is therefore procedural: use a current, location-specific forecast; understand the elevation and directions; favor a sunlit pass against a darker sky; prepare and focus before the window; and record early enough to search. Improve the setup one variable at a time instead of treating an ISS example as a promise for every satellite.
Quick Recap
Product prices and availability are accurate as of the date/time indicated and are subject to change. Any price and availability information displayed on Amazon at the time of purchase will apply.

