
iTechGuides is reader-supported. When you buy through links on our site, we may earn an affiliate commission. As an Amazon Associate I earn from qualifying purchases. Learn more
Start by identifying the blade section you are sharpening. Leatherman’s guidance is different for plain and serrated edges: a plain-edge section uses a 32° included angle (16° per side), while a serrated section uses a 20° one-sided angle. Serrations must be sharpened with a tool that follows their curved scallops, and only from the edged side. Working the flat side can wear the serrations away.
Before choosing equipment, note the exact Leatherman model, blade steel, and any chips or breaks. A suitable home sharpening system can restore a normally dull plain edge, but severe damage or an eligible MagnaCut model may make Leatherman’s service the safer option.
Identify the edge before you sharpen
Open the knife in good light and inspect the cutting edge from heel to tip. Leatherman tools can have a completely plain edge, a completely serrated edge, or a combination blade with both sections. Treat each section according to its geometry rather than sharpening the whole blade with one tool.
Quick wins for a faster PC:
Fix the driver behind crashes, sound loss and screen glitchesFind Drivers →Clear out junk files and repair common Windows errorsFree Scan →Plain edge
A plain edge looks like one continuous, straight cutting line. Leatherman states that its standard sharpening angle for plain-edge blade sections is 32° included, or 16° per side. This is the reference angle to maintain when a sharpening system contacts each face of the edge.
#1 Best Overall
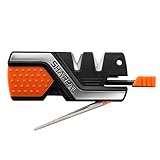
- 6 FUNCTION: 1. No. 1 V-Notch slot (Coarse CARBIDE)-Quickly set a new edge; 2. No. 2 (Fine CERAMIC)-Hone for a smooth finished edge; 3. Tapered diamond rod (Medium 400 Grit) for serrations & gut hooks; 4. Diamond rod with groove for fishhooks; 5. Ferro rod; 6. High-pitched emergency whistle
- PORTABLE EDC FIELD TACTICAL KNIFE SHARPENER: A portable EDC field tactical knife sharpener with built-in lanyard hole for hunting, camping, outdoor survival use. It also works well for your kitchen chef knife
- DURABLE ABRASIVES & SUPERIOR SHARPENING PERFORMANCE: The CARBIDE and CERAMIC abrasives pass 10,000 times field use test. NEVER WEARS OUT. Preset optimal sharpening angle
- VERSATILE & EASY USE: This pocket knife sharpener not only quickly sharpens very dull or damaged blades, but also hone for razor sharp; Not only for straight edge but also serrated knife
- COMPACT DESIGN WITH LANYARD HOLE: Compact body with built-in lanyard hole fits conveniently in your pocket, hunting pack, or tool box for easy portability and accessibility wherever you go
Serrated edge
A serrated edge has repeated scallops or teeth. Leatherman specifies a 20° one-sided angle for serrated sections. The bevel is normally visible on the side with the individual scallops; the opposite side is comparatively flat. Leatherman’s maintenance guidance says: “Sharpen serrated blades only on the edged side.” Sharpening the flat or back side removes material from the teeth and can permanently reduce the serration pattern.
Combination blades
If the blade has a plain section and a serrated section, mark the transition mentally before starting. Use a plain-edge method on the straight portion and a serration-compatible rod on each scallop. Do not drag a flat stone or a plain-edge pull-through across the serrations simply because it worked on the adjacent section.
Check the model and steel
Record the model name and, if available, the steel designation. This matters because Leatherman’s free sharpening service is limited to listed MagnaCut models and to non-serrated edge portions. A model that does not meet those conditions may still be serviceable, but the standard free-service terms do not establish eligibility.
Recommended Free Tools
Prepare a safe sharpening setup
Sharpening removes metal and creates a very sharp edge. The following precautions are conservative handling practices, not a claim that Leatherman tested a particular home procedure.
- Work on a stable, well-lit surface where the tool cannot slide.
- Secure the multi-tool so the blade cannot fold or swing toward your supporting hand. Keep fingers out of the blade’s path and out of the direction in which the abrasive will travel.
- Keep the blade locked open when the model has a lock, and follow the model’s normal locking and handling instructions.
- Clear the bench of loose objects that could catch the edge or cause the tool to move.
- Use eye protection when an abrasive system’s instructions call for it, and keep metal filings away from food-preparation surfaces.
- Clean visible dirt, oil, and grit from the blade so you can see the bevel and avoid embedding debris in the abrasive.
Do not run a finger along the edge to judge sharpness. Use a visual inspection and a controlled cutting test on an expendable material only after the blade has been cleaned and the tool is secure.
Rank #2

- ONE OF OUR BEST: A classic, designed and assembled with premium materials; The Wingman is your go-to tool for projects around the house, on the job or at the campsite
- 14 TOOLS IN 1: Equipped with 14 tools to handle almost anything: knife, pliers, screwdrivers, wire cutters, a wire stripper, scissors, a package opener, bottle and can openers, a file and a ruler
- OUR GUARANTEE: We’re proud to stand behind every product that leaves our factory in Portland, Oregon; That’s why we offer our 25-year warranty, so you can be confident your Leatherman lasts a lifetime
- ONE-HAND OPENING: Open all the tools with one hand, even the ones that aren't accessible from the outside; And with a locking blade, you can cut with confidence
- ALWAYS ON HAND: With its compact size, lightweight design and removable pocket clip, your Wingman is always within reach and ready to work
Choose equipment that matches the blade
For a plain edge
Leatherman says plain-edge blades may be sharpened with standard equipment such as a whetstone, a rod, or a sharpening kit. Choose a system that lets you hold the 16°-per-side angle consistently. A guided kit can make angle control easier for a beginner; a whetstone gives more freedom but requires you to control the blade yourself; a rod can be useful when its diameter and instructions suit the bevel.
Follow the abrasive manufacturer’s directions for preparation, lubrication, cleaning, and any pass limits. The Leatherman guidance establishes the angle, not a universal grit sequence, pressure value, or number of strokes. Those details vary by abrasive and by how much metal must be removed.
For serrations
Use a tapered rod or another system specifically designed to fit serrated scallops. The working surface must preserve the concave shape instead of flattening the teeth. Leatherman identifies the diamond-coated rod on its Blade Sharpener as the element for serrated blades, but any product you use should be operated according to its own instructions.
A flat stone, a broad ceramic surface, or a plain-edge pull-through is not interchangeable with a serration tool. Even if one appears to make the teeth shiny, it can change their radius and reduce their cutting geometry.
Sharpening a plain-edge Leatherman blade
The procedure below describes angle control and safe handling. It intentionally does not prescribe a fixed stroke count or pressure because those depend on the abrasive and the blade’s condition.
Rank #3

- COMPLETE KNIFE SHARPENER: For field, home, or shop use designed for sportsmen who need a complete, compact field sharpening solution. The diamond plates can be easily removed to expose a broad head wrench to speed sharpening in the field.
- ALL THE TOOLS & ACCESSORIES: Includes diamond plates, ceramic rods, leather strop, and sharpening guides. The ceramic honing rod rotates to expose coarse & fine honing surfaces, as well as a grooved surface for sharpening fish hooks.
- CONSISTENT, COMPACT & DURABLE: Includes a 20-25-degree angle to customize your sharpening with 5 abrasives. Maintain a sharp edge while on the go, in the woods, hiking, or camping. All elements are self-contained & require no tools, assembly, or set-up
- 3-YEAR WARRANTY: All Work Sharp sharpeners come with a comprehensive 3-year warranty. Each knife & tool sharpener is meticulously designed and quality-checked at our Oregon facility. We proudly stand behind our products.
- DESIGNED, ENGINEERED, & CALIBRATED IN OREGON: We design, engineer, and calibrate our sharpening machines all under one roof in Ashland, Oregon & ensure our products are sourced from the highest caliber manufacturers, both in the USA and globally.
- Secure the open tool. Clamp or otherwise stabilize the handle so the edge cannot move unexpectedly. Position the blade so you can see the bevel without placing a hand in front of it.
- Set the reference angle. Aim for 16° between the abrasive and each side of the blade, producing Leatherman’s 32° included angle. If your kit has an angle guide, set it to the manufacturer’s equivalent setting. If it does not, use the existing bevel as your visual reference rather than forcing a new, steeper angle.
- Start with the least aggressive suitable surface. Use the abrasive recommended by your system for a dull but undamaged edge. A coarse surface removes metal faster; it also leaves deeper scratches, so do not use it longer than necessary.
- Move the blade with the edge leading or trailing exactly as the abrasive maker specifies. Keep the angle, contact path, and motion consistent from heel toward tip. Keep the blade controlled at the end of each pass so the tip does not dig into the abrasive or swing off the bench.
- Work both sides evenly. Alternate faces or follow the sequence provided with your kit. The objective is to re-form the existing bevel at the same angle on each side, not to remove an arbitrary amount of steel.
- Inspect frequently. Stop to wipe away filings and examine the bevel under good light. Continue only while the dull portion is being removed and the edge remains straight. If you expose a chip or a bent section that requires substantial metal removal, reassess whether home sharpening is appropriate.
- Refine the edge. Move to the finer surface specified by your system once the damaged or blunt portion has been corrected. Keep the same 16°-per-side reference and use light, controlled contact rather than forcing the blade into the abrasive.
- Clean and test safely. Remove abrasive residue from the blade and tool. Test the edge on a controlled, nonvaluable material while holding the tool securely; never test by sliding a finger along the cutting edge.
After sharpening, close or store the multi-tool according to its design, keeping the blade away from loose items that could strike the edge. If the edge is still uneven, return to angle control and inspect for damage instead of simply applying more pressure.
The Tool Desk
Outbyte Driver Updater FREEScan for outdated or missing drivers - takes under a minuteDriver Scan →Outbyte PC Repair FREEClear out junk files and repair common Windows errorsFree Scan →Sharpening a serrated Leatherman blade
Serrations require patience because each scallop is a separate curved cutting area. Leatherman’s specification is a 20° one-sided angle, and its maintenance instruction is to sharpen only on the edged side.
- Identify the beveled side. Hold the blade under light and locate the side where the scallops meet the bevel. The opposite face should remain flat; do not use it as the sharpening surface.
- Select a tapered serration rod. Choose a diameter that fits the scallop without forcing the rod against the shoulders of the tooth. A diamond-coated rod is the element Leatherman designates for serrated blades on its Blade Sharpener.
- Secure the tool and the rod. Keep the blade from folding or shifting. Keep your free hand behind the rod and away from the edge and its travel direction.
- Match the rod to one scallop. Place it in the concave portion and align it to the existing bevel, approximately 20° on the edged side. Do not lay the rod across several teeth at once.
- Follow the curve. Use the motion and contact direction specified by the rod’s maker, allowing the abrasive to follow the scallop rather than cutting a new flat. Keep the rod centered so the tooth shoulders are not rounded over.
- Repeat for each scallop. Move systematically from one end of the serrated section to the other. Scallops may differ in size, so adjust the rod position to maintain contact with the curved surface.
- Leave the flat side alone. Do not remove the small burr or residue by grinding the back face. Any cleanup should follow the serration system’s instructions and must not abrade away the teeth.
- Inspect before testing. Wipe away filings and check that the scallops retain their original shape. If a tooth is broken, flattened, or missing, stop rather than trying to make neighboring teeth match it by eye.
On a combination blade, mask your attention to the serrated section while working. A few accidental passes on the flat side can change the profile that makes the teeth cut.
Using the Leatherman Blade Sharpener
Leatherman lists an optional Blade Sharpener with carbide, ceramic, and diamond-coated sharpening elements. It identifies the diamond-coated rod for serrated blades and says the product was made in collaboration with Work Sharp. The U.S. product page showed the sharpener as unavailable when checked on October 13, 2026, so availability may have changed by the time you read this.
The accessory does not remove the need to identify the edge type. Use the element and angle appropriate to the section you are sharpening, and follow the sharpener’s own instructions for setup and motion. The carbide and ceramic elements are not a substitute for the tapered diamond rod when the blade has scallops.
What’s actually slowing this PC down?
Pick the symptom - the matching free tool is one click away.
Rank #4
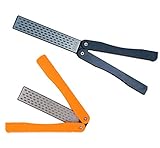
- The garden tool sharpener is made of diamond whetstone for durable use, lightweight ABS handle for comfort; Honeycomb surface can sharpen garden implements faster than conventional stones
- The diamond sharpening stone features double-sides diamond design, coarse 400 grit for quick edge setting, extra fine 600 grit for honing; No oil is needed, just sharpen dry or with water
- Pocket knife sharpener lightweight, compact, convenient, perfectly fits carring around for outdoor activities. The fan-shaped and folding construction provides great protection to the stones, preventing from damage ,Portable folding design fits in the pocket or tool bag, convenient to store and carry around
- Work sharp knife sharpener due to portable design and lightweight, this camp sharpening stone fits for outdoor activities, camping, garden, kitchen, sports or industries
- Knife Sharpener SIZE: diamond whetstone: 4 x 0.8 x 0.2 inch; folding length: 5 inch; spread length: 8.9 inch .Package includes: Black/ Orange(2pcs)
Decide between home sharpening and manufacturer service
Use the following decision points before putting an abrasive on the blade:
- Normally dull, plain edge, no structural damage: home sharpening is consistent with Leatherman’s statement that standard equipment such as whetstones, rods, or kits may be used.
- Serrated or combination edge: proceed at home only if you have a system that follows the scallops and can be used on the edged side at the specified one-sided angle.
- Chipped or broken blade: do not assume ordinary sharpening will remove the problem safely. Leatherman says chipped or broken blades are assessed case by case and may be excluded from its standard service.
- Eligible MagnaCut model: check the current service terms before sharpening. Sending the tool may avoid experimenting on a blade covered by the listed service.
- No suitable angle-controlled or serration-compatible equipment: waiting for an appropriate system or contacting service is safer than improvising with a flat abrasive.
| Route | Best fit | Important limitation |
|---|---|---|
| Home sharpening | Undamaged plain edges, or serrations when you have a compatible tapered system | You must control the angle and protect the serration curvature yourself |
| Leatherman service | Listed MagnaCut models requiring sharpening of non-serrated edge portions | Chipped or broken blades may be excluded; serrated portions are not covered by the free service |
The available sources do not establish that either route is faster or produces a better result for every individual tool. Choose based on eligibility, damage, edge geometry, your equipment, and your confidence in controlling the blade.
Independent reader supportYour contribution helps us test, update, and keep practical guides available for everyone.Leatherman’s free sharpening service
Leatherman’s service page lists ARC, Blazer, Glider, Pioneer, Rustle, Trac, and Wave Alpha as eligible MagnaCut models. The free service is limited to non-serrated edge portions. This is a model-and-steel requirement, not a blanket offer for every Leatherman knife.
What the service terms say
- Eligibility is tied to MagnaCut blades and the listed models.
- Non-serrated portions are the parts covered by the free sharpening service.
- Chipped or broken blades are assessed case by case and may be excluded.
- Leatherman says to allow seven business days for assessment and processing after receipt and check-in.
- The customer-service FAQ states that return shipping is covered.
- Readers outside the United States are directed to contact their local distributor.
Service terms and product availability can change. The details above were current when checked on October 13, 2026; verify the live service page and FAQ before sending a tool.
Prepare a service submission
- Confirm the model name and whether the blade is MagnaCut.
- Photograph or note any chips, breaks, or serrated sections so the condition is clear before shipping.
- Review the current service page for submission instructions and exclusions.
- Package the multi-tool so the blade cannot open or damage the package. Follow any carrier rules that apply to sharp tools.
- Allow the stated seven business days for assessment and processing after Leatherman receives and checks in the tool, then account for transit time.
If you are outside the United States, contact the local distributor as Leatherman directs rather than assuming the U.S. process or shipping coverage applies.
Best Value

- A TOOL BOX IN YOUR POCKET: A small but versatile and high-functional multitool with the essentials and more; Put it to the test under the hood, at the campground or around the house
- 14 TOOLS IN 1: Needlenose and regular pliers, hard and regular wire cutters, wire stripper, knife, package opener, wood/metal file, can and bottle openers, ruler, Phillips screwdrivers and more
- OUR GUARANTEE: We’re proud to stand behind every product that leaves our factory in Portland, Oregon; That’s why we offer our 25-year warranty, so you can be confident your Leatherman lasts a lifetime
- ONE-HAND ACCESS: With the Rev's outside-accessible tools, you can get the job done quickly and effortlessly; With all-locking blades, you can cut with confidence
- ALWAYS ready: With its compact size, lightweight design and removable pocket clip, your Rev is within reach and ready to work
Common mistakes and how to correct them
Using one angle for every edge
A 16°-per-side reference applies to plain-edge sections. Serrated sections use a 20° one-sided specification. Recheck the section before each change of tool.
Sharpening the back of a serration
This is the most damaging geometry error. Stop immediately, inspect the tooth profile, and continue only from the beveled side with a rod that fits the scallop. If the teeth are visibly worn away, a general home pass cannot restore missing metal.
Flattening the scallops
A broad abrasive can create a new flat across several teeth. Replace it with a tapered serration tool and work one concavity at a time.
Chasing a chip with excessive removal
A chip or broken tip may require removing much more steel than ordinary dullness. Leatherman’s service terms say these cases are assessed individually, so stop and check service eligibility rather than assuming extra pressure will solve the problem.
Testing with a finger
Never slide skin along the edge. Clean the blade, inspect it visually, and use a controlled cutting test only with the tool secured and pointed away from your hands.
Aftercare
Wipe all abrasive residue from the blade and handle before folding or storing the tool. Keep the multi-tool clean and dry, and inspect the edge periodically for new chips, flattened teeth, or corrosion. When the blade becomes dull again, repeat the method appropriate to its edge type instead of switching to a more aggressive tool without checking the bevel.
For plain edges, preserve the 16°-per-side reference. For serrations, preserve the 20° one-sided geometry and the original scallop shape. Those two decisions prevent most avoidable damage when maintaining a Leatherman blade.
Quick Recap
Product prices and availability are accurate as of the date/time indicated and are subject to change. Any price and availability information displayed on Amazon at the time of purchase will apply.

