
Free tools Windows power users keep installed
One-click scans. No signup required.
iTechGuides is reader-supported. When you buy through links on our site, we may earn an affiliate commission. As an Amazon Associate I earn from qualifying purchases. Learn more
The reliable way to set up Starlink is to test the dish in a temporary location, use the Starlink app to verify an unobstructed view of the sky, and optimize indoor Wi-Fi before installing anything permanently. Put the router upright, elevated and in an open, central position; use the app’s signal and speed diagnostics to find weak rooms; then add a mesh node or wired connection only where the measurements show a need.
What you need before starting
Have the Starlink dish (the terminal), router, power supply, Starlink cables, a phone or tablet with the Starlink app, and a safe temporary place for the dish. You also need access to an electrical outlet and enough cable slack to place the router where it can serve the home effectively.
- A clear test location: Choose an area where the dish can see as much sky as possible without putting anyone at risk. Do not begin by drilling, trenching or climbing onto a roof.
- The Starlink app: Install the current app on your phone or tablet. It provides the obstruction check, alignment guidance, network map, device signal information and speed diagnostics.
- A safe power path: Keep power components dry and protected from traffic, standing water and accidental pulling.
- A plan for the final installation: If the temporary test works, you can later choose a compatible roof, pole or wall mount and a safe cable route. Mount compatibility depends on the dish generation and the surface.
Set up Starlink in a temporary location first
A temporary setup prevents an expensive mistake. The dish may appear to have a good view from the ground but still be blocked by a roof edge, chimney, tree branch or nearby structure. Test the complete system before making the installation permanent.
Recommended Free Tools
- Place the dish on a stable surface with the broadest practical view of the sky. Keep it away from objects that could fall onto it or obstruct its movement.
- Connect the dish cable to the router or power equipment supplied with your Starlink hardware.
- Connect the power supply and wait for the equipment to start.
- Open the Starlink app and tap Start Setup.
- Follow the app’s prompts to join the Starlink Wi-Fi network and complete the initial configuration.
- Use the obstruction and alignment tools before deciding where the dish will stay.
- Open a few websites and run a speed test only after the app reports that the system is connected. Confirm that the connection remains usable for several minutes rather than relying on a single momentary result.
Do not permanently mount the dish until the app confirms that the location is suitable and the connection is stable. Starlink’s installation guidance identifies a clear view of the sky as the basis for uninterrupted service, while the app’s obstruction tool is the practical site check for your property.
#1 Best Overall
![LUCMO Multi Ports Starlink Ethernet Adapter for Starlink Actuated Gen 2 | Starlink Wired External Network, 2-Port Starlink Ethernet Adapter 1 to 2 [2 Devices Networked Simultaneously] Up to 1 Gbps](https://m.media-amazon.com/images/I/41lWcIMDS1L._SL160_.jpg)
- Compatibility: Our 2 Ports Starlink Ethernet Adapter is specially designed for the Starlink Standard Actuated Generation 2, with optimal connection guaranteed.
- Gigabit Ethernet Support: The adapter features two Gigabit Ethernet (RJ45) ports, allowing you to connect two wired devices directly to your Starlink system, taking full advantage of Starlink’s high-speed internet capabilities.
- Convenience: Just plug in to use, easy to install and no complicated setting up necessary.
- Seamless Performance: Ensures minimal lag and uninterrupted connectivity for demanding tasks, whether for work, entertainment, or smart home management.
- Secure Cable Connections: Features well-designed ports that provide a snug fit, reducing the risk of disconnection and maintaining a stable connection at all times.
Choose the best dish location
Use the obstruction tool as the deciding test
In the Starlink app, open the obstruction or obstruction-view tool and scan the sky from the proposed dish position. The tool is more useful than judging the site by eye because low branches, roof structures and objects outside your immediate line of sight can still interrupt service.
Relocate the dish if the scan shows blocked sections. A location that is slightly farther from the house but has a much clearer sky view can be better than a convenient location beside a wall or under a tree. Trees change with the seasons, and branches can move into the path during wind, so leave practical clearance rather than positioning the terminal immediately beside foliage.
Account for the dish’s viewing requirements
Starlink publishes a 110-degree field of view for the listed terminal specification. This is a model-specific figure, not a promise that every installation will work with the same amount of visible sky. The obstruction scan should take priority over a specification number when selecting your site.
Quick wins for a faster PC:
Repair Windows errors before they cause bigger problemsFix Now →Fix the driver behind crashes, sound loss and screen glitchesFind Drivers →Clear out junk files and repair common Windows errorsFree Scan →Decide whether temporary or permanent placement is appropriate
A temporary ground or stand placement may be sufficient for a short-term installation, but it is more exposed to impact, theft, animals and changing obstructions. A permanent roof, pole or wall mount can raise the dish above nearby obstacles. Starlink lists mounts as accessories intended to avoid obstructions; select one designed for your dish generation and installation surface.
Install the router for the strongest indoor Wi-Fi
Router placement determines how much of your home receives a usable signal after the dish has a good connection. Starlink describes router placement as critical to a successful setup and strong Wi-Fi connection.
Rank #2

- ⚠️ COMPATIBILITY WARNING: Designed EXCLUSIVELY for Starlink Standard Actuated Gen 2. ❌NOT COMPATIBLE with Starlink Gen 3, Flat High-Performance, or any other models. Please verify your dish model before purchase!
- PLUG & PLAY INSTALLATION: Simply connect the adapter between your Gen 2 Starlink router and the cable. No drivers or complex setup needed. Ensure a firm click on both ends for a stable connection.
- ENABLE HARDWIRED SPEEDS & STABILITY: Unlock the full potential of your Starlink by connecting gaming consoles, PCs, and smart TVs directly via Ethernet for lower latency and smoother streaming.
- RELIABLE DATA TRANSFER: Experience lag-free online gaming, 4K video conferencing, and ultra-fast file transfers with a stable, wired internet backbone.
- TROUBLESHOOTING TIP: If not working, first check both connections are secure and restart your Starlink router.
Use an open, central, elevated position
- Keep the router upright on its base.
- Place it on a shelf or other elevated, hard surface rather than on the floor.
- Choose an open, central part of the home whenever the cable layout allows it.
- Start with the same room as the router or a distance of roughly one to two rooms for the first coverage check.
Avoid common sources of attenuation and interference
Do not hide the router in a cabinet, closet or media console. Thick masonry, metal, large appliances and dense building materials can weaken or block Wi-Fi. Keep the router away from equipment that creates radio interference and from large objects that surround it on several sides. Moving the router a few feet into the open can help more than increasing the service plan or restarting the dish.
Separate service performance from Wi-Fi performance
A slow device does not necessarily mean the satellite connection is slow. In the Starlink app, use Advanced Speed Test to separate the connection from the Starlink service from the connection between your device and the router. If the service result is healthy but the Wi-Fi result is poor, work on router placement, interference, mesh positioning or a wired connection. If both results are poor, investigate dish obstructions, cable connections and the Starlink connection itself.
The Tool Desk
Outbyte Driver Updater FREEScan for outdated or missing drivers - takes under a minuteDriver Scan →Outbyte PC Repair FREERepair Windows errors before they cause bigger problemsFix Now →Map weak rooms with the Starlink app
Use the app before buying additional equipment. Open the Network tab to see connected devices and their signal strength. Walk through the rooms where people work, stream or make calls and note where the signal changes from strong to weak.
Use Wi-Fi Scanner and Range tools
The app’s Wi-Fi Scanner and Range tools help identify coverage gaps and likely interference. Test from the actual locations where devices are used, not only beside the router. A phone can show a good result in the hallway while a laptop behind a masonry wall struggles in the office.
Interpret the results before changing hardware
- Good service, weak device signal: Move the router, remove obstructions around it or add a mesh node.
- Good signal near the router, weak signal in one distant room: A single, correctly placed mesh node or a wired access point may be enough.
- Weak signal throughout the home: Reconsider the router’s central position before adding several nodes.
- Weak service and weak Wi-Fi: Check the dish view, alignment, cable seating and power before redesigning indoor coverage.
When to add Starlink mesh Wi-Fi
Mesh is useful when the main router is correctly placed but one or more rooms remain outside reliable coverage. It should not be the first response to a dish obstruction or a router hidden in a cabinet.
Rank #3
![Multi Ports Ethernet Adapter for Starlink Standard 4X/ Gen 3/ Starlink Mini | For Starlink Wired External Network 4 Ports Ethernet Adapter 1 to 4 [4 Devices Networked Simultaneously] - Up to 1 Gbps](https://m.media-amazon.com/images/I/410vGlCO+8L._SL160_.jpg)
- Compatibility -- Works seamlessly with Starlink Gen3/ Standard 4X and Starlink Mini antenna, suitable for various environments.
- Multi-Device Connectivity -- 4 Gigabit Ethernet ports support multiple devices simultaneously, maximizing Starlink's high-speed internet.
- Reliable Performance -- Tested for 72 hours under full load, ensuring stable performance with no speed drops or interruptions.
- Easy to Use -- Plug-and-play design makes installation quick and hassle-free.
- High-Speed Stability -- Whether for work, entertainment, or smart home management, this adapter delivers fast, stable, and convenient networking performance. Upgrade your network setup today
Place nodes close enough to maintain a strong link
Starlink’s mesh guidance says nodes work best when they are no more than one to two rooms apart. Put a node where the app shows a strong or green connection to the main router, not in the dead zone you are trying to fix. A node cannot reliably repeat a signal it can barely receive.
Do these 3 things before closing this tab:
1Fix the driver behind crashes, sound loss and screen glitches2Repair Windows errors before they cause bigger problems3Scan for outdated or missing drivers - takes under a minutePrefer direct links to the main router
Direct links generally perform better than daisy-chaining one mesh node through another. If a second node must be used, place the first node where it still has a strong connection and the second node within the recommended spacing. Keep at least one router in a central position.
Use wired backhaul when practical
A wired Ethernet connection can improve performance and stability, especially through thick walls or between floors. For a distant room or outbuilding, route an appropriately rated Cat6 cable safely, protect it from moisture and physical damage, and terminate it in equipment designed for the environment. Cable length, weather exposure and the routing method depend on the site.
Understand the published capacity
| Specification | Published value | How to interpret it |
|---|---|---|
| Terminal field of view | 110 degrees | Listed for the specified Starlink terminal; the app’s obstruction scan still determines whether a site works. |
| Average power consumption | 75–100 W | Average consumption listed by Starlink for the specified hardware; actual use can vary with conditions and equipment. |
| Wi-Fi router coverage | Up to 3,200 square feet | A stated maximum for the listed router model, not a guarantee for every floor plan or building material. |
| Starlink mesh nodes | Up to 3 nodes | Published limit for the listed system; node placement and backhaul quality still determine usable coverage. |
| Connected devices | Up to 235 devices | Published capacity for the listed router; throughput depends on traffic, device types and radio conditions. |
These figures are model-specific specifications accessed in 2026. They should not be treated as universal performance guarantees, and no official figure establishes a fixed internet speed for a particular placement.
Connect a third-party router or mesh system
If you want another router or a third-party mesh system to handle your home network, check your Starlink hardware configuration first. Starlink’s customer guidance says an Ethernet Adapter is required on supported configurations to provide a wired connection to third-party networking equipment.
Rank #4
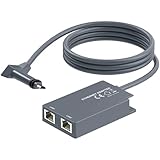
- 【Dual-Port Connection】For Starlink Gen2 Ethernet Adapter simplifies wiring with two ports.Connect devices like a PC+game console or NAS + smart TV simultaneously.Overcome your Starlink Gen2 router's limit for a reliable wired network — ideal for streaming,gaming,and remote work.
- 【Optimized for Starlink Gen2 Routers】Optimized for Starlink Gen2 satellite router, this adapter delivers broad compatibility — seamlessly works with Starlink Gen2 routers paired to Enterprise, mobile HP-Flat High Performance Kit (Gen2), High Performance (Gen1), and Standard Actuated (Gen2) systems.
- 【Multi-Device Compatibility】This Ethernet Adapter supports diverse third-party devices — including PCs, Macs, PS5, Xbox, Smart TVs, NAS, mesh routers, and security systems. It automatically optimizes network performance for reliable connectivity.
- 【High-performance network speed】Support Gigabit wired transmission, provide low-latency, high-bandwidth network, perfect for 4K/8K streaming media, online games, large file downloads, network speed up to 1Gbps say goodbye to wireless lag
- 【Enhanced Reliability:】Features gold-plated ports, energy-efficient chips, and ABS housing with IP65 rating in a compact design. Validated by 72-hour industrial stress testing — rated for 24/7 operation in multiple environments.
- Obtain the Ethernet Adapter that matches your Starlink hardware generation.
- Connect the adapter to the Starlink router or the designated network connection shown in your equipment instructions.
- Connect the adapter’s Ethernet port to the WAN or internet port on the third-party router or mesh system.
- Complete the third-party device’s setup using its own app or web interface.
- If the third-party equipment should perform routing, open the Starlink app and enable Bypass Mode where that option is available.
- Verify that devices receive addresses from only the router you intend to manage the network. If both systems route traffic, you may encounter double NAT, port-forwarding problems or confusing device discovery.
Bypass Mode changes which device performs routing and network services. Record your existing Wi-Fi name and password before changing it, and keep the Starlink router available for recovery if the third-party system does not connect as expected. Compatibility and menu names can vary by Starlink generation.
Complete a permanent installation safely
After the temporary test confirms a clear sky view and stable service, choose a mount designed for the dish generation and the surface where it will be installed.
- Recheck the proposed final position with the app’s obstruction tool.
- Select a compatible roof, pole or wall mount that provides the required structural support.
- Plan a cable route that avoids sharp bends, pinch points, hot surfaces, moving parts and standing water.
- Secure the cable so wind cannot make it rub against the structure or pull on the dish and router connectors.
- Seal exterior penetrations using a weather-appropriate method and keep indoor cable entry points protected.
- Install the mount according to its instructions, then reconnect the dish and router.
- Run the obstruction check and confirm service again before closing up cable runs or removing the temporary arrangement.
Do not work at height in unsafe weather or without appropriate fall protection. If the roof, pole or electrical route is beyond your experience, use a qualified installer.
Independent reader supportYour contribution helps us test, update, and keep practical guides available for everyone.Troubleshoot weak or unreliable Starlink Wi-Fi
The dish shows obstructions
Move the dish to a position with a wider sky view or raise it with a compatible mount. Trim or remove only vegetation you are authorized and equipped to handle. Do not assume that a brief period of connectivity means the location is clear enough for dependable service.
Wi-Fi is weak in one room
Move the main router into the open and closer to the center of the home. Remove cabinets, metal objects and large appliances from around it. If the app still shows a weak device signal, place one mesh node one to two rooms away in a location where its connection to the main router remains strong.
Best Value

- Extend a Network Port for Your Devices: This for Starlink Ethernet Adapter seamlessly integrates your new for Starlink system into your existing business or home network, maximizing throughput from your outdoor dish. It’s an affordable solution for adding or replacing an RJ45 port on your devices, perfect for connecting to a wired network when your device lacks a network port or has a faulty one.
- Improved Speeds: This for starlink adapter ethernet enabled to connect for Starlink dish to existing home mesh Wi-Fi system, significantly boosting the speed. And can extend network to previously unreachable areas of your house due to numerous walls. The direct connection to PC significantly improve internet speeds, providing a more reliable and faster network experience throughout your home.
- 1000Mbps Hyper Speed: The for starlink v2 ethernet adapter is designed to connect a device directly to the for Starlink Router for a reliable wired connection. It supports speeds of up to 1 Gbps, ensuring fast and stable internet performance. Perfect for enhancing your online working, meeting, classing, gaming, HD video streaming, upload, download, and more.
- Easy Installation: for Starlink to RJ45 Gigabit Ethernet Adapter is driver-free. (Installation Way: 1. Turn off the for Starlink router by unplugging its AC power cord from the wall outlet. 2. Unplug the for Starlink antenna cable from the bottom of the router. 3. Insert the for Starlink Ethernet Adapter into the port on the router where the for Starlink antenna cable was previously connected. 4. Connect the for Starlink antenna cable to the connector on the for starlink adapter ethernet. 5. Power everything back on by plugging the router's AC power cord back into the wall outlet )
- Compatible with the for Starlink Standard Actuated Kit V2, this adaptador ethernet for starlink v2 is highly recommended for rural areas. It dramatically enhances internet performance, nearly doubling speeds and reducing latency, making it perfect for browsing, streaming, and gaming.
Mesh performance is inconsistent
Move the node closer to the main router, avoid placing it in the dead zone, and eliminate unnecessary daisy chains. A wired Ethernet backhaul is preferable when walls, floors or distance make the wireless link unreliable.
Advanced Speed Test shows good service but poor Wi-Fi
Concentrate on indoor networking: router position, interference, building materials, node placement and, where possible, Ethernet. Repeating a dish alignment procedure will not fix a device-to-router problem.
Advanced Speed Test shows poor service
Check that every cable is fully seated, the equipment has power, and the dish has not shifted or become obstructed. Reopen the obstruction and alignment tools. If the issue continues at a verified clear-sky site, use the support options in the Starlink app.
PC Slower Than It Used to Be?
A free scan shows the junk files, broken settings and background clutter dragging Windows down - then fixes them in one click.Free scan · Windows 10 & 11Outdated Drivers Are Slowing You Down
One free scan finds every outdated or missing driver and matches the right update for your exact hardware.Free scan · exact hardware matchThe third-party router has no internet
Confirm that the Ethernet Adapter is compatible and connected to the correct Starlink port, that the third-party router is using its WAN port, and that only the intended device is routing. If you enabled Bypass Mode before the third-party router was ready, reconnect directly to the Starlink router and disable the mode to restore the original arrangement.
Quick Recap
A practical decision guide
| Observed situation | First action | Next option if it persists |
|---|---|---|
| Dish obstruction warning | Move or raise the dish and rescan | Install a compatible roof, pole or wall mount |
| Router hidden or floor-level | Place it upright, elevated and in the open | Use the app to map remaining weak areas |
| One weak room, strong main-router signal elsewhere | Place one mesh node one to two rooms away | Use wired backhaul if the wireless link is weak |
| Large home with several weak areas | Centralize the main router and test node positions | Add only the number of compatible nodes needed; direct links are preferred |
| Need advanced routing or an existing mesh system | Use the compatible Ethernet Adapter | Enable Bypass Mode so the third-party system handles routing |
| Service and Wi-Fi both test poorly | Check power, cables and dish obstructions | Contact Starlink support after verifying the site |
Best-practice checklist
- Test the dish temporarily before drilling or trenching.
- Let the app’s obstruction scan decide whether the site is suitable.
- Keep the router upright, elevated, open and central.
- Keep it away from cabinets, thick masonry, metal and large appliances.
- Use Network, Advanced Speed Test, Wi-Fi Scanner and Range to distinguish service faults from indoor Wi-Fi limits.
- Place mesh nodes one to two rooms apart and where their link to the main router is strong.
- Prefer direct or wired links over long daisy chains.
- Use the compatible Ethernet Adapter before connecting a third-party router or mesh system.
- Enable Bypass Mode only when the third-party equipment is intended to perform routing.
- Choose a permanent mount and cable route only after the temporary installation is stable.
Product prices and availability are accurate as of the date/time indicated and are subject to change. Any price and availability information displayed on Amazon at the time of purchase will apply.

