
The Tool Desk
Outbyte Driver Updater FREEFix the driver behind crashes, sound loss and screen glitchesFind Drivers →Outbyte PC Repair FREERepair Windows errors before they cause bigger problemsFix Now →iTechGuides is reader-supported. When you buy through links on our site, we may earn an affiliate commission. As an Amazon Associate I earn from qualifying purchases. Learn more
Short answer: install the current RPCS3 build for your operating system, follow the project’s official Quickstart for system requirements and PlayStation 3 system software, check your exact game in RPCS3’s compatibility database, and then use the Quickstart’s current disc-dumping procedure to create a copy from your own disc. The disc is the source for a game dump; it is not a substitute for RPCS3’s required system software.
This guide gives you the decisions and checks that remain reliable across releases. It deliberately does not invent firmware menu paths, disc-dumping commands, or Blu-ray-drive recommendations: those details can change, and the available project material does not establish a current procedure or a list of compatible drive models. Use the official Quickstart as the authority for those steps.
What RPCS3 is—and what “installing a PS3 game” means
RPCS3 is an open-source PlayStation 3 emulator and debugger. The project identifies Windows, Linux, macOS, and FreeBSD as supported platforms. It recreates the console environment in software so a compatible PS3 title can run on a computer; it is not a PlayStation 3 operating-system replacement and it does not turn a game disc into a normal desktop installer.
Recommended Free Tools
For a disc owner, the practical workflow has four separate parts:
#1 Best Overall

- 【USB3.0 & USB-C (Type-C) & High-Speed Data Transfer Design】compatible with Blu-ray player is compatible with both USB3.0 and Type-C connections, achieving up to compatible with Blu-ray6x, 8x DVD, and 24x CD read/write speeds.
- 【Powered by Data Cable + Additional USB Power Cable】This external compatible with Blu-ray drive is powered via a USB data cable, requiring no external power source for convenience. Additionally, the included USB power cable can be connected to a USB power adapter to ensure stable performance, even in cases of power insufficiency, making it suitable for extended use and compatible with Blu-ray playback
- 【Six Ports for Excellent Expandability】This BD drive is not only an external drive but also includes six expansion ports to connect USB flash drives, SD/TF cards, mice, keyboards, and other devices. This compatible with Blu-ray external drive also functions as a USB hub, offering efficient data management and business use in a compact design.
- This external compatible with BD drive supports writing data, video, and photos to compatible with BD-XL(100GB)、compatible with BD-RE/R (25GB)、compatible with BD-RE/R DL (50GB)、DVD-RE/R (4.7GB)、DVD-RE/R DL (9.6GB)、and SD/TF cards. With Windows and Mac OS standard writing functions, it enables data writing to compatible with BD/DVD and is a high-speed external compatible with Blu-ray drive. It also compatible with BD/DVD M-Disc. (The user manual details how to write data on PC, making it easy for beginners.)
- 【Space-Saving Design, Portable】This Blu-ray player features a compact, slim design with a convenient cable storage area on the bottom, making it easy to place in offices or at home. Its lightweight design, about 400g, makes it easy to carry, ideal for use during travel or business trips.
- Prepare a supported computer and current graphics driver.
- Install RPCS3 and the PlayStation 3 system software required by the current Quickstart.
- Make a game dump from your own disc using a reader and method supported by that Quickstart.
- Point RPCS3 at the resulting game files, then use the game’s compatibility notes to decide whether additional configuration is warranted.
Keeping those parts separate prevents a common mistake: troubleshooting a game before the emulator, system software, and dump have each been verified.
Check your computer before installing anything
The project README sends new users to the official Quickstart for current minimum requirements and operating-system-specific setup. Requirements can change as the emulator develops, so treat that page—not an old forum post or video—as the source of truth for your release.
| Platform | What is established | What to verify in the current Quickstart |
|---|---|---|
| Windows | Supported by RPCS3. | Current CPU, GPU, memory, operating-system version, driver, and installation requirements. |
| Linux | Supported by RPCS3. | Distribution-specific package or binary instructions, graphics stack requirements, permissions, and system libraries. |
| macOS | Supported by RPCS3. | Supported macOS release, Apple hardware requirements, graphics support, and any release-specific limitations. |
| FreeBSD | Supported by RPCS3. | Current package/build instructions, dependencies, graphics configuration, and permissions. |
Before you begin, record your operating-system version, processor, graphics hardware, installed memory, and available storage. You do not need to guess whether a specification is “good enough” from a generic emulator chart; compare it with the Quickstart’s current requirements and then check the game entry as well. A computer can meet the general requirements and still produce poor results for a particular title.
What’s actually slowing this PC down?
Pick the symptom - the matching free tool is one click away.
Update the graphics driver
The project specifically advises keeping graphics drivers up to date. Install the current driver supplied for your GPU and operating system before diagnosing crashes, missing graphics, or unexpectedly low performance. If a problem begins immediately after a driver change, note the driver version; that information is useful when comparing your result with the game’s compatibility notes and current project guidance.
Plan storage and backups
A disc dump can require substantial storage, and RPCS3 may create additional data while a game runs. Reserve more space than the bare size of the files shown by your operating system, and keep the original disc safe. Do not edit, rename, or “clean up” files inside a dump unless the Quickstart or a game-specific note explicitly tells you to do so. If you move the dump later, plan to update RPCS3’s library location rather than creating several partial copies that are difficult to identify.
Check the exact game in the compatibility database
Do this before spending time on installation. Search RPCS3’s compatibility list for the exact title and release you own, then read the complete entry, its status, last-update date, and configuration notes. The project says the list changes frequently, so a result you saw months ago may no longer describe the current emulator or the current game build.
RPCS3 defines Playable as a game that can be completed with playable performance and without game-breaking glitches. That label is a compatibility category, not a promise that every computer, driver, operating-system version, or configuration will produce the same result. Treat it as evidence about the title, not a guarantee about your machine.
| Item to record | Why it matters | How to use it |
|---|---|---|
| Exact game entry | Different releases, regions, or updates may have different behavior. | Match the title and edition on your disc as closely as the database allows. |
| Current status | Status reflects the project’s present compatibility assessment. | Read the status together with the notes; do not infer performance from the label alone. |
| Last update | Compatibility information is not static. | Use the date to judge how recently the entry was checked. |
| Configuration notes | Some titles need documented settings or have known cut-scene, audio, or progression issues. | Apply only instructions written for your game and current RPCS3 release. |
If no exact entry exists, do not conclude that the game is impossible or guaranteed to work. Search by the title’s official name and region, look for an equivalent release entry, and check again after RPCS3 updates. Absence of a useful note is simply uncertainty.
Rank #2
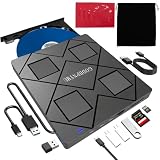
- 【Wide Compatibility—Disc Formats】 This 8-in-1 all-in-one external Blu-ray drive supports reading and burning BD, DVD, and CD discs. Compatible with BD (read support for BD-ROM, BD-R/RE (25GB/50GB), and BD-XL (100GB, read-only); maximum burning support up to 50GB (BD-R DL)), DVD±R/RW (including DL 9.6GB), CD-R/RW, and M-Disc, and supports writing to SD/TF cards. Performance: BD read speed 6x / DVD 8x / CD 24x; write speed BD-R 6x, DVD±R 8x, CD-R 24x. Supports 3D Blu-ray playback. Third-party software ((such as PowerDVD, Leawo, AnyDVD, etc.)) is required to play Blu-ray discs.️⚠️Note: The maximum Blu-ray recording capacity is 50GB (dual-layer); 4K playback is not supported.
- 【 Widely Compatible】 Fully compatible with Windows 11/10/8.1/7/XP/ME/2000 and macOS 10.6 and later. Works seamlessly with laptops, desktops, all-in-one PCs, mini PCs, MacBook Pro/Air, Dell, Lenovo, HP, and other mainstream laptops and desktops, delivering truly hassle-free cross-platform use. Note: Not compatible with TVs, tablets, smartphones, or in-car devices.
- 【8-in-1 Multi-Function Blu-ray Burner + USB Hub】 This External blueray/dvd drive for pc supports burning and reading BD, CD/DVD discs, features 3D playback, and can be used as a USB hub for laptops. Equipped with 2 USB-C ports, 1 USB 3.0 port, 1 USB 2.0 port, and 1 TF/SD card slot, it is compatible with USB wired/wireless mice, keyboards, computer coolers, and other peripherals. Through this card slot, you can quickly transfer photos and videos from camera or phone memory cards to your computer, meeting the need to connect multiple devices simultaneously. This enhances expandability and makes usage more convenient. Note: TF and SD cards cannot be read simultaneously.
- 【Dual-Port All-in-One, High-Speed Reading]】This Bluray burner external has USB-A & USB-C 3.0 for . Even laptops without USB-A can connect via USB-C. Slim and portable, fits in a laptop bag; ideal for home, office, travel. Supports backup, software, media playback, and CD/DVD/Blu-ray for HD. Built-in cable stores in base. Includes USB power cable: if underpowered, connect to PC or 5V/2A adapter (⚠️no data transfer) to improve reading stability. Enjoy your discs anywhere, including Blu-ray.
- 【Ultra-slim and portable, comes with 1 carrying case + 4 CD sleeves】 This Blu ray drive— Lightweight and reliable, ensuring your data stays safe wherever you go Weighing just 300 grams, this external Blu-ray burner features an ultra-slim design (5.5 x 5.5 x 0.35 inches) that fits easily into a backpack or suitcase, making your travels hassle-free. It comes with a portable carrying case and 4 CD sleeves to effectively prevent scratches, avoid cable tangles, and keep your belongings organized and safe.
Install RPCS3 from the project’s current release
Use the project’s official distribution and follow the package instructions for your operating system. The correct package format and first-run behavior differ between Windows, Linux, macOS, and FreeBSD, so a menu path copied from another platform may be wrong.
- Open the official RPCS3 download and Quickstart pages. Confirm that the build supports your operating system and read the release-specific notes.
- Download the current release package. Avoid repackaged executables and “preconfigured” bundles that include games, firmware, or unexplained modifications.
- Place RPCS3 in a location you control. Choose a folder or application location where the program can write its configuration and cache data, following your operating system’s normal application rules.
- Start RPCS3 once. If the program presents a first-run prompt, stop and consult the matching Quickstart section rather than accepting an option you cannot identify.
- Note the installed version. Keep it with your troubleshooting notes, because compatibility reports and settings can be release-specific.
Do not copy a Windows procedure to Linux, macOS, or FreeBSD. Likewise, do not assume that an older screenshot uses the same labels as your build. The safe constant is to use the current Quickstart and the interface shown by the release you actually installed.
Install PlayStation 3 system software through the Quickstart
RPCS3 needs PlayStation 3 system software in addition to the emulator program. The available project material confirms that the Quickstart covers setup, but it does not establish the current firmware-installation screen names, file names, or button sequence. Those details are version-sensitive, so this article does not reproduce an unverified path.
Follow the current official Quickstart for:
- Which system-software package is required for your RPCS3 release.
- Where the package must come from and how its authenticity is checked.
- The exact RPCS3 menu or prompt used to install it.
- The confirmation or completion message you should expect.
Do not use a random firmware mirror, a preinstalled emulator bundle, or a package supplied with a downloaded game. If the Quickstart changes its instructions, follow the newer procedure rather than trying to reconcile it with an old tutorial. If installation fails, capture the exact error and your RPCS3 version before attempting another package; repeatedly installing unrelated files can make the original cause harder to identify.
Prepare a game dump from your own disc
RPCS3 generally works with game data read from a disc and converted into files it can access. The project material available for this guide does not establish the current disc-dumping commands, required file layout, encryption-handling steps, or a list of compatible Blu-ray drives. Because those details are easy to get wrong—and can vary by operating system and drive—you should use the disc-dumping section of the current official Quickstart exactly as written.
What you need
- Your legitimately owned PS3 game disc.
- A computer running a supported RPCS3 platform.
- A Blu-ray reader that the current Quickstart confirms is suitable for the required operation. No specific model is established here.
- Enough storage for the dump and RPCS3’s working data.
- Time to let the read complete without disconnecting the drive or putting the computer to sleep.
A USB Blu-ray drive may be useful if your computer has no suitable reader, but compatibility is model- and firmware-dependent. Confirm a model against the current official guidance before buying one; do not rely on a generic claim that any Blu-ray drive can perform the required read.
Use only the documented workflow
Open the Quickstart’s current disc section and follow its steps for connecting the reader, identifying the disc, selecting the destination, and validating the result. Do not substitute a DVD-ripping tutorial, a command copied from an old forum post, or a pre-made download. The output should be a complete dump that the Quickstart says RPCS3 can use, not merely a shortcut or a handful of files copied from a visible directory.
Free tools Windows power users keep installed
One-click scans. No signup required.
Keep the disc inserted until the documented operation finishes. If the read stops, first check the Quickstart’s supported-drive guidance, cable and power connection, available storage, and operating-system permissions. Record whether the failure occurs with one disc or every disc; that distinction helps separate a damaged or unusual disc from a reader or software problem.
Rank #3

- 13mm for ultra slim and light
- Mac/PC Support
- Includes USB 2. 0 and Type-C cables
- Nero BackItUp function for Android Devices
- DISC Encryption II for password-controls and hidden-file functionality
Add the dump to RPCS3 without guessing menu names
Once the dump has been validated, use the current Quickstart and the interface in your installed release to add its folder to RPCS3’s game library. The exact menu labels and first-run prompts are not established by the available sources, so do not follow a path such as “File > …” from an unverified guide.
When the operation is correct, RPCS3 should be able to identify the game from the dump and show it in its library or game list. Check the displayed title and, where shown, the disc’s identifier against the compatibility entry you researched earlier. If RPCS3 cannot identify it, stop before changing files:
- Confirm that you selected the dump’s top-level folder or file in the manner specified by the Quickstart.
- Confirm that the dump completed without read errors and that its contents were not renamed or rearranged.
- Confirm that your user account can read the storage location.
- Compare the game identifier or edition with the compatibility database entry.
- Re-read the current Quickstart for the supported dump format before trying again.
Do not “repair” an unknown dump by downloading replacement files. That can hide the original problem and may create legal and security risks.
First launch and game-specific configuration
Launch the game only after RPCS3 recognizes the dump and the required system software is installed. The first run may take longer than later launches while the emulator prepares data; allow the operation to finish and note any message that appears.
Start with the game’s documented configuration, if its compatibility entry provides one. Change one setting at a time, write down the original value, and test the same scene or action after each change. This makes it possible to undo a change that introduces a crash, missing effect, audio problem, or progression issue.
Do not apply a setting recommended for another title simply because both games use the same engine. RPCS3’s compatibility notes are game-specific, and an option that fixes one title can reduce stability in another. If your result differs from the database description, include your operating system, RPCS3 version, graphics-driver version, game identifier, and the exact symptom when seeking help.
Troubleshooting by symptom
RPCS3 will not start
- Verify that your operating system is one of the project’s supported platforms.
- Install the current graphics driver recommended for your GPU.
- Check the release’s system requirements in the Quickstart.
- Run the official build rather than a modified bundle, and record any error text.
The system-software installation fails
- Return to the current Quickstart and confirm that you obtained the required package through its documented source.
- Check that the package is complete and that you are using the installation action specified for your release.
- Do not mix instructions or files from different RPCS3 versions.
The game does not appear in the library
- Confirm that the dump finished and that you selected the location in the format required by the Quickstart.
- Check read permissions and available storage.
- Compare the title or identifier with the compatibility entry.
- Re-dump only after the Quickstart’s validation checks indicate that the first dump is incomplete.
The game launches but is unstable or unplayable
- Read the exact compatibility entry, including its status, update date, and notes.
- Confirm that your graphics driver and RPCS3 version match the conditions of any documented workaround.
- Return to default settings, then apply only title-specific recommendations one at a time.
- Distinguish an emulator problem from a known game issue by checking whether the symptom is listed in the entry.
A disc cannot be read
- Check the disc for visible damage and test whether another disc can be read.
- Verify the reader, cable, power, and operating-system permissions.
- Confirm that the reader model and firmware are supported by the current Quickstart.
- Do not assume that replacing a drive will help until the project’s compatibility guidance confirms that the replacement can perform the required operation.
Keep the setup maintainable
Save a short record containing your RPCS3 version, operating system, graphics-driver version, game identifier, dump location, and any per-game changes. When you update RPCS3, recheck the compatibility entry because the project says its results change frequently. Read release notes before changing a working configuration, and keep a backup of configuration files if the Quickstart recommends one for your platform.
Quick wins for a faster PC:
Clear out junk files and repair common Windows errorsFree Scan →Fix the driver behind crashes, sound loss and screen glitchesFind Drivers →Keep your original discs and your own dumps separate from downloaded material. Never use unofficial game or firmware downloads as a shortcut around a failed dump or missing disc. If you no longer know where a file came from, treat it as untrusted and replace it with a fresh, documented dump rather than building more troubleshooting on top of it.
Complete setup checklist
- Supported operating system confirmed: Windows, Linux, macOS, or FreeBSD.
- Current RPCS3 release installed from the official project distribution.
- Graphics driver updated.
- Current Quickstart reviewed for hardware, system software, and platform-specific requirements.
- Exact game entry checked in the compatibility database.
- Game status, last-update date, and configuration notes recorded.
- Own disc, suitable reader, and sufficient storage available.
- Disc dump created and validated using the current Quickstart’s procedure.
- Dump added through the current RPCS3 interface without rearranging its files.
- First launch tested with documented, title-specific settings only.
The practical verdict
RPCS3 setup is straightforward when you treat it as a chain of verified steps rather than a single “install game” action: supported computer, current driver, emulator, PlayStation 3 system software, validated dump from your own disc, and a game-specific compatibility check. The project’s Quickstart is the necessary authority for firmware installation and disc dumping because those procedures and hardware requirements are not safely captured by a static general guide. Once RPCS3 recognizes your dump, the compatibility entry—not the word “Playable” alone—should determine what performance and configuration work to expect.
Quick Recap
Product prices and availability are accurate as of the date/time indicated and are subject to change. Any price and availability information displayed on Amazon at the time of purchase will apply.

