
Recommended Free Tools
iTechGuides is reader-supported. When you buy through links on our site, we may earn an affiliate commission. As an Amazon Associate I earn from qualifying purchases. Learn more
To add a fingerprint, first identify the exact lock and reader model, then use that model’s official app or manual. Fingerprint enrollment is not standardized: a built-in reader can use a different process from a separate fingerprint keypad, and button sequences for one lock may not work on another.
For a reliable setup, confirm compatibility, enroll each household member as a separate user, choose whether that person needs only a fingerprint or also app, phone, or PIN access, and test the credential before relying on it.
What you need to check before enrolling anyone
Smart-lock fingerprint systems fall into two arrangements. Some locks have the fingerprint sensor built into the exterior lock. Others use a compatible keypad that communicates with an existing smart lock. The setup, user limits, and permissions can differ even within the same manufacturer’s product family.
| Arrangement | Where enrollment usually happens | Important check |
|---|---|---|
| Built-in fingerprint reader | At the lock, often together with the manufacturer’s mobile app | Use the exact lock model’s enrollment flow; do not substitute keypad instructions |
| Separate fingerprint keypad | In the lock’s app after the keypad is powered and paired | Confirm that the keypad is approved for your existing lock and property |
Before opening an app or pressing programming buttons, record the model number from the lock, inside escutcheon, packaging, or manual. Also identify whether the fingerprint reader is integrated or separate. Manufacturer support pages are model-specific; for example, Schlage publishes separate programming guides for individual smart-lock models rather than one universal sequence.
#1 Best Overall

- YOUR FINGER IS THE KEY: No codes to remember. No phone to dig out. Just touch and you're in—faster than finding your keys ever was. This keyless entry door lock also offers Auto-Unlock, full smartphone control, a backlit keypad, and a backup key.
- CONTROL FROM ANYWHERE: This electronic door lock puts home security in your pocket, connecting directly to 2.4 or 5 GHz Wi-Fi without a hub or bridge. Lock up, let someone in, and get real-time alerts with the Yale Access app (US & Canada Only).
- UNLIMITED CODES, COMPLETE CONTROL: No more hiding spare keys. Give the dog walker Tuesday access, your parents a permanent code, and your Airbnb guest entry that expires at checkout. Share, schedule, or revoke access in seconds.
- WONDERING IF YOU LOCKED UP? DoorSense knows when your door is fully closed and Auto-Lock secures it for you. Head to bed, rush out the door, or chase after the kids — your smart front door lock handles the details so you don't have to worry.
- ENGINEERED FOR RELIABILITY: Grade 2 certified by BHMA, the industry standard for commercial-grade durability. Built to perform from -22°F winters to 140°F summer heat. Low-power alerts let you know when batteries are about to run out.
- Install the current manufacturer app and sign in to the correct home or property.
- Confirm that the lock and, if applicable, keypad are compatible with one another.
- Charge or install the required batteries and make sure the lock can communicate with the app.
- Have the person whose finger will be enrolled present if the model requires enrollment at the hardware.
- Keep an existing key, PIN, or app credential available so you are not locked out while testing.
Do not combine a programming-button sequence from one model with an app sequence from another. If a manual and an app display different labels, follow the current instructions for your exact model and treat the app’s on-screen prompts as authoritative.
Choose the right type of household user
Many systems distinguish between a credential that unlocks the door and a user account that can manage or use several credentials. That distinction matters when adding family members, cleaners, or temporary residents.
| User choice | Typical access | Use it when |
|---|---|---|
| Fingerprint-only user | Fingerprint unlocking, without in-app access | The person needs a local biometric credential but does not need to operate the lock from a phone |
| App-access user | Potentially phone control, an entry code, and a fingerprint, depending on the model and permissions | The person needs several ways to unlock or needs an account in the lock’s app |
The names and capabilities are not universal. Yale’s Assure Lock 2 Touch documentation, for example, describes “Fingerprint Only” and “App Access” users. An App Access user may be allowed to use a phone, entry code, or fingerprint, while a Fingerprint Only user is limited to fingerprint unlocking. Select the least permissive option that meets the person’s needs.
General enrollment workflow
Although the screen names vary, the following order prevents most setup mistakes.
- Identify the model. Write down the exact lock and reader names, including any keypad model.
- Verify compatibility. Check the manufacturer’s current compatibility list or manual for the lock-keypad combination.
- Prepare the system. Replace weak batteries, wake the keypad, and confirm that the lock appears online in the correct property.
- Open user or access management. Look for labels such as Access, Users, Guests, or Add person in the official app.
- Choose the credential type. Select fingerprint-only access or a broader app-access profile if the person needs phone, code, or remote features.
- Enroll the finger exactly as prompted. Keep the finger clean and dry, place the same finger on the reader for each requested scan, and do not move to a different finger midway through a session.
- Save and test. Lock the door, wake the reader, and test the enrolled finger from outside while another working credential remains available.
- Record the user clearly. Use the person’s name rather than “Guest 1,” so you can remove the correct credential later.
Some locks require the enrolling person to stand at the door. Yale explicitly requires the person to be present when adding a fingerprint to the Assure Lock 2 Touch. A remote administrator cannot assume that inviting someone in the app completes the biometric scan.
Rank #2

- YOUR FINGER IS THE KEY: No codes to remember. No phone to dig out. Just touch and you're in—faster than finding your keys ever was. This keyless entry door lock also offers Auto-Unlock, full smartphone control, a backlit keypad, and a backup key.
- CONTROL FROM ANYWHERE: The included Wi-Fi Bridge manages the connection to your 2.4 or 5 GHz network so your lock doesn't have to—extending battery life and range. Lock, unlock, and get alerts with the Yale Access app (US & Canada Only).
- UNLIMITED CODES, COMPLETE CONTROL: No more hiding spare keys. Give the dog walker Tuesday access, your parents a permanent code, and your Airbnb guest entry that expires at checkout. Schedule and share codes or revoke access in seconds.
- WONDERING IF YOU LOCKED UP? DoorSense knows when your door is fully closed and Auto-Lock secures it for you. Head to bed, rush out the door, or chase after the kids—your smart front door lock handles the details so you don't have to worry.
- ENGINEERED FOR RELIABILITY: Grade 2 certified by BHMA, the industry standard for commercial-grade durability. Built to perform from -22°F winters to 140°F summer heat. Low-power alerts let you know when batteries are about to run out.
Example: enrolling a user on Yale Assure Lock 2 Touch
The Assure Lock 2 Touch is an example of a lock with a model-specific fingerprint workflow. Yale’s current support instructions direct the owner through the Yale Access app’s guest or access-management flow. App labels can change, so use the prompts shown for your lock rather than relying on an old screenshot.
Set up the first fingerprint user
- Open Yale Access and select the home and Assure Lock 2 Touch that should receive the credential.
- Open the access or guest-management area and choose the option to add a person.
- Select whether the person is a Fingerprint Only user or an App Access user.
- Follow the app’s enrollment prompts at the lock. The person whose finger is being registered must be physically present.
- Have the person place the requested finger on the reader for every scan the lock requests. Keep the finger positioned as instructed until the app confirms completion.
- Save the user, lock the door, and test the fingerprint from outside.
Choose Fingerprint Only for a household member who should unlock locally but should not receive an app account. Choose App Access only when that person also needs the phone app, an entry code, or another capability offered by the lock’s permissions. The exact options shown can depend on the lock’s firmware and account role.
PC Slower Than It Used to Be?
A free scan shows the junk files, broken settings and background clutter dragging Windows down - then fixes them in one click.Free scan · Windows 10 & 11Crashes, No Sound, or Screen Glitches?
Random freezes, missing sound and display glitches usually trace back to one bad driver. Find and replace yours safely.Free scan · under a minuteAdd another household member
Repeat the same access-management path for each person. Create a separate profile for every resident instead of registering several people under one shared name. Individual profiles make it possible to identify and revoke one person’s credential without disturbing everyone else.
Example: setting up a Yale Smart Keypad 2
A separate fingerprint keypad has its own installation and pairing process. The Smart Keypad 2 must be powered, added to Yale Home, and linked to a compatible Yale lock before fingerprints can be used.
Initial keypad setup
- Unclip the keypad’s back panel.
- Remove the battery-isolating tab.
- Wait for the front LEDs to blink, indicating that the keypad is ready for setup.
- Open Yale Home, choose the control to add a device, and scan the QR code on the keypad.
- Follow the setup prompts to install any offered firmware update.
- When prompted, select and link the compatible Yale lock.
- Register a fingerprint during onboarding, or finish setup and add it later from the Access area.
- Mount the keypad with its supplied adhesive pad or screws after confirming that it communicates reliably with the lock.
Do not assume that a keypad can be paired with every lock from the same brand. Verify the approved lock models first. If the keypad does not appear during setup, return to the model-specific instructions instead of trying a programming code intended for a built-in reader.
Rank #3

- YOUR FINGER IS THE KEY: No codes to remember. No phone to dig out. Just touch and you're in—faster than finding your keys ever was. This keyless entry door lock also offers Auto-Unlock, full smartphone control, and a touchscreen backlit keypad.
- CONTROL FROM ANYWHERE: This electronic door lock puts home security in your pocket, connecting directly to 2.4 or 5 GHz Wi-Fi without a hub or bridge. Lock up, let someone in, and get real-time alerts with the Yale Access app (US & Canada Only).
- UNLIMITED CODES, COMPLETE CONTROL: No more hiding spare keys. Give the dog walker Tuesday access, your parents a permanent code, and your Airbnb guest entry that expires at checkout. Share, schedule, or revoke access in seconds.
- WONDERING IF YOU LOCKED UP? DoorSense knows when your door is fully closed and Auto-Lock secures it for you. Head to bed, rush out the door, or chase after the kids — your smart front door lock handles the details so you don't have to worry.
- ENGINEERED FOR RELIABILITY: Grade 2 certified by BHMA, the industry standard for commercial-grade durability. Built to perform from -22°F winters to 140°F summer heat. Low-power alerts let you know when batteries are about to run out.
Add a household member after setup
- In Yale Home, open Access for the property and select an existing person or invite a new guest.
- Open the person’s fingerprint option.
- Keep the guest close enough to use the keypad during the registration flow.
- Follow the app’s prompts while the guest places the finger on the keypad as directed.
- Choose app access or fingerprint-only access according to the person’s needs.
- Check the guest list for the fingerprint indicator, then test the enrolled finger at the keypad.
Yale states that only an owner can register a guest fingerprint on Smart Keypad 2. An invited guest or another non-owner administrator should not be expected to complete biometric registration unless the current account permissions explicitly allow it.
Fingerprint capacity and one-finger-per-user limits
Capacity is a device specification, not a general property of fingerprint locks. Yale’s support page for Smart Keypad 2 states that it supports up to 10 fingerprints and allows one fingerprint per user. That figure applies to that keypad and should not be applied to the Assure Lock 2 Touch or another manufacturer’s reader without confirmation.
If a household needs more than the stated capacity, do not overwrite an existing resident blindly. First review the access list, remove credentials that are no longer needed, and check the exact model’s documented limit. A person who needs two fingers may require two supported user profiles only if the manufacturer permits that arrangement; Smart Keypad 2’s stated one-fingerprint-per-user rule does not establish that workaround.
Remove a fingerprint or change household access
Remove credentials through the same official access-management system used to create them. Yale’s Smart Keypad 2 instructions say that only the owner can delete a registered fingerprint.
- Open the property’s Access list.
- Select the person whose credential should change.
- Open the person’s fingerprint or credential settings.
- Use the delete or remove control and confirm the change.
- Check that the fingerprint indicator is gone from the user list.
- Test the former finger while keeping another authorized method available.
When someone moves out, loses permission, or no longer needs entry, remove the fingerprint and any associated app, code, or phone access. Deleting only the biometric entry may leave another credential active. For an Assure Lock 2 Touch, use the same user-management pathway that was used to add the person, following the current app prompts.
What’s actually slowing this PC down?
Pick the symptom - the matching free tool is one click away.
Rank #4
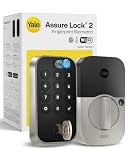
- UNLOCK WITH YOUR FINGERPRINT: The one key that is completely unique to you, and can never be lost or duplicated. With a 99% accuracy and <0.5 recognition time, your fingerprint is the fastest and most secure way to unlock your home. Note: This product only works on 2.4 GHz Wi-Fi and in the U.S. and Canada.
- NO LOCKSMITH NEEDED: The lock replaces your deadbolt on most standard US entry doors using just a screwdriver; no DIY experience required.
- HANDS FULL? NO PROBLEM. A door that auto-unlocks as you approach - now that’s a warm welcome. With this hands-free option, you don’t need to touch your lock or your phone. Always let Yale get the door.
- DON’T WORRY, IT'S LOCKED: Never worry again about remembering to lock the door with Auto-Lock.
- SECURITY AT YOUR FINGERTIPS. The one key that can never be lost or duplicated — your fingerprint. Also, ensure only the right people have access with two-factor authentication, biometric verification, and matte keypads for fingerprint resistance.
Troubleshoot failed enrollment without guessing
There is no single reset or button sequence that applies to all fingerprint locks. Start with model and pairing checks, then return to the exact official workflow.
| Symptom | Likely check | Action |
|---|---|---|
| The reader or keypad is not found | Wrong model, depleted batteries, or an unpaired device | Confirm the model, wake the hardware, replace batteries if needed, and verify that the keypad is linked to the intended lock and property. |
| The app offers no fingerprint option | The selected user type or lock model may not support that credential | Review whether the user is Fingerprint Only or App Access and consult the exact model’s feature list. |
| The scan repeatedly fails | The finger is not positioned as prompted, or the enrollment session is stale | Restart the manufacturer’s enrollment flow, follow the current prompts, and keep the enrolling person at the reader when required. |
| Enrollment succeeds but unlocking fails | The wrong lock was selected, the keypad is out of range, or the test used a different finger | Check the guest list and fingerprint indicator, confirm the linked lock, and test the same enrolled finger at the intended reader. |
| A former resident can still enter | An app account, PIN, phone key, or other credential remains active | Review every credential under that person’s access profile and remove all methods that should no longer work. |
If the problem persists, use the manual or support page for the exact lock and reader. The official material does not establish a universal troubleshooting sequence or a brand-to-brand success rate, so a failed scan alone is not evidence that the sensor is defective.
Built-in reader or separate keypad: how to decide
Use the following criteria when choosing between a lock with an integrated reader and a compatible fingerprint keypad.
| Decision factor | Built-in reader | Separate keypad |
|---|---|---|
| Installation | No additional exterior device, but the lock itself must support fingerprints | Requires mounting, powering, pairing, and linking to a compatible lock |
| Enrollment location | Usually at the lock through its app flow | At the keypad after setup, often managed from the app |
| Compatibility risk | Limited to the lock’s documented features | Must confirm the keypad-lock combination and firmware support |
| User capacity | Model-specific; not established universally | Model-specific; Smart Keypad 2 is documented for up to 10 fingerprints, one per user |
| Presence requirement | Some models require the enrolling person at the lock | The guest generally needs to be near the keypad during registration |
Neither arrangement is automatically more secure or more reliable on the evidence available here. The practical choice depends on your existing lock, documented compatibility, user capacity, and whether household members need app or PIN access in addition to a fingerprint.
Do these 3 things before closing this tab:
1Repair Windows errors before they cause bigger problems2Scan for outdated or missing drivers - takes under a minute3Clear out junk files and repair common Windows errorsHousehold enrollment checklist
- Exact lock and reader models recorded.
- Compatibility confirmed for the lock, keypad, app, and firmware.
- Correct home or property selected in the app.
- Enrolling person present at the hardware when required.
- Separate profile created for each household member.
- Fingerprint-only versus app-access permission deliberately selected.
- Capacity checked for the specific device.
- Fingerprint tested from outside with a backup credential available.
- Former residents’ fingerprints, codes, phones, and app access removed when necessary.
The Bottom Line
Fingerprint setup is dependable when you treat it as a model-specific access-management task: identify the hardware, follow its official enrollment flow, give each person an individual profile, and verify every credential at the door before relying on it.
Quick Recap
Product prices and availability are accurate as of the date/time indicated and are subject to change. Any price and availability information displayed on Amazon at the time of purchase will apply.

