
iTechGuides is reader-supported. When you buy through links on our site, we may earn an affiliate commission. As an Amazon Associate I earn from qualifying purchases. Learn more
The reliable way to set up a new smart TV is to map its labelled ports first, connect each source device to a compatible input, then configure the television’s audio and control settings for your soundbar or receiver. Write down every port you use so you can select the right input later. Menu names differ by brand, model, operating system and region, so use the setup guide for your exact television for Wi‑Fi sign-in, account creation, privacy choices and software updates.
Start with the TV and device manuals
Before plugging in cables, place the TV where you can see the rear and side panels. Find the model numbers for the TV, soundbar or receiver, game console, Blu-ray player and cable or satellite box. Open the corresponding manuals or support pages and note which connections each device supports. A port that looks similar to another may have a different job.
LG’s connection guide summarizes the essential warning: “In and Out mean very different things.” An input receives a signal from another device; an output sends a signal away from the device. The distinction matters particularly for HDMI and optical connections. See the LG USA Easy TV Connect Guide for model-specific illustrations.
The Tool Desk
Outbyte PC Repair FREERepair Windows errors before they cause bigger problemsFix Now →Outbyte Driver Updater FREEScan for outdated or missing drivers - takes under a minuteDriver Scan →- Keep the TV’s model number and the manuals for every device nearby.
- Check whether your soundbar or receiver has HDMI ARC or eARC, optical audio, or both.
- Identify the TV’s antenna input if you plan to receive local broadcast channels.
- Have suitable HDMI cables available, but do not assume a premium-priced cable is automatically required.
- Leave room to reach the TV’s power switch and ports so you can reseat cables during troubleshooting.
The first-run wizard for Wi‑Fi, streaming accounts, privacy settings and firmware updates is not universal. Follow the instructions displayed by your model rather than applying a menu path from another brand.
#1 Best Overall

- Ultra High Speed HDMI Cable: Support 10K 60Hz, 8K 60Hz, 5K 165Hz 144Hz 120Hz, 4K 240Hz 200Hz 180Hz 165Hz 144Hz 120Hz, 2K, 1440P, 1080P, 720P, 480P
- HDMI to HDMI Cable Nylon Braided: 10240×4320, 7680×4320, 3840×2160, 2560×1600, 2560×1440, 2048×1536, 1920×1200, 1920×1080, 1600×900, 1366×768, 1280×800, 1280×720
- HDMI 2.1 Cable: Supports Port 2.1, 2.0b, 2.0a, 2.0, 1.4b, 1.4a, 1.4, 1.3c, 1.3b1, 1.3b, 1.3a, 1.3, 1.2a, 1.2, 1.1, and 1.0. Support 3D Rendering, and Large File Transfers
- Certified HDMI Cable with Ethernet: 48Gbps, Ethernet, CEC, 0.01ms, low EMI, SBTM, HDCP2.3 2.2, Dynamic HDR, HDR10+, Dol-by Vision-2, Dol-by Atmos, ARC, eARC, DTS:X, DTS Master, 3D, 5D, VRR, ALLM , QFT, QMS, 12bit 10bit Color Depth
- Upgraded HDMI Cord: DGX Spark, AI PC, Display, Desktop, Laptop, OLED TV, Mac-mini M1-M5, Macbook, RTX5090 4090, HUB, Docking, Blu-ray Player, DVD, PS5 Pro PS5 PS4 PS3 Consoles, All X-box Series, Soundbar, Fi-re TV, Ro-ku TV, SHIELD TV Etc
Understand the ports before connecting anything
Read the text printed beside each socket. Record the device and port label in a note on your phone; for example, “PlayStation—HDMI 1” or “cable box—HDMI 3.” This small step prevents repeated guessing when several devices are connected.
| Label or port | What it is for | Important qualification |
|---|---|---|
| HDMI IN | Receives video and audio from a console, Blu-ray player, cable or satellite box, streaming player or another source. | Choose any available input that supports the source’s required features. The input number becomes the TV input you select later. |
| HDMI ARC or HDMI eARC | Connects the TV to a compatible soundbar or receiver and can return audio from the TV to that device. | ARC and eARC are return-audio functions. Supported audio formats and features depend on both devices, not just the label. |
| Optical digital audio | Sends TV audio to a soundbar or receiver with a matching optical input. | It is a conditional alternative. An optical-only link does not provide HDMI-dependent power interlock or TV-remote volume control, according to Sony’s guidance. |
| Antenna or RF input | Connects an HDTV antenna for local over-the-air broadcasts. | It is unrelated to streaming apps and requires a channel scan after the antenna is connected. |
| USB | May support model-specific media playback, accessories or service functions. | Use the TV manual to determine what your particular USB ports support; do not treat every USB socket as a video input for an external player. |
Do not force a connector into a port. HDMI plugs fit only one way, and an optical plug may have a protective cap that must be removed. Keep cables loosely routed so their weight does not pull on the sockets.
Connect consoles, players and television boxes
Any console, Blu-ray player, cable box, satellite receiver or streaming player is a source device. Its HDMI output must go to an HDMI input on the TV (or to a compatible receiver that then connects to the TV). The source device cannot be connected to another device’s HDMI output and expected to work.
What’s actually slowing this PC down?
Pick the symptom - the matching free tool is one click away.
- Power everything off. This is not mandatory for every model, but it reduces the chance of selecting the wrong source while you are wiring.
- Connect the source’s HDMI OUT to an available TV HDMI IN. If you are using an AV receiver, consult both manuals to confirm which receiver input and TV output are intended for the signal path.
- Write down the port. Record the exact label, such as HDMI 2 or HDMI 3, next to the device name.
- Connect power to the source and TV, then turn on the TV and the source.
- Select the matching TV input. Press the remote’s Input, Source or equivalent button, or open the on-screen input list, and choose the HDMI number you recorded.
- Confirm the picture and sound. Start playback or open the console home screen. If the screen is blank, use the troubleshooting section below before changing several cables at once.
Roku’s device-connection guidance also recommends connecting a game console or Blu-ray player to an available HDMI input and switching the TV to that input when you use it: Roku Support: How to use a game console or Blu-ray player.
When several devices use the same input number
Each physical HDMI input can carry one source at a time. If you have more sources than TV inputs, you need to change cables, use an HDMI switch that supports your required signals, or route sources through a compatible receiver. An HDMI switch or receiver adds another device and another possible failure point, so connect sources directly to the TV first when that is practical.
Rank #2
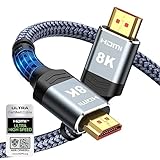
- Top Technology--8K@60HZ: This 8K Ultra-High Speed 2.1 HDMI Cable uses the most cutting-edge technology, which is compatible with 8K@60HZ,4K@240HZ and 4K@120HZ clearly displays every particle, and accurately processes every signal source.
- Upgrade Revolution: Highwings Ultra High Speed HDMI Cable 2.1 8K supports 48Gbps (6GB/s) which can will no longer be stuck or dropped frames when watching video. It is also backward compatible with HDMI 2.0b/2.0a/1.4/1.3/1.2/1.1 versions.
- For Game Enthusiasts: This 8K Ultra High Speed HDMI Cable 2.1 can achieve a super smooth picture of 4K@120HZ. Its latest game mode supports variable refresh rate, maximizes the value of the graphics card and CPU to obtain a smoother and more detailed picture.
- Reinforced high-quality materials: This 8K HDMI Cord uses Highwings' most popular classic style. The tail's anti-bending design has been upgraded to make it more durable. The military grade tensile nylon material also greatly extends its life.
- The ultimate perfectionist: Highwings every parts of the cable has been put through rigorous the performance tests in the laboratory. After we've combined every flawless part into a perfect 8K cable and it can be presented to you.
Rename inputs if the TV allows it
Many televisions let you label an input as “Game,” “Blu-ray,” “Cable” or a custom name. The exact path varies, so look for Edit, Label, or Manage Inputs in the TV’s input screen. Renaming is optional; the port number you recorded is the dependable reference when labels are unavailable.
Connect a soundbar with HDMI ARC or eARC
HDMI ARC (Audio Return Channel) sends audio from the TV back to a compatible soundbar or receiver over HDMI. eARC is an enhanced version of the return channel. The connection is usually a single cable, but both ends must support the intended function and the audio formats you want.
Do these 3 things before closing this tab:
1Fix the driver behind crashes, sound loss and screen glitches2Repair Windows errors before they cause bigger problems3Scan for outdated or missing drivers - takes under a minute- Locate the TV’s labelled ARC/eARC socket. It may be one particular HDMI port rather than every HDMI input.
- Locate the soundbar’s TV ARC/eARC port. Do not use a soundbar HDMI input intended for a source device.
- Connect the two labelled ports with an HDMI cable. Samsung Canada recommends a High Speed HDMI cable with Ethernet or a Premium High Speed HDMI cable for the setup described in its support instructions; check your own manuals for the required cable capability.
- Turn on the TV and soundbar. Set the soundbar’s source to TV, HDMI ARC, eARC or the equivalent label.
- Change the TV’s audio output from internal speakers to External Speaker, HDMI ARC/eARC, or the equivalent option shown by your model.
- Enable ARC/eARC if the TV exposes a separate switch. Some models enable it automatically when a compatible device is detected.
- Enable HDMI-CEC on the TV and soundbar when the manuals require it for ARC operation or shared remote control.
- Play audio from a built-in TV app or connected source and raise the soundbar volume. Confirm that the TV is no longer using its internal speakers.
Samsung’s Canada instructions show the general HDMI ARC arrangement, while Sony explains alternative soundbar connections and their limitations. Read both the TV and soundbar manuals because regional editions and model menus differ: Samsung Canada HDMI ARC support and Sony USA soundbar connection support.
ARC versus eARC: what to verify
Do not infer complete format support from an ARC or eARC label. Verify that the TV, soundbar or receiver, and the content source support the same audio formats and features. A device may have an eARC-labelled port while another part of the chain limits the available format. If a manual lists a required setting such as eARC Mode, Digital Audio Output or Pass-Through, follow that model’s instructions exactly.
When optical audio is the better fallback
Use an optical cable only when the TV and soundbar or receiver both have compatible optical ports and the features you need are available through that connection. Connect the TV’s optical output to the soundbar’s optical input, select Optical or Digital Audio on the soundbar, and choose the corresponding external or optical output in the TV’s sound settings.
Rank #3

- IN THE BOX: HDMI cable (A Male to A Male) for connecting 2 HDMI-enabled devices; 6 feet long in Black
- DEVICE COMPATIBLE: Connects Blu-ray players, Fire TV, Apple TV, PS4, PS3, Xbox One, Xbox 360, and computers to TVs, displays, A/V receivers, and more
- SUPPORTS 4K VIDEO: Supports 4K video at 60 Hz, 2160p, 48-bit/px color depth, as well as bandwidth up to 18Gbps, Ethernet, 3D, and Audio Return Channel (ARC)
- EASY CONNECTION: Share an Internet connection among multiple devices (no need for a separate Ethernet cable)
- BACKWARDS COMPATIBLE: Works with earlier versions to allow for use with a wide range of HDMI-enabled devices
Optical can restore basic TV audio when the HDMI ARC port is occupied, unavailable, or incompatible. It does not carry the HDMI-CEC commands used for shared power and volume control. Sony specifically notes that an optical-only connection does not provide HDMI-dependent power interlock and TV-remote volume control. You may therefore need the soundbar’s own remote, and the TV and soundbar may power on independently.
Quick wins for a faster PC:
Clear out junk files and repair common Windows errorsFree Scan →Fix the driver behind crashes, sound loss and screen glitchesFind Drivers →| Decision point | HDMI ARC/eARC | Optical |
|---|---|---|
| Ports required | TV HDMI ARC/eARC and matching soundbar or receiver port. | TV optical output and matching soundbar or receiver input. |
| TV audio return | Designed to return audio from TV apps and other TV sources. | Returns audio only through the optical connection and supported formats. |
| Shared control | Can support HDMI-CEC power and volume commands when all compatible devices have it enabled. | No HDMI-CEC control over the optical-only link. |
| Format choice | Depends on the ARC/eARC generation and every device in the chain. | Depends on the optical capabilities listed in the manuals. |
| Best use | Preferred single-cable route when both devices support it and you want TV audio plus integrated control. | Fallback for compatible equipment when HDMI ARC/eARC is not available or cannot be used. |
Neither connection is universally superior for every combination. Choose the one that satisfies the port match, TV-audio requirement, control features and end-to-end format support documented for your equipment.
Enable HDMI-CEC for shared controls
HDMI-CEC allows compatible devices to share control commands over the same HDMI connection used for audio and video. It can enable functions such as turning a soundbar on with the TV, switching to an active source, or using one remote for volume. Roku describes the feature this way: “CEC allows commands to be shared between devices over the same HDMI connection you use for audio and video.”
CEC has different names. Roku lists Samsung Anynet+, LG SIMPLINK and Sony BRAVIA Sync as examples. The setting may be under General, External Device Manager, System, Inputs, Sound or HDMI settings, and the location changes by model. Search the TV’s settings for CEC, device link, HDMI control or the brand-specific name, then enable it on each device that is meant to participate.
CEC is optional for basic picture and sound. If enabling it causes unwanted input switching or power behavior, turn it off on the device that is creating the conflict and use the individual remotes. A source, cable or receiver that does not support the requested command cannot gain that function merely because another device has CEC enabled. Roku’s detailed steps are available at Roku Support: configure HDMI settings and ARC.
Crashes, No Sound, or Screen Glitches?
Random freezes, missing sound and display glitches usually trace back to one bad driver. Find and replace yours safely.Free scan · under a minutePC Slower Than It Used to Be?
A free scan shows the junk files, broken settings and background clutter dragging Windows down - then fixes them in one click.Free scan · Windows 10 & 11Rank #4

- Superior Display, Swift Connectivity: Elevate your viewing experience to unparalleled clarity with 8K@60Hz, and enjoy smoother visuals and reduced lag with support for 4K@120Hz and 4K@60Hz.
- Quick and Seamless Video Transfer: With the latest HDMI technology, stream or transfer videos without interruptions, and witness the power of up to 48 Gbps in bandwidth, ensuring consistently clear content.
- Lasts Longer, Performs Stronger: This cable is designed to withstand up to 1,000 bends throughout its lifespan, meaning fewer replacements and continuous peace of mind.
- One Cable, Many Solutions: Whether you're connecting tablets, laptops, HDMI devices, projectors, or desktop screens, this cable effortlessly connects them all.
- What You Get: HDMI Cable (6 ft, 8K), welcome guide, 18-month warranty, and our friendly customer service.
Connect an antenna for local broadcast channels
An antenna is a separate path from internet streaming. Attach an HDTV antenna to the TV’s antenna or RF input, choose the TV’s broadcast or live-TV mode, and run the channel scan offered in the TV’s setup menu. Reception depends on location, antenna placement and local transmissions; the scan can find only channels that reach the antenna.
You do not need an antenna to use streaming apps, and connecting one does not replace an internet connection. Roku’s instructions for connecting a game console also cover the distinction between external HDMI sources and the TV tuner: Roku Support.
Finish the initial smart-TV setup
Once the physical devices work, complete the TV’s on-screen setup for network access, accounts, privacy choices and updates. Because manufacturers present different screens and requirements, use the exact guide for your model and country. Keep the TV connected to stable power during a firmware update and do not unplug it while an update is being installed.
After setup, test each source one at a time and note any device-specific settings you changed. A simple record might include the HDMI number, the source name, the soundbar input, the TV audio-output choice and whether CEC is enabled. This makes later troubleshooting much faster.
Troubleshoot a failed connection methodically
No picture from a console, player or box
- Use the TV remote’s Input or Source control and select the exact HDMI number where the device is connected.
- Confirm that the cable runs from the source’s HDMI OUT to the TV’s HDMI IN, not to an output or the soundbar’s TV-return port.
- Reseat both HDMI plugs so they are fully inserted. Inspect for a damaged plug or visibly strained cable.
- Turn off the TV and source, disconnect power briefly, reconnect the HDMI cable, then turn the source and TV back on.
- Try another known-working TV HDMI input or cable, changing only one item at a time so you can identify the cause.
- If a receiver or switch is in the path, connect the source directly to the TV temporarily. This separates a source problem from an intervening-device problem.
The soundbar has no sound
- Verify that the HDMI cable is in the TV port labelled ARC/eARC and the soundbar port labelled TV ARC/eARC.
- Set the TV audio output to HDMI ARC/eARC, External Speaker or the model’s equivalent, rather than TV Speakers.
- Set the soundbar’s source to TV, ARC or eARC.
- Enable HDMI-CEC and ARC/eARC if the manuals require those switches.
- Reseat the cable at both ends and restart the TV and soundbar.
- Check for firmware updates listed by the TV and soundbar manufacturers.
- If ARC/eARC remains unavailable, test optical audio if both devices support it, accepting that HDMI-dependent power and volume control will not be available through an optical-only link.
Samsung’s soundbar guidance emphasizes selecting the external speaker output, while Sony distinguishes HDMI ARC/eARC from optical behavior. Follow the exact menu labels for your models rather than copying a path from another television.
Best Value

- IN THE BOX: HDMI cable (A Male to A Male) for connecting 2 HDMI-enabled devices; 25 feet long in Black
- DEVICE COMPATIBLE: Connects Blu-ray players, Fire TV, Apple TV, PS4, PS3, Xbox One, Xbox 360, and computers to TVs, displays, A/V receivers, and more
- SUPPORTS 4K VIDEO: Supports 4K video at 60 Hz, 2160p, 48-bit/px color depth, as well as bandwidth up to 18Gbps, Ethernet, 3D, and Audio Return Channel (ARC)
- EASY CONNECTION: Share an Internet connection among multiple devices (no need for a separate Ethernet cable)
- BACKWARDS COMPATIBLE: Works with earlier versions to allow for use with a wide range of HDMI-enabled devices
The picture works but audio does not
Check the TV’s audio-output destination first. A TV can display an HDMI source while still sending sound to its internal speakers, a muted output, or an incorrectly selected external device. Confirm the soundbar volume and mute state, then check the source device’s audio settings if the problem occurs only with one console or player. If you use an AV receiver, bypass it temporarily to determine whether it is negotiating the signal incorrectly.
CEC power or remote control does not work
- Confirm that every device involved supports the control function you want.
- Enable CEC on the TV and the relevant HDMI device using each brand’s terminology.
- Check that the HDMI cable is firmly seated and connected to the correct ARC/eARC port when audio return is involved.
- Restart the TV and HDMI device, then test power and volume again.
- Disable CEC on a conflicting device if it repeatedly changes inputs or powers the system unexpectedly.
CEC behavior is not identical across brands, and an optical-only soundbar connection cannot provide HDMI-CEC commands.
A device works only after repeated unplugging
Disconnect power from the TV and connected HDMI devices, reconnect the cables in the intended order, and power them on again. Check firmware for each device. If a receiver, switch or other intermediary is present, test the source directly on the TV. These steps can reveal a cable, port, firmware or handshake problem without replacing every component.
Use this final verification checklist
- Every source is connected from its output to a compatible TV input.
- You have recorded the physical HDMI input used by each source.
- Selecting each recorded input displays the expected device.
- The soundbar uses matching TV ARC/eARC ports, or a documented optical fallback.
- The TV audio output is set to the external audio system when the soundbar is in use.
- CEC is enabled only on compatible devices that need shared power, input or volume control.
- The antenna is connected and the channel scan is complete if local broadcasts are required.
- TV and device firmware, cables and power connections have been checked after any failed test.
Once these checks pass, leave the port map with the TV’s manuals. It will make future device swaps, input selection and troubleshooting considerably easier.
Quick Recap
Product prices and availability are accurate as of the date/time indicated and are subject to change. Any price and availability information displayed on Amazon at the time of purchase will apply.

