
The Tool Desk
Outbyte Driver Updater FREEScan for outdated or missing drivers - takes under a minuteDriver Scan →Outbyte PC Repair FREEClear out junk files and repair common Windows errorsFree Scan →iTechGuides is reader-supported. When you buy through links on our site, we may earn an affiliate commission. As an Amazon Associate I earn from qualifying purchases. Learn more
The reliable way to improve surround sound is to work in this order: identify the layout your receiver or soundbar supports, place each surround channel beside or behind the main listening seat at an appropriate seated-ear reference, test the subwoofer in several practical room positions, then run the system’s own calibration. There is no universally perfect location because room shape, reflective surfaces, furniture and the number of listening seats change the result.
Use the guide below to correct placement before trying to correct it electronically. Calibration can refine a sensible arrangement; it cannot make an incorrectly assigned channel or an obstructed speaker behave as intended.
Start with the channel layout your system actually uses
A channel label describes the signal layout, not necessarily the number of physical speaker cabinets. In consumer notation, the first number identifies ear-level speaker channels, the number after the dot identifies the subwoofer or low-frequency-effects channel, and a final number identifies height channels.
| Layout | Ear-level speakers | Height speakers | Subwoofer channel | Surround arrangement |
|---|---|---|---|---|
| 5.1 | Five | None | One | One left/right surround pair beside or slightly behind the listening position |
| 7.1 | Seven | None | One | Side surrounds plus a separate rear-surround pair |
| 5.1.2 | Five | Two | One | Surround pair with two height channels |
| 7.1.4 | Seven | Four | One | Side and rear surrounds with four height channels |
The “.1” is a signal channel. It does not automatically mean you must use exactly one subwoofer cabinet; the number of cabinets depends on the equipment and room. Conversely, adding a second cabinet does not turn a 5.1 signal into a 5.2 layout unless the processor labels and manages it that way.
#1 Best Overall

- Wide Compatibility: The PERLESMITH speaker stands feature an adjustable width of 4.5" to 9", making it compatible with most small bookshelf and satellite speakers up to 11 lbs. These speaker stands are compatible with Bose, Harman Kardon, Polk, JBL, Sony, and more. Please note: it is not suitable for round or irregularly shaped speakers.
- Customizable Height for Optimal Sound: These floor speaker stands feature an adjustable height range from 33.3" to 45", positioning your speakers at the perfect level for the best acoustics, whether you're enjoying music or movies. The twist-lock design ensures quick and easy height adjustment without the need for tools.
- Two Cable Management Options: The speaker stands pair feature a 1.18" H x 0.59" W cable hole for routing wires through the hollow poles for a clean look. Please confirm the size before purchase. If the cable holes are too small for connectors or cables to pass through, the floor speaker stands include hook & loop straps to secure cables along the outside of the poles.
- Enhanced Stability: Made from solid steel with a wide base and 20% deeper threaded hole connections, this surround sound speaker stand delivers a rock-solid foundation to keep your speaker secure and balanced. It also includes non-slip foot pads, ensuring safe and stable placement on any floor type.
- Effortless Assembly & Reliable Support: Each pair of speaker stands comes with standard mounting hardware for hassle-free setup. Our US-based customer support team is always online to assist with pre-sale and after-sale support. If you have any questions, feel free to contact us, and we’ll respond within 24 hours.
5.1: one surround pair
In a 5.1 system, the two surround speakers carry the side or rear effects channel assigned by the device. Check the receiver or soundbar diagram rather than assuming that “rear” means directly behind the sofa. Many 5.1 diagrams place the pair to the sides and just behind the main seat.
7.1: side surrounds and rear surrounds
A 7.1 arrangement adds a second pair. The side pair sits alongside the listening area, while the rear pair fills the wall behind it. The channel assignment in your manual determines which output is “side” and which is “rear”; swapping them can make the soundstage feel reversed even when the speakers are physically well placed.
Atmos layouts: 5.1.2 and 7.1.4
Atmos layouts retain the ear-level bed and add height channels. Place and calibrate the ear-level surrounds first, then follow the height-speaker diagram supplied for your particular product. Professional Dolby layout material discusses 5.1.4 and 7.1.4 in mixing-room contexts; those studio requirements should not be treated as mandatory specifications for a home playback system.
Recommended Free Tools
Set the listening position before moving speakers
Choose the primary seat
Start with the seat where surround imaging matters most. Dolby’s consumer guidance describes a “sweet spot” where speaker outputs meet. In a single-seat room, center that seat between the left and right sides when the furniture allows. With several seats, choose the compromise position that gives the largest number of listeners a reasonably balanced angle and distance; no arrangement can make every seat identical in an irregular room.
Rank #2
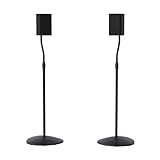
- Height Adjustable: Customize your sound thanks to 10 inches of height adjustment. Now you can mount your speakers directly at ear level, just twist the collar and adjust from 28 to 38 inches. No tools required!
- Premium Design: Built from heavy-gauge steel, these speaker stands will help deliver top quality sound while keeping your speakers safe. The wide base helps prevent against bumps or falls, and included felt pads minimize vibration.
- Universal Speaker Stand: Engineered to securely hold small satellite and bookshelf speakers up to 3.5 lbs, these stands offer three versatile mounting options: L-shaped brackets, a top plate, and a keyhole adapter, ensuring maximum compatibility with your speakers.
- DIY Installation: Easy as 1, 2, 3. This speaker stands pair come with everything you need to take your speakers to new heights, including hardware, base pads and different mounting brackets for your unique setup.
- SANUS Difference: The SANUS adjustable height speaker stand comes with a 5-year warranty, and top-notch Minnesota based customer service. Our experts are ready to chat 7 days a week if you have questions or run into a snag.
Account for the room, not just the floor plan
Room dimensions and shape, hard reflective boundaries, open doorways and furniture all affect what reaches the listener. A wall-mounted speaker may be blocked by a tall cabinet or fire directly into a nearby side wall. A stand can move the same speaker away from an obstruction and makes later rearrangement easier. Leave enough clearance for the speaker’s ventilation and for safe cable routing.
How high should rear speakers be mounted?
Use seated ear height as the reference
Measure from the floor to the listener’s ears while seated in the normal viewing position. Dolby gives about 3.9 feet as an approximate seated-ear-height example, not as a universal mounting requirement. Your actual ear height, sofa cushion and the speaker maker’s instructions take precedence.
Keep the left and right surround speakers at comparable heights. If one side must be higher because of a window, doorway or shelving, document the compromise and let the calibration system account for level and timing differences where it can; do not conceal a major physical mismatch by simply turning that speaker up.
Quick wins for a faster PC:
Scan for outdated or missing drivers - takes under a minuteDriver Scan →Clear out junk files and repair common Windows errorsFree Scan →Fix the driver behind crashes, sound loss and screen glitchesFind Drivers →Choose stands when the room makes mounting difficult
Dolby recommends stands where needed to put speakers at the correct height. They are especially useful when furniture cannot place a compact surround speaker near seated ear level or when you are renting. Before buying, verify the stand’s height range, the speaker-attachment method, the base footprint and the stability of the combined speaker-and-stand assembly. Keep stands where children, pets and walking paths cannot easily knock them over.
Rank #3

- Height Adjustable Speaker Stands:This speaker stands use the collar to adjust height from 30.0" to 39.1" to get your sound speakers the desired height and enjoy stereo or surround sound. Placing the bookshelf speakers stands on the appropriate height can also reduce reflections to give you a purer and more clear sound.
- Compatibility&Multi Installation Options:he surround sound speakers stand fit back screw hole /key hole.The height 2.7" to fit your various speakers of different sizes with different holes. WARM TIPS: Please make sure there are holes on the back the speaker to lock the screws before purchase.NOTE: The metric screws came with the stand do not fit for Samsung HW-Q90R. (For Samsung Q-series Rear Speakers, please refer to speaker stand XAS506).
- Sturdy Square Base:The floor speaker stands is constructed from high quality steel materials which is sturdy enough and durable. The square base of the rear speaker stands is more stable and the weight capacity up to 11lbs/5kg per stand. No worries about it tipping over. Rubber feet for wooden, cement, tile or other hard floor. If the stand is placed on carpet, install the carpet nail.
- Convenient To Use&Us Based Customer Support :This speaker stands pair include all the required hardware and easy instructions, you can assemble it within few minutes. The speaker floor stands can be easily to move to your living room, bedroom and study room. Our team will provide pre-sales and after-sales service online or by phone regarding product suitability or installation problems.
- Cable Mangement:The floor speaker stands keep cables clean and organized with internal channel ( 0.6“ W x 1.2” H) for a clean and tidy appearance. Or external velcros in package to help run the cable around the stand tube.Applicable Speaker Screws: M4X30mm Bolt, M6X30mm Bolt.Warm tips: If any parts are missing, please massage us.
Use wall mounts for a stable but less flexible installation
Wall mounting can keep cables tidy and free floor space, but it fixes the speaker’s position. Mark the proposed height and angle with removable tape, sit in the main seat and confirm that the speaker is not hidden by furniture before drilling. Use the mount and fasteners specified for the speaker’s weight and wall construction.
How should rear speakers be aimed?
Distinguish side surrounds from rear surrounds
Side surrounds belong beside the listener in a 7.1 system; rear surrounds belong on the wall behind the listening area. In a 5.1 system, the single pair may sit beside or behind the listener according to the layout diagram. Do not place every surround directly behind the sofa simply because the product is marketed as a “rear” speaker.
Aim toward the listening area according to the speaker design
Orient each speaker toward the seats it is intended to cover. A conventional directional cabinet generally benefits from facing the listening area, while a purpose-built diffuse surround may be designed to fire toward a wall or spread energy more broadly. Follow the speaker maker’s orientation guidance when it conflicts with a generic diagram.
Keep the left and right speakers symmetrical where the room permits. Symmetry is a useful starting point, but a doorway, open-plan side or unusually reflective wall may require a practical compromise. Note the compromise before calibration so you can judge whether a later change actually improves the result.
Rank #4

- 【Optimal Home Theater Audio Experience】 Home Theater Essential - Whether you’re chilling on the couch or dancing in your socks, easily twist the collar to change bookshelf speaker stands from 28" to 38" to let sound follow your ear. Let's enjoy more immersive, room-filling vibe with fewer reflections!
- 【Universal Speaker Brands Friendly】 Equipped with three key mounts - Top plates(with pads), L-shaped brackets, and Dual brackets, think of the surround sound speaker stand as a universal remote for most satellite speakers and small bookshelf speakers from Klipsch, Polk, JBL, Sony, Vizio, Edifier, and more. Versatile mounting options for theater setup.
- 【Rock Solid Stability】 As a trinity of sturdy metal pole, weighted base, and anti-slip pads, the rear speaker stands make speakers stay put-even when your playlist gets rowdy; Pads protect carpet or tile flooring. Each stand supports up to 11lbs—ideal for small home audio systems.
- 【Cable Wire Management】 Say goodbye to spaghetti wires. The speaker stands for surround sound, keep wires tucked away with larger built-in cable channel. Plus, ten velcro straps make you quickly fix and change the wire.
- 【Quick Setup in Minutes】 The speaker stands pair comes with all the necessary hardware and step-by-step instructions. Grab a screwdriver—no extra tools or hassle required, and you’re done in minutes.
Where should I put the subwoofer for the best bass?
Begin with a workable location, not a supposedly universal answer
Dolby’s consumer guidance notes that low bass is not directional, so a subwoofer can be placed in many parts of a room. “Not directional” does not mean “room-independent”: boundaries and room dimensions can make some seats sound full while others sound weak or boomy. Choose locations that have safe power and signal access, adequate ventilation, and no risk of the cabinet being kicked or blocked.
Use the front wall as one test position
Dolby’s professional guidance for LFE subwoofer cabinets identifies the front wall, around the midpoint between the center speaker and either the left or right speaker, as a good starting point. That guidance is written for professional support and is not a mandatory consumer placement. Treat it as one position to test, not a ranking that overrides your room.
Compare positions using the same material
Testing several positions is more informative than judging a location with a different film or song each time. Use a familiar scene or audio passage with sustained bass and repeat it at the same listening level.
Do these 3 things before closing this tab:
1Fix the driver behind crashes, sound loss and screen glitches2Repair Windows errors before they cause bigger problems3Scan for outdated or missing drivers - takes under a minute- Place the subwoofer at the initial front-wall position or another convenient location.
- Listen from the primary seat, noting whether bass sounds even and integrated rather than concentrated in one note.
- Move the cabinet to two or more other practical positions, such as another part of the front wall or a side-wall location that keeps cables safe.
- Replay the identical passage from the same seat. If multiple seats matter, check each one before deciding.
- Keep the position that gives the most consistent result across the seats you care about, while still meeting ventilation and safety requirements.
Do not assume the position that sounds loudest is the best. A peak at one seat can leave another seat thin, and a smoother result may initially seem less dramatic until the main speakers and subwoofer are calibrated together.
Best Value

- Rear Speaker Compatibility (Up to 5Lbs) - The rear speaker stands designed for surround and satellite speakers with 1/4"-20, M5, M6 threaded holes or keyhole mounts. Compatible with popular brands including Samsung, LG, Sony, Vizio, Roku, JBL, Polk, Klipsch, Logitech, TCL, Nakamichi and more.(⚠️ Please select the correct mounting method based on your speaker’s mounting hole.)
- Height Adjustable for Optimal Sound - The height adjustable speaker stands from 33" to 42" easily position speakers at ear level for an immersive surround sound experience. Features a tool-free rotary knob for quick height adjustments—no extra tools required.
- 2 Installation Options Included - Includes 2 floor speaker stands + 2 wall mount brackets, the home threater speaker stands allowing flexible setup for different room layouts. Perfect for home theater, living room, or media room surround sound systems.(⚠️ Wall mount supports M6, 1/4"-20 thread holes and keyhole speakers.)
- Clean Look with Cable Management - The rear speaker stands integrated 0.5" x 0.5" cable channel hides speaker wires for a clean, clutter-free appearance. Velcro cable ties included to secure thicker cables neatly along the stand.
- Strong Steel Construction & Stable Base - The heavy-duty speaker stands made from high-quality steel for excellent stability and durability. Wide base improves balance and sound performance, while anti-slip foam pads protect floors and reduce vibration. Decorative screw covers provide a sleek, modern finish.
How do I calibrate rear speakers and a subwoofer?
Use the calibration built into your actual device
Many AV receivers, soundbars and subwoofers include a calibration mode. The controls, microphone procedure and terminology differ by manufacturer, so use the manual for your exact model. Dolby’s consumer guidance summarizes the reason clearly: “Every room is different, so calibration can help you get the best setup.”
- Confirm the physical layout and channel assignments in the receiver or soundbar menu. A 7.1 system must identify side and rear outputs correctly, and an Atmos system must identify its height channels.
- Set the speakers and subwoofer in their intended positions before starting. Open doors, move temporary obstacles and place the main seat where it will normally be used.
- Start the device’s automatic calibration routine. If the system supplies a measurement microphone, place it exactly where the instructions specify and keep the room quiet during the test.
- Allow the routine to complete its speaker-detection, level and distance calculations. Do not change positions or controls partway through.
- Save the result under the device’s normal profile or memory location, then listen to familiar dialogue, effects and music. A successful routine is a starting point for listening, not proof that every seat is perfect.
- If the balance is clearly uneven, make one small physical or menu change at a time and listen again. Avoid changing several variables before you know which change helped.
What calibration can and cannot fix
Room correction can optimize output for the measured listening area, including differences caused by room boundaries and unequal distances. It cannot repair a speaker connected to the wrong output, a surround hidden behind furniture, an unstable stand or a subwoofer placed where its response is poor at the seats you use. Correct those physical issues first, then rerun the routine.
Recalibrate after moving speakers or furniture
Dolby’s home-theater guidance recommends trying content and recalibrating occasionally, particularly after speakers or furniture are moved. A new sofa position, a thick rug, a bookcase, an open door or a wall-mounted speaker can change reflections and distances enough to invalidate the previous result.
Keep a short note of the saved profile and the physical arrangement. When you make a meaningful change, restore the speakers to their intended height and orientation, run the calibration again, and compare the same familiar material. Minor decorative changes do not necessarily require a full reset; a speaker move, seat move or large furniture change does.
Quick Recap
Room-specific decisions and common problems
The surrounds sound too loud or distractingly close
- Verify that the side and rear channels are assigned to the outputs shown in the manual.
- Check that both speakers are aimed at the listening area and are at comparable seated-ear reference heights.
- Run the built-in calibration again after correcting the physical placement.
- If a speaker is still intrusive, try a modest placement change before making a large level adjustment.
The surround field feels empty behind the listener
- In a 5.1 system, confirm that you have not placed the pair as though the system had separate side and rear channels.
- In a 7.1 system, check that the rear-surround pair is connected and assigned correctly.
- Move obstructions and re-aim the cabinets toward the seats, then recalibrate.
Bass is boomy in one seat and weak in another
- Test more than one subwoofer position with the same familiar passage.
- Check the primary seat and at least one additional seat before choosing a location.
- Use the receiver, soundbar or subwoofer calibration supplied for the system after the move.
- Do not judge a position only by maximum loudness at one seat.
The calibration routine gives an implausible result
- Inspect speaker and subwoofer connections and confirm every channel is assigned to the intended output.
- Make sure the microphone, if supplied, is positioned exactly as the device instructions require and that the room is quiet.
- Remove temporary obstructions and restore the speakers to the intended height and orientation.
- Run the routine again. If the result remains inconsistent, use the manufacturer’s troubleshooting instructions rather than inventing a universal meter, app or setting.
A practical setup checklist
- Identify whether the system is 5.1, 7.1, 5.1.2, 7.1.4 or another layout shown by the device manual.
- Mark the primary listening seat and consider whether more than one seat must be covered.
- Place side and rear surrounds according to their assigned roles, keeping left and right positions as symmetrical as the room allows.
- Use actual seated ear height as the reference; Dolby’s approximately 3.9-foot example is only a practical illustration.
- Choose stands when they solve a height or rearrangement problem, and verify compatibility and stability before use.
- Aim speakers toward the intended listening area unless the speaker design specifies a different orientation.
- Test several safe subwoofer locations, including the professional front-wall midpoint starting point when it is practical.
- Run the calibration built into the receiver, soundbar or subwoofer, following that device’s instructions exactly.
- Listen to familiar content from the seats that matter, then make one change at a time.
- Recalibrate after moving speakers, changing the main seat or rearranging substantial furniture.
Product prices and availability are accurate as of the date/time indicated and are subject to change. Any price and availability information displayed on Amazon at the time of purchase will apply.

