
What’s actually slowing this PC down?
Pick the symptom - the matching free tool is one click away.
iTechGuides is reader-supported. When you buy through links on our site, we may earn an affiliate commission. As an Amazon Associate I earn from qualifying purchases. Learn more
Better gear is a reason to manage the encounter, not a reason to take a fair fight. In DMZ, break contact when another Operator has the weapon, armor or equipment advantage; preserve your line of sight and escape route; then re-engage only after you create a concrete edge such as surprise, stronger cover or teammate support. If none of those conditions exists, rotate away and finish a lower-risk objective.
This matters because DMZ uses a high-risk, single-life structure. Activision’s Warzone 2.0 DMZ overview says death can cost non-insured weapons and keys. The tactics below are practical applications of that risk and of DMZ’s mission, contract, looting and extraction systems—not guarantees from controlled testing.
First, identify which DMZ rules apply
The equipment examples in this guide come from Call of Duty: Warzone 2.0 DMZ, with the Comms Vest and Stealth Plate Carrier details specifically documented in Activision’s Season 03 material from April 2023. DMZ has changed over time, and a separately described later mode or a different Call of Duty release may use different Operators, carriers, perks, inventories or spawn behavior. Check the mechanics in the version you are actually playing before relying on a named item.
Outdated Drivers Are Slowing You Down
One free scan finds every outdated or missing driver and matches the right update for your exact hardware.Free scan · exact hardware matchPC Slower Than It Used to Be?
A free scan shows the junk files, broken settings and background clutter dragging Windows down - then fixes them in one click.Free scan · Windows 10 & 11The broad principle is more durable than any particular carrier: a kit is an asset you can lose, while information, positioning and the option to disengage remain valuable even when your gun is ordinary.
#1 Best Overall
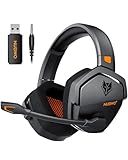
- Zero-Latency, Interference-Free Wireless Gaming Headset: Powered by proprietary 2.4GHz wireless technology, the NUBWO G06 ensures flawless connectivity during intense gaming sessions, including FPS and RPG titles. Seamlessly use wireless peripherals (keyboards, mice, controllers) alongside Wi-Fi networks without interference, delivering 0ms audio latency and 100% uninterrupted immersion
- 100-Hour Uninterrupted Gaming: Powered by a 1200mAh high-capacity battery and Proprietary Low-Power Chipset Technology, the NUBWO G06 delivers 50% reduced energy consumption, enabling 100 hours of uninterrupted gameplay
- Dual Wireless Freedom: Equipped with dual wireless technology (2.4GHz + Bluetooth 5.3), the headset ensures zero-compromise multitasking. While the 2.4GHz dongle connects to gaming consoles (PS5, PS4, PC) for ultra-low-latency audio, the Bluetooth 5.3 simultaneously links to your smartphone. Miss no critical calls—even during intense gaming sessions—as a single power button press instantly answers incoming calls without disrupting gameplay
- Triple Mode All Devices Compatible: Seamlessly switch between 2.4GHz wireless (dongle-connected for PC/PS5/PS4), Bluetooth 5.3 (mobile/tablet pairing), and 3.5mm wired modes (Xbox/Switch compatibility) with zero latency, offering universal device adaptability and uninterrupted gaming immersion (Xbox Series only supports 3.5mm wired)
- Immersive Sound Sync for Competitive Edge: Equipped with a 50mm composite diaphragm driver, this headset delivers immersive 3D surround sound—command the explosive audio of RPG epics and pinpoint tactical footsteps in FPS battles. Powered by a proprietary wireless chip, achieve seamless audio-video synchronization for true-to-life immersion
Why a gear disadvantage changes the correct decision
Death has an inventory cost
Activision describes DMZ as a high-risk mode in which dying can cost non-insured weapons and keys. That makes an avoidable opening duel a poor trade when the other squad has more armor, a better weapon or more tactical options. Winning one fight is not automatically worth risking the Operator and equipment you brought into the deployment.
Your Operator can be assigned a risk level
Activision’s “Call of Duty 101” guidance recommends keeping the best-equipped persistent Operator for tougher missions or deliberately planned, longer infiltrations. It also suggests experimenting with another Operator when little is at stake. Treat your roster as a risk-management tool:
- High-value Operator: reserve for a mission, contract chain or planned route that justifies the exposure.
- Routine Operator: use for learning an area, basic looting or uncertain objectives where losing the kit will not derail your main plan.
- Recovery Operator: after a loss, use the next deployment to rebuild rather than immediately attempting revenge against the same type of squad.
This does not make a weak kit disposable. It gives you a deliberate answer to the question, “What am I risking by taking this fight right now?”
Use a fast engagement test before shooting
When you hear or see a better-equipped squad, make the decision in this order. You are not trying to calculate an exact win percentage; you are checking whether the fight has a reason to exist.
- Can you leave without crossing their sightline? If yes, move now while you still control the timing.
- Do you have hard cover and a second route? A wall, building or terrain break is useful only if it lets you change direction or exit. A single rock with no follow-up route can become a trap.
- Do you know their location and numbers? If you have only a sound cue or a glimpse, do not turn uncertainty into a close-range duel.
- Do you have a specific advantage? Examples include seeing them first, holding a defensible angle, catching one Operator separated from the squad, or coordinating a crossfire with teammates.
- What is the objective cost? If the fight is unrelated to your mission or extraction plan, leaving usually preserves more value than forcing it.
If the answer to the last two questions is no, disengage. “They have better gear” is not itself a reason to challenge them, and “I already took one shot” is not a reason to continue.
Survive the opening minutes
Do not make the spawn area your battlefield
Early movement should have a destination: a building with cover, a mission location, a contract objective or a route toward extraction. Avoid standing in an exposed area while sorting inventory or deciding where to go. A squad that leaves its starting area with a plan is harder to pin than one that waits for a contest it did not choose.
No route or spawn is universally safe. Treat common approaches and crowded opening areas as places where contact is possible, not as guaranteed ambushes or guaranteed escapes. Use terrain and buildings to reduce the number of directions from which another squad can see you, and change your route when audio or visual information suggests that a group is nearby.
Do these 3 things before closing this tab:
1Fix the driver behind crashes, sound loss and screen glitches2Clear out junk files and repair common Windows errors3Scan for outdated or missing drivers - takes under a minuteMove between cover, not across empty ground
Cross an exposed space only when you have identified the next piece of protection and the time needed to reach it. If you are spotted, do not retreat in a predictable straight line. Break the first sightline, turn through a doorway or around terrain, and continue toward a different exit. A sudden change of direction can force a better-equipped opponent to reacquire you instead of allowing an easy follow-up shot.
Leave low-value loot behind
Do not re-expose yourself to recover a common item, a discarded weapon or a bag you have not secured. The item is worth less than the Operator and the equipment already carried. Mark its location mentally only if returning later is consistent with your route and the area is no longer controlled by the other squad.
Build an advantage before you re-engage
A weaker weapon can still win a fight when the encounter is arranged on favorable terms. The following advantages are practical combat judgments, not methods documented as guaranteed by Activision.
| Advantage you create | What it changes | What to verify |
|---|---|---|
| First visual contact | You choose when to fire and can identify whether the squad is split. | You still need an exit if the first burst does not finish the engagement. |
| Hard cover | It limits the angles and damage you must absorb while repositioning. | Check for a second route; one piece of cover can be surrounded. |
| Height or a defensible room | It can make the opponent climb, enter or expose themselves to reach you. | Listen for another approach and avoid trapping yourself in a dead end. |
| Team crossfire | Two players can force the squad to divide attention. | Agree on target, timing and fallback before anyone starts the fight. |
| Information | Knowing location and movement prevents a blind push. | Detection is not certainty; an audio cue does not reveal every enemy or every distance. |
| Separation | A lone Operator cannot immediately receive the full squad’s fire. | Do not chase so far that you enter the rest of the team’s angle. |
Do not try to collect every advantage at once. Two reliable advantages—such as first sight plus hard cover—are often enough to justify a short engagement. If you cannot name one, continue rotating.
The Tool Desk
Outbyte Driver Updater FREEFix the driver behind crashes, sound loss and screen glitchesFind Drivers →Outbyte PC Repair FREEClear out junk files and repair common Windows errorsFree Scan →Disengage correctly when the fight is bad
Break the line of sight first
Use a building corner, hill, wall or other hard obstruction to stop incoming fire. Soft concealment can hide your movement, but it should not be your only protection against a squad with superior weapons. Once the first sightline is broken, do not immediately peek the same edge. The opponent will be watching the place you disappeared.
Change direction and tempo
Turn through an interior room, cross behind a second obstacle or take a route that changes your elevation. Sprinting in one straight line gives the pursuer a simple prediction. A short pause behind cover can also be useful if it lets you hear whether the squad is following, but do not remain stationary so long that they surround the position.
Communicate an exit, not an argument
For a squad, call out the direction of travel and the next rally point: for example, “Breaking west through the buildings; regroup at the contract location.” Teammates should move together or cover the retreat rather than each taking a separate angle and being eliminated individually.
Do not turn a retreat into a revenge push
After escaping, heal, reload and reassess the mission. Returning solely because the other squad damaged you creates an emotional objective that may not serve the deployment. Re-engage only if the squad’s position now gives you a clear advantage and the reward is relevant to your plan.
Positioning habits that reduce the gear gap
Use routes with multiple exits
Buildings with two doors, connected interiors and nearby cover give you more ways to break contact than a rooftop or dead-end alley. Before entering, identify the way out you will use if the front approach becomes dangerous. When moving through a compound, avoid occupying the only doorway unless a teammate is watching the other side.
Keep the squad’s spacing useful
Stay close enough to support a teammate under fire, but not so close that one burst or explosive affects everyone at once. A staggered formation lets the first player spot a threat while the second has an angle to cover the withdrawal. Excessive spacing has the opposite problem: a player who is surprised may be eliminated before help arrives.
Rotate before you are forced to
If a squad has seen your position, assume the angle is compromised. Move while you still have armor, ammunition and a route. Waiting for the opponent to push allows their superior equipment to dictate the engagement distance and timing.
Keep extraction and mission logic in mind
A fight near your intended extraction point can delay or prevent the objective even if you survive. If the deployment’s purpose is a mission or contract, a safe rotation that preserves the possibility of completion is often more valuable than a fight for a few dropped items.
Coordinate a counterattack with teammates
Solo players must emphasize avoidance because they cannot create a crossfire alone. A coordinated squad can sometimes offset weaker equipment, but coordination must be concrete rather than a vague promise to “push together.”
Rank #2
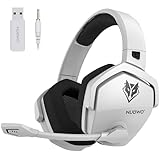
- Zero-Latency, Interference-Free Wireless Gaming Headset: Powered by proprietary 2.4GHz wireless technology, the NUBWO G06 ensures flawless connectivity during intense gaming sessions, including FPS and RPG titles. Seamlessly use wireless peripherals (keyboards, mice, controllers) alongside Wi-Fi networks without interference, delivering 0ms audio latency and 100% uninterrupted immersion
- 100-Hour Uninterrupted Gaming: Powered by a 1200mAh high-capacity battery and Proprietary Low-Power Chipset Technology, the NUBWO G06 delivers 50% reduced energy consumption, enabling 100 hours of uninterrupted gameplay
- Dual Wireless Freedom: Equipped with dual wireless technology (2.4GHz + Bluetooth 5.3), the headset ensures zero-compromise multitasking. While the 2.4GHz dongle connects to gaming consoles (PS5, PS4, PC) for ultra-low-latency audio, the Bluetooth 5.3 simultaneously links to your smartphone. Miss no critical calls—even during intense gaming sessions—as a single power button press instantly answers incoming calls without disrupting gameplay
- Triple Mode All Devices Compatible: Seamlessly switch between 2.4GHz wireless (dongle-connected for PC/PS5/PS4), Bluetooth 5.3 (mobile/tablet pairing), and 3.5mm wired modes (Xbox/Switch compatibility) with zero latency, offering universal device adaptability and uninterrupted gaming immersion (Xbox Series only supports 3.5mm wired)
- Immersive Sound Sync for Competitive Edge: Equipped with a 50mm composite diaphragm driver, this headset delivers immersive 3D surround sound—command the explosive audio of RPG epics and pinpoint tactical footsteps in FPS battles. Powered by a proprietary wireless chip, achieve seamless audio-video synchronization for true-to-life immersion
- Identify the threat: report approximate location, direction of travel and whether you saw one Operator or a full group.
- Choose the fight location: select cover, a doorway or another defensible position instead of chasing into unknown terrain.
- Assign a role: one player watches the likely approach, one holds the fallback route and one prepares to engage or revive when appropriate.
- Set a trigger: fire when the target enters the agreed angle, not when the first player happens to see movement.
- Set a stop condition: if the target is not isolated, if another angle appears or if armor is depleted, withdraw on the same call.
A teammate’s presence is an advantage only if it changes the opponent’s decisions. Players who rush one at a time give the better-equipped squad separate, easy fights.
Use equipment for information and concealment, with version limits
In Activision’s April 2023 Season 03 overview for Warzone 2.0 DMZ, the Comms Vest is described as providing an enemy-proximity audio cue, while the Stealth Plate Carrier is described as including Ghost. Those are version-specific examples of information and concealment utility; they should not be treated as universal properties of every DMZ release or as proof that a nearby squad has been detected at every distance.
What an information cue can do
An audio warning can tell you to slow down, stop looting in the open and check nearby approaches. It cannot replace visual confirmation, reveal the enemy’s exact number or guarantee that no one else is present. Use the cue to improve your route and readiness, not to justify a blind push.
Quick wins for a faster PC:
Clear out junk files and repair common Windows errorsFree Scan →Scan for outdated or missing drivers - takes under a minuteDriver Scan →Repair Windows errors before they cause bigger problemsFix Now →What concealment can and cannot do
A concealment effect may reduce how easily an opponent tracks you, depending on the version’s rules. It does not make movement, gunfire or poor positioning harmless. Preserve hard cover and a fallback route even when your carrier provides a stealth benefit.
Choose carriers by role, not by a universal ranking
Because carrier effects and availability can differ by release, compare an item’s practical role with your plan:
- Information role: useful when you need warning before entering a compound or contract area.
- Concealment role: useful when rotating away or avoiding detection, provided the version actually grants that effect.
- Protection and capacity role: useful for surviving mistakes or carrying mission resources, but it does not remove the need for cover.
- Risk role: any valuable carrier increases what you stand to lose if the Operator dies.
When fighting is unavoidable
Sometimes a squad blocks the only practical route, reaches your teammate or catches you before you can break contact. In that case, make the fight short and purposeful.
Target the tactical problem
Do not distribute fire randomly across several armored Operators. Focus on the player who is exposed, crossing open ground or separated from support. The goal is to create a temporary numbers or position advantage, then use it to leave or secure the objective.
Hold a defensible angle
Peek from cover for information and controlled fire, then return behind protection. Repeating the same peek gives the opponent a predictable target. If your position has only one exit, relocate before the squad can close it.
Stop after the advantage is spent
If you down or displace one player, decide whether the objective is now complete. A new opening can be used to escape, revive a teammate or take a better position; it does not automatically require a chase into the remaining squad.
Recover only what the situation allows
Looting a defeated player in an exposed area can turn a won exchange into a lost deployment. Secure the area, check likely approaches and take only the items that matter to your mission or recovery plan.
Preserve your best-equipped Operator between deployments
Persistent Operators make gear management part of strategy. Before launching, ask whether the task requires your strongest kit. Activision’s guidance recommends saving a well-equipped Operator for tougher missions or planned longer infiltrations and using another Operator when the stakes are low.
Recommended Free Tools
| Deployment purpose | Operator choice | Behavior when a superior squad appears |
|---|---|---|
| High-value mission with a clear route | Best-equipped Operator, if the mission justifies the risk | Disengage unless a concrete advantage protects the mission. |
| Learning an area or testing a route | Lower-cost or less-equipped Operator | Gather information and leave early; do not convert practice into a gear gamble. |
| Loot and recovery after a loss | Recovery Operator | Avoid unnecessary PvP and prioritize equipment that restores future options. |
| Planned long infiltration | Operator whose equipment supports the specific objective | Keep an extraction route and supplies in mind from the start. |
This approach prevents one bad opening encounter from also destroying the kit you intended to use for a more important task.
Rebuild deliberately after losing a fight
DMZ’s progression systems make recovery a normal part of the mode. The November 2022 Activision overview describes gathering and storing weapons, equipment and valuables, and explains that extracting with a Contraband weapon can unlock it across other game modes. Use that loop to restore capability rather than immediately seeking the squad that beat you.
- Accept the loss: replace the missing weapon or key in your plan instead of spending the next deployment trying to recover an item that may be gone.
- Choose a modest objective: select a mission, contract or loot route that can be completed without entering the most contested area.
- Secure useful equipment: prioritize a functional weapon, protection and the resources needed for extraction over a full high-end kit.
- Extract before greed takes over: once the recovery goal is met, leave with the Contraband and valuables you have secured.
- Rebuild the roster: reserve the recovered or upgraded Operator for a task that warrants its risk.
Activision also presents faction missions as a way to learn the mode and earn rewards. A successful infiltration and completed contract can grant a perk for a later infiltration, so contracts are not only immediate loot opportunities; they can improve the next deployment’s starting position.
Use missions and contracts to avoid pointless fights
A mission gives you a reason to be in a location, while a contract gives the deployment a concrete route and reward. Let that purpose determine whether a nearby squad matters. If another Operator is not blocking the objective, rotate around them. If the contract requires entering their area, approach with information, cover and an exit rather than treating the contract marker as permission to sprint into a duel.
Free tools Windows power users keep installed
One-click scans. No signup required.
Early faction missions are particularly useful for learning how much exposure a task creates. Complete them with the least valuable Operator that can reasonably handle the route, then reserve a stronger kit for objectives whose reward or difficulty justifies the risk. This keeps progression moving even when you decline fights.
Common mistakes that make better gear decisive
- Peeking the same corner repeatedly: once the enemy has your angle, every identical peek gives them the timing.
- Retreating in a straight line: predictable movement lets a superior weapon maintain pressure.
- Chasing a cracked or downed player: the rest of the squad may be holding the exact route you need to cross.
- Looting before securing the area: an item is not useful if it exposes you to a second attack.
- Splitting after first contact: separated teammates cannot create the support advantage that can offset weaker equipment.
- Assuming a named carrier solves the fight: Season 03 item effects are historical and role-specific; no carrier removes the need for positioning.
- Taking a fight because you already invested time: sunk time does not make a bad engagement better.
- Using the strongest Operator for every errand: repeated low-value exposure increases the chance that one avoidable loss removes your best future option.
A practical decision checklist
Use this short check whenever a squad with stronger apparent gear enters your path:
- Where is my next hard cover?
- What is my second exit if the first route is watched?
- Do I know the squad’s location and approximate size?
- What concrete advantage would I have if I started the fight?
- Is this encounter required for my mission, contract or extraction?
- Can my teammates support the same angle and retreat together?
- What would I lose if this Operator died?
If you cannot answer the advantage and objective questions, leave. If you can answer them, set a trigger, fight from cover and stop when the objective is achieved. Afterward, extract and rebuild through missions, contracts and deliberate looting rather than treating every deployment as a contest for the most expensive kit.
What this strategy can—and cannot—promise
These methods improve your decision quality by reducing unnecessary exposure and creating better conditions for a fight. They cannot guarantee a win against a better-equipped Operator, compensate for every aim or positioning error, or establish that a particular carrier works the same way in every DMZ version. The documented Season 03 equipment effects and Activision’s progression advice are historical references for Warzone 2.0 DMZ, while the disengagement, positioning and risk-management recommendations are tactical applications of those systems.
Quick Recap
Product prices and availability are accurate as of the date/time indicated and are subject to change. Any price and availability information displayed on Amazon at the time of purchase will apply.

